background image

ASSEMBLY and OPERATION

CONNECTING TO VACUUM CLEANER

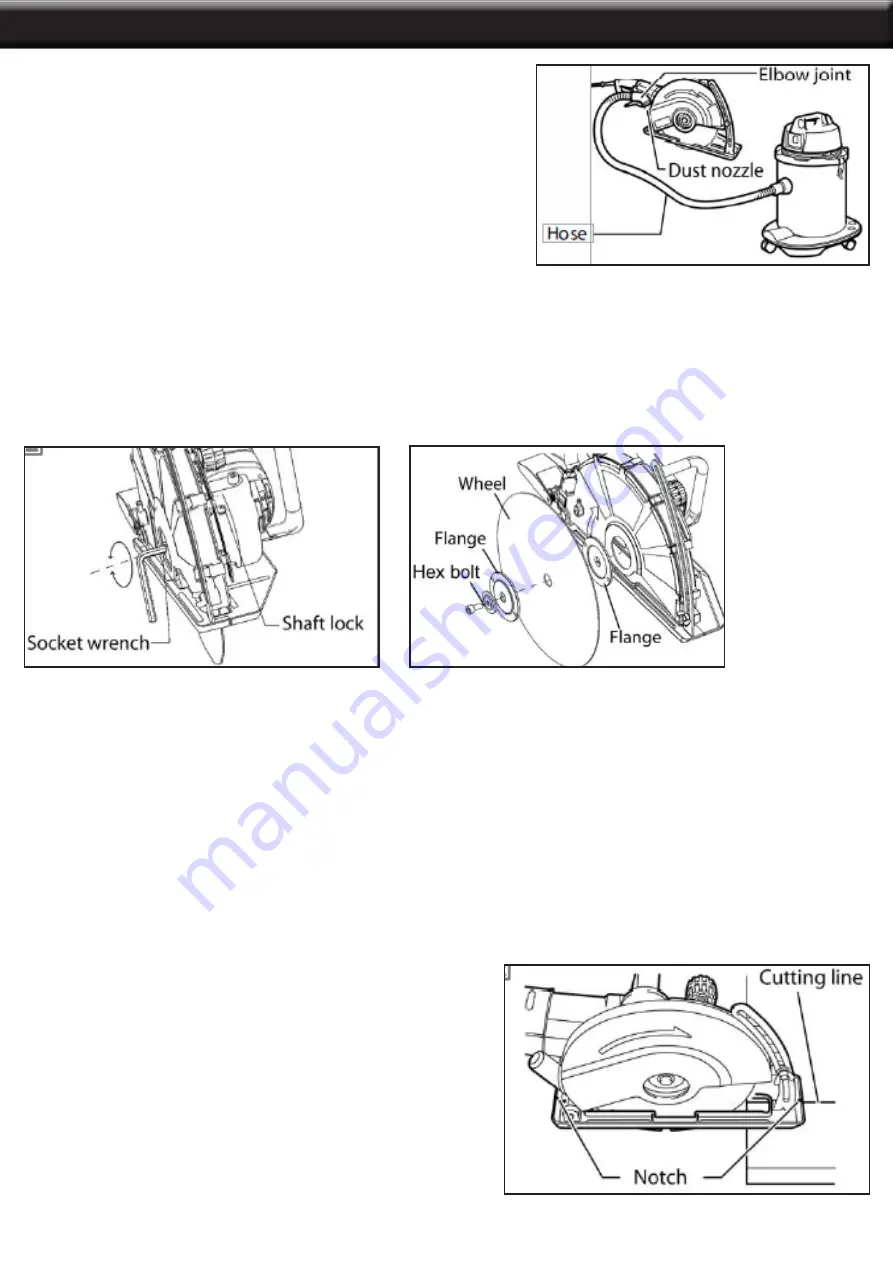
When you wish to perform cleaner operation, connect a vacuum 

cleaner to your tool. Connect a hose of vacuum cleaner to the 

dust nozzle via an elbow joint (accessory). 

INSTALLING OR REMOVING THE WHEEL 

To remove the wheel, depress the shaft lock to hold the shaft stationary, then loosen the 

hex  bolt  clockwise  with  the  socket  wrench.  To  install  a  wheel,  place  flange  with  its  partly 

elevated side facing the tool, and then place ring before installing a wheel onto the spindle 


(shaft) and another flange with partly elevated side facing outward. Be sure to fully tighten the hex bolt 

counterclockwise after mounting the new wheel, or operation will be dangerous. 

OPERATION

CAUTION: 

Be sure to pull the tool when cutting a workpiece.

• This tool should only be used on horizontal surfaces. 

• Use this tool for straight line cutting only. Cutting curves can cause stress cracks or fragmentation of the 

diamond wheel and abrasive cut-off wheel resulting in possible injury to persons in the vicinity. 

• After operation, always switch off the tool and wait until the wheel has come to a complete stop before 

putting the tool down. 

• When cutting concrete blocks, tiles or masonry materials, do not make a cut in depth more than  

60 mm (2-3/B”). When you need to cut a workpiece over 60 mm (2-3/8”) up to 100 mm (4”), make more than 

two passes of cuts. The depth of the most efficient cut is about 40 mm (1-9/16”). 

Hold the tool firmly with both hands. First keep the wheel 

without making any contact with a workpiece to be cut. Then 

turn the tool on and wait until the wheel attains full speed.  

The cut is made by pulling the tool toward you (not 

by pushing away from you). Align the notch on the 

base with your cutting line when performing a cut. 


Switch off the tool on the position posed when finishing a 

cut. Raise the tool after the wheel comes to a complete stop. 

5

Summary of Contents for 50118

Page 1: ...TION MAINTENANCE AND CLEANING PROCEDURES WRITE THE PRODUCT S SERIAL NUMBER ON THE BACK OF THE MANUAL NEAR THE ASSEMBLY DIAGRAM OR MONTH AND YEAR OF PURCHASE IF PRODUCT HAS NO NUMBER OWNER S MANUAL AND SAFETY INSTRUCTIONS ITEM 50118 FOR QUESTIONS PLEASE CALL OUR CUSTOMER SUPPORT 909 628 0880 MON FRI 9AM TO 3PM PST ...

Page 2: ...es hard hat gloves dust collection systems and hearing protection when appropriate This applies to all persons in the work area 1 Read and understand all instructions Failure to follow all instructions may result in serious injury or property damage DO NOT allow persons to operate or assemble the product until they have read this manual and have developed a thorough understanding of how it works D...

Page 3: ...llection can reduce dust related hazards DO NOT force the power tool Use the correct power tool for your application The correct power tool will do the job better and safer at the rate for which it was designed DO NOT use the power tool if the switch does not turn it on and off Any power tool that cannot be controlled with the switch is dangerous and must be repaired Disconnect the plug from the p...

Page 4: ...ched or bound tightly by the kerf closing down the blade stalls and the motor reaction drives the unit rapidly back toward the operator DO NOT use dull or damaged blades Unsharpened or improperly set blades produce narrow kerf causing excessive friction blade binding and kickback Blade depth and bevel adjusting locking levers must be tight and secure before making cut If blade adjustment shifts wh...

Page 5: ...rial Blades coast after turn off Avoid cutting nails Inspect for and remove all nails from lumber before cutting Place the wider portion of the saw base on that part of the workpiece which is solidly supported not on the section that will fall off when the cut is made If the workpiece is short or small clamp it down DO NOT TRY TO HOLD SHORT PIECES BY HAND Before setting the tool down after complet...

Page 6: ...n pull the switch trigger push in the lock lever and then release the switch trigger To stop the tool from the locked position pull the switch trigger fully then release it DO NOT pull the switch trigger hard without pressing the lock lever This can cause switch breakage To prevent the switch trigger from accidentally being pulled a lock lever is provided To start the tool push in the lock lever a...

Page 7: ...enables a flush cut blade not included to be mounted to the machine which allows flush cuts to be made while the outer blade guard is temporarily removed The flush cut blade may be left in place and the operator may return to standard cutting simply by replacing the outer blade guard and securing with the 4 toggle latches In this way it is quick and convenient to switch between standard and flush ...

Page 8: ...tool for straight line cutting only Cutting curves can cause stress cracks or fragmentation of the diamond wheel and abrasive cut off wheel resulting in possible injury to persons in the vicinity After operation always switch off the tool and wait until the wheel has come to a complete stop before putting the tool down When cutting concrete blocks tiles or masonry materials do not make a cut in de...

Page 9: ...se an old discarded coarse grit bench grinder wheel or concrete block to dress the diamond wheel To do this tightly secure the bench grinder wheel or concrete block and cut in it REPLACING CARBON BRUSHES Use a screwdriver to remove the brush holder caps Take out the worn carbon brushes insert the new ones and secure the brush holder caps To maintain product SAFETY and RELIABILITY repairs any other...

Page 10: ...T ALL REPAIRS AND PARTS REPLACEMENTS SHOULD BE UNDERTAKEN BY CERTIFIEDAND LICENSED TECHNICIANS AND NOT BY THE BUYER THE BUYER ASSUMES ALL RISK AND LIABILITY ARISING OUT OF HIS OR HER REPAIRS TO THE ORIGINAL PRODUCT OR REPLACEMENT PARTS THERETO OR ARISING OUT OF HIS OR HER INSTALLATION OF REPLACEMENT PARTS THERETO Record Product s Serial Number Here Note If product has no serial number record month...

Reviews: