background image

Step4 

Turn  off the transmitter.  If transmitter is not to 
be used for a long  duration,  please  remove the 

ON/OFF 

10  FLIGHT ADJUSTMENT A ND SETTING 

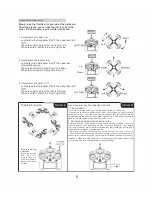
Please practise simulation flight before actual flying 

Before you fly. 

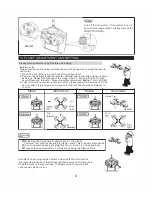
Please practise as the below pictures shown until you get use to using the  remote 

controller. 

1. 

When The aircraft is flying, the back of it wi11 align itself. 

2. 

Exercise the  flying through the  remote controller (each operation mode is  shown 

as below).  Repeat the practice of the  mode : Aileron - Move left/right, Throttle -

Ascent/Descent,  Elevate - Move  forward/backward  and  Rudder- Turn left/right. 

3. 

Flight simulation exercise is very important, please repeat the exercise until you 

do not need to think, fingers can move naturally with the shouted commands to 
control. 

Mode 

Illustration 

Mode 

Illustration 

Ascent 

Fly 

Move 

right 

Fly 

forward

� 

{> 

backward 

©Make  sure  that no people or obstructions in  the  vicinity. 

You must first practise  hovering for flying  safety.  This  is  a basic flight action. 

©(Hovering means  keeping the flight vehicle in mid  air in  a fixed position) 
©Please stand approximately 

m diagonally being the flight vehicle. 

Automatic fine tuning can be achieved when both the throttle stick 

and joystick are pulled to the bottom right hand corner simultaneously 
while the drone is level grounded. The lights of the drone will flash 
continuously when it is set. 

� 

-./} 

Descent 

Turn 

Summary of Contents for FRYER

Page 1: ...INGCMJRJNGFLIGHT 11 ABLE TO ADD CAMERA ml Thank you for choosing our RC product Please read through this instruction before you fly this product Please keep this instruction for future reference Thank you again and hope you have an amazing flying experience ...

Page 2: ...their actions and damage or injury occurred during the operation or as of a fesult of R C aircraft models II0F Flml I Special despecial design for indoor outdoor please keep it away from obstacle This product is suitable for indoor and outdoor the wind grade should be no more than 4 t please choose a place without obstacle and keep distance from crowd and pets don t play it under unsafty for insta...

Page 3: ... F INE TUNING FORWARDIBACKWARDI LEFT FLY RIGHT FLY L E FT FLY AND R IGHT FLY FINE T U NING PHOTO VIDEO O pen the battery cover on the back of the controller Put in 4 AA batteries Please follow by the right and sign as the picture shown Batteries not included Beginners proposed to lift and aileron travel remote control trick mode to 40 60 of the appropriate increase of decrease can also be based on...

Page 4: ...RCRAFT COMPONENTS I NSTALLATION TRIPOD THE I NSTALLATION OF SHIELD 9 BINDING OF RADIO TRANSMITTER A ND RECEIVER The throttle stick to lowest point Li polymer Battery Li polymer Battery 3 Step1 Install the battery into the air craft as the picture shown Then place the aircraft on where is flat Connect the battery with the air craft Step2 Lower the throttle stick to the lowest position then turn on ...

Page 5: ...ght 3 Flight simulation exercise is very important please repeat the exercise until you do not need to think fingers can move naturally with the shouted commands to control Mode Illustration Mode Illustration Ascent t Fly t Move right Fly forward backward Make sure that no people or obstructions in the vicinity You must first practise hovering for flying safety This is a basic flight action Hoveri...

Page 6: ...rcraft will roll 1 31aps Aerial camerafunction specific function 1 The method is 1 To insert the three line plug of camera head into the aircraft socket 2 When it is to open the aircraft power and then the flashing light of camera head turns green it indicates that the camera goes into the normal working state When the red flashes off and green light turns off itindicates the camera head is notass...

Page 7: ...ansmitter and receiver 2 Check transmitter and receiver voltage 3 Poor contact on battery terminals Flight vehicle battery depleted 1 0eformed main blades 2 Ftight vehicle battery depleted 1 0eformed main blades 1 0amaged tail rotors 2 0amaged tail drive motor 1 Gyroscope midpoint not 1 Motor off 2 Cone loose 6 Way to deal Repeat the power up initializing process 1 Turn on transmitter and ensure f...

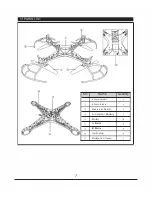
Page 8: ...12 PARIS LIST NO Name Quantity 4 Axis cover 4 Axis base Receiver board Li polymer Battery Motor A Blade B Blade Light strip Protective frame 7 ...

Reviews: