background image


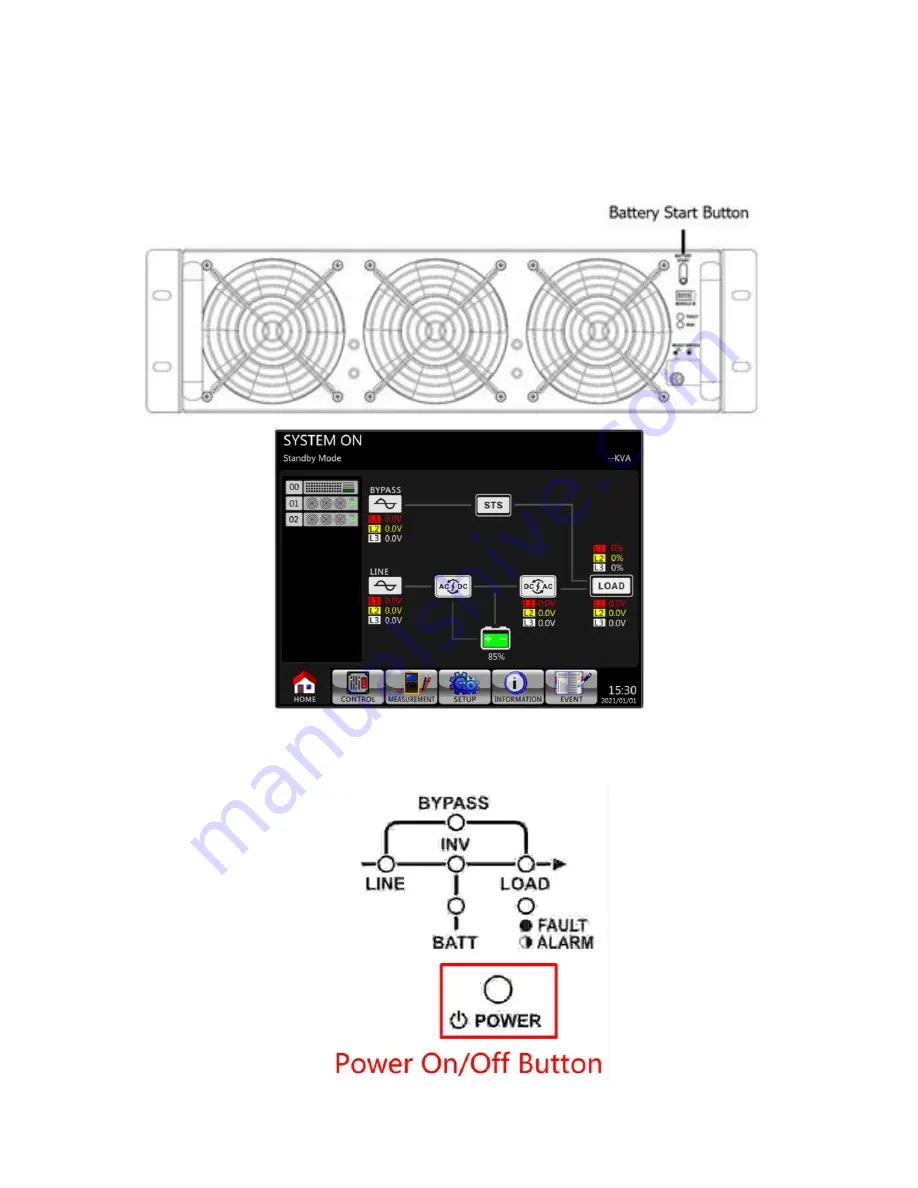
3.3.2 Cold Start Startup 
Step 1

: Switch ON the battery Breaker. 

Step 2

: Press the 

Battery 

Start” button 

on any one of the Power Modules to start up the control 

power of all Power modules. UPS will enter into Standby mode.                                                                                                                                 


Step 3

: Please press 

“P

OWER

” button fo

r 2 second immediately, before UPS enters shutdown 

mode. 


Summary of Contents for X90-2S

Page 1: ...X90 2S Modular Three Phase UPS 140kVA Model User Installation Manual www xpcc com 2023 Xtreme Power Conversion Corporation All rights reserved Rev 4 19 23...

Page 2: ...ay Description 49 4 1 Introduction 49 4 2 Screen Description 50 4 3 Alarm List 73 4 4 History Record 75 5 Interface and Communication 77 5 1 Dry Contact Port Error Bookmark not defined 5 2 Extra Comm...

Page 3: ...rmed by qualified personnel only 1 2 EMC WARNING This is a product for commercial and industrial application in the second environment installation restrictions or additional measures may be needed to...

Page 4: ...regulations The disconnection device should be chosen based on the input current and should break line and neutral conductors four poles for three phases...

Page 5: ...Disconnect the charging source prior to connecting or disconnecting terminals Batteries can result in a risk of electrical shock or burn from high short circuit current When replacing batteries use t...

Page 6: ...ough the cabinet top cooling fans Please do not block the ventilation holes 4 Ensure that the installation area is spacious for maintenance and ventilation 5 Keep the temperature of installation area...

Page 7: ...orklift to move the product to installation area Refer to Figure 2 1 Please make sure the bearing capacity of forklift is sufficient 2 Please follow the orders in Figure 2 2 to remove carton and foams...

Page 8: ...3 4 Remove 2 fixing cabinet plates and loosen leveling feet by rotating them counterclockwise Then move the cabinet from the pallet Refer to Figure 2 4 5 To fix the cabinet in position simply rotate...

Page 9: ...er lateral side of the UPS with hands and the third person pushes the UPS either from the front side or from the back side to the installation area and avoid tipping the UPS 3 The casters are designed...

Page 10: ...2 5 UPS Cabinet Model X90 2S Drawing Cabinet Height 42U Monitor Module 1 Max Power Module 2 Max Power 140kVA...

Page 11: ...he bottom of the UPS cabinet can be used to move the UPS over a short distance There are four leveling feet to fix and stabilize the UPS cabinet on the ground Refer to Figure 2 7 Inside the cabinet th...

Page 12: ...2 6 1 Mechanical Data Dimensions Width Depth Height 600mm 1065m 2010mm Figure 2 8 Dimensions...

Page 13: ...and open the front door and you will see a top cover terminal blocks are behind it the Main Breaker Q1 Maintenance Breaker Q2 Output Breaker Q3 Monitor Module Power Module slots and Battery Module slo...

Page 14: ...ll see the wiring terminal blocks For UPS cabinet wiring please refer to Figure 2 13 No Item Function Description Output Block Connects the loads Includes R S T Bypass Input Block Connects bypass AC s...

Page 15: ...Figure 2 13 Terminal Blocks...

Page 16: ...r Status Definition LINE Green On Input source is normal Flashing Main Input source is abnormal Off No input source BYPASS Yellow On Load on Bypass Flashing Bypass Input source is abnormal Off Bypass...

Page 17: ...Off There is neither a fault nor an alarm...

Page 18: ...r Module makes it a highly cost effective solution to meet your power requirement The number of Power Modules installed in the UPS can be based on the initial needs Once the power requirement changes...

Page 19: ...a Comm Slot An optional Extra Comm Card can be inserted into this slot This card can enhance the communication capability of the UPS system and provide another SNMP slot and some dry contact ports Dry...

Page 20: ...Module Lock it when the Power Module is well installed Then the Power Module can start to work DIP Switches There are five DIP switches for Power Module address ID setting In the same cabinet each Pow...

Page 21: ...ID Assignment The Power Module address ID assignment is shown in Table 2 1 The DIP switches are mounted on the Power Module front panel identified as in Fig 2 17 The DIP switch positions are set at f...

Page 22: ......

Page 23: ...60 60 60 60 2 10 2 DC input nominal current and cable fixation force Power rating 50KVA 100KVA 70KVA 140KVA DC Current A 110 154 220 309 Fixation torque force lb in 60 60 60 60 2 11 Wiring WARNING Be...

Page 24: ...2 AC source connection UPS comes configured for single input from the factory Remove jumpers if feeding the UPS with dual inputs The sequence of three phases R S and T must be connected accordingly T...

Page 25: ...er the battery installation is completed be sure to set up nominal battery voltage battery capacity and maximum charging current on LCD Otherwise if battery setting is different from actual installati...

Page 26: ...people are required for handling it 2 12 1 Insert the Power Module 1 Adjust the DIP switch positions to set the different Module Address ID Refer to Table 2 1 2 Switch the ready switch on the front pa...

Page 27: ...n 2 12 2 Remove the Power Module Before removing any Power Module make sure the remaining Power Modules can support the loads At least one Power Module MUST stay in the UPS cabinet 1 Switch the ready...

Page 28: ...3 Use a screwdriver to remove the four screws from fixing holes 4 Two people pull out together and remove the Power Module from its slot...

Page 29: ...3 Operation Mode and UPS Operation 3 1 Block diagram of UPS Wiring diagram for dual inputs Figure 3 1...

Page 30: ...in the following modes Standby Mode Line Mode Battery Mode Bypass Mode ECO Mode Shutdown Mode Maintenance Bypass Mode manual bypass 3 2 1 Standby Mode Upon connecting to utility input power the UPS i...

Page 31: ...ode the rectifier derives power from the utility power and supplies DC power to the inverter and the charger to charge the battery The inverter filters the DC power and converts it into stable pure si...

Page 32: ...load Figure 3 5 Battery Mode Diagram 3 2 4 Bypass Mode Upon connecting to utility input power the UPS is in Bypass mode before UPS is turned on if BYPASS enable setting is Enabled and charger function...

Page 33: ...sfer to line mode and power the load with inverter output In order to shorten the transfer time the rectifier and the inverter are both running when the UPS is in ECO mode Figure 3 7 ECO Mode Diagram...

Page 34: ...aintenance bypass Mode A manual bypass switch is available to ensure continuity of power supply to the load when the UPS becomes unavailable e g during a maintenance procedure Before starting a mainte...

Page 35: ...s been switched to the Locked position Make sure all the breakers are switched OFF 3 3 1 AC Startup Ensure to follow this procedure when turning on the UPS from a fully powered down state The operatin...

Page 36: ...Step 4 Switch ON the input breaker Q1 The UPS will enter Standby Mode if the setting of Bypass mode is disabled Or the UPS will enter Bypass Mode if the setting of Bypass mode is enabled...

Page 37: ......

Page 38: ...urs If yes please refer to Chapter 6 Troubleshooting to solve it Step 6 Press Power button for two seconds to turn on the inverter as shown below UPS will do self test and start up the inverter UPS wi...

Page 39: ...Step 7 Switch ON the output breaker Q3 AC startup procedure is complete...

Page 40: ...Breaker Step 2 Press the Battery Start button on any one of the Power Modules to start up the control power of all Power modules UPS will enter into Standby mode Step 3 Please press POWER button for...

Page 41: ...t breaker Q3 Cold start startup procedure is complete 3 3 3 Maintenance Bypass Operation 3 3 3 1 Transfer to maintenance bypass Step 1 Remove the mechanical lock plate of Maintenance Bypass Breaker St...

Page 42: ......

Page 43: ...aker Q1 as shown below ON OFF I 0 Q1 Main Step 5 Now one can change Power Module or Battery Module 3 3 3 2 Transfer to UPS Protection Step 1 Make sure the maintenance is complete The Power Modules and...

Page 44: ...mode is enabled If the Bypass mode is disabled you have to change it to enabled Then exit the SETUP menu and check if the UPS operates in bypass mode Step 4 Turn off Maintenance Bypass Breaker as sho...

Page 45: ...s on the Bypass Mode Setting The LCD screens are shown below Bypass Mode Setting is Disabled Bypass Mode Setting is Enabled Step 1 Switch OFF the Main Breaker The LCD screens are shown below Bypass Mo...

Page 46: ...l power switch to disconnect the AC power to the UPS Wait until the LCD is OFF Step 3 Switch OFF the battery breaker if the UPS will be disconnected from AC power for a long time 3 3 4 2 Turn Off Oper...

Page 47: ...f the inverter The UPS will then tranfer to Standby Mode or Bypass Mode depending on the Bypass Mode Setting Next follow the procedure in section 3 3 4 1 Turn Off Operation in Bypass Mode Standby Mode...

Page 48: ...econds to turn off the inverter Or use the LCD operation Control Turn Off to turn off the inverter The UPS will then tranfer to Standby Mode Next follow the procedure in section 3 3 4 1 Turn Off Opera...

Page 49: ...ser can control the UPS operation monitor all measured parameters UPS battery status alarms and view or change settings Figure 4 1 Control panel 1 LCD display Graphic display of real time UPS status a...

Page 50: ...n Turn on UPS or Turn off UPS Press and Hold down for 2 seconds Table 4 3 Audible Alarm Audio Type Description Power on off Buzzer sounds for 2 seconds Battery mode Buzzer sounds once every 2 seconds...

Page 51: ...s measurement screen The meanings of the icons are listed as below Module icon Explanation STS module with ID no X90 2S does not have a separate STS module Power module icon with ID no No power module...

Page 52: ...b screen Figure 4 4 Menu tree 4 UPS Flow Chart Current flow chart and measurement data 5 UPS power rating 6 Date and Time 4 2 3 Control Screen Touch icon to enter the sub menu as shown in Figure 4 5 a...

Page 53: ...Figure 4 6 Control screen page...

Page 54: ...Screen Touch icon to enter the sub menu There are two sub menus system measurement and module measurement Touch icon to monitor system measurement values or icon to monitor module measurement values...

Page 55: ...Figure 4 9 System Measurement Screens...

Page 56: ...Figure 4 10 Module Measurement Screens...

Page 57: ...e Voltage V Battery Positive half string voltage accuracy 0 1V Negative Voltage V Battery Negative half string voltage accuracy 0 1V Positive Current A Battery Positive half string current accuracy 0...

Page 58: ...Standby Mode Bypass Mode Line Mode Battery Mode Battery Test Mode Fault Mode Convert er Mode ECO Mode Authorization User Maintainer General Model Name Y Y Y Y Y Y Y Y Y Language Y Y Y Y Y Y Y Y Y Y TI...

Page 59: ...nsation Y Y Y Y Y Y Y Y Y Charging Voltage Y Y Y Pre Alarm Line Voltage Range Y Y Y Y Y Y Y Y Y Line Frequency Range Y Y Y Y Y Y Y Y Y Overload Y Y Y Y Y Y Y Y Y Load Unbalance Y Y Y Y Y Y Y Y Y Y mea...

Page 60: ...ral screen Table 4 6 Setup General setting list Setting Item Sub Item Explanation Model Name Set UPS Name xxxxxxxxxx The max length is 10 characters Language Provides 3 optional LCD languages English...

Page 61: ...4800 9600 Set COM Port1 Baud Rate 2400 Default 4800 9600 Audible Alarm Set Audible Alarm Disable Enable Default Factory Reset Restore to factory default setting values Refer to Table 4 7 EEPROM Reset...

Page 62: ...ttery Low Shutdown Setting Y Y Periodic Battery Test Y Y Battery Test Interval Y Y Stop by Time Y Y Stop by Battery Voltage Y Y Stop by Battery Capacity Y Y Battery Age Alert Y Y Temperature Compensat...

Page 63: ...Warning screen Table 4 8 Setup System setting list Setting Item Sub Item Explanation Output Voltage Set UPS output voltage 480Vac MUST be reviewed after UPS installation BYPASS SETTING Bypass Voltage...

Page 64: ...fault If set to Enable the UPS will enter line mode once utility restores after the UPS has shut down upon full battery discharge Power Walk in Set power walk in upper lower limits 1s time step settin...

Page 65: ...ed in standby mode otherwise a warning screen will appear as shown in Figure 4 16 Figure 4 17 Setup Battery Screen Table 4 9 Setup Battery setting list Setting Item Sub Item Explanation Nominal Batter...

Page 66: ...attery Number Stop by Battery Capacity Set the battery capacity at which battery test stops 20 50 20 Default Battery Age Alert Battery Age Alert Months Set battery age for replacement Disable 12 60Mon...

Page 67: ...r limit 5 10 15 20 Default Line Frequency Range Set line frequency range Upper Lower limit 1Hz 2Hz 3Hz 4Hz Default Load Set UPS Overload percentage 40 100 100 Default Set UPS load unbalance percentage...

Page 68: ...n check the configurations of the unit There are three sub menus Identification System and Battery Figure 4 20 Information menu 4 2 7 1 INFORMATION Identification Screen Under IDENTIFICATION sub menu...

Page 69: ...own in Figure 4 22 and 4 23 Touch UP and DOWN arrows to switch between different pages Figure 4 22 INFORMATION System screen page 1 Figure 4 23 INFORMATION System screen page 2 4 2 7 2 INFORMATION Bat...

Page 70: ...2 8 Events Screen When an event occurs you will see flashing icon on the Main Screen as shown in Figure 4 25 Touch icon to check the latest event list history event or to reset all events as shown in...

Page 71: ...re 4 27 Current Events screen 4 2 8 2 History Events Under HISTORY EVENT submenu is a list of events that have occurred up to 500 events Each entry displays module ID event description and event occur...

Page 72: ...rd is required to enter Reset All Events screen as shown in Figure 4 29 After the correct Maintainer password is entered a screen will pop up to ask for confirmation Touch icon to reset all events or...

Page 73: ...5 INV B out SC Phase B Line to Neutral output short circuited Fault 16 INV C out SC Phase C Line to Neutral output short circuited Fault 17 INV AB out SC Phase A Phase B Line to Line output short circ...

Page 74: ...GBT fault PFC IGBT over current in S phase Fault 73 T PFC IGBT fault PFC IGBT over current in T phase Fault 74 R INV IGBT fault INV IGBT over current in R phase Fault 75 S INV IGBT fault INV IGBT over...

Page 75: ...Turn On Password 3 Setup Language 4 Setup Change Turn On Password 5 Setup Adjust Time 6 Setup Nominal Power Display 7 Setup System Installed Date 8 Setup Output Voltage 9 Setup System Last Maintain D...

Page 76: ...e Fault Mode 8 UPS Mode Converter Mode 9 UPS Mode ECO Mode 10 UPS Mode Shutdown Mode 11 UPS Mode Un Connection Table 4 15 Control executions Item No Description Item No Description 1 Control System Tu...

Page 77: ...t port The port is shown in Figure 5 2 and described in Table 5 1 Figure 5 2 Remote EPO input port Table 5 1 Description of remote EPO port EPO Logic Setting Position Description Short X1 1 X1 2 EPO i...

Page 78: ...Extra Comm Card This card can be inserted into this slot to enhance the communication capability of the modular UPS It provides an additional SNMP Slot Dry contact I P O P signals and temperature sen...

Page 79: ...ct service personnel Fault S Inverter Voltage Short S phase inverter Output is shorted Contact service personnel Fault T Inverter Voltage Short T phase inverter Output is shorted Contact service perso...

Page 80: ...k the setting of Nominal Battery voltage and contact service personnel Warning Charge Fail As stated Contact service personnel Warning EEPROM Fail EEPROM operation error Contact service personnel Warn...

Page 81: ...ration Mode 1 Turn ready switch to position 2 The Power Module FAULT LED RED indicator is lit to indicate that the Power Module has turned off its output and been disconnected from UPS system 3 Use a...

Page 82: ...ilter is 1 Open the front door of the UPS and you will see the air filters on the back of the door 2 Remove a fixing bar on either side of the air filter to replace 3 Remove the air filter and insert...

Page 83: ...0 4 5 Level 4 CS IEC EN 61000 4 6 Level 3 Power frequency Magnetic field IEC EN 61000 4 8 Level 4 Low Frequency Signals IEC EN 61000 2 2 8 2Environmental Characteristics Table 8 2 Environmental charac...

Page 84: ...ircuit Battery External battery Number of lead acid cells Nominal 216 6cells x 36 12V battery blocks Maximum 240 6cells x 40 12V battery blocks Minimum 192 6cells x 32 12V battery blocks Float voltage...

Page 85: ...ower kVA Unit 140 Rated AC voltage1 Vac 480 Three phase three wire Overload 105 110 for 60min 110 125 for 10min 126 150 for 1min 150 for 200ms Upstream protection bypass line N A Circuit breaker rated...

Page 86: ...105 110 for 60min 110 125 for 10min 126 150 for 1min 150 for 200ms BATTERY SYSTEM Nominal voltage 240VDC Charge Current programable 18A 18A 36A 36A DIMENSIONS WEIGHTS UPS Battery Cabinet W x D x H 23...

Page 87: ...aged by the customer is improperly used or stored is subjected to an adverse operating environment or is operated outside the limits of its electrical specifications or c the equipment has been used o...

Page 88: ......

Reviews: