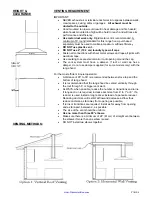
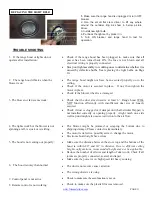
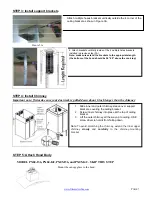
background image

HEIGHT & 
CLEARANCE 

VENTING REQUIREMENT 

 
IMPORTANT: 


  NEVER exhaust air or terminate duct work into spaces between walls, 

crawl spaces, ceiling, attics or garages.   

All exhaust must be 

ducted to the outside. 


  Hood mounted too low could result in heat damage and fire hazard; 

while hoods mounted too high will be hard to reach and will loose its 
performance and efficiency.   
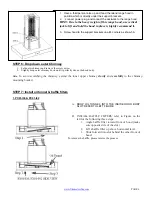
 

Use metal duct work only

. Rigid metal vent is recommended. A 

minimum of 6” round (standard for this range hood, purchased 
separately must be used to maintain maximum airflow efficiency 


DO NOT use plastic vent.   


DO NOT use 4” (10.2 cm) laundry-type wall caps 

  Fasten all connections with sheet metal screws and tape all joints with 

aluminum tape.   

  Use caulking to seal exterior wall or roof opening around the cap.   

  The vent system must have a damper. If roof or wall cap has a 

damper, do not use damper supplied (for some models only) with the 
range hood. 


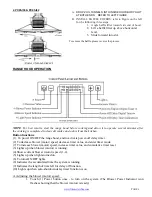
For the most efficient & quiet operation:   

  A distance of 26” to 30” is recommended between stove top and the 

bottom of range hood. 

  It is recommended that the range hood be vented vertically through 

the roof through 6” or bigger vent work.   

  ALWAYS, when possible, reduce the number or transitions and turns. 

If long duct run is required, increase duct size from 6” to 7” or 8”. If a 
reducer is used, install a long reducer instead of a pancake reducer. 
Reducing duct size will restrict airflow and decrease airflow, thus 
reduce duct size as far away from opening as possible.   

  If turns or transitions are required: Install as far away from opening 

and as far apart, between 2, as possible.   

  The size of the vent should be uniform.     


Use no more than three 90° elbows.   

  Make sure there is a minimum of 24” (61 cm) of straight vent between 

the elbows if more than one elbow is used.   


  DO NOT install two elbows together.     


VENTING METHODS:


www.XtremeAirUsa.com

                                                                    PAGE 

4


Summary of Contents for PRO-X PX01-I36

Page 1: ...IDE USER S MANUAL PRO X SERIES Island Mount Range Hood PX01 I36 PX01 I42 PX04 I36 PX04 I42 PX05 I36 PX05 I42 Model IMPORTANT READ AND SAVE THESE INSTRUCTIONS FOR RESIDENTIAL INDOOR USE ONLY www XtremeAirUsa com PAGE 1 ...

Page 2: ...ot following instructions for installation contained in the following text DANGER To avoid the possibility of explosion or fire do not store or use combustible flammable or explosive vapors and liquids such as gasoline inside or in the vicinity of this or any other appliance Keep items that could explode such as aerosol cans away from cook top burners ovens and range hoods Do not store flammable o...

Page 3: ...alled insulated and grounded Before servicing or cleaning unit turn power OFF and un plugged OPERATION Use high settings on cooking range only when necessary Keep all fan baffle spaces filter grease tunnel oil container and grease laden surfaces clean Grease should not be allowed to accumulate on fan baffle spaces filter grease tunnel and oil container Never allow the filters to become blocked or ...

Page 4: ...l cap has a damper do not use damper supplied for some models only with the range hood For the most efficient quiet operation A distance of 26 to 30 is recommended between stove top and the bottom of range hood It is recommended that the range hood be vented vertically through the roof through 6 or bigger vent work ALWAYS when possible reduce the number or transitions and turns If long duct run is...

Page 5: ...nformance with National Electrical Code ANSI NFPA 70 latest edition or CSA Standards C22 1 94 Canadian Electrical Code Part 1 and C22 2 No 0 M91 latest edition and all local codes and ordinances TOOL YOU WILL NEED Maker or pencil Stud finder Measuring tape Powered screwdriver or drill Flat Phillips screwdrivers Level Drill with 1 1 4 7 9 mm drill bits Jigsaw or keyhole saw Cabinet Jack optional PA...

Page 6: ... the ceiling bracket onto the ceiling 5 Trace a circle where the ducting will go 6 Mark the 4 corners where you will screw Important Due to the weight and size of this unit ceiling bracket must be mounted to a weight bearing ceiling support system or framework being used is stable and secure on the ceiling able to support at least twice the weight of the hood 1 Place chimney bracket against ceilin...

Page 7: ...ote first make sure your ductwork is pulled down about 6 inch longer than the chimney 1 Slide inner and outer chimney sleeve over support brackets covering the ceiling bracket 2 Screw inner chimney into place at the top of ceiling bracket 3 Lift the outer chimney all the way up to ceiling USE screw driver to hold it from falling down Note To avoid scratching the chimney extend the inner upper chim...

Page 8: ...kets 2 connect power plug and connect the ductwork to the range hood HINT Due to the heavy weight of this range hood use vertical jack to lift and hold the hood in place is highly recommend it 3 Screw hood to the support brackets on all 4 corners as show 5A A DROP OIL TUNNEL INTO THE INSIDE HOOD BODY SLOT REFER TO LEFT FIGURE B INSTALL BAFFLE FILTERS refer to Figure on the left for the following t...

Page 9: ... the kitchen Button functions 1 To power ON OFF the range hood and to activate power off delay timer 2 To decrease blower motor speed decrease timer value and enter timer mode 7 To increase blower motor speed increase timer value and cumulative timer reset 3 Lights up when blower motor is running 4 Shows current blower motor speed 1 4 5 Lights up when lights turned on 6 To turns ON OFF lights 8 In...

Page 10: ...shut down E To clear cleaning reminder When blower motor starts to rotate cumulative running time will be shown in Power On Elapsed Digital Timer This timer icon flashes when 30 hours is up and reminds user to clean the baffle filters After cleaning the filters and when the motor is not in use touch and hold Increase Value button over 3 seconds to reset the timer Please note that turning off the s...

Page 11: ...ecured properly on to the ceiling Check if the motor is secured in place If not then tighten the motor in place Check if the blower wheel is a damaged Check that the duct sized used is at least 6 Range hood WILL NOT function efficiently with insufficient duct size loosely secured Check if duct is clogged or if damper unit half circular flapper is not installed correctly or opening properly A tight...

Page 12: ... scratch and damage the stainless steel surface For heavier soil use liquid degrease such as Formula 409 or Fantastic brand cleaner If hood looks splotchy stainless steel hood use a stainless steel cleaner to clean the surface of the hood Avoid getting cleaning solution onto or into the control panel Follow directions of the stainless steel cleaner CAUTION Do not leave on too long as this may caus...

Reviews: