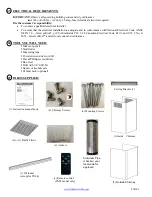
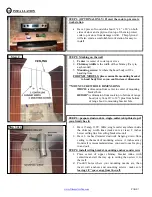
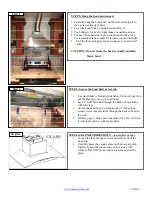
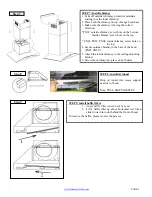
background image

www.XtremeAirUsa.com

                                                                    PAGE 

6


HOOD DIMENSIONS & INSTALLATION OVERVIEW


PX01-W30 
PX01-W36 

PX02-W30 
PX02-W36 


PX03-W30 
PX03-W36 

PX04-W30 
PX04-W36 

08 

Summary of Contents for PX01-W30

Page 1: ...IMPORTANT READ AND SAVE THESE INSTRUCTIONS FOR RESIDENTIAL INDOOR USE ONLY PRO X SERIES INSTALLATION GUIDE USER S MANUAL Models PX01 W30 PX01 W36 PX02 W30 PX02 W36 PX03 W30 PX03 W36 PX04 W30 PX04 W36 PX04 W42 Wall Mount Range Hood ...

Page 2: ...t store flammable or explosive materials in adjacent cabinets or surrounding areas Disclaimer The manufacturer and or distributor reseller decline all responsibility in the event of failure to ob serve the instructions provided for installation maintenance and suitable use of the product The manufacturer and or distributor reseller shall NOT be responsible for any injury due to negligence and the ...

Page 3: ...iring must be properly installed insulated and grounded Before servicing or cleaning unit turn power OFF and un plugged OPERATION Use high settings on cooking range only when necessary Keep all fan baffle spaces filter grease tunnel oil container and grease laden surfaces clean Grease should not be allowed to accumulate on fan baffle spaces filter grease tunnel and oil container Never allow the fi...

Page 4: ...system must have a damper If roof or wall cap has a damper do not use damper supplied for some models only with the range hood For the most efficient quiet operation A distance of 26 to 30 is recommended between stove top and the bottom of range hood It is recommended that the range hood be vented vertically through the roof through 6 or bigger vent work ALWAYS when possible reduce the number or t...

Page 5: ... CSA Standards C22 1 94 Canadian Electrical Code Part 1 and C22 2 No 0 M91 latest edition and all local codes and ordinances TOOL YOU WILL NEED Maker or pencil Stud finder Measuring tape Powered screwdriver or drill Flat Phillips screwdrivers Box level Drill with 1 8 drill bit Jigsaw or keyhole saw Cabinet Jack optional PARTS SUPPLIED 6 Anchors 2 or 3 Baffle Filters 1 Instruction manual book 1 Rem...

Page 6: ...www XtremeAirUsa com PAGE 6 HOOD DIMENSIONS INSTALLATION OVERVIEW PX01 W30 PX01 W36 PX02 W30 PX02 W36 PX03 W30 PX03 W36 PX04 W30 PX04 W36 08 ...

Page 7: ...ors and mounting screws make sure leaving 1 8 space away from the wall Step 3 4 Step 1 STEP 1 OPTIONAL ONLY Protect the cook top create work station Have 2 piece of wood stub about 2 x 4 x 20 on both sides of stove and a plywood on top of them to protect cook top or stove from damage or dirt This plywood will also create a comfortable work station for easy to install STEP 2 Marking on the wall 1 C...

Page 8: ...hood body on the wall attaching it to the 2 screws already in place 2 Level the hood body by using horizontal level 3 Use hand screw driver to tight those 2 mounting screws 4 Connect the exhaust on the hood to the ductwork above Use a luminum tape to make all joints secure and all tight 5 Find the three pronged plug and connect to an electrical outlet CAUTION Do not release the hood yet until you ...

Page 9: ...ng not the inner chimney 2 Place both the chimney on top of range hood base 3 Make sure the chimney is facing the correct direction PX02 outside chimney screw hole on the bottom Inside chimney screw hole on the top PX01 PX03 PX04 inside chimney screw hole on the top 4 Secure outside chimney to the base of the hood PX02 ONLY 5 Attach the inside chimney to the ceiling mounting bracket 6 Screw the ch...

Page 10: ...f inactivity A Activating Normal Blower Function B Activating Light Function C Activating Power Off Delay Function Touch Light button to turn the lights on or off 1 While the range hood is on and the blower is running in normal mode touch Power Off Delay button to activate delay off timer 2 Adjust to desired period of delay of timer by touching or button 1 15 minutes Timer begins to countdown imme...

Page 11: ...F lights 8 8 Indicates the accumulated time the system is running 9 9 Indicates the length of time left for delay off function 10 10 Lights up when auto shutdown delay timer function is on A Activating Blower Function Option 1 Touch and hold down for 1 2 seconds Option 2 Touch and hold down power sign 1 for 1 2 seconds the blower will be running as the same speed as last used Note The system saves...

Page 12: ...e cumulative running time will be shown in Power On Elapsed Digital Timer This timer icon flashes when 30 hours is up and reminds user to clean the baffle filters After cleaning the filters and when the motor is not in use touch and hold Increase Value button over 3 seconds to reset the timer Please note that turning off the system will not reset the Power On Elapsed Digital Timer F AUTOMATIC SHUT...

Page 13: ... work but the blower is not spinning at all is stuck or is rattling The blower might be jammed or scraping the bottom due to shipping damage Please contact us immediately The motor is defective possibly seized change the motor 5 The hood is not venting out properly Make sure the distance between the stove top and the bottom of the hood is within 26 and 30 in distance Due to different ceiling heigh...

Page 14: ... cotton cloth Do not use corrosive or abrasive detergent e g Comet Power Scrub EZ Off oven cleaner or steel wool scoring pads which will scratch and damage the stainless steel surface For heavier soil use liquid degrease such as Formula 409 or Fantastic brand cleaner If hood looks splotchy stainless steel hood use a stainless steel cleaner to clean the surface of the hood Avoid getting cleaning so...

Reviews: