background image


Maintenance Manual XA41/XA42 

AMM-XA42-0040-001 C.00


Page 

 Page date:  

Chapter  78 

  25.09.2018 


78-00-00  GENERAL 

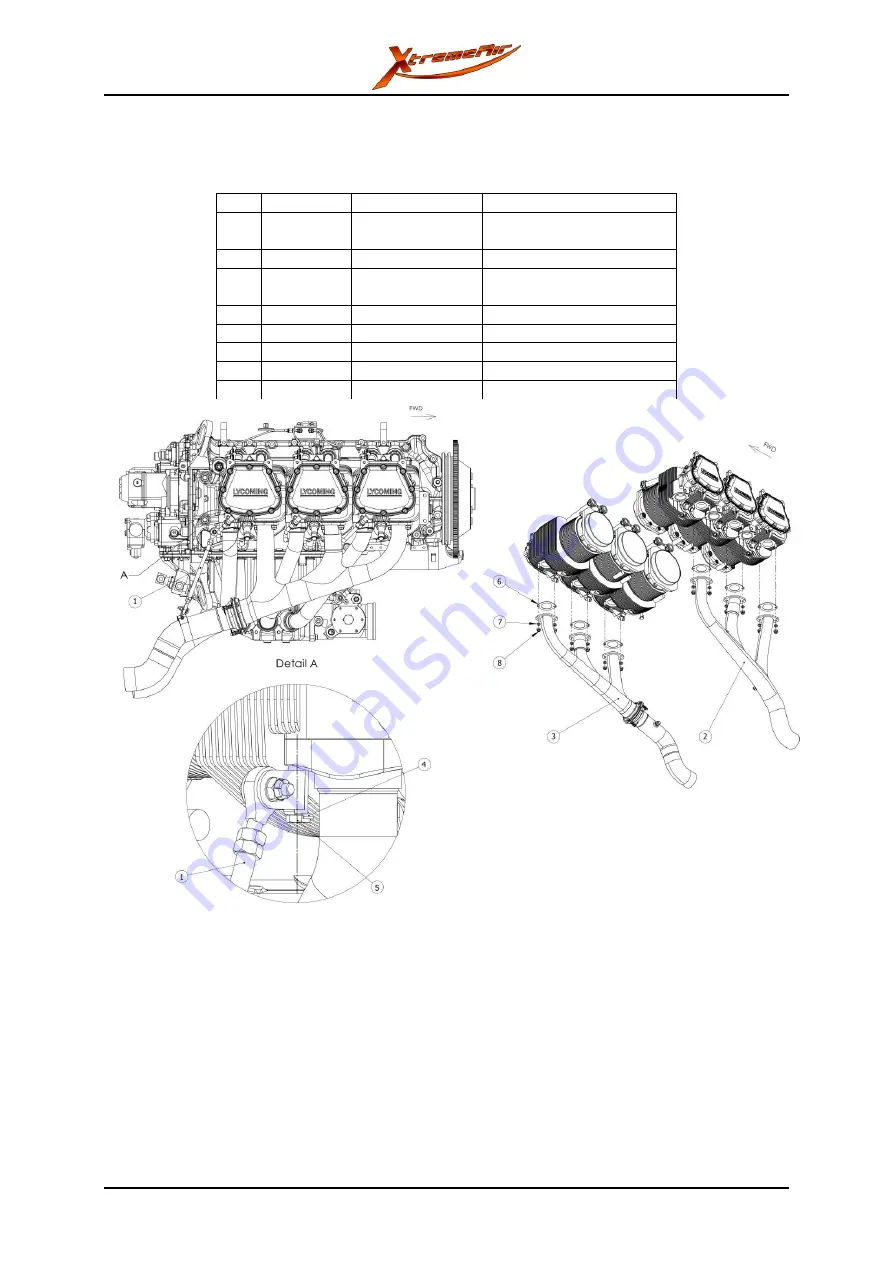
The exhaust gas of the six engine cylinders goes into two exhaust stacks (6 into 2 system). The 

assembly on the engine is shown in Figure 78-1. 


No.  Quantity 

Component 

P/N 

Exhaust brace 

RH 

XA42-7810-101 

Exhaust Stack LH 

XA42-7810-151 

Exhaust Stack 

RH 

XA42-7810-156 

Locking plate 

DIN 463 A4 6.4 

Bolt 

DIN 931 UNC 1/4x2” 10.9 

Gasket 

75118 Lycoming 

Washer 

STD 35 Lycoming 

Self-locking nut 

STD 2233 Lycoming 


Figure 78-1: Exhaust assembly applicable to these serial numbers: 

- S/N 07 and subsequent (XA41)  
- S/N 119 and subsequent (XA42)  

- Aircraft that accomplished SB-2014-003 and/or SB-2015-003. 


Summary of Contents for XA41

Page 1: ...en Cochstedt 39444 Hecklingen Germany This Manual includes the material required to be furnished to the maintenance personal by EASA regulations additional information provided by the manufacturer and in Chapter 4 the EASA approved Airworthiness Limitations The present revision C replaces the previous revision B The technical information contained in this document has been approved under the autho...

Page 2: ...d Pages Reason Of Change C 00 25 09 2018 All Manual rewritten in Simplified Technical English ASD STE 100 Inclusion of the following modifications General Corrections Grove and Beringer Brake system improvement Canopy seal treatment Secondary spar bolt washer correction Camlocks footrest Fire protective coating ...

Page 3: ...e 1 25 09 2018 C 00 Ch 05 Page 7 25 09 2018 C 00 Ch 21 Page 2 25 09 2018 C 00 Ch 05 Page 8 25 09 2018 C 00 Ch 21 Page 3 25 09 2018 C 00 Ch 05 Page 9 25 09 2018 C 00 Ch 21 Page 4 25 09 2018 C 00 Ch 05 Page 10 25 09 2018 C 00 Ch 23 Page 1 25 09 2018 C 00 Ch 05 Page 11 25 09 2018 C 00 Ch 23 Page 2 25 09 2018 C 00 Ch 05 Page 12 25 09 2018 C 00 Ch 24 Page 1 25 09 2018 C 00 Ch 05 Page 13 25 09 2018 C 00...

Page 4: ...8 C 00 Ch 28 Page 10 25 09 2018 C 00 Ch 51 Page 11 25 09 2018 C 00 Ch 28 Page 11 25 09 2018 C 00 Ch 51 Page 12 25 09 2018 C 00 Ch 28 Page 12 25 09 2018 C 00 Ch 51 Page 13 25 09 2018 C 00 Ch 28 Page 13 25 09 2018 C 00 Ch 51 Page 14 25 09 2018 C 00 Ch 28 Page 14 25 09 2018 C 00 Ch 51 Page 15 25 09 2018 C 00 Ch 32 Page 1 25 09 2018 C 00 Ch 51 Page 16 25 09 2018 C 00 Ch 32 Page 2 25 09 2018 C 00 Ch 52...

Page 5: ...00 Ch 85 Page 3 25 09 2018 C 00 Ch 72 Page 5 25 09 2018 C 00 Ch 85 Page 4 25 09 2018 C 00 Ch 72 Page 6 25 09 2018 C 00 Ch 91 Page 1 55 25 09 2018 C 00 Ch 72 Page 7 25 09 2018 C 00 Appendix 1 25 09 2018 C 00 Ch 72 Page 8 25 09 2018 C 00 Appendix 2 25 09 2018 C 00 Ch 76 Page 1 25 09 2018 C 00 Appendix 3 25 09 2018 C 00 Ch 76 Page 2 25 09 2018 C 00 Appendix 4 25 09 2018 C 00 Ch 76 Page 3 25 09 2018 C...

Page 6: ...stem 03 3 03 10 06 Electrical System 03 3 03 10 07 Instruments 03 4 CHAPTER 04 AIRWORTHINESS LIMITATIONS 04 1 04 00 00 GENERAL 04 3 04 00 01 Operating Time 04 4 04 10 00 LIFE LIMITED COMPONENTS 04 4 04 10 01 General 04 4 04 10 02 Replacement Time 04 4 04 10 03 Service Life Limited Components 04 4 CHAPTER 05 TIME LIMITS AND MAINTENANCE CHECKS 05 1 05 00 00 GENERAL 05 2 05 10 00 TIME LIMITS 05 2 05 ...

Page 7: ...G AND STORAGE 10 2 10 10 01 Parking 10 2 10 10 02 Storage 10 2 10 20 00 TIEDOWN 10 3 10 30 00 RETURN TO SERVICE 10 4 CHAPTER 11 PLACARDS AND MARKINGS 11 1 11 00 00 GENERAL 11 2 11 20 00 EXTERNAL PLACARDS AND MARKINGS 11 2 11 30 00 INTERNAL PLACARDS AND MARKINGS 11 2 CHAPTER 12 SERVICING 12 1 12 00 00 GENERAL 12 2 12 10 00 REPLENISHING 12 3 12 10 01 Refueling 12 3 12 10 02 Defueling 12 4 12 10 03 F...

Page 8: ...ADPHONES HELMETS 23 2 CHAPTER 24 ELECTRICAL POWER 24 1 24 00 00 GENERAL 24 2 24 30 00 DC GENERATOR 24 2 24 50 00 ELECTRICAL LOAD DISTRIBUTION 24 2 CHAPTER 25 EQUIPMENT AND FURNISHING 25 1 25 10 00 COCKPIT 25 2 25 10 01 Seats 25 2 25 10 02 Harnesses 25 2 25 10 03 Document Bag 25 4 25 50 00 CARGO COMPARTMENTS 25 4 25 60 00 EMERGENCY 25 5 25 60 01 Emergency Locator Transmitter 25 5 25 60 02 Parachute...

Page 9: ...4 3 34 10 03 Airspeed Indicator 34 3 34 20 00 DIRECTION 34 3 34 20 01 Magnetic Compass 34 3 34 50 00 DEPENDENT POSITION DETERMINING 34 4 34 50 01 Transponder 34 4 CHAPTER 39 ELECTRIC ELECTRONIC PANELS MULTIPURPOSE PARTS 39 1 39 00 00 GENERAL 39 2 39 10 00 INSTRUMENT AND CONTROL PANELS 39 2 39 10 01 XA41 Instrument Panel 39 3 39 10 02 XA42 Rear Instrument Panel 39 4 39 10 03 XA42 Front Instrument P...

Page 10: ...57 70 00 SIGHTING DEVICES 57 8 CHAPTER 61 PROPELLER 61 1 61 00 00 GENERAL 61 2 61 10 00 PROPELLER 61 2 61 20 00 PROPELLER CONTROL 61 2 CHAPTER 71 POWER PLANT 71 1 71 00 00 GENERAL 71 2 71 01 00 MANIFOLD 71 2 71 10 00 COWLING 71 3 71 10 01 Upper Cowling 71 3 71 10 02 Lower Cowling 71 3 71 20 00 ENGINE MOUNT 71 4 71 30 00 FIRE WALL 71 6 CHAPTER 72 ENGINE 72 1 72 00 00 GENERAL 72 2 72 10 00 ENGINE 72...

Page 11: ...91 34 91 07 00 ELT 91 39 91 08 00 DIGITAL DEVICES 91 40 91 09 00 GPS 91 50 91 10 00 OPTIONAL WIRING DIAGRAMS 91 54 91 13 00 AUDIO 91 55 APPENDIX APPENDIX 1 FORM OCCURRENCE REPORT A 1 APPENDIX 2 FORM MASS AND BALANCE A 2 APPENDIX 3 FORM COMPASS COMPENSATION A 3 APPENDIX 4 FORM GROUND RUN REPORT A 4 APPENDIX 5 FORM CHECK FLIGHT REPORT A 5 APPENDIX 6 FORM CONTROL SURFACES MASS AND MOMENT A 6 APPENDIX...

Page 12: ...Maintenance Manual XA41 XA42 AMM XA42 0040 001 C 00 XII Page date 25 09 2018 Left blank intentionally ...

Page 13: ... 00 Page date Page 1 25 09 2018 Chapter 01 Chapter 01 Introduction Table of Contents Chapter Title Page 01 00 00 GENERAL 01 2 01 00 01 Revision Service 01 2 01 00 02 Warnings Cautions and Notes 01 2 01 00 03 Log of Revisions 01 2 01 10 00 SAFETY 01 3 ...

Page 14: ...Controlled Variable Pitch Propeller MTV 9 mt Propeller ATA 61 20 48 E 1048 Operation and Installation Manual Hydraulically Constant Speed Governor P 8 01 00 01 Revision Service The manufacturer has a revision service for the Aircraft Maintenance Manual The revision shows the design changes to the aircraft or changes in procedures Each page and each chapter of the manual show the date of the first ...

Page 15: ...jury and or damage during the maintenance procedures on the XA41 and the XA42 Only approved personnel must do the maintenance work and inspections Read the maintenance manual before you start the maintenance work To do the maintenance work refer to the applicable national safety requirements Obey the warnings cautions and notes in this manual ...

Page 16: ...Maintenance Manual XA41 XA42 AMM XA42 0040 001 C 00 Page 4 Page date Chapter 01 25 09 2018 Left blank intentionally ...

Page 17: ...2 0040 001 C 00 Page date Page 1 25 09 2018 Chapter 02 Chapter 02 Organization and Handling of this Manual Table of Contents Chapter Title Page 01 00 00 GENERAL 01 2 01 00 01 Revision Service 01 2 01 00 02 Warnings Cautions and Notes 01 2 ...

Page 18: ...The pages of each chapter have continuous numbers Page 1 is the title page of each chapter Figure 1 is the first figure in each chapter 02 00 01 Revisions The manufacturer makes changes to the aircraft maintenance manual to show design changes maintenance procedure changes or other changes Each group of changes is referred to as a revision A manual revision includes these items The changed pages T...

Page 19: ...048 m nm 1 852 km Velocity Kilometers per hour km h Meters per second m s Miles per hour mph Knots kts Feet per minute fpm km h 1 852 kts km h 1 609 mph m s 196 85 fpm mph 1 609 km h kts 1 852 km h fpm 196 85 m s Rotational Speed Revolutions per minute rpm rpm min 1 Pressure Bar bar Pounds per square inch psi bar 14 5038 psi psi 14 5038 bar Force or Weight Newton N Pound lb N 4 448 lb lb 4 448 N T...

Page 20: ...ion Factor Unit SI to US Imperial US Imperial to SI Volume Liter l US gallon US gal US quart USqt Cubic inch in l 3 7854 US gal l 0 9464 USqt l 61 024 in US gal 3 7854 l USqt 0 9464 l in 61 024 l Mass Kilogram kg Pound lb kg 0 45359 lb lb 0 45359 lb Temperature Degree Celsius C Degree Fahrenheit F C 1 8 32 F F 32 1 8 C ...

Page 21: ...Description of the Aircraft Table of Contents Chapter Title Page 03 00 00 GENERAL 03 2 03 10 00 DESCRIPTION 03 2 03 10 01 Construction 03 2 03 10 02 Flight Control System 03 2 03 10 03 Brake System 03 2 03 10 04 Powerplant 03 3 03 10 05 Fuel System 03 3 03 10 06 Electrical System 03 3 03 10 07 Instruments 03 4 ...

Page 22: ...ON 03 10 01 Construction Manufacturer XtremeAir GmbH Harzstraße 2 Am Flughafen Cochstedt D 39444 Hecklingen Germany Fuselage carbon fiber composite monocoque Wing carbon fiber composite Stabilizers carbon fiber composite Landing gear tail dragger 2 main wheels 1 tailwheel steel spring type main landing gear struts Seat pilot rear seat to pedal distance adjustable seven point harness 03 10 02 Fligh...

Page 23: ...94348 Atting Germany Type MTV 9 B C C203 20d or MTV 14 B C C190 130 diameter 2030 mm 1900 mm diameter 3 blade 4 blade wood composite hydraulic variable pitch with constant speed regulator 03 10 05 Fuel System Tanks 2 integral wing tanks 1 acro tank behind the firewall with floptube equipped headertank Fuel supply mechanically operated gear driven pump electrically operated auxiliary boost pump 03 ...

Page 24: ... 001 C 00 Page 4 Page date Chapter 03 25 09 2018 03 10 07 Instruments Standard equipment minimum installed Instrument XA42 XA41 Primary glass panel engine monitor MVP 50P 1 1 Airspeed indicator 2 1 Altimeter 2 1 Magnetic compass 1 1 G Meter 2 1 ...

Page 25: ...proval Date and Sign of Approval B 01 12 12 2011 All First edition 01 February 2012 B 03 13 10 2012 All FAA approval statement 18 October 2012 B 07 29 11 2013 All Service Life 6000 hrs 26 February 2014 C 00 25 09 2018 All Editorial changes Revision equivalent to B 07 Limitations not affected n a Log of Effective Pages Chapter 04 Page Date Issue 1 04 25 09 2018 C 00 2 04 25 09 2018 C 00 3 04 25 09 ...

Page 26: ...2 Page date Chapter 04 25 09 2018 Table of Contents Chapter Title Page 04 00 00 GENERAL 04 3 04 00 01 Operating Time 04 4 04 10 00 LIFE LIMITED COMPONENTS 04 4 04 10 01 General 04 4 04 10 02 Replacement Time 04 4 04 10 03 Service Life Limited Components 04 4 ...

Page 27: ...maximum replacement intervals and or maintenance requirements for aircraft components systems and structures determined to be life limited and or require monitoring through scheduled maintenance Note All time limits and requirements listed in this section are also covered in Chapter 5 Time Limits and Maintenance Checks The following airworthiness limitations and requirements are separated into gro...

Page 28: ...pecified period of operation for that component or in accordance with the manufacturer s service data or airworthiness directives 04 10 02 Replacement Time The following items must be replaced during the regular maintenance periods Item Part number Limit life time Fuselage longeron connection bolt Zylinderschraube M12x120 XA42 5300 205 A 01 100 h subject bolts are installed on MSN 01 02 03 101 102...

Page 29: ...05 10 01 General 05 2 05 10 02 Overhaul Schedule 05 2 05 10 03 Recommended Replacement Times 05 3 05 20 00 SCHEDULED MAINTENANCE CHECKS 05 4 05 20 01 General 05 4 05 20 02 First 25 Hour Inspection 05 5 05 20 03 50 Hour Inspection 05 5 05 20 04 100 Hour Inspection 05 13 05 20 05 1000 Hour Inspection 05 14 05 20 06 Engine change 05 14 05 20 07 Maintenance Checks Performed 05 15 05 50 00 UNSCHEDULED ...

Page 30: ...ice bulletins and service letters The pilot must make sure that all airworthiness directives service bulletins and other requirements of the airworthiness authority are completed as necessary 05 10 00 TIME LIMITS 05 10 01 General All scheduled maintenance checks have specified time limits Do the scheduled maintenance in these time limits Do an inspection of all components that are not included in ...

Page 31: ...on condition refer to manufacturer s instructions for replacement time Brake hoses and sensing hoses on condition Wheels Beringer on condition refer to manufacturer s instructions for replacement time ELT Batteries Kannad Refer to manufacturer s instructions for replacement time Engine shock mounts Lord on condition or at each engine overhaul Engine shock mounts Barry on condition or at each engin...

Page 32: ...re the inspection 1 Seats 2 Footrest XA41 or footrest cover of the front compartment XA42 3 Inspection hole covers in the cockpit 4 Baggage compartment 5 Cowling top and bottom 6 Wheel pant covers 7 Covers of the wing inspection holes 8 Fuselage wing spar cover After the inspection Install all removed parts again Clean the aircraft internally and externally Column Description Gives you the correct...

Page 33: ...op to stop CHECK The play of the pedal sliders is correctly adjusted CHECK The AN23 18A bolt is correctly installed in the pedal axle CHECK The split pins are correctly installed in the master brake cylinder assembly CHECK The brake pedal and the master brake cylinder move freely when you push the brake pedal CHECK The brake lines are correctly connected CHECK The condition of the rudder pedal ass...

Page 34: ...n control have safety wires split pins or locking varnish on selflocking nuts CHECK All screw connections of the elevator control have safety wires split pins or locking varnish on selflocking nuts CHECK The ends of the elevator control rod turn freely at the left and right stops Make sure that the elevator control rod is correctly adjusted Incorrect adjustment can cause damage to the rod end hous...

Page 35: ...ECK Set the Master Switch to OFF Pitot Static System The static ports are corrctly attached CHECK The pitot tube is correctly attached CHECK Left hand side console XA42 rear cockpit The throttle slider is correctly installed and operates correctly CHECK The front and rear throttle linear ballbearing is free of dirt CHECK The throttle grip is correctly installed The fixation screws are correctly in...

Page 36: ... and LH The bellcranks move freely from stop to stop CHECK The condition of the bellcranks is satisfactory and they are correctly installed CHECK The ends of the aileron control rod turn freely at the left and right stops Make sure that the aileron control rod is correctly adjusted Incorrect adjustment can cause damage to the rod end housing and failure of the aileron control CHECK Seatbelts front...

Page 37: ... pin is correctly installed CHECK Exhaust LH and RH The condition of the exhaust is satisfactory and it is correctly installed CHECK The EGT sensors are correctly installed The routing of the adjacent cables is correct CHECK The smoke lines are correctly connected CHECK Engine mount shock mounts The condition of the engine and shock mounts is satisfactory and they are correctly installed CHECK Oil...

Page 38: ...p to stop CHECK The connecting bolts and the safety wiring are correctly installed CHECK The hinge pin is correctly installed and locking varnish applied CHECK Horizontal tail The elevator is correctly installed and moves freely from stop to stop CHECK The hinge pin of the elevator is correctly installed CHECK The trim tab is correctly installed and moves freely from stop to stop CHECK The hinge p...

Page 39: ...led The battery is correctly installed in the battery box CHECK The relay is correctly installed CHECK The fuse is correctly installed CHECK The cables have the correct routing and are correctly connected There are no signs of chafing CHECK The insulating bushing is correctly installed in the electrical power bulkhead CHECK Fuel and vent line connections to the wing tank plate are correctly instal...

Page 40: ... control and the antenna cable are correctly connected CHECK The routing of the antenna and of the remote control cables is correct and they are safely attached CHECK The ELT antenna is correctly installed CHECK The remote control is correctly installed CHECK External markings and placards The aircraft type placard is correctly attached CHECK All placards are correctly attached iaw AFM para 2 17 C...

Page 41: ...lve CHECK The bushing is correctly installed in the carry through bridge of the spar CHECK The front universal joint and the mounting bracket are correctly installed CHECK Structure The firewall and the adjacent structure are not damaged and have no cracks CHECK Visual inspection The composite structure is not damaged and has no cracks CHECK The torque of the fuselage longeron connection bolt is 4...

Page 42: ... the elevator CHECK Remove the rudder CHECK Remove the stabilizer CHECK Do the NDI on all composite structure bond lines for example the tap test refer to FAA AC43 13 1B section 8 EXAMINE Remove the tailwheel strut Disassemble the tailwheel CLEAN If necessary REPLACE Disassemble the controls and the control rods CLEAN and EXAMINE 05 20 06 Engine change Install the engine refer to 72 10 00 and Lyco...

Page 43: ...001 C 00 Page date Page 15 25 09 2018 Chapter 05 05 20 07 Maintenance Checks Performed Flight time Date Place Signature 25 h 50 h 100 h 150 h 200 h 250 h 300 h 350 h 400 h 450 h 500 h 550 h 600 h 650 h 700 h 750 h 800 h 850 h 900 h 950 h 1000 h ...

Page 44: ...2 0040 001 C 00 Page 16 Page date Chapter 05 25 09 2018 continued Flight time Date Place Signature 1050 h 1100 h 1150 h 1200 h 1250 h 1300 h 1350 h 1400 h 1450 h 1500 h 1550 h 1600 h 1650 h 1700 h 1750 h 1800 h 1850 h 1900 h 1950 h 2000 h ...

Page 45: ...eller strike Description Action Signature Remove and examine the propeller refer to the manufacturer s maintenance manual EXAMINE Remove the engine and examine it for shock loading refer to the engine manufacturer s specification EXAMINE Engine mount EXAMINE Engine fire Description Action Signature Cowling Structural damage EXAMINE Fuel and oil lines EXAMINE Cables EXAMINE Lightning strike Descrip...

Page 46: ...XA42 AMM XA42 0040 001 C 00 Page 18 Page date Chapter 05 25 09 2018 Hail damage Description Action Signature Upper exposed surfaces Damage coin tapping inspection Dents visual inspection EXAMINE Propeller blades Damage EXAMINE ...

Page 47: ... Chapter 06 Dimensions Table of Contents Chapter Title Page 06 10 00 DIMENSIONS XA41 XA42 06 2 06 10 01 Primary Data 06 3 06 10 02 Wing 06 3 06 10 03 Horizontal Tail with Elevator 06 3 06 10 04 Elevator 06 3 06 10 05 Trim Tab 06 3 06 10 06 Vertical Tail with Rudder 06 4 06 10 07 Rudder 06 4 ...

Page 48: ...pter 06 25 09 2018 06 00 00 GENERAL The XA41 and the XA42 use the System International SI for dimensions and areas For the conversion factors of SI units and US imperial units refer to Chapter 02 06 10 00 DIMENSIONS XA41 XA42 Figure 06 1 Dimensions XA42 left and XA41 right ...

Page 49: ...Wing Wing planform Trapezoid Wing span 7500 mm Wing area 11 25 m Aspect ratio 5 00 Airfoil PS 1 16 Tip PS 1 09 Root chord 2060 mm Tip chord 950 mm MAC 1505 mm Aileron span 3220 mm Aileron area 1 26 m Aileron deflection 30 06 10 03 Horizontal Tail with Elevator Planform Trapezoid Span 2600 mm Area 2 97 m Airfoil DU86 MOD1 06 10 04 Elevator Span 3200 mm Area 1 45 m Deflection 27 06 10 05 Trim Tab Sp...

Page 50: ...1 XA42 AMM XA42 0040 001 C 00 Page 4 Page date Chapter 06 25 09 2018 06 10 06 Vertical Tail with Rudder Planform Trapezoid Height 1100 mm Area 1 54 m Airfoil DU86 MOD1 06 10 07 Rudder Height 1400 mm Area 0 82 m Deflection 30 ...

Page 51: ...001 C 00 Page date Page 1 25 09 2018 Chapter 07 Chapter 07 Lifting and Shoring Table of Contents Chapter Title Page 07 00 00 GENERAL 07 2 07 10 00 JACKING 07 2 07 20 00 SHORING 07 2 07 20 01 Shoring the front 07 2 07 20 02 Shoring the tail 07 3 ...

Page 52: ...ted load of more than 1000 kg 2200 lbs Hold the wings with trestles to prevent the aircraft to tilt to one side 07 20 00 SHORING It is necessary to shore the aircraft during the installation or removal of the main or tail landing gear 07 20 01 Shoring the front To lift the front a support is necessary The support area must be a minimum of 100 x 500 mm Put a cushion on top of the support to prevent...

Page 53: ...he tail support must be 500x300x300 mm Put a cushion on top of the tail support to prevent damage to the fuselage To lift the tail 1 Use wheel chocks to safety the main wheels 2 Lift the tail 3 Put the applicable tail support below the fuselage refer to the figure below 4 Put the tail on top of the tail support 3 1 Figure 07 2 Shoring the tail ...

Page 54: ...Maintenance Manual XA41 XA42 AMM XA42 0040 001 C 00 Page 4 Page date Chapter 07 25 09 2018 Left blank intentionally ...

Page 55: ...001 C 00 Page date Page 1 25 09 2018 Chapter 08 Chapter 08 Leveling and Weighing Table of Contents Chapter Title Page 08 00 00 GENERAL 08 2 08 10 00 LEVELING 08 2 08 20 00 MASS BALANCE 08 3 08 20 01 Weighing 08 3 08 20 02 Center of Gravity 08 4 ...

Page 56: ... necessary When the tail is lifted too much the aircraft can tilt forward This can cause injury to persons 08 10 00 LEVELING To level the aircraft 1 Use wheel chocks to safety the main wheels 2 Lift the tail 3 Put a jack below the tailwheel The tailwheel must be locked straight 4 Use a water level to measure the attitude of the aircraft Put the water level on the straight part of the canopy cutout...

Page 57: ...in the fuel tanks 4 Make sure that all other fluids have the correct fluid level for example engine oil and brake fluid Fill the fluids to the correct level if necessary 5 Remove all objects that are not part of the equipment luggage and others 6 Clean and dry the aircraft 7 Close the canopy 8 Move the two main wheels onto the scales Use ramps if necessary 9 Put a third scale below the tailwheel 1...

Page 58: ... moment arms A and B are constant values XA42 A 112 mm B 4475 mm XA41 A 120 mm B 4225 mm For mass M1 2 3 and the weighing procedure refer to chapter 08 20 01 Calculate the center of gravity XS of the empty aircraft as follows XS A M1 A M2 B M3 M Only operate the aircraft in the permitted range of mass and center of gravity limits This will give good flight performance good handling qualities and i...

Page 59: ...e Manual XA41 XA42 AMM XA42 0040 001 C 00 Page date Page 1 25 09 2018 Chapter 09 Chapter 09 Towing and Taxiing Table of Contents Chapter Title Page 09 00 00 GENERAL 09 2 09 10 00 TOWING 09 2 09 20 00 TAXIING 09 2 ...

Page 60: ...nner to prevent damage Push only the leading edges of the wing or tail or pull the inner part of the propeller blades near the spinner 09 20 00 TAXIING If necessary remove the wheel chocks and the tie down devices Taxi the aircraft only at slow speeds Taxi a distance of some feet and make sure that the brakes are serviceable To turn the aircraft operate the left or the right toe brake To stop the ...

Page 61: ... 25 09 2018 Chapter 10 Chapter 10 Parking Mooring Storage and Return to Service Table of Contents Chapter Title Page 10 00 00 GENERAL 10 2 10 10 00 PARKING AND STORAGE 10 2 10 10 01 Parking 10 2 10 10 02 Storage 10 2 10 20 00 TIEDOWN 10 3 10 30 00 RETURN TO SERVICE 10 4 ...

Page 62: ...dimensions This will prevent damage to the wheel covers To park the aircraft 1 Taxi or tow the aircraft to the parking position 2 Align the aircraft into the wind 3 Put the wheel chocks in front of and behind the main wheels 4 Safety the control stick in the rear center position with the lap strap of the rear cockpit harness 5 Close the canopy 6 Install the pitot cover and the canopy cover accesso...

Page 63: ...down points of the aircraft are at the outer aileron hinge on each side of the wing You can also use the tailwheel axle to tie down the tail Tie down the aircraft as follows 1 Park the aircraft refer to chapter 10 10 02 Make sure that the ropes do not have too much tension to prevent damage 2 Attach a rope to each mooring point and to the ground anchor point We recommend that you push the aileron ...

Page 64: ...r more than 30 days we recommend that you do a 50 hour Inspection refer to chapter 05 20 04 Also do the procedure to return the engine to service refer to Lycoming Service Letter L180 newest issue If necessary install the equipment which you removed for storage If the aircraft battery is disconnected or removed connect or install the battery again ...

Page 65: ...42 0040 001 C 00 Page date Page 1 25 09 2018 Chapter 11 Chapter 11 Placards and Markings Table of Contents Chapter Title Page 11 00 00 GENERAL 11 2 11 20 00 EXTERNAL PLACARDS AND MARKINGS 11 2 11 30 00 INTERNAL PLACARDS AND MARKINGS 11 2 ...

Page 66: ...nd markings to prevent accidents and or damage 11 20 00 EXTERNAL PLACARDS AND MARKINGS For applicable external placards and their locations refer to the Aircraft Flight Manual chapter 2 17 The order for replacement placards must have the correct placard text and the placard number or the aircraft serial number 11 30 00 INTERNAL PLACARDS AND MARKINGS For applicable internal placards and their locat...

Page 67: ...03 Fuel Drainage 12 4 12 10 04 Replenishment of Engine Oil 12 4 12 10 05 Engine Oil Change 12 6 12 10 06 Replenishment of Brake Fluid 12 7 12 10 07 Tire Inflation 12 8 12 10 08 Overview of Fluids for Replenishing 12 8 12 20 00 SCHEDULED SERVICING 12 9 12 20 01 Cleaning of the external surfaces 12 9 12 20 02 Cleaning of the internal surfaces 12 9 12 20 03 Engine Cleaning 12 10 12 30 00 UNSCHEDULED ...

Page 68: ...pter gives information about the servicing of the aircraft Shorter service and maintenance intervals are recommended when the aircraft operates in unusual conditions such as Very high or low temperature ranges Atmospheric conditions with dust High humidity and moisture Rough runways Other unusual operating conditions ...

Page 69: ...ne make sure that there is no spilled fuel around the aircraft If you do not obey these precautions accidental fire can occur The minimum aviation grade fuel for the Lycoming AEIO 580 B1A engine is AvGas 100 or 100LL Refer to the newest revision of Lycoming Service Instruction No 1070 For fuel quantities refer to chapter 12 10 08 Make sure to keep the fuel quantity in the limits for the specified ...

Page 70: ...ned close the drain valve correctly and make sure that there are no leaks To drain the fuel 1 Before you drain the fuel and examine the fuel drain valves wait for a minimum of 5 minutes after refuelling Thus moisture and sediment can collect at the bottom of the tank 2 Use a transparent container to drain a quantity of fuel before the first flight of the day 3 Let the drained fuel collect at the b...

Page 71: ...and tighten it with your hand 10 Close the hatch in the upper cowling half To add engine oil 1 Examine the oil quantity refer to chapter 12 10 04 Add oil only if it is necessary 2 Make sure that the oil has the correct specification and viscosity Fill the necessary quantity in the open filler port 3 Examine the oil level during the procedure to make sure that there is not too much engine oil 4 Put...

Page 72: ...plicable dimensions below the oil drain plug 4 Remove the oil drain plug and let the oil drain into the container 5 Remove the oil screen housing from the engine accessory housing Be careful when you find metal particles on the oil pressure screen Metal particles are signs of engine damage Make sure that the oil pressure screen and the mesh are not damaged 6 Examine the oil pressure screen for met...

Page 73: ...ure that air cannot get out Open the valve a quarter turn 4a Applicable to brake systems with a XA42 3280 230 master cylinder Open the vent plug refer to Figure 12 1 left 4b Applicable to brake systems with a XA42 3280 232 master cylinder with reservoir XA42 3280 233 Remove the top reservoir cover Remove the membrane refer to Figure 12 1 right 5 Use a pump and supply brake fluid into the system un...

Page 74: ...ng AEIO 580 B1A engine is Maximum sump capacity 15 15 L 16 USqt Minimum sump capacity 8 52 L 9 USqt The engine oil must have the specifications as given in the table below refer to the Lycoming AEIO 580 B1A Operation and Installation Manual Table Recommended oil grades Average Ambient Air MIL J 6082B or SAE J1966 Spec Mineral Grades MIL L 22851 or SAE J1899 Spec Ashless Dispersant Grades All Tempe...

Page 75: ...ng edges we recommend that you clean them immediately after the flight You can apply non silicone car polish to the surfaces and polish them to make them glossy The manufacturer recommends that you polish them two times a year To clean the canopy Plexiglass you must only use clean water without detergent Use a clean sponge or a chamois leather to clean the Plexiglass Do not use usual detergents or...

Page 76: ...ture of the engine decrease before you clean it 2 Make sure that the electrical components the air intakes and the cowling have protection from cleaning agents Do not start the engine before you removed all cleaning agents Use only cleaning agents that are not flammable to prevent fire 3 Start to clean the engine compartment from the top with a cleaning agent 4 Flush the engine compartment with cl...

Page 77: ...NDARD PRACTICES AIRFRAME 20 2 20 10 01 Types of Bolts 20 2 20 10 02 Standard Torque Values 20 3 20 10 03 Special Torque Values 20 3 20 10 04 Torque Measurement 20 4 20 10 05 Check for Delamination 20 4 20 10 06 Flexible Hoses 20 4 20 10 07 Fittings 20 5 20 20 00 ASSEMBLY AND DISASSEMBLY INSTRUCTIONS 20 6 20 20 01 General 20 6 20 20 02 Assembly Instructions 20 7 20 20 03 Disassembly Instructions 20...

Page 78: ...nd or damage to material 20 10 00 STANDARD PRACTICES AIRFRAME 20 10 01 Types of Bolts Applicable bolts for the aircraft are LN Bolts Luftfahrt Norm AN Bolts Army Navy DIN Bolts Deutsche Industrie Norm The marks on the bolt head identify the types of bolts The table below shows the identification Table Types of Bolts LN Bolts AN Bolts DIN Bolts Head identification Marks on head Manufacturer identif...

Page 79: ...4 28 7 0 5 2 AN5 5 16 24 13 6 10 0 AN6 3 8 24 28 5 21 0 AN7 7 16 20 38 5 28 0 AN8 1 2 20 54 2 40 0 AN9 9 16 18 91 0 67 0 AN10 5 8 18 125 0 92 0 20 10 03 Special Torque Values Table Special torque values Location and Item Torque value Nm lb ft Engine to Engine Mount NAS363 720 metal stop nut 55 41 Engine Mount to fuselage AN5 25 18 4 Horizontal Stabilizer Spar Bolt XA42 5510 291 60 44 Longeron conn...

Page 80: ... bulletins Examine the hoses and the hose assemblies for deterioration at each inspection period Examine the hoses for Leakage Separation of the cover or of the braid of the inner hose Hard parts or parts that are not flexible Cracks Scratches marks or cracks because of the pressure of hose clamps or supports If damage occurs replace all parts of the hose assembly Use a new hose assembly with the ...

Page 81: ...the smoke system are made of aluminum alloy Most fittings are AN fittings The dash number that follows the AN number shows the dimension of the hose for which the fitting is made in 16th of an inch This dimension is the inner diameter of the hose The material code letter D follows the dash number Example AN823 10D Apply Loctite 577 on all National Pipe Threads NPT before installation to prevent le...

Page 82: ...nstructions of chapter 20 20 02 Only approved personnel are permitted to do the assembly and the disassembly For assembly and disassembly these tools are necessary 2 x 3 8 wrench socket 2 x 7 16 wrench socket 2 x wrench socket 1 x 11 16 wrench 1 x 10 mm wrench socket 1 x 19 mm wrench socket 1 x 30 mm wrench socket 1 x 6 mm Allen key 1 x 10 mm Allen key 1 x T50 Torx wrench socket 1 x PH 2 Phillips ...

Page 83: ...tall the wing Refer to chapter 57 10 00 8 If temporary transportation nuts are installed on the wheel axles remove the nuts Install operational wheel nuts on the wheel axles Safety the nuts with a split pin DIN 94 3 2x50mm Figure 20 1 Transportation nut left operational wheel nut right 9 Install the propeller refer to chapter 61 10 00 10 Install the landing gear fairings refer to chapter 32 50 00 ...

Page 84: ...the wing fuselage intersection with transparent PU protection tape Figure 20 3 Wing fuselage intersection 23 Seal the gap between the horizontal stabilizer and the fuselage with transparent PU protection tape Figure 20 4 Fuselage horizontal stabilizer intersection 24 Install the LH and RH side visors with MS24694C5S screws Safety the thread of the screws with Loctite 243 Write an applicable logboo...

Page 85: ...rudder refer to chapter 55 60 00 8 Remove the elevator refer to chapter 55 20 00 9 Remove the stabilizer assembly refer to chapter 55 10 00 10 Remove the wing refer to chapter 57 10 00 After removing the wing do not unload the front jack without securing the fuselage cut out with the aluminum longeron spacers This could seriously damage the fuselage structure due to the weight of the engine 11 For...

Page 86: ...Maintenance Manual XA41 XA42 AMM XA42 0040 001 C 00 Page 10 Page date Chapter 20 25 09 2018 Left blank intentionally ...

Page 87: ...AMM XA42 0040 001 C 00 Page date Page 1 25 09 2018 Chapter 21 Chapter 21 Environmental Systems Table of Contents Chapter Title Page 21 00 00 GENERAL 21 2 21 20 00 DISTRIBUTION 21 2 21 20 01 Air Vents 21 2 21 20 01 Canopy Defog 21 3 ...

Page 88: ... 2130 234 4 2 Screw DIN 7991 M3x16 5 1 Bushing XA42 2130 239 6 4 Washer DIN 9021 3 2 x 7 x 0 5 7 2 Nut DIN 985 M3 Figure 21 1 Adjustment lever for the air vents and the canopy defog system 21 20 00 DISTRIBUTION 21 20 01 Air Vents Air for the ventilation comes into the aircraft through a NACA intake on the front left part of the canopy The NACA intake is connected to a duct system which supplies th...

Page 89: ...connected to a duct system It supplies the air to the canopy glass through a diffuser on the bottom front part of the canopy To adjust the quantity of air for defogging move the applicable lever on the right side of the rear cockpit On the XA41 an air intake on the center front part of the canopy lets the air in for the canopy defogging To adjust the quantity of air for defogging move the lever in...

Page 90: ...Maintenance Manual XA41 XA42 AMM XA42 0040 001 C 00 Page 4 Page date Chapter 21 25 09 2018 Left blank intentionally ...

Page 91: ...2 0040 001 C 00 Page date Page 1 25 09 2018 Chapter 23 Chapter 23 Communication Table of Contents Chapter Title Page 23 00 00 GENERAL 23 2 23 10 00 VHF COMMUNICATION TRANSCEIVER 23 2 23 40 00 INTERCOM 23 2 23 50 00 HEADPHONES HELMETS 23 2 ...

Page 92: ...ugh a shielded cable Manufacturer Cobham plc Brook Road Wimborne Dorset BH21 2BJ UK This antenna is installed at the bottom of the fuselage between the support bulkheads of the rear seat To remove the antenna 1 Remove the rear seat 2 Disconnect the antenna connector 3 Remove the 4 mounting screws Remove the antenna 23 40 00 INTERCOM The XA42 and XA41 have a voice controlled intercom which is a par...

Page 93: ... XA42 AMM XA42 0040 001 C 00 Page date Page 1 25 09 2018 Chapter 24 Chapter 24 Electrical Power Table of Contents Chapter Title Page 24 00 00 GENERAL 24 2 24 30 00 DC GENERATOR 24 2 24 50 00 ELECTRICAL LOAD DISTRIBUTION 24 2 ...

Page 94: ...lternator The LR3C 14 is installed in the front right compartment Manufacturer B C Specialty Products 123 E 4th Street POB B Newton KS 67114 USA 24 50 00 ELECTRICAL LOAD DISTRIBUTION The electrical system is a 12 Volt direct current system An alternator supplies the power for the onboard battery 12V 16Ah If the alternator is defective the battery will supply all direct current devices with power f...

Page 95: ... Copilot Instr Other options Circuit breakers Power Bus 1 and 2 are not connected when a large alternator is installed S N 145 and subsequent have two alternative circuit breaker configurations in the center console for the Power Bus One circuit breaker for small alternators Two circuit breakers for large alternators For more information on the wiring loom refer to chapter 91 10 00 ...

Page 96: ...Maintenance Manual XA41 XA42 AMM XA42 0040 001 C 00 Page 4 Page date Chapter 24 25 09 2018 Left blank intentionally ...

Page 97: ... Chapter 25 Equipment and Furnishing Table of Contents Chapter Title Page 25 10 00 COCKPIT 25 2 25 10 01 Seats 25 2 25 10 02 Harnesses 25 2 25 10 03 Document Bag 25 4 25 50 00 CARGO COMPARTMENTS 25 4 25 60 00 EMERGENCY 25 5 25 60 01 Emergency Locator Transmitter 25 5 25 60 02 Parachutes 25 6 ...

Page 98: ... 832R8 screws The front bottom of the rear seat is attached to the fuselage floor with Velcro or with MS21083N08 nuts on male studs These studs are bonded on the fuselage floor To remove the seats 1 Remove the screws 2 Pull the seat up 3 Pull the shoulder harnesses through the applicable holes in the top part of the seat Exception for rear seats from SN 152 and on or after applying SB XA42 2018 01...

Page 99: ...Maintenance Manual XA41 XA42 AMM XA42 0040 001 C 00 Page date Page 3 25 09 2018 Chapter 25 Figure 25 2 Installation of the Harness system ...

Page 100: ...ents bag is for storage of The Log book The Aircraft Flight Manual The Maps 25 50 00 CARGO COMPARTMENTS The XA41 and the XA42 have a cargo compartment which you can use during non aerobatic flight The cargo compartment must be empty for aerobatic flight If there are items in the cargo compartment during a utility flight make sure that they cannot move Safety the items with the restraint system res...

Page 101: ...ation of the ELT Figure 25 3 ELT components The ELT is attached to a mounting bracket on the left side of the rear left seat frame The remote control is on the right side of the instrument panel of the rear cockpit or on the right side of the center console The remote control is connected to the ELT with three wires For more information on the installation refer to the manufacturer s Initial Insta...

Page 102: ... a flashing indicator and a buzzer For the maintenance procedures refer to the manufacturer s Installation Manual Operation Manual Find the expiration date of the batteries and make sure that it is not expired It is mandatory to replace the battery After more than 1 hour of transmitter operation cumulative operating time Before the battery expiration date When the battery was used in an emergency ...

Page 103: ... Page 27 00 00 GENERAL 27 2 27 00 01 Control Sticks 27 3 27 00 02 Torque Tube 27 4 27 00 03 Control Rods 27 7 27 10 00 AILERONS 27 10 27 20 00 RUDDER 27 17 27 20 01 Rudder Pedals 27 18 27 20 02 Control Cables 27 23 27 30 00 ELEVATOR AND TRIM TAB 27 26 27 30 01 Trim Tab 27 27 27 30 02 Elevator bellcrank 27 29 27 30 03 Elevator control rod CFRP 27 30 ...

Page 104: ...fuselage side walls of the XA41 and XA42 rear cockpit and to the forward fuselage bulkhead of the XA42 front cockpit The rudder pedals are adjustable with an adjuster handle on the rudder pedal assembly Elevator and aileron controls operate through a system of push rods and bell cranks Cables operate the rudder An electric actuator operates the trim tab The elevator trim tab is operated by an elec...

Page 105: ...lower part of the stick 2 Remove the tie wraps 3 Remove the bolt from the lower part of the stick 4 Remove the stick 5 Assemble the control stick in the opposite sequence 6 Make sure that there is no play between the control stick and the stick base on the torque tube No Quantity Component P N 1 1 Rear stick XA42 2790 105 2 5 Screw AN4 20A 3 7 Washer AN960 416 4 5 Nut MS21044 N4 Figure 27 2 Rear s...

Page 106: ...nnect the elevator control rod Refer to Figure 27 3 detail D 4 Disconnect the aileron control rods Refer to Figure 27 3 detail C 5 Remove the front seat rib spacer bar refer to chapter 25 10 02 6 Remove the four M8x100 DIN 7991 bolts from the front and rear bearing blocks Refer to Figure 27 3 details A and D 7 Disassemble the bearing blocks 8 Remove the torque tube Assemble the torque tube in the ...

Page 107: ... 4 Self locking nut DIN985 M8 10 1 Washer AN960 616 11 1 Inner racer LR 50x55x20 5 13 4 Washer AN960 10 14 4 Nut MS21044N3 15 2 Elevator stop XA42 2790 255 16 4 Countersunk machine srew MS24693S274 17 2 Hexagon head srew AN4 11 18 4 Washer AN960 416 19 2 Castle nut AN310 4 20 2 Cotter pin DIN94 2x12 21 1 Drawn cup LR 50x55x20 5 22 2 Aileron rod inboard XA42 2710 109 23 1 Elevator rod FWD XA42 2730...

Page 108: ...Maintenance Manual XA41 XA42 AMM XA42 0040 001 C 00 Page 6 Page date Chapter 27 25 09 2018 Figure 27 3 Torque tube installation ...

Page 109: ...bolt connection which connects the rod ends to other parts Refer to the applicable section in chapter 27 for details 3 Remove the control rods Install the control rods in the opposite sequence To measure the length L of the control rods refer to Figure 27 4 For the lengths of the control rods refer to Table 27 2 Figure 27 4 Length L of the control rods Figure 27 5 Overview control rods 1 4 5 5 2 6...

Page 110: ... connects the applicable rod end to other parts Refer to the applicable section in chapter 27 for details 3 Loosen the counter nut 4 Turn the rod end until you get the correct length 5 Measure the maximum adjustment length L of the rod ends refer to Figure 27 6 Make sure that a length equal to a minimum of 1 5 times of the diameter of the screw is in the thread Make sure that the control system co...

Page 111: ...Maintenance Manual XA41 XA42 AMM XA42 0040 001 C 00 Page date Page 9 25 09 2018 Chapter 27 10 Install the access panels Figure 27 6 Maximum adjustment length ...

Page 112: ... bell cranks are sealed ball bearings Each aileron is attached to five hinge points with one metal rod To prevent flutter each aileron has a balancing mass in its leading edge To decrease the pilot s control forces the ailerons have spades The spade arms are connected to the center hinge ribs of the ailerons Travel stops on the fuselage structure near the torque tube keep the aileron travel in the...

Page 113: ...tral hinge point of the ailerons with two bolt connections The spades are attached to the spade arms with three screw connections To remove the spades and or the spade arm 1 Remove the two bolts from the top of the spade arm Refer to Figure 27 8 detail X 2 Remove the three screws from the spade mounting plate Refer to Figure 27 8 detail Y 3 Install the spades in the opposite sequence 4 Do a test f...

Page 114: ...5760 193 3 1 Spade plate XA42 5760 196 opt 632 cm spade plate XA42 5760 197 opt 585 cm undersized spade plate XA42 5760 198 4 2 Screw AN4 14A 5 2 Washer AN960 416L 6 2 Nut MS21083N4 7 opt Spade arm shim plate 1 5 mm aft XA42 5760 401 opt Spade arm shim plate 1 5 mm front XA42 5760 402 opt Washer AN960 10 8 3 Screw AN526 1032R12 Figure 27 8 LH Spade arm assembly and installation ...

Page 115: ...to Figure 27 9 detail B 3 Remove the wing Refer to chapter 57 10 00 4 Remove the screws that connect the bellcrank to the fuselage Refer to Figure 27 9 detail A 5 Install the bellcrank in the opposite sequence Replace the split pins and the stop nuts 6 Safety the bolts and screws threads with locking varnish No Quantity Component P N 1 2 Mounting bracked aileron idler XA42 2710 101 2 1 Aileron bel...

Page 116: ...Maintenance Manual XA41 XA42 AMM XA42 0040 001 C 00 Page 14 Page date Chapter 27 25 09 2018 Figure 27 9 Fuselage bellcrank installation ...

Page 117: ...e 15 25 09 2018 Chapter 27 27 10 03 Wing bellcrank The Aileron bellcrank wing is installed on the third wing end rib It connects the aileron rod CFRP and the aileron rod outboard See Figure 27 10 for details on the connection Figure 27 10 Wing bellcrank installation ...

Page 118: ... AN960 416 8 3 Nut AN310 4 9 3 Cotter pin DIN 94 2x12 10 4 Washer AN960 10 11 4 Nut MS21044N3 12 2 Screw AN4 10 13 2 Washer AN960 416L 27 10 04 Aileron outboard rod The aileron rod outboard is installed between the wing bellcrank and the aileron actuation horn The connection of the rod to the aileron is shown in Figure 27 11 No Quantity Component P N 1 1 Aileron rod outboard XA42 2710 119 2 1 Scre...

Page 119: ...rol system are attached to the fulcrum lever For maintenance of the fulcrum lever remove the rudder The rudder is attached to three hinge points of the vertical tail The fulcrum lever and the related control cables connection to the rudder are at the bottom hinge point To prevent flutter each rudder has a balancing mass in the rudder horn Figure 27 12 Rudder control system Safety the connections 4...

Page 120: ...7 20 02 under To install a set of assembled control cables 6 Assemble the aircraft in the opposite sequence To adjust the deflection of the rudder The deflection of the rudder is set to a constant angle It is not possible to adjust it 1 Make sure that the deflection tolerances agree with Table 27 1 2 If the deflection is too large and or the rudder does not touch the stops replace the stops at the...

Page 121: ...e sure that the pedals move freely from stop to stop Figure 27 15 Front right rudder pedal XA42 To remove the rear rudder pedals 1 Disconnect the top connection of the brake cylinder from the pedal 2 Remove the AN23 18A screw connection that safeties the hinge bolt Refer Figure 27 16 pos 1 3 Remove the hinge bolt 4 Remove the pedal 5 Assemble the rear rudder pedals in the opposite sequence with a ...

Page 122: ...lit pin from the bolted connection of the master brake cylinder Remove the nuts Remove the two 2 AN4 7A bolts Disconnect the master brake cylinder 2 Remove the connection of the length adjustment rod to the pedal cart as follows Remove the split pin Remove the nuts Remove the AN4 7A bolt Refer to Figure 27 19 3 Remove the nuts from the four rollers 4 Remove the four rollers 5 Remove the connection...

Page 123: ...ckwise direction The eccentric roller is torqued correctly when there is no play and when the cart can roll without friction with all rollers rotating Wrong adjustment of the eccentric rollers can lead to excessive wear of the rollers 12 Adjust the eccentric rollers as necessary to prevent play between the rollers and the rail and to allow free movement Torque the nuts to 20 Nm 14 75 ft lbs 13 Saf...

Page 124: ...Maintenance Manual XA41 XA42 AMM XA42 0040 001 C 00 Page 22 Page date Chapter 27 25 09 2018 Figure 27 19 Connection bolt AN4 7A of the length adjustment rod to the pedal cart ...

Page 125: ...e connecting bolts 3 Pull the control cable out of its position To install a set of assembled control cables 1 Start the installation on one side in this example the left side Start with the aft control cable XA42 2720 255 at the fulcrum lever 2 Turn the rod end XA42 2720 265 15mm onto the threaded rod from one side of the control cable Lock it in position with an AN 315 4 counter nut 3 Install th...

Page 126: ... on the lever refer to Figure 27 21 Figure 27 21 Left control cables installation to the fuselage side wall lever 9 Do the installation steps 2 to 8 for the middle control cable XA42 2720 253 Install the cable first on the lever in the side wall of the rear cockpit refer to Figure 27 21 Then install the cable with the lever on the front pedal refer to Figure 27 22 10 To adjust the correct length o...

Page 127: ...ension of 110 N 25 lb 10 to the cable system Use the left aft control cable to measure the tension 14 Move the rudder control system from stop to stop Make sure that it only touches the stops at the fulcrum lever and no other parts 15 Check minimum thread engagement in rod ends and turnbuckles Figure 27 22 Left control cables installation to the front rudder pedal AN4 10A AN960 416L AN310 4 DIN 94...

Page 128: ...er 55 20 00 To adjust the neutral position and or the deflection of the elevator 1 Examine the control rods bell crank levers and hinges for wear and other damage 2 Measure the length of the control rods and adjust them if necessary Refer to Table 27 2 3 Make the aircraft level refer to chapter 08 10 00 4 Hold the control stick in the neutral position 5 Make sure that the elevator leading edge ali...

Page 129: ...the horizontal tail and the trim tab drive See Figure 27 23 detail H and P 4 Disconnect the trim tab drive electrically 5 Remove the trim tab drive See Figure 27 23 detail P The trim tab LED position indicator and the actuator switch are located in the left side panel in the rear cockpit Refer to chapter 39 30 00 No Quantity Component P N 1 1 Trim rod assy XA42 2750 105 2 1 Trim bell crank XA42 27...

Page 130: ...Maintenance Manual XA41 XA42 AMM XA42 0040 001 C 00 Page 28 Page date Chapter 27 25 09 2018 Figure 27 23 Trim control installation Detail L from S N 08 and S N 144 on or after performing SB 2016 006 ...

Page 131: ...ntrol rod CFRP 4 Remove the hinge bolt between the bellcrank and the seat frames 5 Reassemble in reverse order No Quantity Component P N 1 1 Elevator bellcrank XA42 2730 100 2 1 Elevator control rod CFRP XA42 2730 101 3 1 Elevator control rod FWD XA42 2730 103 4 1 Spacer elevator bellcrank XA42 2730 220 5 2 Bearing MS27640 5 6 1 Hexagon head bolt AN5 53A 7 1 Flat washer AN960 516 8 1 Lock nut MS21...

Page 132: ...e connection of the elevator control rod CFRP to the elevator refer to Figure 27 25 No Quantity Component P N 1 1 Elevator control rod CFRP XA42 2730 101 2 1 Elevator XA42 5520 051 3 1 Screw AN4 13 4 2 Washer DIN 9021 6 4 M6 5 1 Nut AN310 4 6 1 Cutter pin DIN 94 2x12 Figure 27 25 Elevator control rod CFRP installation on the Elevator ...

Page 133: ...8 3 28 10 01 Acro Tank 28 3 28 10 02 Flop Tube 28 4 28 10 03 Wing Tanks 28 6 28 10 04 Ventilation Lines 28 6 28 20 00 DISTRIBUTION 28 7 28 20 01 Fuel Selector Valve and Fuel Selector Switch 28 7 28 20 02 Fuel Lines 28 10 28 20 03 Fuel Filter 28 10 28 20 04 Auxiliary Boost Pump 28 11 28 40 00 INDICATING 28 12 28 40 01 Fuel Quantity Indicator 28 12 28 40 02 Fuel Quantity Sensors 28 12 ...

Page 134: ... by the engine The acro tank is used for aerobatic flight take off and landing The wing tanks are used only for utility flight Figure 28 1 Overview Fuel system The fuel tanks capacities refer to chapter 12 10 08 are Total fuel capacity 277 L 73 2 US gal Wing tanks 2x 10⁵ L 2x 27 7 US gal Acro tank 67 L 17 7 US gal Usable fuel capacity Total 266 L 70 3 US gal Usable fuel capacity Acro 57 L 15 1 US ...

Page 135: ...he acro tank is installed in the forward center fuselage It is attached with two bolts on each side to the side walls of the fuselage tank compartment Shims might be installed between the tank attachments and the tank walls The support structure around the acro tank holds it in position The tank filler neck is connected to a bonding cable A tank drain valve is accessible from the bottom of the fus...

Page 136: ...gure 28 2 8 Remove the acro tank 9 Assemble the acro tank in the opposite sequence Apply RTV 106 sealant MIL A 46106 on the rear side of the metal sheet of fire wall No Quantity Component P N 1 4 Bolt AN6 7A 2 8 Washer AN960 616 3 Optional 1 or 0 5 mm Shim XA42 2810 301 302 4 4 Nut MS21042 6 Figure 28 2 Installation Acro tank 28 10 02 Flop Tube The flop tube continuously supplies fuel during all f...

Page 137: ...Make sure that there is a good airflow in the work area and that safety equipment is available If you do not obey these precautions accidents can occur 7 Before you assemble the flop tube again examine the seal for damage Replace the seal if necessary Clean the sealing surfaces mechanically with acetone 9 Examine the flop tube for wear and damage Replace the flop tube assembly if necessary 10 Asse...

Page 138: ...ine from the tank side of the inspection panel This is not applicable for aircraft with serial numbers 01 thru 07 and 101 thru 133 no accomplishment of SB 2014 004 8 Remove the inspection panel Be careful with flammable cleaning agents such as acetone Make sure that there is a good airflow in the work area and that safety equipment is available If you do not obey these precautions accidents can oc...

Page 139: ...ated auxiliary boost pump before it goes into the engine fuel pump Figure 28 5 Overview fuel distribution 28 20 01 Fuel Selector Valve and Fuel Selector Switch The fuel selector valve is attached to a bracket on the bottom of the fuselage behind the fire wall A control rod connects the fuel selector valve to the fuel selector switch in the rear cockpit The positions of the fuel selector switch are...

Page 140: ...wer access panel from the metal sheet of the fire wall Refer to chapter 71 30 00 4 Disconnect the fuel lines from the fuel selector valve 5 Remove the attachment screws from the selector valve Refer to detail D 6 Remove the front actuation rod assembly includes the fuel selector valve to the front 7 Remove the Actuation rod union assembly from the seat frame as described above 8 Remove the actuati...

Page 141: ...Maintenance Manual XA41 XA42 AMM XA42 0040 001 C 00 Page date Page 9 25 09 2018 Chapter 28 Figure 28 7 Fuel selector mechanism assembly ...

Page 142: ...boost pump in the lower left forward fuselage compartment To remove the fuel filter 1 Set the fuel selector switch to OFF 2 Remove the lower left forward fuselage compartment cover 3 Disconnect the fuel lines from the fuel filter Drain the fuel into an applicable container 4 Remove spilled fuel immediately Figure 28 8 Filter housing left and filter element right To replace the fuel filter element ...

Page 143: ... counter nut on the setting screw Refer to Figure 28 9 2 Screw the setting screw all the way in without applying torque 3 Loosen the setting screw by 270 4 Fix the setting screw in that position by torqueing the counter nut To remove the auxiliary boost pump 1 Set the fuel selector switch to OFF 2 Remove the lower left forward fuselage compartment cover 3 Disconnect the electric cables 4 Disconnec...

Page 144: ... quantity sensor for each tank 1 Make the aircraft level refer to chapter 08 10 00 2 Fully remove all fuel from the fuel tanks 3 Make the wing level Use shims or change the tyre pressure on each side 4 Set the engine monitoring system MVP 50 to ON 5 Push the MENU button on the MVP 50 6 Select the System Configuration Screens Menu 7 Enter the Level 1 password 200 8 On the system configuration scree...

Page 145: ...Use Current Count for 11 1 US Gallons to Yes 18 Fill 14 liters 3 7 US Gallons of fuel into the acro tank 19 Set the Use Current Count for 14 8 US Gallons to Yes Calibration of the Wing Tanks Calibrate the two wing tanks at the same time Each wing tank must have the same quantity of fuel during the calibration process to keep the wings level If you calibrate only one wing tank incorrect fuel quanti...

Page 146: ...ance Manual XA41 XA42 AMM XA42 0040 001 C 00 Page 14 Page date Chapter 28 25 09 2018 29 Set the Use Current Count for 27 5 US Gallons to Yes for each wing 30 Push EXIT some times to go back to the main screen ...

Page 147: ... 32 Chapter 32 Landing Gear Table of Contents Chapter Title Page 32 00 00 GENERAL 32 2 32 10 00 MAIN LANDING GEAR 32 2 32 20 00 TAIL GEAR 32 4 32 40 00 WHEELS AND BRAKES 32 10 32 40 01 Wheels 32 10 32 40 02 Brakes 32 17 32 50 00 MAIN LANDING GEAR FAIRINGS 32 21 32 60 00 BRAKE SYSTEM 32 22 ...

Page 148: ...2 3210 151 2 2 MLG bushing XA42 3210 212 3 2 Bolt XA42 3210 230 4 2 Washer DIN 125 10 5 M10 5 Safty wire MS20995 Diameter 032 Figure 32 1 Installation of the main landing gear To remove the main landing gear gear struts of the main landing gear 1 Remove the cowling refer to chapters 71 10 01 and 71 10 02 2 Lift the front of the aircraft refer to chapter 07 20 01 3 Remove the wheel pants refer to c...

Page 149: ...the gear strut out together with the gear fairing If you cannot remove the leg easily turn the wheel around the yaw axis 9 If necessary remove the fairing and the brake lines from the leg Refer to chapter 32 50 00 10 Assemble the main gear main gear struts in the opposite sequence 11 Install a new safety wire If the brake line was removed attach it to the leg with tie wraps Torque the bolt on the ...

Page 150: ...of the stick travel The lock is connected to the control stick with a Bowden cable This cable goes from the elevator idler behind the pilot s seat to the locking mechanism that is attached to the tail wheel spring Figure 32 2 Tail gear and fuselage assembly No Quantity Component P N 1 1 Tail wheel fork XA42 3260 110 2 1 Tail gear Swing arm XA42 3230 113 3 1 Tail gear mounting bracket XA42 3220 109...

Page 151: ...Maintenance Manual XA41 XA42 AMM XA42 0040 001 C 00 Page date Page 5 25 09 2018 Chapter 32 Figure 32 3 Tail gear strut assembly 243 ...

Page 152: ...ar strut assembly in the opposite sequence 7 Make sure that the tail wheel lock operates and that it is correctly adjusted No Quantity Component P N 1 1 Tail gear strut assembly XA42 3260 051 2 1 Spring bracket XA42 3260 130 3 1 Lock XA42 3260 120 5 2 Spring fitting XA42 3260 217 6 1 Bowden cable holder XA42 3260 216 7 2 Tail wheel lock bushing XA42 3260 305 8 1 Clamping piece XA42 6110 201 10 1 C...

Page 153: ...hen the tail wheel lock is disengaged To remove the control assembly of the tail wheel lock Refer to Figure 32 6 1 Remove the rear seat 2 Remove the TWL spring Pos 8 the TWL spring retainer Pos 9 and the Bowden cable Refer to detail L and H 3 Remove the TWL slider bushing Pos 7 and the TWL slotted link Pos 6 4 Remove two TWL idler bushings Pos 5 from the elevator bell crank Refer to chapter 27 30 ...

Page 154: ...el lock idler bushing XA42 3261 206 6 1 Tail wheel lock slotted link XA42 3261 204 7 1 Tail wheeel lock slider bushing XA42 3261 205 8 1 Tail wheel lock spring XA42 3261 207 9 1 Tail wheel lock spring retainer XA42 3261 203 10 1 Bowden cable holder XA42 3260 216 11 2 Hexagon head bolt AN3 3A 12 3 Flat washer AN960 10 13 2 Lock nut MS21044N3 14 2 Nut DIN934 M6 15 5 Flat washer AN960 10L 16 2 Castle...

Page 155: ...e elevator leading edge 90mm and temporarily lock it in this position Refer to Figure 32 7 3 Put the forward end of the Bowden inner cable into the TWL clamp Figure 32 6 Pos 2 Attach it with the screw Figure 32 6 Pos 3 Safety the screw with safety wire 4 Install the TWL clamp Figure 32 6 Pos 2 from the left side in the 6 mm hole of the TWL slotted link Figure 32 6 Pos 6 Use a castle nut AN310 03 F...

Page 156: ...e wheels and the brakes for the maintenance personnel It includes inspections removal servicing refinishing and installation 32 40 01 Wheels Main wheels Beringer 5 00 5 wheels with 5 00 5 10ply tires To disassemble the main wheel assembly from the main wheel strut of the main landing gear 1 Remove the main landing gear strut refer to chapter 32 10 00 2 Remove the axle split pin and the axle nut fr...

Page 157: ...pport RH XA42 3210 168 4 2 Wheel assembly RF 018 A 5 2 Brake assembly HE2 for DOT4 6A 002 2N A 6 2 Tire 5 00 5 10PLY Michelin Aviator TL PAA02 7 2 Main wheel axle FUS 009 1 8 2 Axle nut ECR 002 B 9 4 Washer HYD 005P 10 2 Banjo fitting HYD 019VC 11 2 Banjo bolt HYD 003P 12 6 Screw AN4H 12A 13 8 Washer AN960 416 L 14 2 Screw AN4H 7A 15 Safty wire MS20995 Diameter 032 Figure 32 8 Beringer main wheel ...

Page 158: ...e pressure is fully released If you do not obey this instruction there is a risk of injury Be careful when you remove the wheel Scratches and or nicks will cause damage to the corrosion resistant protection of the wheel 1 To deflate the tire push the valve stem plunger until all the air is fully released 2 Put the wheel assembly on an applicable work surface Be careful when you remove the tire bea...

Page 159: ... dye penetrant inspection You can remove small nicks scratches and pits with 400 grit sandpaper and polish the surface Then paint the wheel half and or apply corrosion preventive compound to prevent corrosion Be careful when you dry the bearings with compressed air The bearings must not turn to prevent damage 3 Clean the wheel bearings in an applicable solvent Dry them with compressed air 4 Examin...

Page 160: ...ion from the non braking part of the disc Then paint the non braking part and or apply corrosion preventive compound to prevent corrosion To assemble the wheel Assemble the wheel carefully Do not cause damage to the protective finish of the wheel 1 Assemble the wheel on a clean flat surface 2 Install the bearing races again if applicable a Clean the race bore of the wheel bearing Apply a thin coat...

Page 161: ...il it has the shape of the tire Release pressure from the tire Stop to release the pressure when the tire starts to change its shape c Put the tire and the tube onto the outer wheel half Carefully put the valve stem through the hole in the wheel half d Install the inner wheel half into the tire Make sure that the tie bolt holes are aligned and that the tire is not between the two halves e Put the ...

Page 162: ...e axle Turn the wheel carefully to prevent damage to the valve stem 4 Turn the wheel slowly and tighten the axle nut lightly at the same time Continue to tighten until you feel a stop 5 Loosen the axle nut sufficiently to make sure that the wheel turns freely or only with small friction 6 Align the axle nut to the nearest split pin hole in the axle If you must turn the nut to align it first try to...

Page 163: ...e torque plate for corrosion cracks and loose bolts that attach the torque plate to the axle 4 Make sure that there is no brake fluid on the brake linings Replace the brake linings if there is brake fluid 5 Examine the brake linings and the brake line fittings for signs of damage or leakage Replace the linings that are worn to less than 0 100 2 5mm thickness Removal and inspection of brake linings...

Page 164: ...ximum of three cracks is permitted Only two cracks are permitted in each 90 degree segment 4 Make sure that the pads are tightly attached to the back plate and the press plate Installation of the back plate and press plate assemblies 1 Remove dirt grease and other unwanted material from the brake cylinder and the piston Push the piston back into the cylinder 2 Clean the torque pins Do not use grea...

Page 165: ...e system Collect the released fluid and discard it correctly 2 Disconnect the brake line from the brake caliper Put a cap on the brake line to prevent contamination 3 Remove the back plate Be careful when you remove the piston to prevent injury and damage Use compressed air only with low pressure to make sure that the piston will not eject at high speed 4 Remove the piston from the caliper body Su...

Page 166: ...embly and installation of the brake caliper assembly 1 Clean the brake parts in solvent Do not clean the O rings and the brake linings Dry the cleaned parts with air Be careful with the hydraulic fluid to prevent injury and damage to equipment Do not get in on your skin Remove hydraulic fluid immediately from the skin and from the equipment 2 Apply aircraft hydraulic fluid Dow 55M O ring lubricant...

Page 167: ...emove the cowling Refer to chapter 71 10 00 2 Shore the front of the aircraft Refer to chapter 07 20 01 3 Remove the landing gear Refer to chapter 32 10 00 4 Remove both leg fairing parts together or separate them by removing the screw that connects them Pos 9 5 Assemble the leg fairings in the opposite sequence No Quantity Component P N Note 1 1 Wheel Pant LH XA42 3250 151 2 1 Wheel Pant RH XA42 ...

Page 168: ... installed on the front rudder pedals refer to Figure 32 13 Rear master brake cylinders XA42 3280 232 are installed on the rear rudder pedals refer to Figure 32 14 The brake fluid reservoir XA42 3280 233 is installed on the rear rudder pedals refer to Figure 32 14 The master brake cylinder installed in the rear rudder pedals for aircraft with serial numbers 01 thru 06 and 101 thru 120 which did no...

Page 169: ...Maintenance Manual XA41 XA42 AMM XA42 0040 001 C 00 Page date Page 23 25 09 2018 Chapter 32 Figure 32 13 Front brake cylinder LH ...

Page 170: ...Maintenance Manual XA41 XA42 AMM XA42 0040 001 C 00 Page 24 Page date Chapter 32 25 09 2018 Figure 32 14 Rear brake cylinder RH ...

Page 171: ...Maintenance Manual XA41 XA42 AMM XA42 0040 001 C 00 Page date Page 1 25 09 2018 Chapter 33 Chapter 33 Lights Table of Contents Chapter Title Page 33 40 00 ANTI COLLISION LIGHTS ACL 33 2 ...

Page 172: ...aft has strobe ACL lights on each wingtip Each light strip is attached to the wingtip structure with two M3 DIN 7991 screws When you assemble the strobe lights seal the connection with silicone The switch for the anti collision light ACL is on the right side panel of the rear cockpit For wiring refer to the wiring diagram in chapter 91 ...

Page 173: ...tatic System Table of Contents Chapter Title Page 34 00 00 GENERAL 34 2 34 10 00 FLIGHT ENVIRONMENT DATA 34 2 34 10 01 Pitot Static System 34 2 34 10 02 Altimeter 34 3 34 10 03 Airspeed Indicator 34 3 34 20 00 DIRECTION 34 3 34 20 01 Magnetic Compass 34 3 34 50 00 DEPENDENT POSITION DETERMINING 34 4 34 50 01 Transponder 34 4 ...

Page 174: ...rough the wing to the fuselage and to the instrument panels The total pressure hoses are identified with a red tape If it is necessary to remove the wing you can disconnect the pressure hoses from the wing root The static pressure goes into two static ports one on each side of the rear fuselage The two ports are connected to one flexible hose that transmits the static pressure to the instrument pa...

Page 175: ...safety the connection of the hose to the instrument adapter 5 Do a check refer to 14CFR Part 43 Appendix E or an equivalent 34 10 03 Airspeed Indicator The airspeed indicator measures the speed of the aircraft in relation to the atmosphere The instrument uses the pitot and static pressure to calculate the airspeed Maximum operating altitude 12 000 m or 39 370 ft Calibrated range 30 thru 240 kts 34...

Page 176: ...ING 34 50 01 Transponder The standard transponder is the TRT800H OLED It has the standard A C modes of operation and the Mode S support with an extended squitter function The transponder antenna is located left under the fuselage It is forward of the spar at the wing fuselage intersection See chapter 91 for the wiring diagrams ...

Page 177: ... Parts Table of Contents Chapter Title Page 39 00 00 GENERAL 39 2 39 10 00 INSTRUMENT AND CONTROL PANELS 39 2 39 10 01 XA41 Instrument Panel 39 3 39 10 02 XA42 Rear Instrument Panel 39 4 39 10 03 XA42 Front Instrument Panel 39 5 39 20 00 ELECTRICAL SWITCH PANEL 39 6 39 30 00 THROTTLE AND TRIM CONTROL 39 7 39 50 00 CIRCUIT BREAKER PANEL 39 9 ...

Page 178: ...ached to the structure with screws and click bonds In the XA42 the cover of the rear instrument panel is part of the front seat 39 10 00 INSTRUMENT AND CONTROL PANELS To remove an instrument panel 1 Remove the screws around the panel 2 Remove the panel 3 Disconnect the instruments refer to chapters 34 10 02 34 10 03 and 34 20 01 4 Assemble the instrument panel in the opposite sequence ...

Page 179: ...tic Direction Indicator 12 Circuit breaker panel 3 Altimeter 13 Electric switch panel 4 Timer 14 Propeller control 5 GPS 15 Mixture control 6 G Meter 16 Throttle lever with smoke switch 17 Fuel selector switch 18 Com 19 XPDR Transponder 20 ELT Remote control MVP 50P has these functions Fuel pressure Ampere Voltmeter EGT CHT Scanner Fuel capacity Tachometer Oil temperature Oil pressure Manifold pre...

Page 180: ...HT Scanner Triple fuel capacity gauge Tachometer Oil T P Dual Gauge Manifold pressure Clock G Meter Structure temperature monitoring 1 Airspeed indicator 11 Instrument panel 2 Magnetic Heading Indicator 12 Circuit breaker panel 3 Altimeter 13 Electric switch panel 4 GPS 14 Propeller control 5 Timer 15 Mixture control 6 G Meter 16 Throttle lever with smoke switch 7 ELT Remote control 17 Fuel select...

Page 181: ...anel If other options are installed the layout of the instrument panel can be different Refer to the figure below for the location of each equipment item of the front instrument panel 1 Airspeed indicator refer to chapter 34 10 03 2 Altimeter refer to chapter 34 10 02 3 G Meter Figure 39 3 XA42 Front instrument panel 1 2 3 ...

Page 182: ...ndustriestraße 2 8 D 90518 Altdorf Avionic Master switch Part No 3130 F110 P7T1 W12QY2 20A Manufacturer Supplier E T A Elektrotechnische Apparate GmbH Industriestraße 2 8 D 90518 Altdorf Anti collision light Part No 3130 F110 P7T1 W12QY2 5A switch Manufacturer Supplier E T A Elektrotechnische Apparate GmbH Industriestraße 2 8 D 90518 Altdorf Smoke switch Part No 3130 F110 P7T1 W12QY2 8A Manufactur...

Page 183: ...dle 3 Remove the bolt that connects the throttle handle to the control rod 4 Remove the throttle handle 5 Remove the screws from the panel 6 Lift the panel 7 Disconnect all wiring refer to chapter 91 10 00 Cut the safety wire 8 Remove the panel 9 Assemble the panel in the opposite sequence Safety the cable shoes with wire 10 Do a functional check of all controls To remove the trim switch after rem...

Page 184: ...g refer to chapter 91 10 00 4 Remove the panel 5 Reassemble in reverse order Secure the cables as required with tie wraps To remove the trim switch after removal of the panel 1 Loosen and remove the nut on the bottom side of the panel 2 Remove the trim switch 3 Reassemble in reverse order Perform a functional check of the trim control To remove the LED scale after removal of the panel 1 Remove the...

Page 185: ...rlands Part No 7274 2 MS26574 Volt Regulator 2A Field 5A Starter 5A Trim 3A EMS 5A Fuel Sensor 1A GPS 3A COM 5A XPDR 3A will change depending on installed equipment To remove the circuit breaker panel 1 Remove the screws around the circuit breaker panel 2 Lift the circuit breaker panel 3 Disconnect all wiring refer to chapter 91 10 00 Cut the wires that safety the cable shoes 4 Remove the circuit ...

Page 186: ...Maintenance Manual XA41 XA42 AMM XA42 0040 001 C 00 Page 10 Page date Chapter 39 25 09 2018 Left blank intentionally ...

Page 187: ... Paint 51 6 51 30 06 Agents and Sealers 51 8 51 30 07 Exterior Foil 51 9 51 60 00 CONTROL SURFACE BALANCING 51 10 51 60 01 Weighing and Calculation of the Control Surface Moments 51 10 51 70 00 REPAIRS 51 11 51 70 10 Repairs of Reinforced Glass and Carbon Fiber Parts 51 11 51 70 11 Damage inspection 51 11 51 70 12 Damage description 51 12 51 70 13 Repair guidelines 51 12 51 70 15 Painting of Compo...

Page 188: ...omposite and metal parts of the XA41 and the XA42 Suppliers are also included 51 30 01 Composite Parts Use only approved materials to repair composite parts If you do not obey this precaution accidents can occur Epoxy resin Epoxy system Manufacturer Hexion Resin Epikote Resin L20 Hardener Epikure Curing Agent 960 Component weight ratio 100 parts L20 34 parts EPH 960 Carbon fiber fabrics Manufactur...

Page 189: ... Kasinostraße 19 21 D 42103 Wuppertal Germany Type Tenax HTS40 F13 24k 1600 tex WLB 8 3614 1 WLB Werkstoff Leistungsblatt refer to German standard DIN WL Glass fiber fabrics Manufacturer Porcher Industries Germany GmbH Style WLB No LN 9169 US style Weavepatterns Mass per unit area g m 90070 8 4505 60 1610 plain 80 92110 8 4548 60 twill 2 2 163 92125 8 4551 60 twill 2 2 280 All glass fabric is made...

Page 190: ...ny Type Cotton Flakes Manufacturer Supplier Omega Mineral Germany GmbH Rugenbarg 63a D 22848 Norderstedt Germany Type Microballoons 51 30 02 Steel Parts Use only approved materials to repair steel parts If you do not obey this precaution accidents can occur Steel tubing Supplier CP Tech GmbH Zeppelinring 1 6 D 33142 Büren Germany Type WLB 1 7734 5 Steel sheet metal Manufacturer Supplier Böhler Udd...

Page 191: ...1354 T4 or 2024 T4 WLB 3 1364 T3511 or 2024 T3 WLB 3 3214 T4 or 6061 T4 SS Aluminum bronze Manufacturer Supplier CARO PROMETA Metallvertriebs GmbH Wilhelm Maisel Straße20a D 90530 Wendelstein Germany Type 2 1052 2 0331 51 30 04 Titanium Parts Use only approved materials to repair titanium parts If you do not obey this precaution accidents can occur Titanium sheet Supplier Enpar Sonderwerkstoffe Gm...

Page 192: ...rer Spies Hecker Supplier Spies Hecker An der Wuhne 4 D 39326 Hermsdorf Germany Type Basefiller 3508 Hardener 9520 Thinner 3385 Type HS Premium filler 5310 Hardener 3315 3310 Thinner 3385 Exterior Manufacturer Nexa Autocolor Supplier Nexa Autocolor Düsseldorferstrasse 80 D 40721 Hilden Germany Type Aquabase Plus base coat P99 xxx Thinner P980 5000 Type clearcoat HS Clearcoat P190 6690 Hardener P21...

Page 193: ...Düsseldorferstrasse 80 D 40721 Hilden Germany Type HS Topcoat P47 xxx Hardener P210 82 xxx Thinner P852 189x Type 2K EHS Topcoat P498 Hardener P210 877 Thinner P852 189x Cowling fire protective paint Manufacturer PPG Aerospace Supplier PRC Desoto International 24811 Ave Rockefeller Valencia CA 91355 USA Type Paint N56582 T508 Manufacturer Indestructible Paint Ltd Supplier Indestructible Paint Ltd ...

Page 194: ... B2 NA Wing Tank bonding area Firewall Sealer Manufacturer Momentive Supplier Interturbine Aviation Logistics GmbH Kisdorfer Weg 36 D 24568 Kaltenkirchen Germany Type RTV 106 MIL A 46106B Bonding Agents Manufacturer Huntsman Corporation Supplier Filzring OHG Werrastraße 3 4 D 37242 Bad Sooden Allendorf Germany Type Araldite 2011 AW 106 Harz HV 953 U Härter Supplier Filzring OHG Werrastraße 3 4 D 3...

Page 195: ...ch as control surfaces and the canopy Recesses of parts that you can remove such as inspection covers and cowlings Spinner and propeller Minimum properties of the foil Maximum foil thickness 0 08mm Temperature range 50 C thru 100 C Resistant to water oil and fuel Adhesive material Permanent solvent polyacrylate Self extinguishing material refer to DIN 75200 or an equivalent Exterior Foil Manufactu...

Page 196: ...face mass and moment To calculate the mass at the specified arm and the control surface moments 1 Remove the control surface refer to chapter 27 2 Install the hinge pin 3 Put the hinge pin onto two mandrels one on each side of the control surface The mandrels must not touch the control surface For the Flettner tab use a string to hold the hinge pin of the tab 4 Calculate the balance mass at the sp...

Page 197: ...ed part Aspects such as reparability costs time weight aerodynamic shape and finish will also have an effect on the decision 3 Do the repair as given in the repair instructions from the design organization Refer to chapter 51 70 13 and obey the repair guidelines 4 If necessary prepare the surface and paint the repaired area refer to chapter 51 70 15 51 70 11 Damage inspection Always do a damage in...

Page 198: ...ir process get the aid of the design organization 2 Remove some damaged layers around the damage area without spreading too much in the width 3 Examine the area to know the depth of the damage and the number of damaged layers 4 Send the damage description to the design organization If applicable include it in an occurrence report 51 70 13 Repair guidelines Be careful with resin Do not get it on yo...

Page 199: ...for the repair area Before you do the repair make sure that dirt and dust is fully removed from the repair area Dirt and dust can cause bad bonding 4 Sand the repair area Remove the dust with a vacuum cleaner Make sure that fiber layers have the correct orientation the correct number of layers and the correct layup sequence This is necessary to get the correct stability and strength of the part 5 ...

Page 200: ...urface rough To finish the surface use grade 150 or higher 4 Remove dust and unwanted materials from the surface of the repair area 5 Apply filler refer to chapter 51 30 05 6 Make sure that the filler is fully dry Then prepare the surface with wet sand paper grade 400 7 Clean the surface 8 Apply paint as given in the manufacturer indications Refer to chapter 51 30 05 9 Polish the painted surface 1...

Page 201: ...etal parts put them fully in a clean degreasing solution We recommend that you use an alkaline based solution for aluminum parts 2 Remove hard dirt or grease with a soft bristle brush or soak the part in a cleaning solution 3 Clean bearing cones carefully in a different container with clean solvent Do not use compressed air to dry the bearing cones If they turn too quickly damage can occur 4 When ...

Page 202: ...t from the parts Remove all fittings O rings nuts bolts washers pistons bearing cups and other items to prevent damage 1 Remove grease from all parts as given in the procedure Removal of grease Make sure that the parts are fully soaked with solvent to prevent corrosion 2 Fully soak the part in paint removing solvent 3 Remove the part from the solvent and flush it fully with hot water 75 C 170 F Re...

Page 203: ...Maintenance Manual XA41 XA42 AMM XA42 0040 001 C 00 Page date Page 1 25 09 2018 Chapter 52 Chapter 52 Canopy Table of Contents Chapter Title Page 52 00 00 GENERAL 52 2 ...

Page 204: ...ap from the fuselage side stringer Refer to Figure 52 1 section A A While you disconnect the canopy hinge bolts hold the canopy safely to prevent damage 3 Remove the screws from each of the three canopy hinge bolts 4 Remove the canopy hinge bolts On the XA42 Pull the front and center bolts aft Pull the rear bolt forward Refer to Figure 52 1 detail X and Y 5 Remove the canopy 6 Assemble the canopy ...

Page 205: ... 002 2 3 Canopy hinge pin XA42 5230 150 3 1 Countersunk washer A3235 028 193 4 1 Screw MS24693S274 5 3 Retainer plate XA42 5230 250 6 3 Screw AN526 10R10 7 Shim washer canopy 1 0 XA42 5230 255 Shim washer canopy 1 2 XA42 5230 256 Shim washer canopy 1 5 XA42 5230 257 8 1 Maintenance cover canopy XA42 5210 295 9 2 Screw MS35214 28 From S N 151 onwards Figure 52 1 Canopy installation ...

Page 206: ...Maintenance Manual XA41 XA42 AMM XA42 0040 001 C 00 Page 4 Page date Chapter 52 25 09 2018 Left blank intentionally ...

Page 207: ...Maintenance Manual XA41 XA42 AMM XA42 0040 001 C 00 Page date Page 1 25 09 2018 Chapter 53 Chapter 53 Fuselage Table of Contents Chapter Title Page 53 00 00 GENERAL 53 2 ...

Page 208: ...18 53 00 00 GENERAL The fuselage of the XA41 and the XA42 is a carbon fiber honeycomb sandwich construction All composite parts have different protective layers a polyester layer an acrylic filler and an acrylic paint to prevent damage to the structure because of moisture and UV radiation ...

Page 209: ... 0040 001 C 00 Page date Page 1 25 09 2018 Chapter 55 Chapter 55 Stabilizers Table of Contents Chapter Title Page 55 00 00 GENERAL 55 2 55 10 00 HORIZONTAL STABILIZER 55 2 55 20 00 ELEVATOR 55 4 55 30 00 TRIM TAB 55 6 55 60 00 RUDDER 55 7 ...

Page 210: ... layer an acrylic filler and an acrylic paint to prevent damage to the structure because of moisture and UV radiation 55 10 00 HORIZONTAL STABILIZER To remove the horizontal stabilizer 1 Remove the rudder Refer to chapter 55 60 00 2 Remove the rear seat and the luggage compartment Refer to chapter 25 3 Remove the elevator Refer to chapter 55 20 00 4 Disconnect the elevator trim electric connector ...

Page 211: ...e horizontal stabilizer into position from the rear Make sure that the main stabilizer spar is flush with the fuselage fin rib Make sure that the alignment pins from the stabilizer are correctly engaged into the fuselage bushings The bolt thread end must not be more than 1mm above the bushing If necessary install DIN 988 22x30 shim washers on the bolt head Refer to Figure 55 3 position 3 If you do...

Page 212: ...od Refer to chapter 27 30 01 4 Disconnect the elevator rod CFRP Refer to chapter 27 30 03 5 Remove the elevator hinge pin 5mm Allen key Refer to Figure 55 5 6 Remove the elevator Figure 55 4 Slot fairing installation To install the elevator 1 Install the horizontal stabilizer Refer to chapter 55 10 00 2 Lift the elevator into position 3 Push the elevator hinge pin in Refer to Figure 55 5 4 Torque ...

Page 213: ...XA42 AMM XA42 0040 001 C 00 Page date Page 5 25 09 2018 Chapter 55 No Quantity Component P N 1 1 Elevator XA42 5520 051 2 1 Stabilizer XA42 5510 001 3 1 Control surface hinge pin XA42 5780 150 Figure 55 5 Elevator installation ...

Page 214: ...hinge pin Refer to Figure 55 6 3 Remove the trim tab 4 Assemble the trim tab in the opposite sequence 5 Safety the hinge pin with a new safety wire 6 Do these checks The trim tab must move freely from stop to stop Deflection and permitted play must agree with Table 27 1 No Quantity Component P N 1 1 Elevator XA42 5520 051 2 1 Flettner tab XA42 5530 101 3 1 Flettner hinge pin XA42 5530 202 4 Safety...

Page 215: ...2 Push the rudder hinge pin in from the top 3 Torque the hinge pin 5mm Allen key to 15Nm 11lbs ft Safety the connection with Loctite 243 4 Seal the connection with locking varnish 5 Install the AN5H 6A bolts wrench Torque the bolts 6 Safety the bolts with new 0 032 safety wire 7 Do these checks The rudder must move freely from stop to stop Deflection tolerance and permitted play must agree with th...

Page 216: ...Maintenance Manual XA41 XA42 AMM XA42 0040 001 C 00 Page 8 Page date Chapter 55 25 09 2018 Left blank intentionally ...

Page 217: ... XA41 XA42 AMM XA42 0040 001 C 00 Page date Page 1 25 09 2018 Chapter 57 Chapter 57 Wing Table of Contents Chapter Title Page 57 00 00 GENERAL 57 2 57 10 00 WING 57 2 57 60 00 AILERONS 57 7 57 70 00 SIGHTING DEVICES 57 8 ...

Page 218: ...d that goes through the spar bridge underneath the wing Refer to chapter 28 20 01 and Figure 28 7 8 Remove the lower longeron connectors Remove the 10 mm connection bolts T50 Torx wrench socket Remove the aluminum spacers from the bottom side of the aircraft refer to Figure 57 3 and Figure 57 4 9 Disconnect the aileron rod CFRP from the Aileron bellcrank fuselage Refer to chapter 27 10 02 10 Disco...

Page 219: ...the fuselage Refer to chapter 07 10 00 The front should be unloaded The main wheels should still have contact with the ground 4 Remove the wheel pants if installed refer to chapter 32 50 00 5 Refer to chapter 32 50 00 Figure 32 12 Remove the aft screws of the upper strut fairing LH and RH Pos 12 Carefully turn the landing gear strut fairing LH and RH 90 degrees down Pos 3 and 5 for the LH and Pos ...

Page 220: ... Install new safety pins 3 2 mm x 71 mm in the two main spar bolts 17 Install new safety pins 3 2 mm x 40 mm in the two rear spar bolts 18 Install aluminum longeron spacers for the lower longeron connectors and align them with the holes in the fuselage brackets 19 Install XA42 5300 210 longeron connection bolts from the rear Install four bolts for each spacer Two on the fuselage belly and two on t...

Page 221: ...all the wheel pants Refer to chapter 32 50 00 29 Install the cowling Refer to chapter 71 10 00 Figure 57 1 Dynamic pressure line fuselage LH side Figure 57 2 Connection of fuel lines fuel tank vent lines and wires Figure 57 3 Longeron connector main spar assembly Figure 57 4 Longeron connector outer view left and inner view right LH RH RH a a b b c AN526C 8R6 Aluminium longeron spacer XA42 5320 23...

Page 222: ... of the fuel selector valve in the intersection between the fuselage and the wing main spar during transportation Figure 57 8 Wiring at the leading edge of the wing root FWD Rear spar bolts XA42 5320 340 Rear spar bolt washer XA42 5320 344 or DIN 988 20x28x1 A2 or DIN 988 20x28x0 5 A2 DIN94 3 2x40 LH FWD Main spar bolts XA42 5320 250 Main spar bolts bushing XA42 5320 253 DIN94 3 2x71 LH ...

Page 223: ...must move freely from stop to stop Deflection tolerance and permitted play must agree with Table 27 1 The ailerons have spades to decrease the control forces For information on the spades refer to chapter 27 10 01 To put shim washers to the ailerons do these steps Measure the aileron play 1 Move the aileron to the inboard side 2 Measure the inboard and outboard clearance between the hinge horn of ...

Page 224: ...Aileron complett rh XA42 5760 061 4 2 Aileron hinge pin XA42 5780 150 Figure 57 10 Aileron installation 57 70 00 SIGHTING DEVICES The aircraft has sighting devices at the wing tips that you can remove The sighting devices are made of carbon fiber rods To remove the sighting devices 1 Remove the screw from the sighting device MS24694C5S 2 Remove the sighting device from the wing 3 Install the sight...

Page 225: ...Manual XA41 XA42 AMM XA42 0040 001 C 00 Page date Page 1 25 09 2018 Chapter 61 Chapter 61 Propeller Table of Contents Chapter Title Page 61 00 00 GENERAL 61 2 61 10 00 PROPELLER 61 2 61 20 00 PROPELLER CONTROL 61 2 ...

Page 226: ...ch For troubleshooting and the removal and installation instructions refer to MT Propeller ATA 61 01 24 E 124 Operation and Installation Manual Hydraulically Controlled Variable Pitch Propeller MTV 9 No other special procedures for the aircraft are applicable 61 20 00 PROPELLER CONTROL The propeller is operated with a vernier control on the left side of the rear cockpit that goes to the propeller ...

Page 227: ...plit pin 1 6 20 DIN94 Figure 61 1 Connection to the propeller governor S N 01 07 and 101 150 No Quantity Component P N 1 1 Propeller governor P 880 5 MT with XA42 6110 210 housing 2 1 Bolt AN3 11 3 1 Washer M5 DIN 9021 4 1 Rod end XA42 6110 211 5 1 Nut AN315 3 6 1 Wire grip XA42 6110 212 7 1 Bushing XA42 7620 225 8 1 Washer AN960 10 9 1 Nut AN310 3 10 1 Split pin 2x12 DIN 94 Figure 61 2 Connection...

Page 228: ...Maintenance Manual XA41 XA42 AMM XA42 0040 001 C 00 Page 4 Page date Chapter 61 25 09 2018 Left blank intentionally ...

Page 229: ... Page 1 25 09 2018 Chapter 71 Chapter 71 Power Plant Table of Contents Chapter Title Page 71 00 00 GENERAL 71 2 71 01 00 MANIFOLD 71 2 71 10 00 COWLING 71 3 71 10 01 Upper Cowling 71 3 71 10 02 Lower Cowling 71 3 71 20 00 ENGINE MOUNT 71 4 71 30 00 FIRE WALL 71 6 ...

Page 230: ...tion of the manifolds on the engine refer to Figure 71 1 No Quantity Component P N 1 1 Intake manifold 1 XA42 7100 111 2 1 Intake manifold 2 XA42 7100 112 3 1 Intake manifold 3 XA42 7100 113 4 1 Intake manifold 4 XA42 7100 114 5 1 Intake manifold 5 XA42 7100 115 6 1 Intake manifold 6 XA42 7100 116 7 6 Manifold flange 74360 Lycoming 8 6 Gasket 71973 Lycoming 9 11 Bolt LW 25 1 25 Lycoming 10 11 Lock...

Page 231: ... around the upper cowling 6x MS24693S274 2x MS24693S276 6x AN526 10R10 2 Remove the two hinge wires XA42 7110 170 3 Lift the upper cowling and remove it XA42 7110 105 4 Install the upper cowling in the opposite sequence Make sure that the upper cowling has a tight fit 71 10 02 Lower Cowling To remove the lower cowling 1 Remove the upper cowling refer to chapter 71 10 01 2 Remove all screws around ...

Page 232: ...unt at four points with bolts and washers Each mounting point has a shock absorber to absorb engine vibration For the installation of the engine on the engine mount refer to Figure 71 2 To install or remove an engine refer to chapter 72 No Quantity Component P N 1 4 Mounting kit Lord J 7764 20 Barry controls 94016 02 Barry controls 94016 044 2 4 Bolt AN7 50A 3 4 Screw AN363 720 Figure 71 2 Install...

Page 233: ...he engine mount installation refer to Figure 71 3 No Component P N Comment 1 Engine mount XA42 7120 151 2 LH Front pedal XA42 2780 121 XA42 Upper plate XA41 7120 201 XA41 3 RH Front pedal XA42 2780 126 XA42 Upper plate XA41 7120 201 XA41 4 Lower plate XA42 7100 114 5 Bolt AN5 12A Alt 11A 13A 6 Washer AN960 516 7 Washer AN960 516L 8 Self locking nut MS 21045 5 Figure 71 3 Engine mount installation ...

Page 234: ... cover plate XA42 7130 170 3 1 Fire wall assembly XA42 7130 180 1 Firewall assembly for External power XA42 7130 181 External power option 4 1 Padding for acro tank XA42 7130 210 5 1 Padding fuel level probe XA42 7130 216 6 1 Cable guide firewall XA42 7100 205 2 ea for External power option 7 2 Top Flange XA42 7130 221 8 2 Bottom flange XA42 7130 222 10 1 Hose clamp RSGU1 20 15W1 11 3 Screw AN526 ...

Page 235: ...Maintenance Manual XA41 XA42 AMM XA42 0040 001 C 00 Page date Page 7 25 09 2018 Chapter 71 Figure 71 4 Firewall installation ...

Page 236: ...Maintenance Manual XA41 XA42 AMM XA42 0040 001 C 00 Page 8 Page date Chapter 71 25 09 2018 Left blank intentionally ...

Page 237: ...Maintenance Manual XA41 XA42 AMM XA42 0040 001 C 00 Page date Page 1 25 09 2018 Chapter 72 Chapter 72 Engine Table of Contents Chapter Title Page 72 00 00 GENERAL 72 2 72 10 00 ENGINE 72 2 ...

Page 238: ...et access to the engine compartment through the two inlets on the front of the cowling The baffling is an aid to get the correct airflow through the cylinder fins The baffling has rubber edges to accurately attach to the shape of the adjacent cowling An engine driven oil pump lubricates the engine For aerobatic maneuvers an inverted oil system is installed Two oil coolers Setrab P N 50 113 7612 co...

Page 239: ... injector body and the engine refer to chapter 76 10 00 We recommend that you remove the intake manifold from cylinder No 6 This will help you to disassemble the XA42 7620 151 bracket and to disconnect the assembly from the engine Refer to Figure 72 2 Figure 72 2 Throttle Bowden cable and bracket XA42 7620 151 10 Disconnect the smoke oil hoses from the exhaust stacks refer to chapter 85 10 00 11 D...

Page 240: ... refer to chapter 71 20 00 We recommend that you start with the top connections To install the engine If the wing is removed install the lower fuselage longeron spacers first before you install the engine This will prevent damage to the fuselage Refer to chapter 57 10 00 Install the engine on the engine mount carefully Do not cause damage to the installed ignition cables and hoses 1 Use an engine ...

Page 241: ...k mount kits 5 Torque all four 4 bolts to 51 56 Nm 450 500 in lb Safety the nuts with inspection varnish 6 Install the fuel and oil hoses refer to chapters 28 00 00 79 00 00 and 79 00 01 Make sure that the routing of the cables agrees with the figures below Also refer to chapter 20 10 06 Oil system Figure 72 4 thru Figure 72 8 The oil line numbers on the figures agree with Figure 79 1 Figure 72 4 ...

Page 242: ...Maintenance Manual XA41 XA42 AMM XA42 0040 001 C 00 Page 6 Page date Chapter 72 25 09 2018 Figure 72 5 Oil line 1 and 3 Figure 72 6 Oil lines 5 and 11 3 1 11 5 ...

Page 243: ... XA41 XA42 AMM XA42 0040 001 C 00 Page date Page 7 25 09 2018 Chapter 72 Figure 72 7 Oil line 4 LH for SN 01 07 and SN 101 136 CENTER from SN 08 and SN 137 on RH for option with oil filter Figure 72 8 Oil line 5 4 5 4 4 ...

Page 244: ...age date Chapter 72 25 09 2018 Fuel system Figure 72 9 thru Figure 72 11 Refer to Figure 28 5 Figure 72 9 Fuel lines Figure 72 10 Fuel lines cont Firewall Mechanical pump Fuel injection servo Firewall Mechanical pump Fuel injection servo Fuel pressure transducer ...

Page 245: ...ses with a T fitting Connect the hoses to the exhaust stacks refer to Figure 72 4 8 Connect the throttle Bowden cable to the injector body and the engine Refer to chapter 76 10 00 9 Connect the propeller control Vernier to the propeller governor Refer to chapter 61 20 00 Figure 72 12 Propeller control vernier Fuel injection servo To fuel divider ...

Page 246: ...e 10 Page date Chapter 72 25 09 2018 10 Connect the mixture control vernier to the injector body and the engine 11 Connect the hose to the manifold pressure sensor 12 Connect all electrical cables to the engine and the accessories refer to chapter 91 10 00 ...

Page 247: ... XA41 XA42 AMM XA42 0040 001 C 00 Page date Page 1 25 09 2018 Chapter 76 Chapter 76 Engine Controls Table of Contents Chapter Title Page 76 00 00 GENERAL 76 2 76 10 00 THROTTLE CONTROL 76 2 76 20 00 MIXTURE CONTROL 76 5 ...

Page 248: ...he rod end connects the forward end of the Bowden cable to the operating lever on the injector body Thus the full operation range is available from idle to full throttle To remove the throttle control grip and rod for S N 01 07 and S N 101 150 refer to chapter 39 30 00 To remove the throttle control grip and rod from S N 151 on or after performing SB 2017 014 To replace throttle track and traveler...

Page 249: ...hrottle track 1 XA42 7610 235 For retrofit installed in front and rear 7 1 Front throttle traveller XA42 7610 236 8 1 0 Throttle track 2 XA42 7610 237 Not for retrofit 9 1 Rear throttle traveller XA42 7610 238 10 4 Edge protection XA42 7610 381 11 4 Screw cap socket head MS16998 26 12 6 Screw cap socket head XA42 7610 220 13 2 Screw cap socket head XA42 7610 221 14 1 Clevis bolt dia 6mm XA42 7610 ...

Page 250: ...7610 365 Secured with Loctite 243 2 2 Screw cap socket head MS16998 28 For retrofit Secured with Loctite 243 Figure 76 3 Rear Throttle handle installation on the aircraft RIGHT after performing SB 2017 014 No Quantity Component P N Comments 2 2 Screw cap socket head MS16998 28 Secured with Loctite 243 Figure 76 4 Front Throttle handle installation on the aircraft ...

Page 251: ...pit and a lever on the right side of the injector body control the mixture Figure 2 Mixture control linkage To adjust the mixture control change the length of the rod end bearing The rod end bearing connects the forward end of the Bowden cable to the operating lever on the injector body Thus the full operation range is available from idle cutoff to full rich ...

Page 252: ...Maintenance Manual XA41 XA42 AMM XA42 0040 001 C 00 Page 6 Page date Chapter 76 25 09 2018 Left blank intentionally ...

Page 253: ...Maintenance Manual XA41 XA42 AMM XA42 0040 001 C 00 Page date Page 1 25 09 2018 Chapter 78 Chapter 78 Exhaust Table of Contents Chapter Title Page 78 00 00 GENERAL 78 2 ...

Page 254: ...tity Component P N 1 1 Exhaust brace RH XA42 7810 101 2 1 Exhaust Stack LH XA42 7810 151 3 1 Exhaust Stack RH XA42 7810 156 4 1 Locking plate DIN 463 A4 6 4 5 1 Bolt DIN 931 UNC 1 4x2 10 9 6 6 Gasket 75118 Lycoming 7 6 Washer STD 35 Lycoming 8 6 Self locking nut STD 2233 Lycoming Figure 78 1 Exhaust assembly applicable to these serial numbers S N 07 and subsequent XA41 S N 119 and subsequent XA42 ...

Page 255: ...XA41 XA42 AMM XA42 0040 001 C 00 Page date Page 1 25 09 2018 Chapter 79 Chapter 79 Oil System Table of Contents Chapter Title Page 79 00 00 GENERAL 79 2 79 00 01 Christen Inverted Oil System 79 3 79 40 00 OIL COOLING 79 4 ...

Page 256: ...e oil system refer to Figure 79 1 No Component P N Comment 1 Parker no 124007E0274C000 MS8005H274D000 2 Parker no 124001 8CR 0141 MS8005H141A 3 Parker no 124001 8CR 0130 MS8005H130A 4 Parker no 124012F0300C305 MS8005J300F305 For SN 01 07 and SN 101 136 Parker no 124012F0475C090 MS8005J475F090 From SN 08 and SN 137 on Parker no 124012F0200C040 MS8005J200F040 For aircraft with oil filter 5 Parker no...

Page 257: ...oil pump and to the engine lubrication points Figure 79 2 Schematic illustration of the Christen oil system during normal flight During an inverted flight or during negative g maneuvers Figure 79 3 engine oil falls or is pushed up to the top of the engine crankcase The weighted ball valve in the oil separator closes and prevents an overboard oil loss through the top of the oil separator Blow by ga...

Page 258: ...ve two oil coolers Setrab P N 50 113 7612 Flexible hoses connect the oil coolers to each other and to the engine The oil coolers are attached to the engine mount on the left and the right side Air flow to the oil coolers is supplied through the cowling This air flow comes out of the engine compartment behind the oil coolers During operation the oil flow is as follows The oil pump supplies the hot ...

Page 259: ...l XA41 XA42 AMM XA42 0040 001 C 00 Page date Page 1 25 09 2018 Chapter 85 Chapter 85 Smoke System Table of Contents Chapter Title Page 85 00 00 GENERAL 85 2 85 10 00 SMOKE OIL TANK 85 2 85 20 00 SMOKE DISTRIBUTION 85 4 ...

Page 260: ...ge structure behind the rear seat The smoke oil tank has a capacity of 27 liters of smoke oil The smoke oil tank has a flop tube to supply smoke oil during all flight attitudes The flop tube assembly is shown in the figure below Figure 85 1 Flop tube assembly of the smoke tank To remove the flop tube or the outlet of the smoke oil tank Refer to Figure 85 2 1 Drain the smoke oil tank as described i...

Page 261: ...e oil flop tube assembly installation To fill the smoke tank change the pump direction of the smoke pump with the switch on the right side panel To operate the smoke system start the smoke pump with the applicable switch An ON OFF button is on the pilot s throttle stick Magnetic valves inject the smoke oil into the exhaust stacks You can adjust the quantity of smoke oil with the magnetic valves Fi...

Page 262: ...ector 2 Put an applicable container below the breather line that comes from the bottom of the rear fuselage 2 Set the battery switch to ON 3 Set the REFILL SMOKE switch to REFILL 4 Set the I O button on the pilot s throttle stick to I 5 Set the I O button on the pilot s throttle stick immediately to O when the smoke tank is full Make sure that the smoke oil that spills from the breather line colle...

Page 263: ...Maintenance Manual XA41 XA42 AMM XA42 0040 001 C 00 Page date Page 1 25 09 2018 Chapter 91 Chapter 91 Charts Electrical Charts are provided on demand Please send a request to support xtremeair de ...

Page 264: ...tle Page Appendix 1 FORM OCCURRENCE REPORT 2 Appendix 2 FORM MASS AND BALANCE 5 Appendix 3 FORM COMPASS COMPENSATION 7 Appendix 4 FORM GROUND RUN REPORT 9 Appendix 5 FORM CHECK FLIGHT REPORT 11 Appendix 6 FORM CONTROL SURFACES MASS AND BALANCE 13 Appendix 7 FORM CONTROL SURFACE DEFLECTIONS 15 Appendix 8 DAMAGE DESCRIPTION 17 ...

Page 265: ...Maintenance Manual XA41 XA42 AMM XA42 0040 001 C 00 Page 2 Page date Appendix 24 09 2018 APPENDIX 1 FORM OCCURENCE REPORT ...

Page 266: ...porting Date Contact Person Phone E Mail Occurrence Title Occurrence Finding Date ATA Chapter Occurrence Location in A C Other Parties already informed _ None _ EASA _ NAA _ CAMO _ Occurrence Caused _ No Damage Injury _ Damage to Aircraft _ Damage to Property _ Personal Injury 2 Aircraft Information Aircraft Type Aircraft S N Operator Owner Aircraft Registration Aircraft Flight Hours Aircraft tota...

Page 267: ..._ Approach _ Landing _ Aerobatic _ Hovering _ Manoeuvring _ Unknown _ Probable Cause s _ Design _ Production _ Maintenance _ Operational _ Repair _ Fatigue _ Corrosion _ Unapproved Part _ Human Factors _ Not Determined _ 5 Occurrence Details Failure Mal function Defect Description incl Photos Sketches etc Suggestion if any Aircraft still in Operation _ Yes _ No _ Restricted Present Position of the...

Page 268: ...Maintenance Manual XA41 XA42 AMM XA42 0040 001 C 00 Page date Page 5 24 09 2018 Appendix APPENDIX 2 FORM MASS AND BALANCE ...

Page 269: ...d Empty CG position Support point Total Kg Tara Kg Mass Net Kg Moment Arm m Mass Moment mkg Tailwheel Mainwheel LH Mainwheel RH Fuel Acrotank 0 72 kg l 0 285 Fuel Wingtank 0 72 kg l 0 340 Empty mass EM Empty mass moment ME Empty mass CG xE M1 A M2 B XE M1 M2 Variable masses 1 Fuel Acrotank 0 72 kg l 0 285 2 Fuel Wingtanks 0 72 kg l 0 340 3 Front seat 0 780 4 Rear Seat 1 670 5 Baggage 2 225 6 Misce...

Page 270: ...Maintenance Manual XA41 XA42 AMM XA42 0040 001 C 00 Page date Page 7 24 09 2018 Appendix APPENDIX 3 FORM COMPASS COMPENSATION ...

Page 271: ...ompensation New Aircraft Maintenance Compass instrument panel Pilot rear Compass instrument panel Passenger front Deviation in Degrees 14 12 10 8 6 4 2 0 2 4 6 8 10 12 14 Deg 000 030 060 090 120 150 180 210 240 270 300 330 360 Calculation of the deviation coefficients A 4 W S O N B 2 W O C 2 S N A 4 B 2 C 2 A B C Verification of the compass compensation Target heading N 030 060 O 120 150 S 210 240...

Page 272: ...Maintenance Manual XA41 XA42 AMM XA42 0040 001 C 00 Page date Page 9 24 09 2018 Appendix APPENDIX 4 FORM GROUND RUN REPORT ...

Page 273: ...PDR COM Propeller adjustment Governor function Canopy lock Brake function Trim indicator Cockpit glass striations Microcracks CO Test in Cockpit Leaks Odor in Engine compartment Observations are to be documented as an attachment Operational phase Throttle setting Propeller setting Target RPM Measured RPM Oil pressure Oil Temp CHT MAP Observations In order MCP rpm rpm psi F F In HG i e Sensor fail ...

Page 274: ...Maintenance Manual XA41 XA42 AMM XA42 0040 001 C 00 Page date Page 11 24 09 2018 Appendix APPENDIX 5 FORM CHECK FLIGHT REPORT ...

Page 275: ...Vibration noises Control deflections Propeller setting Flight instrumentation Compass Trim indicator Pitot static system Smoke system Trim range Wheel brake Radio in flight Cruise flight Flight phase Power MVP 50 IAS Height Vario RMP MAP Oil CHT EGT Fuel kts ft ft min 1 s In HG bar C C C bar l h Engine run up Idle Take off Max Climb Max 75 Cruise Max 0 75 0 55 0 Landing Idle Stall test Desired val...

Page 276: ...Maintenance Manual XA41 XA42 AMM XA42 0040 001 C 00 Page date Page 13 24 09 2018 Appendix APPENDIX 6 FORM CONTROL SURFACES MASS AND BALANCE ...

Page 277: ...f hinge line Balance Mass kg Should be Left aileron with without spade spade arm 6 4 9 4 0 286 0 8 1 4 Right aileron with without spade spade arm 6 4 9 4 0 286 0 8 1 4 Elevator without flettner 10 13 0 560 0 3 1 8 Flettner 0 35 0 55 0 145 0 05 0 15 Rudder 5 2 6 2 0 870 0 7 1 5 Comments Deviations To perform the moment measurements the control surface needs to be suspended by a frictionless axis Th...

Page 278: ...Maintenance Manual XA41 XA42 AMM XA42 0040 001 C 00 Page date Page 15 24 09 2018 Appendix APPENDIX 7 FORM CONTROL SURFACE DEFLECTIONS ...

Page 279: ...Pull Deflection Target Measured Target Measured 27 3 5 27 3 5 Rudder Left Right Projected distance from most aft rudder position to rudder axis 435 mm Target Measured Target Measured 30 3 435 39 mm 30 3 435 39 mm Flettner With neutral elevator Trim nose heavy With neutral elevator Trim tail heavy Deflection Target Measured Target Measured 3 1 3 1 Push elevator Trim neutral Pull elevator Trim neutr...

Page 280: ...A42 0040 001 C 00 Page date Page 17 24 09 2018 Appendix APPENDIX 8 DAMAGE DESCRIPTION Use the aircraft views below to document the position and dimensions of the damage In case necessary attach further sketches and detailed description ...

Page 281: ...Maintenance Manual XA41 XA42 AMM XA42 0040 001 C 00 Page 18 Page date Appendix 24 09 2018 ...

Page 282: ...Maintenance Manual XA41 XA42 AMM XA42 0040 001 C 00 Page date Page 19 24 09 2018 Appendix ...

Page 283: ...Maintenance Manual XA41 XA42 AMM XA42 0040 001 C 00 Page 20 Page date Appendix 24 09 2018 ...

Page 284: ...Maintenance Manual XA41 XA42 AMM XA42 0040 001 C 00 Page date Page 21 24 09 2018 Appendix ...

Reviews: