background image

8

MAINTENANCE

LED BULB REPLACEMENT

NOTE

: The flame effect on this electric fireplace insert is created by LED Bulbs. The life of these LED bulbs will 

be 100,000 hours. The users are not recommended to Replace the LED Bulbs. For any reason should the bulbs 

stop working properly, contact a Qualified technician.

CLEANING

• Turn heater 

OFF

 and unplug from electrical outlet before any cleaning or maintenance is performed. Wait at 

least 10 minutes to allow all components to cool properly.
• Use a vacuum or duster to keep heater and vent area clean from dust and dirt.
• The exterior of the fireplace should be cleaned with a damp cloth or duster.

Do not use a

brasive cleaners or liquid sprays.

WARNING:

 To avoid electrical shock not open the back panel of the insert unless the Power has been turned 

off. And the insert has been unplugged.

WARNING:

 Any electrical repairs.to this electric fireplace. Should only be Performed by a qualified technician.

WARNING:

 Any

 electrical wiring repairs should only be performed by a qualified Technician. And also must 

comply with local buildings codes.

WARNING:

 Disc

ontinue use of this electric fireplace if any of the follow has Occurred: Water damage. If insert 

has been or dented. If power cord has Become broken. If power cord becomes hot to touch, if unit smokes or

Smells like smoke.

NOTE

: When the he

at functions is used for the first time. A slight odor may be Present. This is normal and 

should be occur again unless heater is not used For extended

TECHNICAL SPECIFICATIONS:

 Supply: 120V/60Hz
 Rated power:750W/1500W

Mea

ning of crossed - out wheeled dustbin: Do not dispose of electrical appliances as unsorted municipal waste, 

use separate collection facilities.   


 

This applian

ce is fitted with a safety cut-off which will operate if the fire overheats (e.g. due to blocked air vents) 

For safety reasons, the fire will NOT automatically reset.

• To reset

 the appliance, disconnect the appliance from the mains supply for at least 15 minutes. Reconnect the 

supply to the mains and switch on the appliance.
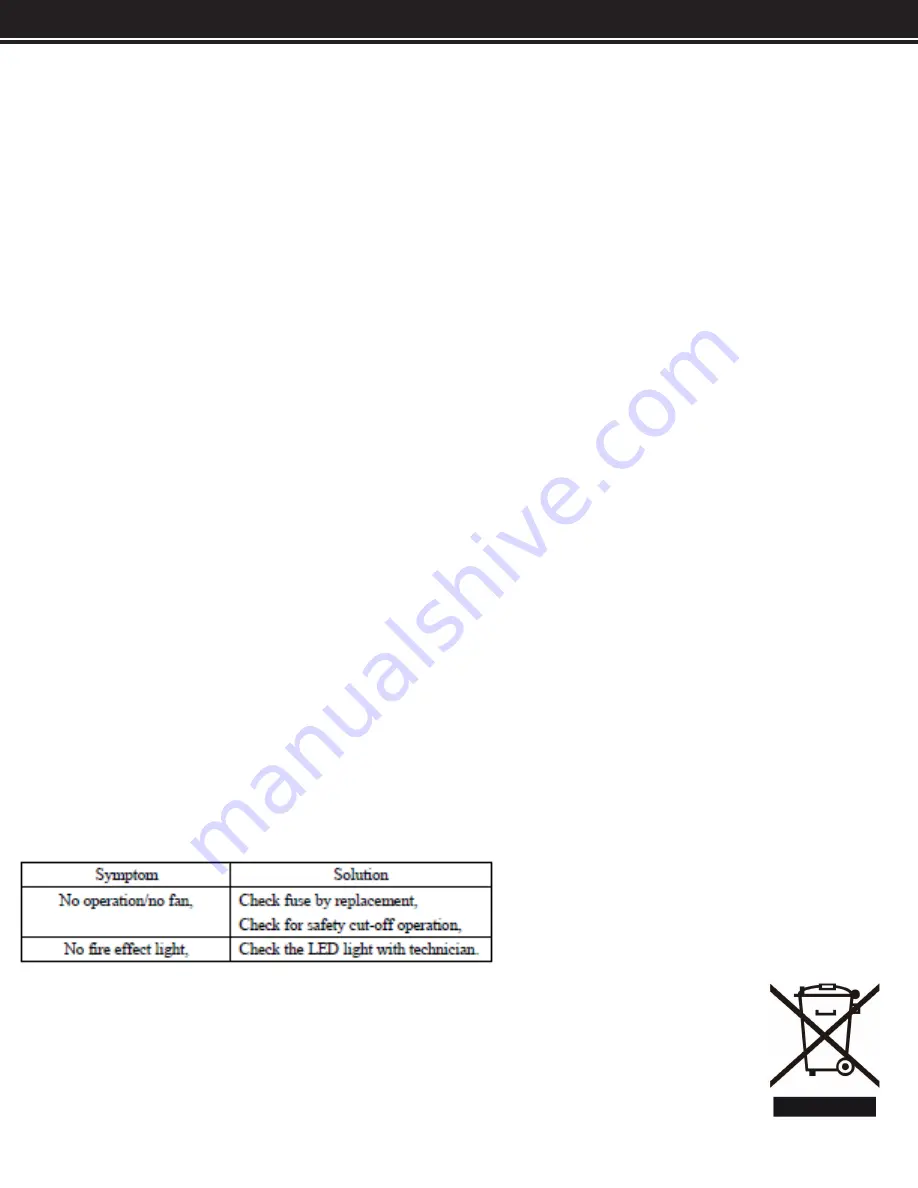
TROUBLESHOOTING

7

Do not dispose of electrical appliances as unsorted municipal waste, use separate 

collection facilities. Contact you local government for information regarding the collection 

systems available. If electrical appliances are disposed of in landfills or dumps, hazardous 

substances can leak into the groundwater and get into the food chain, damaging your 

health and well-being. When replacing old appliances with new ones, the retailer is legally 

obligated to take back your old appliance for disposals at least free of charge.

Summary of Contents for 95032

Page 1: ...P THIS MANUAL FOR SAFETY WARNINGS PRECAUTIONS ASSEMBLY OPERATION INSPECTION MAINTENANCE AND CLEANING PROCEDURES WRITE THE PRODUCT S SERIAL NUMBER ON THE BACK OF THE MANUAL OR THE MONTH AND YEAR OF PURCHASE IF PRODUCT HAS NO SERIAL NUMBER FOR QUESTIONS PLEASE CALL CUSTOMER SERVICE 909 628 0880 ...

Page 2: ...n electrical or mechanical adjustment or repair The electric fireplace is not intended for use in bathrooms laundry areas and similar indoor locations Never locate heater where it may fall into a bathtub or other water container Do not run the electrical cord under carpeting Do not cover electrical cord with throw rugs runners or similar materials Arrange electrical cord away from traffic area and...

Page 3: ...e bottom right of the heater A distance of 600mm from the bottom of the heater to the floor is recommended for optimum viewing of the fuel bed see Fig 1 below for recommended fixing dimensions For optimum viewing mark the top four screws fixing positions on the wall in accordance with the recommended fixing dimension See Fig 2 NOTE Ensure the bracket is level by using a spirit level whilst marking...

Page 4: ...n both sides as provided Fig 5 Place the front glass surround over the front of the fire aligning the slots in the bracket at each side of the glass panel with the lugs on the sides of the fire See Fig 4 Again two people will be required for this operation Manual Operation The switches located at the center right hand side of the fire The standby switch must be first switch on ...

Page 5: ...ance s holes See Fig 2 Fix the tempered glass with 2pcs of 4 8mm screws provided Fig 5 Place the front glass surround over the front of the fire aligning the slots in the bracket at each side of the glass panel with the lugs on the sides of the fire See Fig 3 Again two people will be required for this operation The appliance can be operated either by the switches located on the top right hand side...

Page 6: ...OFF setting Press once the HEAT button for the low heat setting 750W press twice for the high heat setting 1500W press again to turn off the heater Temperature setting The highest temperature of the thermostat is 82F There are several thermostat levels you can cycle through between 62F and 82F and the OFF settings Timer setting Press the TIMER button to cycle through the timer settings 1Hour 2H 3H...

Page 7: ...m to operate this appliance From time to time check the cord for damage Never use the appliance if the cord or any part of the appliance shows signs of damage Do not operate this appliance with a damaged plug or cord after a malfunction or after being dropped or damaged in any way Repairs to electrical appliances should only be performed by a qualified electrician Improper repairs may place the us...

Page 8: ... insert has been or dented If power cord has Become broken If power cord becomes hot to touch if unit smokes or Smells like smoke NOTE When the heat functions is used for the first time A slight odor may be Present This is normal and should be occur again unless heater is not used For extended TECHNICAL SPECIFICATIONS Supply 120V 60Hz Rated power 750W 1500W Meaning of crossed out wheeled dustbin D...

Page 9: ...MANUFACTURER AND OR DISTRIBUTOR EXPRESSLY STATES THAT ALL REPAIRS AND PARTS REPLACEMENTS SHOULD BE UNDERTAKEN BY CERTIFIED AND LICENSED TECHNICIANS AND NOT BY THE BUYER THE BUYER ASSUMES ALL RISK AND LIABILITY ARISING OUT OF HIS OR HER REPAIRS TO THE ORIGINAL PRODUCT OR REPLACEMENT PARTS THERETO ORARISING OUT OF HIS OR HER INSTALLATION OF REPLACEMENT PARTS THERETO Record Product s Serial Number He...

Reviews: