background image

////// Copyright xtrons //////

Summary of Contents for PROCAM X18

Page 1: ...HD DIGITAL CAR CAMCORDER PROCAM X18 USER MANUAL 取扱説明書 C o p y r i g h t x t r o n s ...

Page 2: ... C o p y r i g h t x t r o n s ...

Page 3: ...s of the images may infringe the copyright or other legal rights and interests of others Attention Do not open or disassemble the product without authorization which may lead to electric shock or equipment failure Do not pressure the screen as this may break Do not use sharp objects to touch the screen to avoid screen damage Do not let children play with the equipment Do not use if the charger is ...

Page 4: ...l authorization service Center for maintenance Temperature and humidity Equipment normal working temperature is 0 60 with humidity of 10 80 Please place the equipment in a safe place Transportation In the case of sudden changes in temperature or humidity moisture condensation inside the machine can cause a short circuit Protect the unit in order to avoid dust settling inside 2 Do not use in damp e...

Page 5: ...Automatic impact sensitivity adjustment lock file Drive start simultaneously Supports video cycling HDMI output port Max 32GB memory card input Can charge while recording Image monitor with real time output 3 Please use the original or suitable packaging to transport the equipment 720P 60FPS 720P 30FPS 3 3 inch LTPS Product structure Front 1 Camera 2 Speaker C o p y r i g h t x t r o n s ...

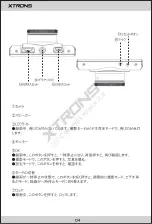
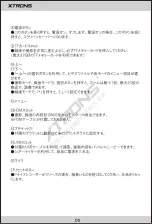
Page 6: ... Back Left Right 4 3 Indicator LED 5 OK button 6 Mode button 7 Lock button 8 Power button 9 10 Up button 11 Menu button 12 Down button 4 Screen TF Card slot C o p y r i g h t x t r o n s ...

Page 7: ... Right Bottom 5 13 HDMI 16 Mic 14 Stent Hole 15 USB 17 Reset C o p y r i g h t x t r o n s ...

Page 8: ...tion to often change the memory card and copy content to other storage media Do not burn on the video card program or run other executable file it could erase the above data The start up and shut down of equipment Use the built in battery or connect the car mounted charger to boot the device or connect to computers Note when using the built in power supply and the low battery signal appears save yo...

Page 9: ...t will start to record automatically During recording the red icon on the upper left corner of the screen will flash you can press the OK button to stop or start the recording mode Video mode WDR M sensor Video time Video segmentation time Motion detecting EV Video resolution Record TF Card Date time Battery Video 7 C o p y r i g h t x t r o n s ...

Page 10: ... OK button until a cut sound is heard Users can choose different shooting settings according to requirements Photo mode EV White balance ISO Anti shake Remaining photos Photo resolution Image quality SD Card Battery Photo mode 8 C o p y r i g h t x t r o n s ...

Page 11: ...oose the project Settings Press the OK button to confirm Settings press to exit the menu again Image resolution Full HD 1080FHD HD 720P 60FPS HD 720 30FP WVGA VGA Loop video 2 min 3 min 5 min Playback mode Press up or down key files were selected press OK button to confirm play Playback mode Press button twice to enter the playback menu under this menu to delete the file and protection can also choose...

Page 12: ...00ms Parking monitor Off High Standard Low Date time 2015 01 01 00 11 Year Month Day Key tone ON OFF Plate number AAAAAA Auto power off OFF 3 min 5 min 10 min Beep sound ON OFF Language English Simplified Chinese Traditional Chinese Japanese French German Korean Italian Portuguese Russian TV mode NTSC PAL Light source frequency 50HZ 60HZ Automatic LCD close Close 1min 3 min 5 min Formatting Yes No Th...

Page 13: ...me Delete Delete the current Delete all Protection Lock current Unlock current Lock all Unlock all Slide play 2s 5s 8s Lock button An emergency manual press to lock video Audio recording video recording mode or video on standby mode press the down to open or close the audio 4X zoom Photo mode press button Up or Down to zoom The device supports direct USB reading by connecting a USB cable from the ...

Page 14: ...ons press the button enter the following screen press the up down key to set the date press the button to confirm After setting the date and time press the ok button to confirm the settings With the memory card inserted to the device connect it to your computer via a USB cable There will be two options displayed on the device Select Storage a removable disk will appear on the computer the unit will ...

Page 15: ...e the unit can also used as a PC CAM 13 LCD screen size pixel lens Video resolution Video format Loop recording memory USB DC in frequency Battery capacity Power consumption 3 0 inch TFT 3M CMOS 170degrees high definition wide Angle lens Full HD 1080FHD HD 720P 60FPS HD 720 30FP WVGA VGA MOV 2min 3min 5min TF max to 32G USB1 1 2 0 DC5V 1000MA 50HZ 60HZ 400mAH Standby 350 mA Recording 420mA C o p y ...

Page 16: ...ust and dirt on the lens Press the reset button to initialize the machine In general please careful reset initialization the operation is likely to lead to loss of data If the problem persists please contact your seller Can t use normal video recording Note The specification may be due to the upgrade and update changes such as reason in kind prevail 14 Support English Simplified Chinese Traditional ...

Page 17: ... C o p y r i g h t x t r o n s ...

Page 18: ... C o p y r i g h t x t r o n s ...

Page 19: ... C o p y r i g h t x t r o n s ...

Page 20: ... C o p y r i g h t x t r o n s ...

Page 21: ... C o p y r i g h t x t r o n s ...

Page 22: ... C o p y r i g h t x t r o n s ...

Page 23: ... C o p y r i g h t x t r o n s ...

Page 24: ... C o p y r i g h t x t r o n s ...

Page 25: ... C o p y r i g h t x t r o n s ...

Page 26: ... C o p y r i g h t x t r o n s ...

Page 27: ... C o p y r i g h t x t r o n s ...

Page 28: ... C o p y r i g h t x t r o n s ...

Page 29: ... C o p y r i g h t x t r o n s ...

Page 30: ... C o p y r i g h t x t r o n s ...

Page 31: ... C o p y r i g h t x t r o n s ...

Page 32: ... C o p y r i g h t x t r o n s ...

Reviews: