background image


ii

3.2.2


Login

...................................................................................................................................10


3.3


Main Window

..........................................................................................................................12


3.3.1


Decode Channel Information

..........................................................................................14


3.3.2


Decode Channel Setup

....................................................................................................14


3.3.3


Add /Remove Front-end Device

.....................................................................................15


3.3.4


File Playback and Time Playback

..................................................................................15


3.4


Decoder Configuration

..........................................................................................................17


3.4.1


Tour  Config

.....................................................................................................................17


3.4.2


Decode Output

..................................................................................................................18


3.4.3


Video Output

......................................................................................................................19


3.4.4


TV Adjust

............................................................................................................................20


3.4.5


Here you can adjust the TV display margin.

.................................................................20


3.4.6


Decode Tour

......................................................................................................................20


3.4.6     Decode strategy

...........................................................................................................21


3.5


Configuration

..........................................................................................................................22


3.5.1


System Information

...........................................................................................................22


3.5.2


System Configuration

.......................................................................................................23


3.5.3


Advanced

...........................................................................................................................30


3.5.4


Additional Function

...........................................................................................................31


3.6


Alarm

.......................................................................................................................................32


3.7


About

.......................................................................................................................................33


3.8


Log out

....................................................................................................................................33


4


ALARM INPUT AND OUTPUT

...............................................................34


4.1


Alarm Input Port

.....................................................................................................................34


4.2


Alarm Output Port

..................................................................................................................35


4.3


Alarm Output Relay Specification

.......................................................................................36


Summary of Contents for XP101VD

Page 1: ...XP101VD User s Manual V1 1 0 ...

Page 2: ...eck Unpacked NVS 5 2 2 Front panel 5 2 3 Rear Panel 6 2 3 1 NVS0404DH 6 2 3 2 NVS0104DH 7 2 4 Connection 7 2 4 1 General Connection 7 2 4 2 Audio Video Connection 8 2 4 3 Audio Talk Input Connection 8 2 4 4 Video Output Device and Connection 8 2 4 5 Audio Output 8 3 OPERATION 10 3 1 Boot Up and Shut Down 10 3 2 Login 10 3 2 1 Preparation 10 ...

Page 3: ...Decode Output 18 3 4 3 Video Output 19 3 4 4 TV Adjust 20 3 4 5 Here you can adjust the TV display margin 20 3 4 6 Decode Tour 20 3 4 6 Decode strategy 21 3 5 Configuration 22 3 5 1 System Information 22 3 5 2 System Configuration 23 3 5 3 Advanced 30 3 5 4 Additional Function 31 3 6 Alarm 32 3 7 About 33 3 8 Log out 33 4 ALARM INPUT AND OUTPUT 34 4 1 Alarm Input Port 34 4 2 Alarm Output Port 35 4...

Page 4: ...OARD CONTROL DECODE EXPLANATION 37 5 1 Connection 37 5 1 1 Keyboard setup after serial ports connected 37 5 1 2 Keyboard setup after network connected 37 5 2 Login method 38 5 3 Picture switch 38 APPENDIX TOXIC OR HAZARDOUS MATERIALS OR ELEMENTS 39 ...

Page 5: ... user s manual is designed to be a reference tool for the operation of your system Here you can find information about this series NVS s features and functions Before installation and operation please read the following safeguards and warnings carefully ...

Page 6: ... 2 Installation Do not apply power to the device before completing installation Do not put object on the NVS 3 Environment This series NVS should be installed in a cool dry place away from direct sunlight inflammable explosive substances and etc Please guarantee sound ventilation and keep device clean 4 About Accessories Be sure to use all the accessories recommended by manufacturer Contact your l...

Page 7: ...me time it greatly reduces the system general cost This series product adopts embedded OS to guarantee the safety stability reliability of the device and network monitor system and also guarantee the high performance of the device and the system 1 2 Specification Device Model XP101VD Main Processor High performance industry embedded micro processor OS Embedded LINUX Input Device Front panel button...

Page 8: ...getaway subnet mask Support remote control NTP Synchronize system time via NTP service DHCP Automatically get network parameter such as IP parameter Auto get After you configured the front end encode device information decoder can automatically connect to the encode device and then begin work independently and reliably Network Passive receive In transmit mode decoder can get the random data bit st...

Page 9: ...he main cor e for 8 channels the minor cores for 2 channels each and 7 1080 P decode output 8M the main core for 4 channels the minor cores for 1 channel each Auto check current decode loading and prompt user decode abnormal event Real time stream decode Get the local real time bit stream of the encoder and then output Previous stream decode Get the local previous bit stream of the encoder and the...

Page 10: ... maintenance Auto maintain device regularly DNS Domain service Upgrade Support various upgrade types such as U disk network and TFTP Intelligent Operation Support copy function for the same setup Development Provide decode device SDK Provide demonstration software and development introduction ...

Page 11: ...ly we need you to represent the serial number when we provide the service after sales 2 2 Front panel This series product has two front panels One front panel is shown as in Figure 2 1 Figure 2 1 Please refer to the following sheet for detailed information Name Icon Function Name Icon Function Power button Press it for three seconds to boot up or shut down the device USB port Connect to external U...

Page 12: ...n system boots up Alarm indication light N A Network indication light The indication light becomes on when abnormal network event occurs offline IP conflict and etc HDD indication light N A IR receiver N A TV indication light When device is in TV working mode For XP101VD only the channel 1 to channel 4 indication lights are effective The rest channels 5 to channel 16 indication lights are null rig...

Page 13: ...t port 5 Audio talk input port 6 VGA port 7 HDMI port 8 RS232 port 11 Power plug port 9 Network interface 10M 100M 1000Mself adaptive Ethernet port 12 Power switch 10 Relay input relay output duplex RS485 port 2 4 Connection 2 4 1 General Connection Please refer to the following figure for connection information See Figure 2 5 ...

Page 14: ...ndustry monitor has stronger vivid and colorful video Industry monitor can be used in many complicated environments and has strong anti interference capability It is more stable Please note using TV as video output device is not a reliable substitution method You need to reduce the working hours and control the interference from power supply and other devices The risk of short circuit problem resu...

Page 15: ...ng property z Reduce the volume of the sound box until there is no squeaking z Using more sound absorbing materials in decoration to reduce voice echo and improve acoustics environment z Adjust the layout to reduce risk of the squeaking ...

Page 16: ... the same section for the PC and NVS Please input corresponding gateway and subnet mask if there are routers When NVS booted up normally please input account name admin and password admin via the PC COM port then input net a and then input IP NETMASK GATEWAY The command mode is net a IP NETMASDK GATEWAY For example Username admin Password admin DeBug net a 192 168 XXX XXX 255 255 XXX XXX 192 168 X...

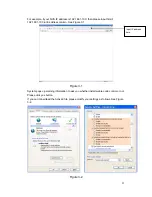
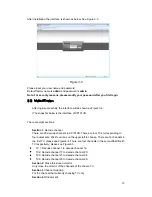
Page 17: ... 100 in IE address column See Figure 3 1 Figure 3 1 System pops up warning information to ask you whether install webrec cab control or not Please click yes button If you can t download the ActiveX file please modify your settings as follows See Figure 3 2 Figure 3 2 Input IP address here ...

Page 18: ...re 28 decode channels in XP101VD There are four TVs corresponding to four output sets Click four icons on the upper left to choose There are 16 channels in the first TV please see Figure3 4 There are four channels in the second third fourth TV respectively please see Figure3 5 TV 1 Decode channel 1 to decode channel 16 TV2 Decode channel 17 to decode channel 20 TV3 Decode channel 21 to decode chan...

Page 19: ...em menu Please read the user s manual for further reference Section6 Here you can view device channel information You can add delete decoder front end device and realize file playback and time playback function There are two shortcut options mapping channel and close full screen monitor Section7 Bidirectional talk Please select the corresponding audio talk mode from the drop down list and then ena...

Page 20: ...decode output Please see figure 3 6 1 Front end device IP address 2 Front end real time monitor channel 3 The real monitor channel connection status between the decoder and the front end 4 It is a button to control the connection between the decoder and the front end Figure 3 6 3 3 2 Decode Channel Setup 1 2 3 4 ...

Page 21: ...an see the device begins to connect the newly added front end device Figure 3 7 Once the connection is OK you can see the channel information in section 3 See Figure 3 8 Figure 3 8 z Delete Device Select one front end device and then click delete device button system can remove it from the list 3 3 4 File Playback and Time Playback You can select a device you want to playback and then select the c...

Page 22: ...nd then click playback button you can view the video The decode channel is shown as in figure3 10 Figure 3 10 Double click decode channel you can view in full screen The playback bar is shown as below See figure3 11 The three buttons ranges from left to the right are playback pause and stop Figure 3 11 Note z In parameter column you can click the dropdown list and then select the corresponding dat...

Page 23: ... search failed or No record z Time Playback Please select the decode channel and then select a front end on line to playback Please click the device name and then click time playback button you can see an interface is shown as below Figure 3 12 Please select corresponding time period and channel and then click playback button system can playback automatically The playback bar is the same with file...

Page 24: ...tput decode channel TV output Choose window mode Decode channel 1 2 3 4 Single window Display in two lines 1 16 and 17 28 1 2 3 4 1 4 window 1 4 5 8 9 12 13 16 17 20 21 24 25 28 1 1 9 window 1 9 8 16 Note there are no 1 9 window tour in TV2 TV3 and TV4 3 4 2 Decode Output The decode output interface is shown as below See Figure 3 14 Here you can view current decode information Status Current chann...

Page 25: ...ution of the output TV Supports three resolutions 1280x1024 1208x720 and 1920x1080 Here you can view there are two connection modes direction connection and forward connection When you use WEB or PSS Professional surveillance software to control the device the device is in direction connection type When you use DSS to control the device the device is in forward mode Important The connection mode h...

Page 26: ... end device Stream The front end stream type There are two options main stream and extra stream User The user name you use to login the front end device Please make sure it is useable Multiple users can use current account to login at the same time Password The password you use to login the front end device Interval The period video displayed in current channel The value ranges from 10 to 120 seco...

Page 27: ...top Click it to stop the decode tour setup of the specified channel z Pause Click it to pause tour Current tour will be displayed in the channel all the long z Resume Click it to resume tour The tour gets activated and then begins from the next tour setup z Export Export all tour setups of the device z Import Import all tour setups of the device Setup steps 1 Set the parameters of decode channel s...

Page 28: ...28 are available decoding buffer time Selectable range 80 480 Figure 3 18 3 5 Configuration 3 5 1 System Information z Version Information Here you can view device hardware feature and software version information See Figure 3 19 ...

Page 29: ...ameter information Parameter Function Type Log types include system operation configuration operation alarm event user management log clear Search You can select log type from the drop down list and then click search button to view the list Clear You can click this button to delete all displayed log files Backup You can click this button to backup log files to current PC 3 5 2 System Configuration...

Page 30: ...formation Parameter Function System Time Here is for you to modify system time Please click Save button after your completed modification Sync PC You can click this button to save the system time as your PC current time DST Here you can set day night save time begin time and end time See Figure 3 23 Language You can select the language from the dropdown list Device needs to reboot to get the modif...

Page 31: ...led information Parameter Function RS232 COM You can use the COM or mini terminal to upgrade and debug the software Function You can use special keyboard to control device via COM Data Bit The value ranges from 5 to 8 Stop Bit There are three options 1 1 5 2 Baud Bit You can select corresponding baud bit here Parity There are four options none odd mark space System default setup is z RS232 COM01 z...

Page 32: ...vice Name Default name is NVD You can input a new one if necessary TCP Port Default value is 37777 HTTP Port Default value is 80 UDP Port Default value is 37778 Max Connection Network user max amount The value ranges from 1 to 10 NTP The NTP interface is shown as in Figure 3 26 NTP is a UDP protocol for IP network to realize network time synchronization You need to install a SNTP server in the PC ...

Page 33: ... GMT 3 New Deli GMT 5 Bangkok GMT 7 Beijing Hong Kong GMT 8 Tokyo GMT 9 Sydney GMT 10 Hawaii GMT 10 Alaska GMT 9 Pacific Time P T GMT 8 American Mountain Time M T GMT 7 American Central Time C T GMT 6 American Eastern Time E T GMT 5 Atlantic Time GMT 4 Brazil GMT 3 Middle Atlantic Time GMT 2 z Alarm Alarm setup interface is shown as in Figure 3 27 ...

Page 34: ...28 Figure 3 27 Figure 3 28 ...

Page 35: ...e draw a circle to enable corresponding period z Select date If you do not select current setup applies to today only You can select all week column to apply to the whole week z Click OK button system goes back to alarm setup interface please click save button to exit Anti dither System only memorizes one event during the anti dither period The value ranges from 0 to 15s Normal Out Enable alarm ac...

Page 36: ...ctory default setup You can select corresponding items The options include general RS232 Network Alarm Backup Export current configuration to local PC or import configuration from current PC Figure 3 30 Please refer to the following sheet for detailed information Parameter Function Select All Restore factory default setup Export Configuration Export system configuration to local PC Import Configur...

Page 37: ...to delete old files interval from the dropdown list See Figure 3 32 Please note system is in four window display mode after it automatically rebooted Figure 3 32 3 5 4 Additional Function z Preferred DNS Here you can set server or local operator DNS address See Figure 3 33 ...

Page 38: ...32 Figure 3 33 3 6 Alarm There are three modes external alarm decoder alarm DSP alarm You can set alarm prompt mode See Figure 3 34 Figure 3 34 ...

Page 39: ...33 3 7 About Click about button you can view the web information See Figure 3 35 Figure 3 35 3 8 Log out Click log out button you can go back to log in interface See Figure 3 36 Figure 3 36 ...

Page 40: ... than 1A it may result in heavy current which may destroy the relay Please use co contactor to realize the connection between the alarm output port and the load Sound Ground Please make sure the front end device has earthed Otherwise it may result in chip damage Alarm input type can be NO normal open or NC normal close Figure 4 1 Parameter XP101VD Ground alarm GND port t r o p t u p n i y a l y e ...

Page 41: ...rm device needs the battery supported z To avoid overload to damage the device please refer to the following sheet for relay specification information z About A B cable of RS485 they are used to connect to the PTZ decoder A B cable Please refer to Figure 4 3 for alarm input module information Figure 4 3 Please refer to Figure 4 4 for alarm output module information ...

Page 42: ...nce 100mΩ 0 1A 6VDC Contact Material AgNi Gilded Contact Rating Resistive 0 5A 125VAC 1A 30VDC Max switching voltage 125VAC 60VDC Max switching current 2A Max switching power 62 5VA 30W Min permissible loading 1mA 5V Mechanical durability 1x107times 300 times min Electrical durability 1x105times 30 times min ...

Page 43: ...input 3 then it will be shown as 3 which means that the front end device that numbered 3 has finished control setup user can thus read the type and name of NO 3 device z Device name Name the front end device The keyboard supports multiple input methods z Device type Choose DVR for the decoder Types are DVR Dome CMS and NVS etc Choose front end device type by controlling directional keys left and r...

Page 44: ... the data anymore 5 2 Login method Users can choose any way to login ID number device name IP address 232 address 485 address then press ENTER to go to the setup and find the info that looking for at last press ENTER to finish the search If search is successful it will auto connect if the info does not exist it will be shown as follows The address does not exist please retry Login by shortcut Look...

Page 45: ... standard During the environmental friendly use period EFUP period the toxic or hazardous substance or elements contained in products will not leak or mutate so that the use of these substances or elements will not result in any severe environmental pollution any bodily injury or damage to any assets The consumer is not authorized to process such kind of substances or elements please return to the...

Reviews: