U S E R M A N U A L · U S E R M A N U A L · U S E R M A N U A L · U S E R M A N U A L · U S E R M A N U A L · U S E R M A N U A L · U S E R M A N U A L · U S E R M A N U A L · U S E R M A N U A L · U S E R M A N U A L · U S E R M A N U A L · U S E R M A N U A L
XXL-Rehab Manuel wheelchair – The Eclipse
16
Unpacking and assembly
UNPACKING CHECKLIST
1. Check for any obvious damage to the carton or its contents. If damage is
evident, notify your dealer/carrier immediately.
2. Remove all loose packing from the carton.
3. Carefully remove all components from the carton.
After opening the box with the XXL-Rehab Eclipse wheelchair, check that it
contains the following standard items:
1. One Eclipse frame
2. Two rear wheels
3. Two Quick-release axles
4. Two anti-tip tubes
5. Two armrest assemblies
6. One Eclipse back
7. One pair front rigging (optional)
8. Two sector blocks (optional)
NOTE
— Unless the XXL-Rehab Eclipse is to be assembled immediately,
retain cartons and packing materials for use in storing the wheelchair until
assembly is required.
ASSEMBLY
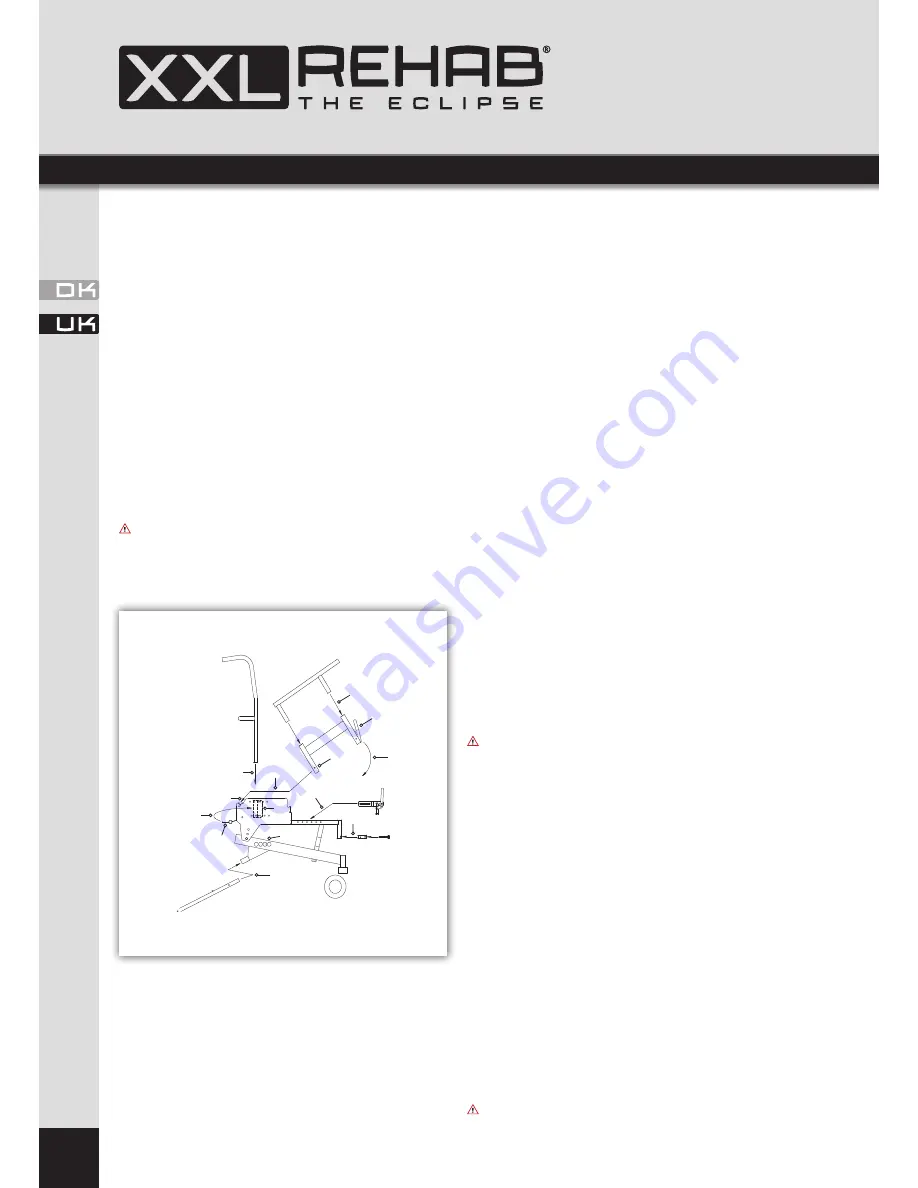
FIG. 4
1. Insert Upper Armrest into Lower Armrest
2. Slide Pin A into Slot B
3. Rotate Armrest so Latch C locks on sideplate
4. Insert Back Tubes into Socket D
5. Engage Pin E to lock back
6. Install wheel locks to fit chosen wheel position
7. Install rear wheels in chosen wheel position with quick release axles
8. Insert Antitip tubes
9. Install sector blocks and front rigging
USER CUSTOMISATION
The following instructions explain how to adjust the XXL-Rehab Eclipse
wheelchair. After making adjustments, it is very important to check that all
parts are properly secured.
Tools
Philips Screw Driver
Allen Keys: 1/8”, 5/32”, 3/16”
Adjustable or Open End Wrench: 7/16”, 1-1/4”, 1-5/16”
Socket Head Driver with socket Heads: 9/16”, 3/4”, 1-1/4”
Removable arm
To Swing Back & Remove Arm/Adjust Armrest Height
The armrest release lever is located on the side of the chair, on the front of
the arm support tube, below the armrest pad. Unlock the arm by moving the
armrest release lever in a rearward direction, approximately 1/2”. The front
of the armrest can then swing up and out of the engaged / locked position.
The rear arm connection can now be disengaged from the skirt guard if
needed.
To replace and lock armrest, first slide the rear armrest support tube into
the rear slot located on the skirt guard. With the rear armrest post ‘seated’
into the slot, swing the front armrest support tube downward and into
place over the front of the skirt guard. Lift the armrest without activating
the release lever to ensure the arm is locked down.
Wheel locks
Activate ‘Push to Lock’ wheel lock by pushing the handle forward. To adjust
locks, loosen the bolt and nut which run through the mounting bracket and
frame. Slide the clamp toward the rear wheel until the wheel lock shoe is
embedded into tire material approximately 1/8” when handle is engaged to
the lock position. Re-tighten bolt and nut to secure mounting bracket in the
desired location. Inspect for correct locking action BEFORE actual use. If the
lock becomes worn or damaged, replace entire assembly immediately.
CAUTION:
WHEEL LOCK IS NOT A BRAKE. DO NOT attempt to stop a
moving wheelchair with the wheel lock. When leaving or entering chair,
ALWAYS ENGAGE BOTH WHEEL LOCKS.
Adjustable back frame
Determine appropriate seat depth under guidance of a health care profes-
sional. Adjust seat depth and back angle to correspond with desired depth
and recline angle. Movable backrest receptacles are attached via four bolts
installed into pre installed hole patterns. Ensure identical hole locations
are used on both left and right side mounts. Your dealer may trim the Back
Frame height to the desired length using a metal cutting saw or pipe cut-
ting tool.
Upholstery
Back upholstery ‘fit’ may be adjusted by loosening or tightening hook
and loop fasteners. For optimum fit, loosen fasteners, then position user
in wheelchair so that upper part of upholstery supports upper back. Re-
tighten fasteners securely.
Replacing/Adjusting Upholstery
XXL-Rehab suggests that you study how the upholstery fastens to the chair
prior to making alterations.
Periodically check upholstery for signs of ripping and sagging. If these are
present, check the inner liner to determine if it has also been damaged or
weakened. Replace immediately if upholstery is damaged or liner shows
sagging. This will ensure uniform tautness which might not be achieved
when upholstery has been used over a period of time.
WARNING:
Laundering or moisture will reduce upholstery flame
retardancy.
D
A
7
3
8
D
4
B
5
E
6
9
2
1
FIG. 4


