en – Original Instructions
22
Installation, Operation and Maintenance Manual
4.3.2
Installation
WARNING: Danger, system pressurized
Before starting work, close the shut-off valves on the suction and discharge sides or drain the
system.
CAUTION:
Install appropriate seals between the unit couplings and the piping system.
WARNING: Hot water leakage hazard
Pressurize the system slowly while checking for leaks at all joints with gaskets or solder
connections.
WARNING:
After installation, run the unit for a few minutes with several utilities open in order to wash the
inside of the system.
Recirculating pumps - Installation sequence
1.
First read and follow the concerning instructions in section 4.3.1 Guidelines for the
hydraulic system on page 18-19.
2.
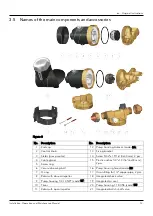
Unscrew the screw ring (item 5 in Figure 3 on page 13) and remove the motor unit and o-
ring from the pump housing. Do not sweat the housing into the plumbing line with the motor
or o-ring attached.
3.
Identify the arrow, cast on the pump housing to define the flow direction of the liquid.
4.
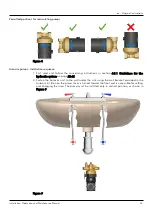
Install the pump housing into the plumbing line in the proper flow direction and in one of the
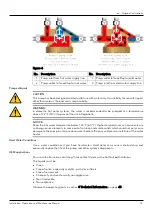
permitted mounting positions (see Figure 8 on page 23).
5.
The BU models are supplied with 1/2” union fittings. These fittings should be removed from
the pump housing before soldering to avoid damaging the internal valves.
6.
For BT models, use the proper gaskets or thread seal and tighten the connections.
7.
Close the shut-off valve on the inlet side of the pump and turn the water supply to the house
back on.
8.
Flush system of debris. Before reattaching the pump motor, open the shut-off valve on the
inlet side of the pump housing and let water flow through the housing. Use a bucket to catch
the water. Let the water run long enough to clear all sand, solder pellets, plumbers tape
flakes, etc. from the lines. Close the inlet shut-off valve when finished.
9.
If the pump unit is supplied without a power cord, prepare the electrical connection
according to the instructions in section 4.4 Electrical connection on page 27.
10.Connect the pump motor to the housing. Make sure the rubber o-ring is in place in the
housing and the screw ring is securely tightened.
NOTICE:
Do not over tighten the screw ring! Do not use plumbers putty on its thread!
Applicable tightening torque:
Brass screw ring (standard product range): ~110 lb-in (12.5 Nm)
Plastic screw ring (only for OEM applications): ~80 lb-in (9 Nm)
11.
Reopen the shut-off valve or valves and let the water flood the pump housing.
12.
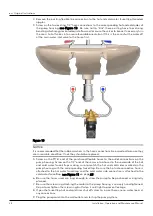
Purge air from the supply line. Turn on the faucet/taps or shower farthest from the water
heater. Open the line until you get a good, steady stream of water without sputter or
evidence of air.
13.
Purge air from the return line. Connect the pump to the electrical supply. With the pump
running, open the hose bib and let water run until the pump is running quietly and there is
no sputtering or other evidence of air coming from the hose bib. Then close the hose bib.
14.
Your system is now in operation. Allow a few minutes for instant hot water to recirculate to
all of your faucet/taps.

