SonTek, a Xylem brand
RiverSurveyor S5/M9 System Manual (February 2013)
125
•
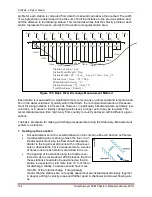
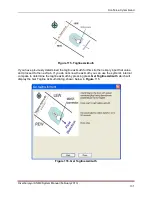
The magnetic-north heading (azimuth) of the tagline is measured. This is the compass
orientation of the tagline in the direction of the right river bank. Setting the tagline azi-
muth is important because it allows the M9/S5 to rotate freely around the sample loca-
tion and still measure the correct mean-station velocity by using its internal compass to
resolve the true direction of velocity and then calculate the normal velocity to the tagline.
In the example to the right, the tag line is oriented to the southwest (225º). The azimuth
should be measured with the internal compass in the ADP (preferred) or a hand-held
compass.
2. Setting up the Software
•
Connect to the ADP through the software.
•
Enter the site and system information into the software. This information includes the site
name, number, location, starting bank, gauge heights, azimuth, velocity-reference meth-
od, depth reference method, rated discharge and any additional weather or measure-
ment conditions comments.
3. Make the Measurement
•
The operator starts at one edge (the start bank), recording the starting-edge location,
water depth and gauge heights.
•
The operator then proceeds to the first station and enters the station location, transducer
depth, and gauge heights (not required).. If ice is present, the values for the ice thick-
ness, depth of water and slush thickness should also be entered.
•
The M9/S5 is positioned with the transducers submerged and the system as vertical as
possible. Ideally the system will be mounted to a platform, vessel, or mounting structure.
•
Data collection begins and the M9/S5 measures the 3D current velocities and bottom
depth throughout the water column.
•
Only the component of water velocity perpendicular to the transect line (or azimuth) is
used to ensure proper discharge calculations, regardless of the flow direction. This nor-
mal component of the velocity is known as the “Normal Velocity”. The true flow direction
or “True Velocity” is still measured, recorded and will be displayed on screen or as a
comparison with the Normal Velocity.
•
At the end of the averaging time for the measurement, the discharge is calculated using
the formula shown in
•
Repeat the steps above at each station along the transect until the last station is com-
pleted. Press the End Section button when the last station is completed.
•
The ending-edge location and depth are recorded.
4. Post Measurement
•
The quality of the entire measurement is assessed and recorded.
•
The total discharge (the sum of all station discharges), the total area and mean velocity
are displayed with graphs of parameters for the entire transect.
•
A report of the entire measurement can then be generated for review.
o
The report includes the estimated uncertainty of the final discharge calculation; the
uncertainty calculation is described in G-8.1.
G-5. Selecting a Measurement Location
The key issues to consider when selecting the location of your measurement cross-section are:
•
Select an area of relatively uniform and steady flow. Try to avoid areas with standing ed-
dies or strong turbulence. Note that a measurement may still be made in these areas


