background image

Multi 3630 IDS

pH value

ba77170e03

10/2017

29

5

pH value

5.1

Measuring

5.1.1 Measuring the pH value

Stability control

(AutoRead )

The stability control function (

AutoRead

) continually checks the stability of the 

measurement signal. The stability has a considerable impact on the reproduc-
ibility of measured values. The display of the measured parameter flashes until 
a stable measured value is available.
You can start the 

Stability control

 function manually at any time, irrespective of 

the setting for automatic 

Stability control

 (see section 11.6.3) in the 

System


menu.

The sensor connection and the USB-B (device) interface are gal-
vanically insulated. This facilitates interference-free measurements 
also in the following cases:

Measurement in grounded test samples

Measurement with several sensors connected to one 
Multi 3630 IDS in one test sample

1

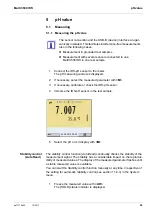
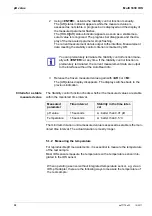
Connect the IDS-pH sensor to the meter.
The pH measuring window is displayed.

2

If necessary, select the measured parameter with 

<M>

.

3

If necessary, calibrate or check the IDS-pH sensor.

4

Immerse the IDS-pH sensor in the test sample.

5

Select the pH or mV display with 

<M>

.

30.09.2015 08:00

Info

1

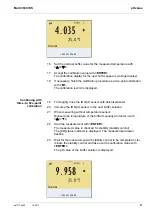
Freeze the measured value with 

<AR>

.

The [HOLD] status indicator is displayed.

Summary of Contents for WTW OxiTop-IDS Multi 3630 IDS

Page 1: ...OPERATING MANUAL ba77170e03 10 2017 Multi 3630 IDS DIGITAL METER FOR IDS SENSORS 3630 IDS...

Page 2: ...Multi 3630 IDS 2 ba77170e03 10 2017 Copyright 2017 Xylem Analytics Germany GmbH Printed in Germany...

Page 3: ...safe operation 11 2 2 3 Unauthorized use 11 3 Commissioning 12 3 1 Scope of delivery 12 3 2 Power supply 12 3 3 Initial commissioning 12 3 3 1 Inserting the rechargeable batteries 13 3 3 2 Connecting...

Page 4: ...45 6 1 2 Measuring the temperature 46 6 2 ORP calibration 47 7 Dissolved oxygen 48 7 1 Measuring 48 7 1 1 Measuring D O 48 7 1 2 Measuring the temperature 50 7 2 FDO check procedure check of the FDO...

Page 5: ...2 Buffer sets for calibration 77 11 1 3 Calibration interval 79 11 2 ORP measurement settings 80 11 2 1 Settings for ORP measurements 80 11 3 D O measurement settings 80 11 3 1 Settings for D O senso...

Page 6: ...ance activities 102 14 1 2 Replacing the rechargeable batteries 102 14 2 Cleaning 103 14 3 Packing 103 14 4 Disposal 103 15 What to do if 104 15 1 General information 104 15 2 pH 105 15 3 Dissolved ox...

Page 7: ...s and turbidity measurements quickly and reliably The Multi 3630 IDS provides the maximum degree of operating comfort reli ability and measuring certainty for all applications The Multi 3630 IDS suppo...

Page 8: ...es number Calibration data Measurement settings The calibration data are updated in the IDS sensor after each calibration pro cedure A message is displayed while the data are being updated in the sens...

Page 9: ...ensor name and sensor series number to assign calibration data to an IDS sensor Calibration data and calibration history are always stored and output with the sensor name and sensor series number to a...

Page 10: ...ds might be damaged if the actions mentioned are not taken 2 1 2 Safety signs on the meter Note all labels information signs and safety symbols on the meter and in the battery compartment A warning sy...

Page 11: ...ration Note the following points for safe operation The meter may only be operated according to the authorized use specified above The meter may only be supplied with power by the energy sources menti...

Page 12: ...rter 3 2 Power supply The Multi 3630 IDS is supplied with power in the following ways Battery operation with NiMh rechargeable batteries Mains operation with the supplied power pack The NiMh batteries...

Page 13: ...eter CAUTION Make sure that the poles of the rechargeable batteries are po sitioned correctly The signs on the batteries must correspond to the signs in the battery compartment 3 Place four rechargeab...

Page 14: ...ing the meter into opera tion for the first time The charging process takes approx 24 hours Symbol Explanation Line power operation with charge function Batteries are automatically charged in the back...

Page 15: ...Multi 3630 IDS Commissioning ba77170e03 10 2017 15 3 3 4 Setting the date and time 3 See section 4 5 5...

Page 16: ...Switches the meter on or off M Selects the measured parameter CAL CAL_ Calls up the calibration procedure Displays the calibration data AR Freezes the measured value HOLD function Switches the AutoRea...

Page 17: ...ture with unit 9 Softkeys and date time AutoCal e g TEC Calibration with automatic buffer recognition e g with the buffer set Technical buffers ConCal Calibration with any buffers Error An error occur...

Page 18: ...is a USB B connection at the same time e g to a PC the data are output to the USB B interface only Power supply via the USB B interface Batteries are not being charged 1 IDS sensors pH ORP conductivi...

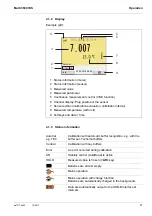
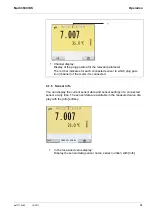
Page 19: ...a are available in the measured value dis play with the Info softkey 1 Channel display Display of the plug position for the relevant parameter The red bar indicates for each connected sensor to which...

Page 20: ...r e g incl CMC feature with pH sensors With the softkey you can very easily switch between the two display types The suitable softkey is displayed depending on the operating situation 2 Display furthe...

Page 21: ...the sensor The meter is ready to measure If the user administration function is activated the Login dialog appears after the meter is switched on see section 4 4 The user administration function is no...

Page 22: ...assword menu item is grayed out no password is required for the login 1 Switch the meter on with On Off or On Off_ The Login dialog appears 2 Using select the menu item User name and confirm with ENTE...

Page 23: ...alog appears 2 Using select the menu item User name and confirm with ENTER The user name is highlighted 3 Using select a user name and confirm with ENTER 4 Using select the menu item Change password a...

Page 24: ...procedures contain further subelements The selection is done with the keys The current selection is dis played with a frame Submenus The name of the submenu is displayed at the upper edge of the fram...

Page 25: ...y reference of examples Setting the language section 4 5 4 Setting the date and time see section 4 5 5 Language Deutsch Acoustic signal off Volume 9 Illumination on Brightness 12 Switchoff time 1 h Te...

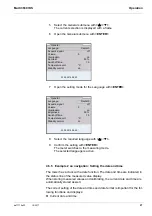
Page 26: ...the measuring mode 2 Open the Storage config menu with ENTER_ The instrument is in the setting mode 3 Select the System submenu with The current selection is displayed with a frame 4 Open the System s...

Page 27: ...nt date and time 5 Select the General submenu with The current selection is displayed with a frame 6 Open the General submenu with ENTER 7 Open the setting mode for the Language with ENTER 8 Select th...

Page 28: ...confirm the System Clock function menu with and ENTER The setting menu for the date and time opens up 3 Select and confirm the Time menu with and ENTER The hours are highlighted 4 Change and confirm...

Page 29: ...atic Stability control see section 11 6 3 in the System menu The sensor connection and the USB B device interface are gal vanically insulated This facilitates interference free measurements also in th...

Page 30: ...OLD AR status indicator appears as soon as a stable mea sured value is recognized The progress bar disappears and the dis play of the measured parameter stops flashing The current measurement data is...

Page 31: ...n any order Below calibration with Technical buffers TEC is described When other buffer sets are used other nominal buffer values are displayed Apart from that the procedure is identical Measurement o...

Page 32: ...perature of the buffer manually and enter it with 6 Start the measurement with ENTER The measured value is checked for stability stability control The AR status indicator is displayed The measured par...

Page 33: ...dicator is displayed The measured parameter flashes 13 Wait for the measurement with stability control to be completed or ter minate the stability control and take over the calibration value with ENTE...

Page 34: ...isplay 20 If necessary use M to finish the calibration The calibration record is displayed or Switch to calibration with the next buffer with ENTER Calibration is automatically completed after the las...

Page 35: ...the buffer manually and enter it with 6 Start the measurement with ENTER The measured value is checked for stability stability control The AR status indicator is displayed The measured parameter flas...

Page 36: ...t 25 C and determines the zero point of the IDS pH sensor 15 03 2016 08 00 ConCal 11 Thoroughly rinse the IDS sensor with deionized water 12 Immerse the IDS sensor in buffer solution 2 13 When measuri...

Page 37: ...19 Thoroughly rinse the IDS pH sensor with deionized water 20 Immerse the IDS pH sensor in the next buffer solution 21 When measuring without temperature sensor Measure the temperature of the buffer m...

Page 38: ...lue for the measured temperature with 25 Accept the calibration value with ENTER The calibration display for the next buffer appears voltage display 26 If necessary use M to finish the calibration The...

Page 39: ...tion Calibration Calibration data stor age Display Displays the calibration records Further options Scroll through the calibration records with Output the displayed calibra tion record to the interfac...

Page 40: ...measuring range The following information is displayed 30 30 62 61 or 56 50 Clean the IDS sensor according to the sensor operating manual Error Error 30 or 30 62 or 50 Eliminate the error according to...

Page 41: ...g lines for all nominal buffer values used with the last valid cali bration 3 Measuring range for which a valid calibration is available Measured values in this range are suitable for documentation 4...

Page 42: ...nts of a QSC initial calibration the QSC initial cali bration should optimally be carried out with the initial commissioning of the sen sor Carry out the normal calibrations for your special measuring...

Page 43: ...nsor sym bol for this sensor 1 Open the menu for measurement settings with ENTER 2 In the QSC menu select First calibration with The calibration display appears AutoCal QSC Kit is displayed as the buf...

Page 44: ...01 02 2016 08 00 Info 1 Open the menu for measurement settings with ENTER 2 In the QSC menu select Control calibration with The calibration display appears AutoCal QSC Kit is displayed as the buffer...

Page 45: ...of the setting for automatic Stability control see section 11 6 3 in the System menu The sensor connection and the USB B device interface are gal vanically insulated This facilitates interference fre...

Page 46: ...icator appears while the measured value is assessed as not stable A progress bar is displayed and the display of the measured parameter flashes The HOLD AR status indicator appears as soon as a stable...

Page 47: ...0 IDS ORP ba77170e03 10 2017 47 6 2 ORP calibration ORP electrodes are not calibrated You can however check ORP electrodes by measuring the ORP of a test solution and comparing the value with the nomi...

Page 48: ...rom an IDS conductivity sensor is taken over the sta tus indicator Sal is displayed in the measurement window of the IDS oxy gen sensor The status indicator Sal is displayed in the measurement window...

Page 49: ...alue with AR The HOLD status indicator is displayed If the HOLD function is active you can e g start a manual mea surement with stability control 2 Release the frozen measured value again with AR The...

Page 50: ...O Check procedure you can find out in a simple manner whether the FDO 925 D O sensor should be cleaned or calibrated 7 2 2 When should you check the sensor Checking can be useful in the following case...

Page 51: ...the meter 2 Place the D O sensor in the check and storage beaker The sponge in the check and storage beaker must be moist not wet Leave the sensor in the check and storage beaker long enough so it can...

Page 52: ...he check resulted in a measured value of 99 3 The measurement error is within the specified validity scope No cleaning or user calibration is required 7 3 Calibration 7 3 1 Why calibrate D O sensors a...

Page 53: ...rage beaker The sponge in the check and storage beaker must be moist not wet Leave the sensor in the check and storage beaker long enough so it can adapt to the ambient temperature 3 Start the calibra...

Page 54: ...the cal ibration The evaluation appears on the display and in the calibration record The calibration record is automatically transmitted to the interface after calibrating Menu item Setting func tion...

Page 55: ...record Relative slope S 0 94 1 06 S 0 92 0 94 or S 1 06 1 08 S 0 90 0 92 or S 1 08 1 10 Error Error S 0 90 or S 1 10 Perform error elimination accord ing to chapter 15 WHAT TO DO IF Multi 3630 IDS Ser...

Page 56: ...D function you can freeze the current measured value The dis played measured value stops changing until you switch the HOLD function off The sensor connection and the USB B device interface are gal va...

Page 57: ...play disappears 1 Freeze the measured value with AR The HOLD status indicator is displayed 2 Using ENTER activate the Stability control function manually The AR status indicator appears while the meas...

Page 58: ...near temperature compensation nLF according to EN 27 888 Linear temperature compensation Lin with adjustable coefficient in the range 0 000 10 000 K No temperature compensation off Application tips Se...

Page 59: ...or by calibrating with the control standard in the following range 0 450 0 500 cm 1 e g TetraCon 925 nominal cell constant 0 475 The cell constant is determined in the control standard 0 01 mol l KCl...

Page 60: ...the Calibration menu in the measured value display press the ENTER key 4 Immerse the IDS conductivity sensor in the control standard solution 0 01 mol l KCI 5 Start the measurement with ENTER The mea...

Page 61: ...cord to the interface with PRT Output all calibration records to the interface with PRT_ Quit the display with ESC or ENTER Switch directly to the measured value display with M Calibration Calibration...

Page 62: ...ti 3630 IDS 62 ba77170e03 10 2017 Calibration record USB output Multi 3630 IDS Ser no 09250023 CALIBRATION Cond Calibration date 15 03 2016 16 13 33 TetraCon 925 Ser no 09250033 Cell constant 0 476 1...

Page 63: ...ements also in the following cases Measurement in grounded test samples Measurement with several sensors connected to one Multi 3630 IDS in one test sample 1 Connect a turbidity sensor to the measurin...

Page 64: ...uc ibility of measured values The display of the measured parameter flashes until a stable measured value is available You can start the Stability control function manually at any time irrespective of...

Page 65: ...layed and the display of the measured parameter flashes The HOLD AR status indicator appears as soon as a stable mea sured value is recognized The progress bar disappears and the dis play of the measu...

Page 66: ...solution Range FNU NTU 1 0 0 1 0 2 5 0 200 0 3 200 0 4000 0 As the standard with turbidity value 0 0 FNU you can use clean tap water or filtered deionized water in a suitable calibration vessel depend...

Page 67: ...Use and to set the concentration of the standard solution for each digit and confirm with ENTER The standard solution is measured The measured value is checked for stability AutoRead 10 Wait for the e...

Page 68: ...bration records of the last 10 calibrations are available in the menu Cal ibration Calibration data storage Display To open the Calibration menu in the measured value display press the ENTER key 14 Us...

Page 69: ...with Output the displayed calibration record to the interface with PRT Output all calibration records to the interface with PRT_ Quit the display with ESC or ENTER Switch directly to the measured val...

Page 70: ...the MPP 930 is equipped with the maximum number of IDS sensors of the XXX P series 3 the setting menu for the parameter depth of immersion is only available from the single display of the parameter F2...

Page 71: ...the sensors The following functions are enabled only if the IDS sensors of the XXX P series are connected directly to the meter see section 10 5 Calibration Reset Updating the firmware 10 2 Measuring...

Page 72: ...value stops changing until you switch the HOLD function off Stability control AutoRead The stability control function AutoRead continually checks the stability of the measurement signal The stability...

Page 73: ...XX P series are calibrated while being directly con 2 Using ENTER activate the Stability control function manually The AR status indicator appears while the measured value is assessed as not stable A...

Page 74: ...s are printed in bold 10 5 What to do if Display of Sensor input open Menu item Possible setting Explanation Sal correction on off Manual salt content correction for depth of immersion measurements Sa...

Page 75: ...Disconnect the additional IDS sen sor The firmware of the meter does not support the sensor Update the firmware of the meter see section 17 1 1 Disconnect the multi parameter probe from the meter 2 D...

Page 76: ...the USB A interface USB memory device USB printer Calibration Calibration data stor age Output to RS232 USB Outputs the stored calibration data to the USB B interface PC Calibration Buffer TEC NIST D...

Page 77: ...tem perature sensor is connected Alternative tempera ture on off Takes over the temperature value from an IDS sensor This menu item is only available if an IDS adapter and an IDS sensor with integrat...

Page 78: ...7 000 10 000 20 C 8 Merck 5 4 010 7 000 10 000 25 C 9 DIN 19267 1 090 4 650 6 790 9 230 25 C 10 Mettler Toledo USA 1 679 4 003 7 002 10 013 25 C 11 Mettler Toledo EU 1 995 4 005 7 002 9 208 25 C 12 F...

Page 79: ...laced by the QSC color scale see section 5 4 16 Metrohm 3 996 7 003 8 999 25 C 17 Beckman 4 005 7 005 10 013 25 C 18 Hamilton Duracal 4 005 7 002 10 013 25 C 19 Precisa 3 996 7 003 8 999 25 C 20 Reage...

Page 80: ...th M Default settings are printed in bold 11 3 D O measurement settings 11 3 1 Settings for D O sensors The settings are available in the menu for measurement and calibration set tings To open the set...

Page 81: ...The meter reminds you to calibrate regularly by the flashing sensor symbol in the measuring screen FDO Check Start FDO Check Starts the FDO check procedure FDO Check Check interval 1 60 999 d Interva...

Page 82: ...ld Salinity 0 0 70 0 Salinity or salinity equivalent for the salt content correction This menu item is only available if the automatic salt content correc tion is switched off and the manual salt cont...

Page 83: ...vity sensor in days The meter reminds you to calibrate regularly by the flashing sensor sym bol in the measuring screen Type Measuring cell used Cal Measuring cells whose cell constant is determined b...

Page 84: ...00 Factor for TDS value Reset Resets all sensor settings to the delivery condition see section 11 7 1 Menu item Possible setting Explanation Menu item Possible setting Explanation Cell constant 0 090...

Page 85: ...ash drive or printer Outputs the stored calibration data to a connected USB memory device USB printer Calibration Calibration data storage Output to RS232 USB Outputs the calibration data storage to t...

Page 86: ...ace Output format ASCII CSV Output format for data transmission For details see section 13 System Interface Decimal sep arator Dot xx x Comma xx x Decimal separator System Interface Output header Outp...

Page 87: ...itchoff function in order to save the batter ies see section 11 6 1 The automatic switch off function switches off the meter if no key is pressed for an adjustable period The automatic switch off func...

Page 88: ...e reset under the Reset menu item in the menu for cali bration and measurement settings To open the settings display the required measured parameter in the measured value display and press the ENTER k...

Page 89: ...tings display the required measured parameter in the measured value display and press the ENTER key Turbidity The following settings for the turbidity measurement are reset to the default condition wi...

Page 90: ...g system settings can be reset to the default status The resetting of the system settings is done in the menu Storage config Sys tem Reset To open the menu Storage config in the measured value display...

Page 91: ...e to continue storing Then you can e g transmit the stored data to a PC or a USB flash drive see section 12 3 1 and subsequently erase the storage see section 12 3 2 12 2 Automatic data storage at int...

Page 92: ...n Automatic data stor 30 09 2015 08 00 1 2 3 Menu item Possible setting Explanation ID number 1 10000 ID number for the dataset series Interval 1 s 5 s 10 s 30 s 1 min 5 min 10 min 15 min 30 min 60 m...

Page 93: ...ceed as follows to switch off the automatic data storing function before the adjusted storing duration has expired 1 Remaining storing duration 2 Graphical display of the storing duration If the autom...

Page 94: ...he manual data memory as an example The same settings and functions are available for the automatic data memory Menu item Setting function Explanation Data storage Manual data storage Display Displays...

Page 95: ...section 12 3 1 EDITING THE MEASUREMENT DATA MEMORY 12 3 3 Measurement dataset A complete dataset consists of Date time Meter name series number Sensor name series number Manual data storage 3 of 64 15...

Page 96: ...t while storing stable measured value Otherwise the AR dis play is missing Calibration evaluation 4 levels or no evaluation or QSC percentage Memory locations The Multi 3630 IDS meter has two measurem...

Page 97: ...nnecting the USB memory device Transmitting data options 13 2 Transmitting data to a USB printer Via the USB A interface USB Host you can transmit data to a USB printer or USB memory device How to tra...

Page 98: ...USB printer to the USB Host interface 2 Connect the power pack to the Multi 3630 IDS see section 3 3 2 As soon as the USB printer is identified by the meter the printer status indicator is displayed...

Page 99: ...nu Calibration Calibration data storage For details see menu for calibration and measurement settings of the sensor Automatic At the end of a calibration procedure The following rule applies With the...

Page 100: ...ured values of all con nected sen sors Manual With PRT Simultaneously with every manual storing process see section 12 1 Automatic at intervals With PRT_ Then you can set the transmission interval Sim...

Page 101: ...ng rule applies With the exception of the menus shortly pressing the PRT key generally outputs the display contents to the interface displayed measured values measuring datasets calibration records If...

Page 102: ...ors for instructions on maintenance 1 Screws 2 Battery compartment 1 Unscrew the two screws 1 on the underside of the meter 2 Open the battery compartment 2 on the underside of the meter 3 Remove the...

Page 103: ...takes approx 24 hours Dispose of used batteries according to the local regulations of your country End users within the European Union are obligated to return used batteries even ecologically compati...

Page 104: ...use Remedy Operating condition undefined or EMC load unallowed Processor reset Press the ENTER and On Off key simultaneously Cause Remedy E g a question by the service department Switch on the meter O...

Page 105: ...nnect the power pack Cause Remedy A battery voltage untypical for NiMH batteries was identified Disconnect the power pack from the meter Check whether the batteries in the battery compartment are suit...

Page 106: ...ffer solutions The used buffer solutions do not agree with the set buffer set Set different buffer set or Use different buffer solutions Buffer solutions too old Use only once Note the shelf life Buff...

Page 107: ...red value outside the measuring range Select a suitable measuring medium Cause Remedy Sensor contaminated Clean the sensor Measured temperature value outside the operating conditions display of OFL UF...

Page 108: ...o old Unsuitable calibration envi ronment e g gas bubbles reflection light Check the calibration Minimum depth of immersion not observed Heed the minimum depth of immer sion of the sensor 2 cm Cause R...

Page 109: ...Other days 85 Power supply Rechargeable batter ies 4 x 1 2 V NiMH batteries type AA Operational life Approx 150 h Power pack charging device Kuantech Co Ltd KSAC 0900110W1UV 1 Input 100 240 V 50 60 Hz...

Page 110: ...s used EMC EC directive 2004 108 EC EN 61326 1 EN 61000 3 2 EN 61000 3 3 FCC Class A Meter safety EC directive 2006 95 EC EN 61010 1 IP protection class EN 60529 Measuring ranges accuracy Variable Mea...

Page 111: ...e page 104 1 Install the downloaded firmware update on a PC An update folder is created in the Windows start menu If an update folder already exists for the meter or meter type the new data are displa...

Page 112: ...older is created in the Windows start menu If an update folder already exists for the sensor or sensor type the new data are displayed there 2 In the windows start menu open the update folder and star...

Page 113: ...body in the housing wall of reference elec trodes or electrolyte bridges It arranges the electrical contact between two solutions and makes the electrolyte exchange more dif ficult The expression junc...

Page 114: ...Slope The slope of a linear calibration function Stability control AutoRead Function to control the measured value stability Standard solution The standard solution is a solution where the measured v...

Page 115: ...easured parameter 88 System settings 90 Display 17 E Energy saving feature 14 F FDO Check 50 Firmware update 111 I Initial commissioning 12 14 Initialize 87 Interval for calibration 79 K Keys 16 M Mea...

Page 116: ...nterval 91 T Temperature compensation 58 Temperature measurement Conductivity 58 73 O2 50 pH 30 46 Three point calibration ISE 68 pH 33 37 Transmitting data 97 Transmitting measured values 97 Two poin...

Page 117: ......

Page 118: ...buildings factories and farms In more than 150 countries we have strong long standing relationships with customers who know us for our powerful combination of leading product brands and applications...

Reviews: