Operation
System 182-XT-4
4 - 16
ba76027e02
12/2014
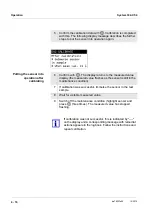
Putting the sensor into
operation after
calibrating
5
Confirm the calibration data with
g
. Calibration is completed
with this. The following display message describes the further
steps to put the sensor into operation again.
6
Confirm with
g
. The display returns to the measured value
display (the measured value flashes as the sensor is still in the
maintenance condition).
7
If calibration was successful, immerse the sensor in the test
sample.
8
Wait for a stable measured value.
9
Switch off the maintenance condition (highlight sensor and
press
g
three times). The measured value has stopped
flashing.
If calibration was not successful, this is indicated by "----"
on the display and a corresponding message with remedial
actions appears in the log book. Follow the instructions and
repeat calibration.
Summary of Contents for YSI DIQ/S 182-XT-4-PR
Page 6: ...Contents System 182 XT 4 0 4 ba76027e02 12 2014...
Page 10: ...Overview System 182 XT 4 1 4 ba76027e02 12 2014...
Page 14: ...Safety System 182 XT 4 2 4 ba76027e02 12 2014...
Page 64: ...Installation System 182 XT 4 3 50 ba76027e02 12 2014...
Page 82: ...Operation System 182 XT 4 4 18 ba76027e02 12 2014...
Page 88: ...The SETTINGS menu System 182 XT 4 5 6 ba76027e02 12 2014...
Page 114: ...Relay outputs System 182 XT 4 6 26 ba76027e02 12 2014...
Page 116: ...Maintenance and cleaning System 182 XT 4 7 2 ba76027e02 12 2014...
Page 122: ...What to do if System 182 XT 4 8 6 ba76027e02 12 2014...
Page 134: ...Technical data System 182 XT 4 9 12 ba76027e02 12 2014...
Page 135: ...System 182 XT 4 1 ba76027e02 12 2014...
Page 138: ...Accessories and options System 182 XT 4 11 2 ba76027e02 12 2014...
Page 142: ...Appendix store separately if required System 182 XT 4 13 2 ba76027e02 12 2014...
Page 143: ......


