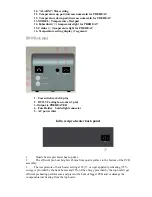
background image

unit.  
3


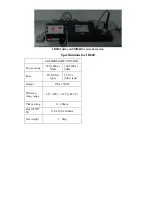
  Insert the connector/receptacle cord from the back output of controller to back of 

pre-heater inlet.        
4


Plug the AC power cord and flip the mains illuminated switch to the “ ON ” position.   

5


The PREHEATER is ready to use.   


Temperature parameter value setting 


Temperature setting range: 3

0

~350

  (86

~662

)  

Temperature compensation range: +99

~ -99

  (+99

  ~    -99

)  

Preset temperature: 3

0

℃ 

(86

Temperature adjustment: “00” or “-00”   
 

À Pre-heater temperature setting: By pressing “

” or “

” pad to increase or 

decrease the temperature. Would suggest set temperature at “22

0

℃ 

(430

approx.) fo

r  

better performance

.  


Temperature forward counting: If pressing “

” pad one time, the digital will be   

increased “1” numeral. If continuous pressing “

” pad then the digital numerals will   

be forwarded till the temperature you would set or adjust and then depressing the “

”  

pad off.   
 

Temperature backward counting: If pressing “

” pad one time the digital will be   

decreased “1” numeral. If continuous pressing “

” pad then the digital numerals will   

be backward till the temperature you would set or adjust and then depressing the “

”  

pad off.   
 

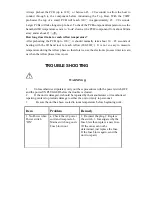
1. Check actual temperature compensation value:   

Press “MODEL” pad until digital display show “- - -“, then release the “MODEL” pad, 
the display will show the actual temperature compensation value automatically after 4 
seconds. After 2 seconds the display will be back to preset temperature.   

2. Actual tempe

rature adjustment: Press “MODEL” pad until digital display show “- - 

-“ ,then press the “MODEL” pad again within 4 seconds, the display will show the actual 
temperature compensation value automatically and twinkling. Now it 

is ready to adjust by 

using 

and 

” pads. Press “

” pad the temperature will be up and 

press 

” pad   

the temperature will be down. If there is no need to adjust the temperature, after

 2 sec. the 

display will become normal situation. For example: Assume the temperature set at 200

℃ 

and 

actual temperature being measured 190

, then the temperature to be needed to 10

℃ 

and the parameter value shows 

00 or -00"then temperature compensation value is

10"[00 

+ 10=( increase 10

)]. If the parameter value shows -20 then temperature compensation value 

is 10 (-20+10=10

). If the parameter value shows 20 then the compensation value is 30 [20 

Summary of Contents for IR860

Page 1: ...ed Preheater the system will achieve remarkable improvements in quality and efficiency of SMD BGA rework operations Please read this manual carefully to maximize the advantages of using your new SMD BGA rework system and keep this manual readily accessible for reference C a t a l o g u e Introduction Warning Caution P 3 4 Installation and Specifications P 5 6 Features P 7 9 Principle of operation ...

Page 2: ...nt Never submerse the unit in liquid or allow any liquid to enter the station Never use any solvent to clean the case 8 8 Quartz heater is fragile be slightly moving the station if necessary 9 9 This unit is designed for SMD rework BGA re balling and pre heating PCB assembly and should not be used for any other purpose without first consulting the manufacturer or its authorized agent 10 10 Keep th...

Page 3: ...re heater to contact exposed skin as burning may occur To eliminate the possibility of burns allow time for the equipment to cool before commencing maintenance ٛ Death or serious injury may result from electric shock It is therefore essential to isolate the equipment from the mains before commencing repairs ٛ Do not allow the spillage of any liquid to fall on the quartz emitter pre heater as damag...

Page 4: ...ecifications for IR860 SOLDERLIGHT CONTROL Power rating 220 240Vac 50Hz 100 120Vac 60Hz Fuse T2A Slow type T3 15A Slow type Output 15Vac 150W IR Lamp temp range 45 450 113 842 Time setting 0 900sec Size W H D 170 x 100 x 200mm Net weight 3 3Kg ...

Page 5: ...w o AC power cord 2 8Kg Features of IR860 Front panel ٛ 1 Timer switch ٛ 2 Power Switch for Solderlight ٛ 3 Down key Time counting temperature decrease ٛ 4 Up key Time counting temperature increase ٛ 5 SOLDER LIGHT Temperature display 3 segment IR hand tool intensity power ٛ 6 Celsius temperature light for Solderlight ٛ 7 Fahrenheit temperature light for Solderlight ٛ 8 RESET Offset frontward coun...

Page 6: ... fan socket 3 pin ٛ 3 Output to PREHEATER ٛ 4 Fuse Holder Solderlight connector ٛ 5 AC power inlet Infra red pre heater back panel 1 Quartz heater gets faster heat up time 2 The efficient pre heat height is 45mm from quartz surface to the bottom of the PCB assembly 3 The temperature of back heater setting at 220 can get apparent preheating 75 energy is provided by the back heater and 25 of the ene...

Page 7: ...backward counting If pressing key one time the digital will be decreased 1 numeral If pressing key over 2 seconds then the digital numerals will be down continuously till the temperature you set and then depressing the key off Step footswitch the IR lamp commence to warm up release the footswitch IR lamp will be stop operating IR lamp operating with positive numeral module Flip the TIMER IR switch...

Page 8: ...own 0 If released the footswitch then positive numeral counting will be stopped step again then the timing will be calculated continuously The IR lamp and positive numeral counter will be commenced counting when footswitch being stepped the vise versa To check a reflow time of new component there are two ways to get the negative numeral counting one by using positive numeral counting data converse...

Page 9: ...ll the temperature you would set or adjust and then depressing the pad off 1 Check actual temperature compensation value Press MODEL pad until digital display show then release the MODEL pad the display will show the actual temperature compensation value automatically after 4 seconds After 2 seconds the display will be back to preset temperature 2 Actual temperature adjustment Press MODEL pad unti...

Page 10: ...tools and fluxes required Switch on and warm up The following simple procedure will warm the system up ٛ Switch on the IR 810 controller Set control settings Set IR hand tool power setting between 220 380 normal 240 Set Pre heater power setting between 200 290 normal 240 ٛ Allow system to warm up switch pre heater on and wait 5 minutes Tools and fluxes required The following are required for use i...

Page 11: ...nter of the PCB pre heater For BGAs apply a very small amount of gel flux approx 0 1 0 15mm thickness Place and align component note depending on the application y0ou may be required to apply solder paste to the PCB before placing component ٛ A PREHEAT the fluxed component PCB to approximately 120 as measured by the IR sensor ٛ B REFLOW use the IR hand tool operated by pressing the footswitch for ...

Page 12: ...reflow phase time normally 30 45 seconds for a small PCB ٛ C SOAK for a short period to soak about 10 seconds the component allowing the joints to fully bond ٛ D COOL allow the component to cool to below 180 before moving the PCB Aftercare ٛ Clean flux residue off PCB if necessary ٛ Check solder joints ٛ Test Q A What Top Heat setting should you use Between 220 380 Normal setting is 240 What s the...

Page 13: ...re during the reflow phase so therefore we use the electronic process timer to warn us when the reflow phase time is over TROUBLE SHOOTING WARNING 1 Unless otherwise stipulated carry out these procedures with the power switch OFF and the power UNPLUGGED before the trouble is cleared 2 If the unit is damaged it should be repaired by the manufacturer or its authorized repairing centers to preclude d...

Page 14: ...assembly 4 IR Lamp not light a Check the IR lamp b Check the 15A fuse on IR810 c Check the AC power transformer has AC15V output d Forget to step foot switch 1 Replace the IR lamp if burnt 2 Investigate why the fuse blew then replace a new fuse If the cause can not be determined just replace the fuse If the fuse blows again send the unit to repair 3 Replace a new transformer if burnt 4 Step foot s...

Reviews: