background image

Ver.1  

April 2016

P 3

da Vinci  

• Do not place the printer in humid or dusty environment such as bathrooms and high traffic areas.

• Do not place the printer on a rickety surface and/or inclined position. Printer may fall down/or 

tumble and it may cause serious injury. 

• Please keep the front door closed during printing to avoid injury. 

• Do not touch the interior of the printer while printing. As it may be hot and include moving parts. 
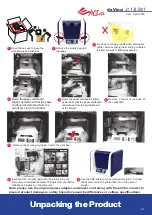
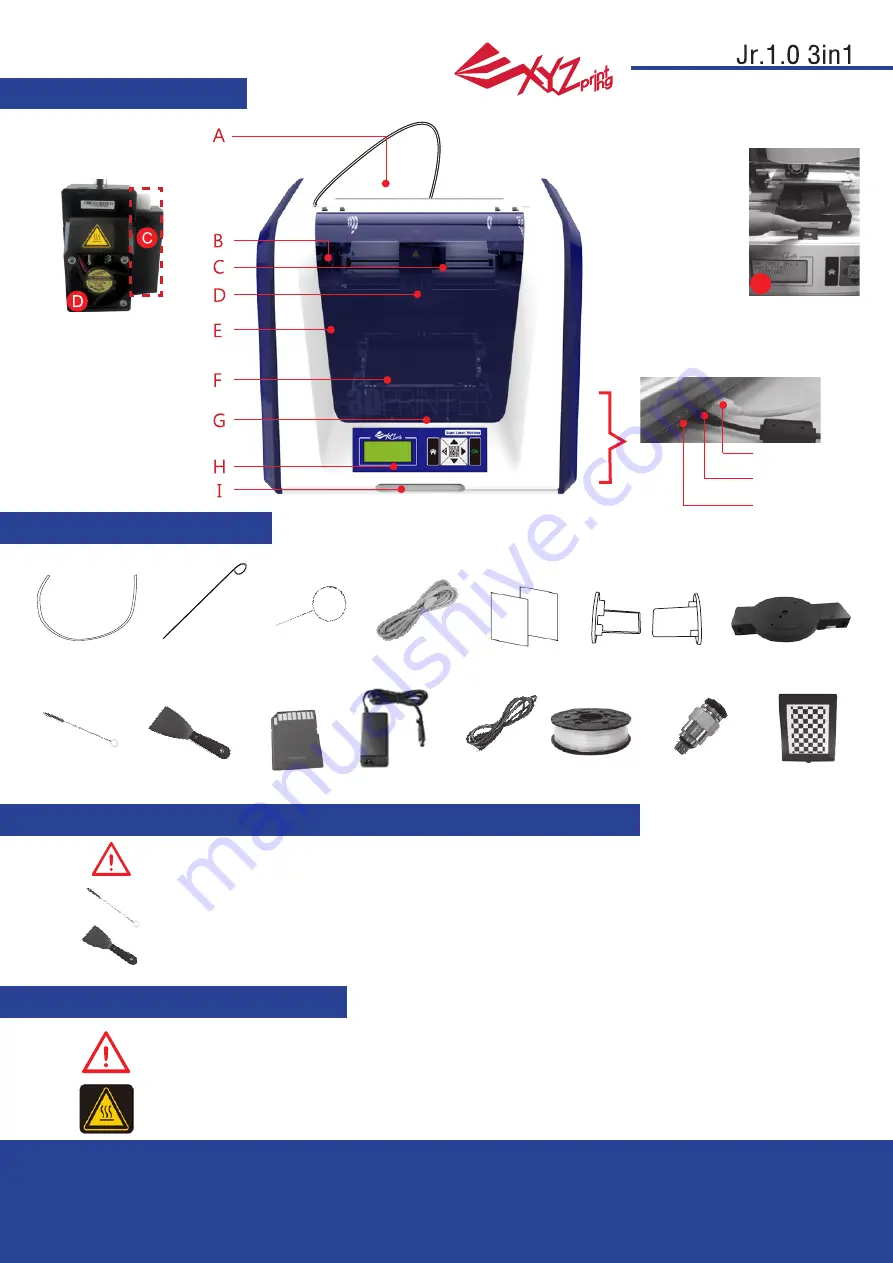
Product Overview

Accessory Checklist

Important Safety Instruction for Use of Maintenance Tools

Important Safety Instruction

• The maintenance tools provided should be only handled by an adult. Please keep the tools away 

from children.

• The scraper is used to remove the object from the print bed when printing has finished. The bed tape 

is reusable and it can be replaced when it has worn out.

• Store the gear cleaning brush properly. This tool shall only be used to clean the specified parts of the 

machine and should not be used for the cleaning of other parts to prevent damaging the machine.

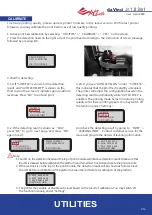
A: Filament movement area
B: Feed module
C: Detector
D: Extruder
E: Filament
F: Print bed

G: SD card port 

(Storage format: FAT32)

H: Control and display panel
I: Front cover

USB Port

Power Switch

Power Connector

G

Cleaning Brush

Scraper 

USB Wire

Power Cord 

Bundled filament

Calibrating Plate

Scan Bed

Bed Tape X 3pcs 

Filament spool axle ring 

Power Adapter

Guide tube

Cleaning Wire x 5

Feeding Path   

   Cleaning Wire

SD Card

.Feeding Tube Grip X1

(Please watch the tutorial video

on XYZprinting website for replacing and 

installing the Feeding Tube Grip.)

Product Overview

Summary of Contents for da Vinci Jr. 1.0

Page 1: ...Ver 1 April 2016 P 1 da Vinci da Vinci Jr 1 0 3in1 User Manual da Vinci Junior 1 0 3 in 1 3D Printer...

Page 2: ...int is strongly recommended When registered with XYZprinting you will receive latest technical supports and updates To register simply click Register Now to begin You may use XYZware to initiate manua...

Page 3: ...move the object from the print bed when printing has finished The bed tape is reusable and it can be replaced when it has worn out Store the gear cleaning brush properly This tool shall only be used t...

Page 4: ...the printer in order to prevent product damage or safety hazards caused by differences in voltage specifications Open the box and remove the accessories and cushions Remove 2 foams at the back of the...

Page 5: ...g the Accessories Install the filament guide tube Run the guide tube through the gap over the printing chamber to the filament feed hole Ensure that the guide tube has been tightly inserted into the f...

Page 6: ...the correct manner Open the release arm and push the filament all the way to the bottom so that the front end of the filament is completely inserted into the feed module Take out and separate the fil...

Page 7: ...menu LOAD FILAMENT EXTRUDER HEATING TEMPERATURE 210 C PLEASE WAIT LOAD FILAMENT EXTRUDER HEATING TEMPERATURE 210 C PLEASE WAIT LOADING PLEASE WAIT UNLOADING PLEASE WAIT OK TO RETURN UTILITIES CHANGE S...

Page 8: ...bsite Environmentally friendly 3D printer that satisfies the WEEE recycling requirements and utilizes the environmentally friendly PLA filaments for printing Satisfies electrical appliance safety spec...

Page 9: ...t Change filament Sample printing SETTINGS The parameters of printer INFO The firmware and printer statistical information MONITOR MODE Monitor of extruder and print bed working temperature and printi...

Page 10: ...ODE SYSTEM VERSION BUILD FROM CARD SPOOL STATS CLEAN NOZZLE CALIBRATE Z OFFSET HELP P14 P14 P14 P14 P14 BUZZER LANGUAGE ENERGY SAVE AUTO LEVEL RESTORE DEFAULT Home Menu Top Menu Sub Menu The map above...

Page 11: ...no yes 2 Put the bed tape on the print bed 3 Select YES to start printing 4 Remove the printed object when the printing has finished and the print bed has descended The bed tape is reusable and it can...

Page 12: ...rm And check the detecting result by going to INFO LEVELING INFO Contact customer service for the issue and provide the details of leveling information 4 1A If SUCCESS is shown for the detection resul...

Page 13: ...wo sheets of copy paper to be drawn out smoothly but six sheets of copy paper cannot be passed 2 Increase decrease the value based on a scale of 0 05mm Increasing the value will increase the gap betwe...

Page 14: ...n the printer between English and Japanese The default lanague is English To switch to Japanese Select OFF and press OK to change the setting Select 06M for auto off after 6 minutes or OFF for never t...

Page 15: ...e latest information product documents tutorial video and more MONITOR MODE shows the temperature of the extruder See below for the working temperature for the parts in different modes SPOOL STATISTIC...

Page 16: ...vated with XYZscan With the software you may also edit save the scan and send the object for printing 360 degrees automatic rotating platform for scanning 3D laser scanner at the right sides Set scan...

Page 17: ...s of physics objects with some features may not scan well If scanning with the correct scan mode setting doesn t help follw the suggestion below may help to improve the scanning quality Place the prin...

Page 18: ...ore attach or remove it In XYZscan select Setting Calibrate Now Wait until XYZscan shows the instructions of calibrating plate placement place the plate at the center of the turntable with chessboard...

Page 19: ...are remaining filaments in the nozzle and remove them accordingly After removing the filament please select CHANGE NOZZLE Once the laser engraver module has been installed open the XYZware software S...

Page 20: ...aving modes default software setting is Vector mode Set engraving speed number of engraving layers contour detection sensitivity or color depth detection sensitivity PAUSE Select PAUSE to pause the la...

Page 21: ...emove the chips of filament out of the gear Replace the wire after the cleaning is completed 2 Press the black rubber fixer on top of hole and pull the guide tube out 2 Use the cleaning brush to scrub...

Page 22: ...set the printer and the computer in same network domain i e connecting to the same Wireless Access Point 2 Before connecting the printer adjust the set value of the connected Wireless Access Point Fo...

Page 23: ...The monitoring function of printer can be used to confirm the on line status and the IP information of the connected printer XYZware secures the IP address of the printer and the connection is succes...

Page 24: ...wireless printing 2 Install XYZprinting App from Android or iOS system Category User Information Gallery Main screen My Upload Upload the item and printable file Printer To remote control printer Abou...

Page 25: ...e file will be sent to the printer and ready to print You may remote control the printing status Select the object you want to print 4 5 6 2 The printable file is 3w format which can print from App di...

Page 26: ...acid which is extracted from corn sugarcane or other sugar containing crops and is regarded as the most environmentally friendly 3D printing material Unwanted PLA printed objects can be simply discard...

Page 27: ...Internal communication error Internal communication error Extruder storage error Unable to detect extruder Calibration failure Right camera error Left camera error Right scanning laser error Left sca...

Page 28: ...tions Commission FCC Statement You are cautioned that changes or modifications not expressly approved by the part responsible for compliance could void the user s authority to operate the equipment Th...

Page 29: ...the printer can lead to printer damage or safety risks Do not use flammable chemicals or alcohol wipes to clean this device Do not disassemble or replace the printer cover with none XYZprinter covers...

Reviews: