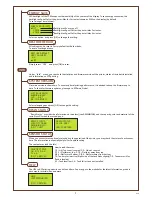
background image

V1.5

-9-

Operation Flow

① 

Click "Import" to import a .stl/.3wn file to the virtual platform.

② 

Adjust the placement, angle and size of the object with "Move", "Rotate" and "Scale" buttons on the left as desired.Please note that .3wn file is 

unadjustable.

③ 

Click "print" and setup printing preference based on the features of the prints, and click "Print" to slice and send the file for printing. 

C. 
D. 

E.

F.

G.
H.
I.

J.
K.

L.
M.
N.

O.

Save as .stl file: Save all objects on the platform to a single stl file. Any adjustment to the size or placement of the objects will apply to the stl file. 
Setup printing preference and send the objects for printing: Once your device is connected to the printer, click "Print" to open printout setting 
window (options are the same as "Export" window). Set your printing preference based on the features of the objects and hit "Print" to proceed. 
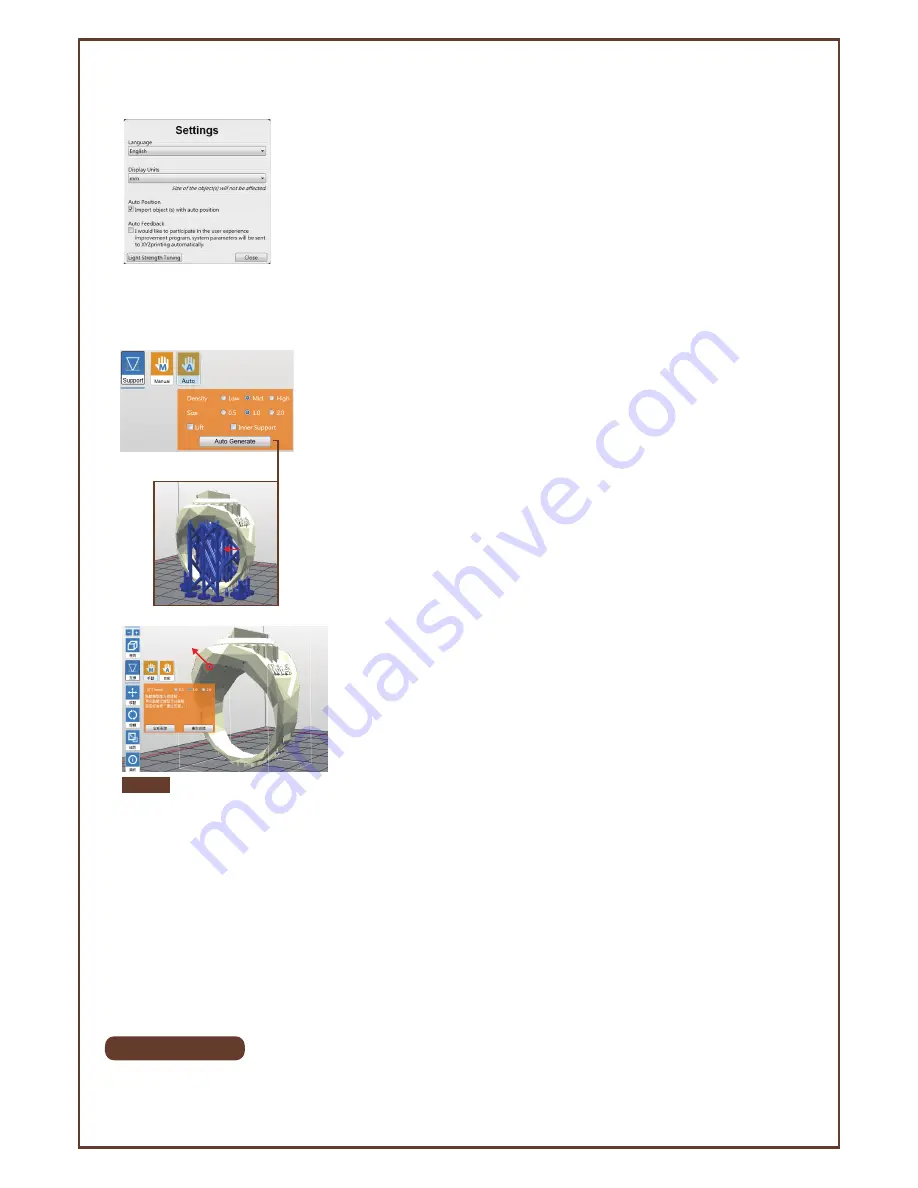
Setup interface language, display unit, light strength tuning and etc.

Tips for Light Strength Tuning :The delicacy and solidness of prints is determined by the strength of the laser 
beam. You may adjust the strength of the laser's power based on common features and purposes of your prints. 
The printer prints in moderate laser power by default. You may get more delicate objects when printing with lower
laser power, but the printouts may slightly weaken under force. Try post curing in the sun or with a UV source in
this case. If the objects deform easily, you may try to increasing the laser power. 

Tips for Printout Scaling:
If you find the dimension of the printout may not match the 3D model, you may adjust the scale of the X/Y axis 
with the slider and arrow keys by -5% to +5%. The setting is stored in the software. Make sure to adjust the setting 
before printing from the another Nobel 1.0 3D printer.

Info/Software & firmware update: Apply printer firmware and XYZware_Nobel updates when prompt by the software for stable printing perfor-
mance.
Zoom in/out: Zoom in or out the platform to view the details of objects.
Switch views: Switch views with a click to view objects from different angles.
Support structure: support structure is required under overhangs. It prevents the falling for gravity and the deforming duo to the stickiness during 
printing, and increases adhesion of the model to the platform.

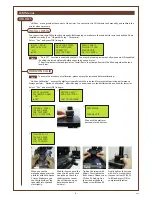
Support auto generation: XYZware_Nobel is able to analyze the features of the model and add support  
structure to where necessary. Simply select a desired density 

 and size 

, choose to "Lift" 

 the print and/or 

print without internal support 

, and press "Generate" to preview the support structure.

 Density : Large overhangs will require more support structure. However, more support structure 

will take longer for printing.

 Size : Thicker contact point will lead to higher strength but will take longer for printing.

 Lift : Lift the objects over the platform will ease the removal after printing. However, the support 

structure under the prints will take longer for printing.

 Inner Support : For objects with inner overhanging structure, XYZware_Nobel will add support to 

the parts. However the support at inside may not be removed easily, you may consider printing 
without inner support. 

Manual editing: you may add or delete support structure based on the features of the print manually. 
To add support, simply select a proper size of the contact point and then click on the model at the top
of where support is required downward. To delete support, just click on the support mark (the blue 
dot). After setting up support marks, click "Generate" to continue.

You may generate support automatically with XYZware_Nobel, and then add/delete the support structure based on your printing 
experience. Use both functions help to ensure the success of printing, and may decrease resin consumption and shorten printing time.

Move the object: move the object along the x, y, or z axis. You may also press and hold ALT key and drag the mouse to move the object horizontally.
Rotate the object: adjust the angle of the object around the x, y, or z axis. Flipping the object around to adjust the face on the platform may help to 
enhance printing performance. Increasing the contact area between the object and the platform may help to enhance printing quality and strength.
Resize the object: Scale the object as you desire. The adjustment to the object on the platform will not affect the size of your original file.
View info of the object: check the dimension and location of the object, so you can tell the size of the object easily.
Remove the object from the platform: select an object and click the option to delete it from the platform. Or you may press Delete key to remove 
the object. 
View printer status

Tip


(mm)

Support Mark

Summary of Contents for Nobel 1.0

Page 1: ...erence to radio or television reception which can be determined by turning the equipment off and on the user is encouraged to try to correct the interference by one or more of the following measures Reorient or relocate the receiving antenna Increase the separation between the equipment and receiver Connect the equipment into an outlet on a circuit different from that to which the receiver is conn...

Page 2: ... on top of the printer Liquid and solid objects that fall into the printer may lead to printer damage or safety risks Please keep the printer resin or alcohol away from fire Do not disassemble or replace the printer cover with non XYZprinting covers Insert and secure the power cord firmly for proper usage and to avoid potential electricity and fire dangers Do not attempt to service the printer bey...

Page 3: ...ord to the printer Switch on the printer Initialization will take around 10 minutes Raise the platform On the printer screen select UTILITIES and press to find MOVE PLATFORM TO TOP And press YES to raise the platform When the platform is moved to the top remove the protecting foam Unpack the resin tank and insert it into the tank slot Push all the way until reaching the end Install filling tubes P...

Page 4: ... panel Here is the map of the buttons Move up Next page Move down Back Cancel Home menu Confirm selection and settings Exit Platform Filling Tubes Cartridge Slot Tank Slot Operation Panel Lid Resin Tank Rinse Basket Gloves Scraper USB Flash Drive Inner Tube Nozzle cap Power Cable Power Adapter Starter Resin USB Wire Power Jack USB Wire Port USB Drive Port Back View Power Switch Quick Start Guide W...

Page 5: ...ALL RESIN BOTTLE BY NOW NO YES MAKE SURE PIPES ARE INSTALLED CORRECTLY OK FOR NEXT RESIN TANK IS FILLING UP NOW PLEASE WAIT OK TO CANCEL Select Yes and press OK to begin Note To ensure the accurracy of calibration please empty the resin tank before calibrating Note START HORIZON CALIBRATION NOW NO YES REMOVE OBJECT FROM PLATFORM OK TO CONTINUE LOOSEN 4 SMALL SCREWS ABOVE THE PLATFORM OK TO CONTINU...

Page 6: ... printing This is especially useful when printing large objects Buzzer is turned on by default To switch off the buzzer Select OFF and press OK to change the setting AUTO FILL BUZZER ON OFF ON Auto Fill is enabled by default To disable the function Select OFF and press OK to change the setting Be sure to place the printer on a leveled surface or tank level detection may be inaccurate Auto fill wil...

Page 7: ... and material of the resin Press to read the second page SENSOR STATUS When you encounter exceptional status during the operation of the printer you may check the status of each sensor here The information is especially helpful for troubleshooting SENSOR STATUS C 0 Z T 1 Z B 0 T 1 L 0 OK TO RETURN HELP The URL to XYZprinting website can be found here You may go to the website for the latest inform...

Page 8: ...under Export PC link Printing via XYZware_Nobel Before printing from PC please first install XYZware_Nobel on your device Connect your PC to the printer before installing the software or the installation may be incomplete XYZware_Nobel Installer can be found in the bundled USB drive or at XYZprint ing website http support xyzprinting com global_en Support download log in is required Minimum system...

Page 9: ...n of the model to the platform Support auto generation XYZware_Nobel is able to analyze the features of the model and add support structure to where necessary Simply select a desired density and size choose to Lift the print and or print without internal support and press Generate to preview the support structure Density Large overhangs will require more support structure However more support stru...

Page 10: ... sensor should return to the original position after a soft push When the tank is full or the resin gets sticky the sensor s movement may be hindered greatly It may take 1 minute for sensor to return to normal speed If stuck remove the remaining resin from tank before cleaning If resin in tank is cured please replace the tank Check Before Every Print Check the following items before printing to en...

Page 11: ...an be left for future printing To prevent dust from accumu lating on the resin always cover the lid over the printer after removing any residue from the tank or the platform Place the printer away from direct sunlight or UV lighting even if the lid is covered or resin in tank may cure and solidify Cleanup and reinstall Note Rinse part in Alcohol 75 Alcohol Pour alcohol into the rinse basket shake ...

Page 12: ...ondensation USB Wire USB drive 100 240V 50 60Hz 60W 280 x 337 x 590 mm 11 x 13 2 x 23 2 9 6 KG Photopolymer Resin Windows 7 8 and above Mac OSX 10 8 and above Connectivity AC Input Printer Dimension Net Weight Print Material OS Support Error Code 1000 Vibration generator movement abnormalities or tank sensormalfunctioned Suggestion Contact customer service center directly V1 5 12 Post Process Your...

Page 13: ... filling timeout Suggestion If the resin bottle is not empty and the NFC tag matches the cartridge first check if the nozzle cap is securely closed Then check if the tank level sensor is functioning Select INFO SENSOR STATUS and touch the tank level sensor If the value doesn t switch from 1 to 0 after L the sensor is not working Then tap the tank level sensor to see if it moves smoothly If the sen...

Page 14: ...r directly Error Code 2003 Resin bottle empty Suggestion Resin bottle is empty is based on the the reading from the NFC tag Select INFO RESIN STATUS to check resin level When REMAINING is shown as 0 then the resin bottle should be empty Please install another XYZprinting resin bottle before printing Error Code 2005 Unrecognized resin tag Suggestion Check the record of the resin bottle by selecting...

Reviews: