background image

28

Receiving APRS Beacons

Convenient functions

A special notification bell can be rung when a beacon from an APRS station or one within 
a specific range is received.


Notification of incoming beacon from a specified station (call sign ringer)

Register the call sign under 

[10 APRS]

 → 

[9 APRS RINGER (CALL)]

, and set the bell 

ring ON/OFF under 

[8 APRS RINGER]

 → 

[6 CALL RINGER]

.

By registering the call sign of an APRS station that you want to check, a special bell will 
ring when a beacon is received from that station.
A maximum of up to 8 stations can be registered.


Checking if there are other stations within the specified range (range ringer)

The range to be checked and the bell ring can be set ON/OFF under 

[10 APRS]

 → 

[8 

APRS RINGER]

 → 

[7 RANGE RINGER]

.

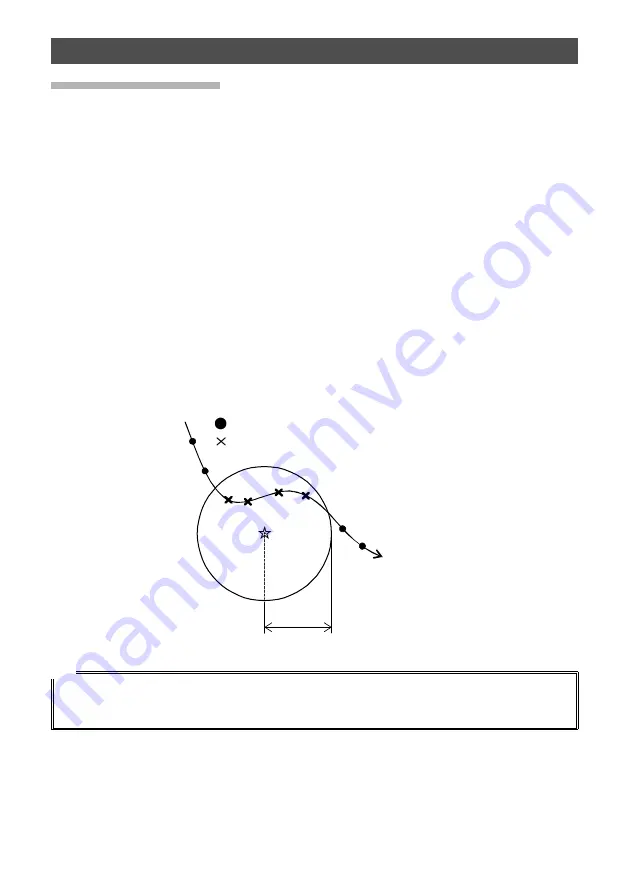
A special bell will ring when an APRS station in the station list enters the set range.
A special bell will also ring when a beacon from an APRS station lying within the set range 
is received.
The checking range can be set at a radius between 1 km and 100 km from your own 
station. The range ringer function will be turned off when the range is set at 0 km.

My station

Radius 10 km

 : Normal bell ring

 : RNG RINGER special bell ring

Tip

The call sign ringer bell will ring when the call sign ringer and range ringer functions are in operation 
at the same time and a partner station that satisfies both conditions is detected (the call sign ringer 
function takes priority).

Summary of Contents for FTM-100DR

Page 1: ...tion For information on basic operation of the transceiver please refer to the enclosed FTM 100DR DE operating manual Company names and products in this manual are trademarks or registered trademarks...

Page 2: ...ransmission interval 35 Using SmartBeaconing 36 Attaching status text to a beacon 38 Selecting a position comment 40 Setting the digipeater route 41 Sending and Receiving APRS Messages 43 Checking mes...

Page 3: ...67 Selecting the digipeater route 70 My call sign setting 70 Filter setting for messages received 70 Automatic response setting of received messages 71 My position setting 72 Entering your own station...

Page 4: ...a unit or entering the position data manually APRS Initial Settings This sets the various information of your own station prior to commencing APRS operation Setting the position information of your ow...

Page 5: ...hen not using the GPS function This may be necessary when the GPS satellites cannot be acquired or the radio is used in a fixed location 1 Matching the time Please refer to Adjusting the date and time...

Page 6: ...tes then press The cursor will shift to the 1 100 minutes setting item 11 Turn the DIAL input the 1 100 minutes value then press The cursor will shift to the longitude item 12 Turn the DIAL select eas...

Page 7: ...Gate station Internet connection station 3 1200 bps broadband digipeater 11 Balloons aircraft spacecraft etc 4 Digipeater mobile station meteorological station etc 12 1 way tracker station messages c...

Page 8: ...of the cursor Please refer to Input characters P 20 in the basic operating manual for details 6 Press The cursor will shift to the right 7 Repeat steps 5 and 6 to enter the call sign Up to 6 digits ca...

Page 9: ...longer The set up menu will be displayed 2 Turn the DIAL select 10 APRS then press The menu list will be displayed 3 Turn the DIAL select 21 MY SYMBOL then press The screen for selecting the symbol wi...

Page 10: ...can change the code and set your own symbol when the symbol that you want is not available The two characters of the code refer to the following contents First character Table ID This indicates the c...

Page 11: ...isplay will return to the previous screen Tip Please refer to http aprs org symbols symbolsX txt and http aprs org symbols symbolsnew txt for the latest symbol table Setting the APRS baud rate The APR...

Page 12: ...when the DIAL is turned Tips Factory default value 1 200 bps When receiving a message the baud rate will automatically match the baud rate of the partner station signal regardless of the value set 6...

Page 13: ...e APRS function will be set to ON and the display will return to the previous screen Tip The icon indicating the APRS beacon s transmission method will be displayed Automatic beacon transmission Autom...

Page 14: ...the DIAL select APRS STATION LIST then press The screen switches between the STATION LIST screen and the MESSAGE LIST screen each time is pressed Tips You can switch between 2 HEADING UP for always d...

Page 15: ...n transmission icon When automatic transmission is selected When smart beacon is selected When manual transmission is selected Number Displayed in order of most recently received beacon maximum 100 st...

Page 16: ...gn object name or item name of a transmitting station Transmitting station information Information and comments of transmitting station The expansion key switches when is pressed When is pressed the d...

Page 17: ...the beacon of an object station is received compressed type 22 I Item This is displayed when the beacon of an item station is received 22 i Item This is displayed when the beacon of an item station is...

Page 18: ...the partner station will be displayed Altitude The altitude of the partner station will be displayed Position comment The standard message from the partner station will be displayed Latitude The curre...

Page 19: ...t This displays the partner station s transmission output Height of antenna from ground This displays the height of the antenna from the ground Antenna gain This displays the gain of the partner stati...

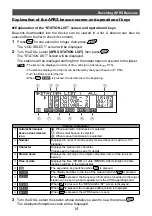
Page 20: ...eceived Time This displays the time HH MM the beacon was received Altitude The altitude of the partner station will be displayed Latitude The current position of the partner station will be displayed...

Page 21: ...eed The movement speed of the partner station will be displayed Direction The movement direction of the partner station will be displayed Altitude The altitude of the partner station will be displayed...

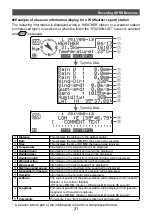
Page 22: ...ght Information on the rainfall from midnight onwards will be displayed Wind direction Information on the wind direction will be displayed Wind speed Information on the wind speed will be displayed Ma...

Page 23: ...s the distance to the partner station Date This displays the date MM DD the beacon was received Time This displays the time HH MM the beacon was received Altitude The altitude of the partner station w...

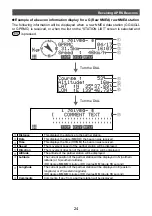
Page 24: ...ormation will be displayed when a status station is received or when the list on the STATION LIST screen is selected and is pressed Date This displays the date MM DD the beacon was received Time This...

Page 25: ...HH MM the beacon was received Speed The movement speed of the partner station will be displayed Direction The movement direction of the partner station will be displayed Altitude The altitude of the p...

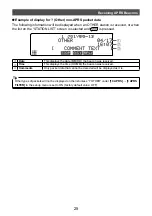
Page 26: ...T screen is selected and is pressed Date This displays the date MM DD the beacon was received Time This displays the time HH MM the beacon was received Comments Only packet data that cannot be decoded...

Page 27: ...tion will be displayed Direction The movement direction of the partner station will be displayed Altitude The altitude of the partner station will be displayed Position comment EMERGENCY will be displ...

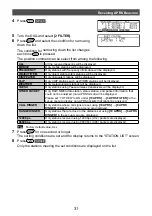
Page 28: ...station whose details you want to see then press The detailed information screen will be displayed 4 Press The extension key switches 5 Press The information display will change Tips Turn the DIAL to...

Page 29: ...specified range range ringer The range to be checked and the bell ring can be set ON OFF under 10 APRS 8 APRS RINGER 7 RANGE RINGER A special bell will ring when an APRS station in the station list e...

Page 30: ...then press 4 Turn the DIAL and select 1 SORT 5 Press and select the condition for sorting the list The sorting condition will switch between TIME CALL SIGN and DISTANCE each time is pressed TIME Sort...

Page 31: ...ed 3 Press The extension key switches 4 Press The display order will changeaccording to the set conditions Filtering the list The type of beacon to be displayed in the station list can be selected 1 P...

Page 32: ...transceivers will be displayed OTHER PACKET Only RAW NMEA data station status station and packet information that could not be analysed non APRS format will be displayed Please set 7 OTHER to ON under...

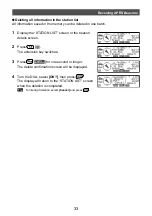
Page 33: ...Turn the DIAL select OK then press The display will return to the STATION LIST screen when the deletion is completed Tip To interrupt deletion select Cancel and press Deleting a beacon on the STATION...

Page 34: ...ay the STATION LIST screen or the beacon details screen 2 Press The extension key switches 3 Press for one second or longer The delete confirmation screen will be displayed 4 Turn the DIAL select OK t...

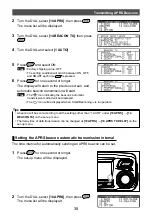
Page 35: ...The APRS beacon will be transmitted Transmitting from the beacon details screen 1 Display the beacon details screen 2 Press The extension key switches 3 Press The APRS beacon will be transmitted Tip A...

Page 36: ...rt Tips The icon indicating the beacon s automatic transmission method will be displayed The icon will be displayed when SmartBeaconingTM is in operation Tips A beacon will be sent according to all th...

Page 37: ...tation position with information data such as movement speed and direction of advance derived from a GPS antenna unit This APRS function supports automatic beacon transmission using SmartBeaconing The...

Page 38: ...DIAL and select 1 AUTO 9 Press and select SMART The sorting condition will switch between ON OFF and SMART each time is pressed 10 Press for one second or longer The display will return to the previou...

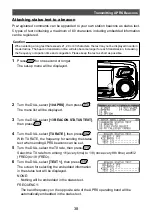
Page 39: ...second or longer The set up menu will be displayed 2 Turn the DIAL select 10 APRS then press The menu list will be displayed 3 Turn the DIAL select 13 BEACON STATUS TEXT then press 4 Turn the DIAL se...

Page 40: ...right Press This deletes all characters to the left of the cursor Please refer to Input characters P 20 in the basic operating manual for details 9 Press Tip Repeat Steps 6 to 9 to continue entering...

Page 41: ...comment The position comment can be select from among the following 1 Off Duty 2 En Route 3 In Service 4 Returning 5 Committed 6 Special 7 Priority 8 Custom0 14 Custom6 15 Emergency Caution The confir...

Page 42: ...d to operate in the New Paradigm format As the number of supporting digipeater stations is the largest the default setting of this radio is therefore set to WIDE 1 1 WIDE 2 1 when shipped from the fac...

Page 43: ...ons 4 Turn the DIAL and select the digipeater route Tip The packet will not be relayed when 1 OFF is selected 5 Press for one second or longer The digipeater route will be setand the display will retu...

Page 44: ...saved in a common list in the memory Checking messages Sent and received messages can be viewed in a list A message can also be selected from the list to check its contents 1 Press on the frequency di...

Page 45: ...ressed When is pressed the TX OUT messages those with no ACK receipt will be resent When is pressed the message resending operation is canceled P 47 When is pressed the display moves to the top of the...

Page 46: ...optional voice guide unit FVS 2 is installed in the transceiver This is convenient while driving when looking at the screen is not advisable Listening to audio when the MESSAGE LIST screen is display...

Page 47: ...s switches between letters and numbers Press This deletes all characters to the right of the cursor Press This shifts the cursor to the left Press The cursor will shift to the right Press This deletes...

Page 48: ...ed to write a new message This can be used to forward a received message 1 Display the MESSAGE LIST screen 2 Press The message input screen will be displayed Tip To delete previously created call sign...

Page 49: ...be displayed 4 Turn the DIAL select the text number 1 to 8 then press The cursor moves to the item for inputting text 5 Turn the DIAL and select characters to enter them Tip Numbers and symbols can be...

Page 50: ...LIST screen 2 Select the message tag that you would like to reply to or display the message details 3 Press The screen for inputting the message and call sign time will be displayed 4 Turn the DIAL an...

Page 51: ...upt deletion select Cancel and press The display will return to the function menu screen when the deletion is completed The messages in the list will be moved up one at a time Deleting a message using...

Page 52: ...celled 1 Display the MESSAGE LIST screen 2 Select the message that you would like to cancel the resend 3 Press The extension key switches 4 Press The resend will be cancelled Deleting all APRS message...

Page 53: ...y Displaying the remaining transmission count MESSAGE LIST screen when the number of transmissions remaining is four Message details screen when the number of transmissions remaining is four Displayin...

Page 54: ...op up display beacons and messages 1 BEACON OFF 3 sec 5 sec 10 sec HOLD 2 MESSAGE OFF 3 sec 5 sec 10 sec HOLD 3 MYPACKET OFF ON 8 APRS RINGER Bell sound setting at beacon arrival 1 TX BEACON ON OFF 2...

Page 55: ...ETIN 3 BLN 18 MESSAGE REPLY Automatic response setting of received messages 1 REPLY OFF ON 2 CALLSIGN 3 REPLY TEXT 19 MY POSITION SET My position setting 1 GPS 2 MANUAL 20 MY POSITION Manual setting o...

Page 56: ...like to configure then press 4 Turn the DIAL to change setting values 5 Press for one second or longer The amended set value will be confirmed and the display will return to the previous screen Tips T...

Page 57: ...or one second or longer The set up menu will be displayed 2 Turn the DIAL select 13 RST CLONE then press Themenu listwill be displayed 3 Turn the DIAL select 6 APRS RESET then press 4 Turn the DIAL se...

Page 58: ...een 2 HEADING UP This displays the direction of advance of your own station at the top at all times Tip Factory default value 2 HEADING UP 5 Press for one second or longer The direction of the compass...

Page 59: ...lay the item beacon STATUS Download and display the status beacon OTHER Download and display the non APRS packets RANGE LIMIT This restricts reception to beacons that lie within a specified range from...

Page 60: ...default settings 1 Mic E ON 2 POSITION ON 3 WEATHER ON 4 OBJECT ON 5 ITEM ON 6 STATUS ON 7 OTHER OFF 8 RANGE LIMIT OFF 9 ALT NET OFF Inputting standard message text Eight types of standard messages co...

Page 61: ...second or longer The set up menu will be displayed 2 Turn the DIAL select 10 APRS then press The menu list will be displayed 3 Turn the DIAL select 7 APRS POP UP then press The screen for setting the...

Page 62: ...sets the bell ring when your own station is sending a beacon When set to ON a bell will ring prior to the transmission TX MESSAGE This sets the bell ring when your own station is sending a message Whe...

Page 63: ...ct ON or OFF for each one Pressing turns this function ON and OFF 7 Press for one second or longer The bell ring will be set and the display will return to the previous screen Tip Factory default valu...

Page 64: ...n to the previous screen Data transmission delay time setting The following preamble data transmission delay time can be set when sending APRS data Start of transmission APRS beacon transmission conte...

Page 65: ...5 Press and select the unit to be displayed The display unit for the latitude longitude minute and below DD MM MM can be changed Press to switch between dd mm mm and dd mm ss dd mm mm displays in 1 10...

Page 66: ...s and inches Tip Factory shipping value inch 18 Turn the DIAL and select 8 WIND 19 Press and select the unit of wind speed You can changetheunit of wind speed Press to switch between m s mph and knots...

Page 67: ...he OFF value 4 digits The position information will appear with the lower 4 digits onwards masked from the OFF value Example Masking your own station position with a latitude of 35 37 23 and a longitu...

Page 68: ...a beacon will be displayed 4 Turn the DIAL and select 1 AUTO 5 Press Selecting the beacon automatic transmission method Pressing switches between the options in the following order OFF ON SMART OFF Y...

Page 69: ...RS 15 DIGI PATH SELECT in the set up menu will be automatically changed refer to the following example OFF The transmission will be in accordance with the address selected under 10 APRS 15 DIGI PATH S...

Page 70: ...on has stopped for whenb 4 DECAY is set to ON When the speed is lower than the value set the station will be deemed to have stopped 13 Turn the DIAL select the cut off value then press A speed between...

Page 71: ...characters can be entered 1 GROUP 1 ALL 2 GROUP 2 CQ 3 GROUP 3 QST 4 GROUP 4 YAESU 5 GROUP 5 any and 6 GROUP 6 any can be set for the group code For bulletin 7 BULLETIN 1 to 9 BULLETIN 3 can be set 1...

Page 72: ...N A reply message is returned automatically when a message is received OFF A reply message is not returned when a message is received Tip Factory shipping value OFF 6 Turn the DIAL select 2 CALLSIGN t...

Page 73: ...nger The automatic reply for messages received will be set and the display will return to the previous screen My position setting The position information of your own station can be obtained from the...

Page 74: ...TUS 5 Press and select the SmartBeaconing operating method Press to switch between the options in the following order OFF TYPE 1 TYPE 2 TYPE 3 OFF SmartBeaconing is not active TYPE 1 TYPE 2 TYPE 3 Sma...

Page 75: ...thenext digit 10 Press 11 Turn the DIAL select 3 HIGH SPEED and press Move the cursor over the item for which you would like to enter numbers When the speed exceeds the speed set the beacon is sent a...

Page 76: ...ld like to enter numbers Set the coefficient for dynamically changing the angle that is used to determine changes in the direction of advance depending on the movement speed The larger the coefficient...

Page 77: ...st and selects the type of beacon to be displayed in the station list 1 Press for one second or longer The set up menu will be displayed 2 Turn the DIAL select 10 APRS then press The menu list will be...

Page 78: ...up menu will be displayed RANGE RINGER Only information of stations deemed as nearby stations according to 7 RNG RINGER settings that are set under 10 APRS 8 APRS RINGER in the set up menu will be di...

Page 79: ...code to be set next will be used as the squelch target RX TSQL Although a tone squelch is used in sending and receiving voice signals a tone signal is not appended when sending APRS data After select...

Page 80: ...voice alert setting When voice alert is in operation the setting in this menu will be prioritized for the APRS band squelch The voice alert function will not work when APRS data is set to be received...

Page 81: ...ding dong ding ding dong When a beacon is received RANGE RINGER When a group bulletin message is received ding ding dong ding ding ding ding ding dong When a beacon is received CALLSIGN RINGER When a...

Page 82: ...without the permission of YAESU MUSEN CO LTD YAESU MUSEN CO LTD Tennozu Parkside Building 2 5 8 Higashi Shinagawa Shinagawa ku Tokyo 140 0002 Japan YAESU USA 6125 Phyllis Drive Cypress CA 90630 U S A...

Reviews: