

8
Before Using
Contents
Setting the display contrast ........................... 173
Switching the time display
and the voltage display ...... 173
Transmit and receive settings ............................ 174
Setting the signal format ............................... 174
Setting the AMS transmission mode ............. 174
Setting the squelch type of the
digital mode ...... 175
Setting the squelch code of the
digital mode ...... 176
Setting the pop-up time for the
partner station information ..... 177
Setting the display method for my position ... 178
Setting the Standby Beep ............................. 178
Displaying the version of the DSP program .. 178
Setting the sub-band mute ............................ 179
Setting the sensitivity of the microphone ....... 179
Memory channel settings ................................... 179
Setting the display method for the
memory tag ...... 179
Setting the memory scan method ................. 179
Tone signal settings ........................................... 180
Setting the squelch tone frequency
(CTCSS) ....... 180
Setting the DCS code .................................... 180
Setting the transmission method
of the DTMF code ...... 180
Registering the DTMF code .......................... 180
Recalling only specified stations ................... 180
Setting the user programmed
reverse CTCSS tone ...... 180
Using the bell Notification of an
incoming call from a partner station
using the bell .... 181
Setting the squelch type separately
for transmit and receive .... 181
Setting the weather alert operation
(USA Version Only) .... 182
Scan settings ..................................................... 182
Setting the signal reception method .............. 182
Setting the scanning direction ....................... 182
Setting the receive operation
when the scanning stops ...... 183
Group monitor function settings ......................... 183
Settings on the functions and configuration ....... 183
Setting the date and time .............................. 183
Setting the display format for the
date and time ...... 184
Setting the time zone .................................... 185
Setting the auto repeater shift ....................... 186
Setting the direction of the repeater shift ...... 186
Setting the shift width of the repeater ............ 187
Setting the frequency step ............................ 188
Setting the volume of the beep ..................... 188
Setting the clock shift of the CPU .................. 188
Setting the program key of the microphone .. 189
Expanding the receive range ........................ 190
Setting the unit display .................................. 191
Switching the power off automatically ........... 191
Limiting the continuous transmission time .... 191
Setting the PIN code of the
optional Bluetooth headset ..... 191
Setting the geodetic reference system
of the GPS function .... 192
Positioning using the external GPS device ... 192
Setting the interval for recording the
GPS position information ... 192
Data communication settings ............................. 193
Setting the COM port .................................... 193
Setting the operating band of the
APRS and data communication .... 196
Setting the baud rate of the APRS and
data communication .... 197
Setting the output condition of the
squelch detection and squelch terminal .... 198
APRS function settings ...................................... 199
Micro-SD card settings....................................... 199
Writing settings to the micro-SD card ............ 199
Writing group IDs to the micro-SD card ......... 200
Initializing the micro-SD card ........................ 200
Optional device settings ..................................... 200
Setting the image of the connected
speaker microphone with camera ..... 200
Setting the operation of the
Bluetooth headset ..... 201
Setting the voice memory operation .............. 201
Initialization and saving settings ........................ 201
Reconfiguring the settings ............................. 201
Registering the preset ................................... 201
Recalling the registered preset ..................... 202
Sorting the registered memory channels ...... 203
Copying saved data ...................................... 203
Call sign settings ................................................ 204
Changing the call sign ................................... 204
Appendix
............................................................... 206
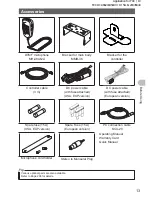
Options List............................................................. 206
Maintenance ........................................................... 207
Care and maintenance....................................... 207
Replacing the fuse ............................................. 207
When you have difficulties ... .................................. 208
There is no power ......................................... 208
There is no sound ......................................... 208
There is no transmission ............................... 208
The keys or knobs will not operate ................ 208
About internal spurious signals .......................... 209
After-market Services ........................................ 209
Specification ........................................................... 210
Index
...................................................................... 212
Application for FCC / IC
FCC ID: K6620345X40 / IC: 511B-20345X40


