4
Installation
26
07.2020
ba
-o
.2
.6
.0
-us
-3
.2
-ys
|
A1
18
67
50
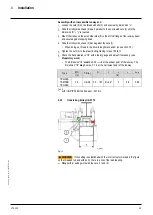
1 Re
v A
E
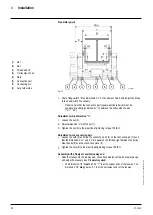
(1)
Nuts
(2)
Nuts
(3)
Trolley side cheek
(4)
Support bolt
(5)
Threaded bolt
Fig. 12
Check flange width “B” and dimension “c” on the basis of Tab. 7 and adjust the trolley
to the beam width if necessary.
Adjustment work, dimension “c”:
Loosen the nut (2).
Adjust
dimension “c” with the nut (1).
Tighten the nut (2) to the prescribed tightening torque 159 lb
f
ft.
Assembly with a freely accessible runway end
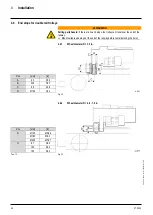
Slide the trolley onto the runway end, check track clearance f/2 with a feeler gauge
and adjust if necessary (see
Preparatory work
).
–
The dimension “f/2”
must
be 0.02
+0.04
in at the widest point of the runway. The
dimension “f/2”
may
be max. 0.1 in at the narrowest point of the runway.
Assembly with an inaccessible runway end
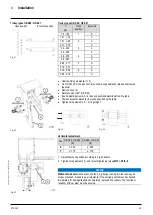
Loosen the nuts (2) on the
threaded bolts (5) and unscrew by dimension “x”.
Slide the trolley side cheek (3) apart parallel, to the unscrewed nut (2) until the
dimension “B” + “y” is reached.
Mount the trolley on the wire rope hoist in the bottom flange of the runway beam and
secure against slipping out.
Slide the trolley side cheek (3) back against the nut (1).
–
When doing so, thread in the drive-through mechanism (see section 7.5).
Tighten the nut (2) to the prescribed tightening torque 159 lb
f
ft.
Check the track clearance “f/2” with a feeler gauge and adjust if necessary (see
“Preparatory work”
).
–
The dimension “f/2”
must
be 0.02
+0.04
in at the widest point of the runway. The
dimension “f/2”
may
be max. 0.1 in at the narrowest point of the runway.
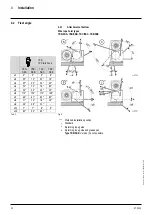
Type
Ø D
Trolley
B
c
x
y
z
max
[in]
[in]
YKA/SKA
3.1
KE-S33
3.5…19.7
B+2.6 *
1
2.8
5.4
0.91
YKB/SKB
3.9
KE-S44
3.1
5.8
0.98
YKC/SKC
5.5
KE-S65
4.7…19.7
3.7
6.4
1.4
YKD/SKD
7.9
KE-S76
4.9…19.7
B+3.6 *
1
3.7
7.4
1.8
YKE/SKE
Tab. 7
*
1
with I (INP/IPN) EN 10024 beam: -0.079 in


