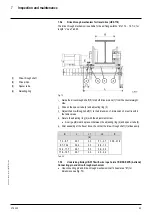
7
Inspection and maintenance
104
07.2020
ba
-o
.2
.6
.0
-us
-3
.2
-ys
|
A1
18
67
50
1 Re
v A
E
7.9.2
Replacing the brake rotor
CAUTION
Brake dust is hazardous to health.
➢
Do not clean brakes with compressed air, brushes or similar.
➢
Use a vacuum system or a damp cloth to remove brake dust.
➢
If dust develops, wear safety eyewear and a fine dusk mask.
WARNING
With an incorrectly assembled brake rotor, the brake cannot hold the load and the load
will fall. This can result in serious injuries and even death.
➢
Ensure that a competent person carries out the replacement work.
The pressure springs of the brake must always be replaced at the same time.
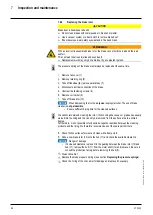
Unplug the plug (15).
Unscrew the fastening screws (16).
Disassemble external ventilation (5).
Loosen stud bolt (4).
Disassemble the encoder.
Disassemble the encoder bracket.
Loosen stud bolts (6) on the adapter shaft.
Disassemble adapter shaft with jacking screws (M6).
Remove V-Ring (7) (IP66).
Remove retaining ring (14).
Disassemble electrical connection of the brake.
Unscrew the fastening screws (8).
Remove coil carrier (9).
Take off brake rotor (11).
NOTICE
When dampening the cloths,
only use
isopropyl alcohol. The use of brake
cleaner is
not
permissible
.
–
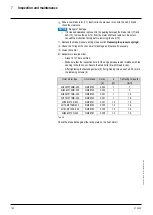
Ensure sufficient drying time for the cleaned surfaces.
We cannot recommend cleaning the rotor / friction linings because oil / grease has usually
worked into the lining and this can only be removed from the surface area to a limited
degree.
Furthermore, it is not possible to fully exclude negative reactions between the cleaning
products and the lining. We therefore recommend use of the spare parts kit here.
Check friction surfaces for wear and clean with a damp cloth.


