background image

Summary of Contents for Assure Lock Lever Touchscreen YRL226

Page 1: ...d For New Doors Or Adjusting Existing Door le r v I Drill 0 Wood Level b Utility Pencil Mortise Tape Knife Measure Chisel JJ DOWNLOAD THE BILT APP Billo tJMNI MIN Using the app on your smart phone sca...

Page 2: ...256 Let s GetStarted Installation Guide and Door Template Levers o I I o Battery Cover Key 0 Inside Lock Battery Cover OJ AA Alkaline Batteries Mounting Hardware Strike Plate h x4 Mounting Plate T x2...

Page 3: ...1 Removing Existing Door Knob or l ever _f _Do not discard old lock hardware until Assure Lever r f has been successfully installed _ I I fiY IC 11...

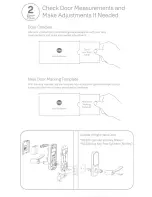
Page 4: ...e any needed adjustments Let s Get Started New Door Marking Template Check Your Door Guide With the door checker use the template from installation guide envelope to prep a new door that has not been...

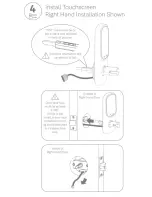
Page 5: ...Plate Right Hand Installation Shown t ri t f AYRL DRIVE Adjustable Drive In Latch available for purchase ffl 2 3 811 through bolt posts default 0 PULL Q 2 3 411 through bolt posts optional Note Adjust...

Page 6: ...op surface and tailpiece in vertical position Incorrect orientation will cause lock to fail Door face hole must be at least 2 7 8 If hole is too small a door lock installation kit or jig should be use...

Page 7: ...ze Install Mounting Plate Right Hand Installation Shown Inside of Right Hand Door Make sure keypad and mounting plate are straight before tightening screws Inside of Right Hand Door Insert cable throu...

Page 8: ...tach Cable Right Hand Installation Shown Inside of Right Hand Door JJ JJ Yi Ridges along edges facing outward i Use cable hook for proper cable routing Do not pinch cable Ol Ol 8 8 Ii Make sure cable...

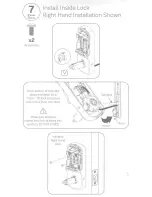
Page 9: ...Shown I x2 Actual Size Hook bottom of lock into place and listen for a click Tilt lock into place until lock is flush with door Make sure tailpiece inserts into lock as tilting into position DO NOT FO...

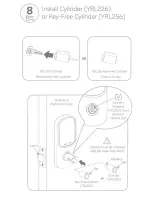
Page 10: ...der Remove key from cylinder Latch Outside of Right Hand Door OR e YRL256 Key Free Cylinder There is no key Cylinder Tailpiece YRL226 must slide into Cylinder must be installed with bar away from latc...

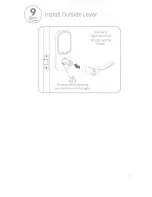
Page 11: ...9 Install Outside Lever Outside of Right Hand Door YRL226 Cylinder Shown Press pin while installing lever so lock is not damaged...

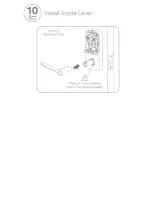
Page 12: ...Install Inside Lever Inside of Right Hand Door Press pin while installing lever so lock is not damaged...

Page 13: ...r Open 0 0 t j e 0 Outside of Right Hand Door Outside of Right Hand Door Test thumbturn and both levers in locked and unlocked positions If operation fails check installation beginning with Step 4 and...

Page 14: ...with Door Open 0 I j 0 t I j Outside of Right Hand Door Outside of Right Hand Door If key operation test fails check installation beginning with Step 8 Almost done Turn sheet over to finish installati...

Page 15: ...s must not be installed prior to inserting and or removing Yale Smart module NOTE If a Smart module was included with your lock it is in a separate box with additional module installation instructions...

Page 16: ...over Welcome to Yale Real Living Inside of Right Hand Door Congratulations you ve installed the Yale Assure Lever Touchscreen YRL226 or Key Free Touchscreen YRL256 Using Your Lock instructions will he...

Page 17: ...ming and use of lock is not possible until this step has been successfully completed See Using Your Lock instructions 11 Ill 0 0 I I D Ml Enter 4 8 digit Master Entry Code Press 0 1 2 3 4 5 6 7 111 II...

Page 18: ...emove the inside lock to access the reset button 3 The reset button see image above is marked 4 Re insert 3 batteries and hold the reset button for 3 seconds 5 While still holding the reset button ins...

Page 19: ...umbturn does not have anything preventing it from physically rotating c Verify that you can rotate thumbturn freely My lock is not making any sound when I touch numbers or icons on the keypad a Use th...

Page 20: ...status Inside Indicator Light Disabled Off Locked of lock and can be enabled or disabled in the Advanced Lock Settings Main Menu selection 3 Choosing English 1 Spanish 2 or French 3 Language English b...

Page 21: ...ter Entry Code and press to access Settings Menu All Code Lockout Indicator or Key Free Cylinder YRL256 Touchscreen Keypad Inside Indicator Light Speaker Thumbturn Inside Lock NOTE TO INSTALLER AND CO...

Page 22: ...r Master Entry Code with 6 or more digits and create a separate code that is used daily to lock and unlock the door D 0 1 2 3 4 5 6 7 B S D Enter 4 8 digit Master Entry Code r e 1 2 3 4 5 6 7 B 9 Regi...

Page 23: ...out D 0 Press G Enter Master Entry Code Menu Mode enter number press the gear key to continue 1 2 3 4 5 6 7 8 9 Press p Enter 4 8 digit Entry Code Press code flashes 1 2 3 4 5 6 7 B 9 0 Adding more En...

Page 24: ...t enter the Entry Code you wish to delete Enter 4 8 digit Entry Code Press 1 2 3 4 5 S 7 8 9 Enter Master Entry Code Menu Mode enter number press the gear key to continue 1 2 3 Press Press 4 5 B 7 B 9...

Page 25: ...ng Door with Entry Codes Enter Entry Code Press 0 1 2 3 4 5 s 7 B 9 111 II 111 0 0 I 11111 0 0 8 Ill I Code Chart Duplicate if necessary Entry Code Management Entry Code Master Homeowner User Name Bab...

Page 26: ...the function to be performed followed by the icon Follow the voice commands Advanced Lock Settings Volume Settin All Code Lockout Auto Re lock One Touch Lockin Remain in Settings Menu or Exit Settings...

Page 27: ...gear cannot be part of the Entry Code Upon entering an Entry Code Verify entered code is a valid previously programmed and pressing0key the lock 4 to 8 digit code displays invalid code error or All Co...

Page 28: ...a Increase the separation between the equipment and receiver Connect the equipment into an outlet on a circuit different from that to which the receiver is connected Consult the dealer or an experienc...

Page 29: ...set 1 C I w I 0 I _ c I I lffi I o I r lc J I t 2 1 8 1 0 54mm I LL Dia m I Thru Dia A j l El EEl EEl l l I For 1 3 8 35mm Thick Door 2 3 8 60mm Backset 2 1 8 54mm Dia Thru Hole Yale 1 I I I CAUTION I...

Page 30: ...new doors oradjusting existing prep _1 _ 25mm Dia 2 1 8 54mm 8 Dia I I 2 3 8 60mm or 2 3 4 70mm Backset Drill holes 1 2 way through door then complete from other side to prevent splitting 1 25mm Dia 1...

Page 31: ...ch setting C Backset Adjust latch setting D Face Bore Diameter I I I I I I I I 1 8 3 8 5 8 7 8 1 I E 1 4 3 4 1 2 A A E Edge Bore Diameter and Depth Cross Bore Diameter Measure Face Bore Measure Cross...

Page 32: ...to Help 24 7 Our trained and dedicated support team is available via phone or email 24 hours a day seven days a week ISL 2066 00 000 Ver 2 Part of ASSA ABLOY Call us at 1 855 213 5841 or Email Support...

Page 33: ...Refer a Friend Give your friends a discount and you ll earn credit to your next purchase too Visit ShopYaleHome com Refer Some exclusions may apply Subject to change...

Reviews: