background image

Pistons and Connecting Rods Repair

600 YRM 496

8.

Install oil strainer. Tighten M6 capscrews to 8 to
12 N•m (6 to 9 lbf ft). Tighten M8 capscrews to 16
to 23 N•m (12 to 17 lbf ft).

9.

Install gasket and oil pan. Tighten capscrews to 7
to 12 N•m (5 to 9 lbf ft).

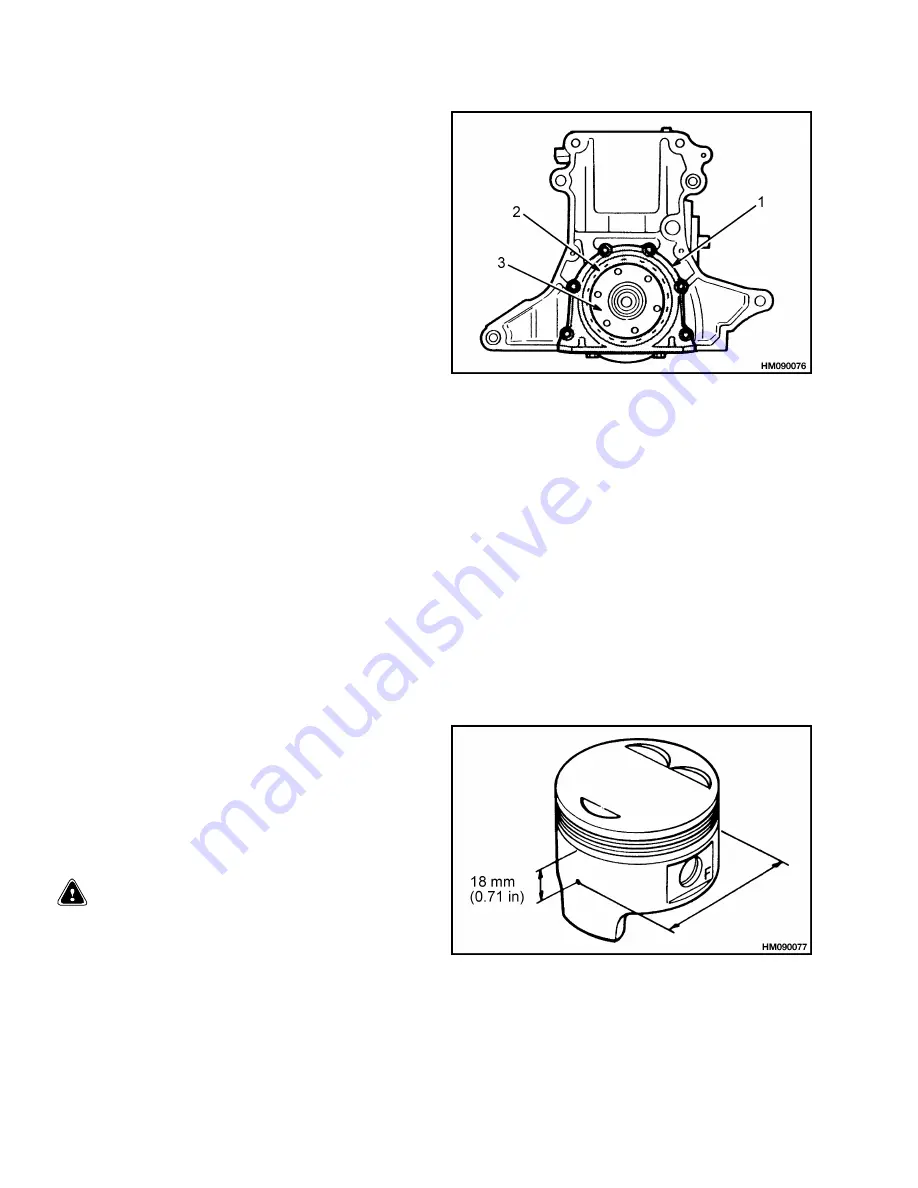
1.

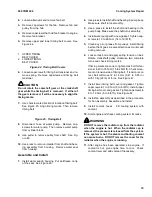
REAR COVER

2.

OIL SEAL

3.

CRANKSHAFT

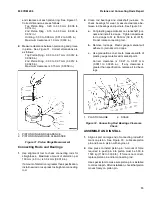
Figure 29. Rear Cover

Pistons and Connecting Rods Repair

REMOVE AND DISASSEMBLE

1.

Remove cylinder head as described in Cylinder
Head, Camshaft, and Valve Mechanism Repair.

2.

Remove oil pan and oil strainer.

3.

Put identification mark on top of each piston.

4.

Clean carbon from top of each cylinder bore.

5.

Remove caps and bearings from each connecting
rod. Keep caps and bearings with correct piston
assemblies.

6.

Push connecting rod and piston from cylinder block.

7.

Carefully remove piston rings from pistons. Use
tool to push piston pin from connecting rod.

CLEAN

WARNING

Cleaning solvents can be flammable and toxic and
can cause skin irritation. When using cleaning sol-
vents, always follow solvent manufacturer’s recom-
mended safety procedures.

Clean all parts in solvent. Make sure all oil passages
and grooves are clean. Make sure all machined sur-
faces are smooth.

INSPECT AND REPAIR

Pistons

1.

Inspect pistons for wear and cracks. Replace any
piston that is damaged.

2.

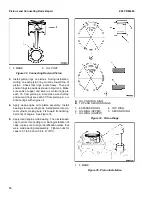
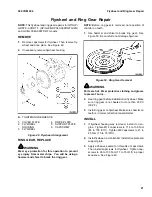
Measure outside diameter of piston. See Figure 30.
Correct dimension is 85.944 to 85.964 mm (3.3836
to 3.3844 in.). Maximum clearance between piston
and cylinder bore is 0.15 mm (0.0059 in.).

Figure 30. Piston Measurement

Piston Rings

1.

Install piston ring into cylinder bore where it will be
used. Use thickness gauge to measure amount of

12

Summary of Contents for GDP16-20AF

Page 1: ...F2 GP GLP GDP16 20AF BF GP GLP GDP030 040AF BF A810 GC GLC030 040AF B809 GLP GDP16 20AF GP GLP GDP030 040AF B810 GP GLP GDP2 00 3 00RF TF GP GLP GDP040 060RG TG ZG A875 GC GLC040 065TF RF E187 PART N...

Page 2: ...d condition Always use YALE APPROVED parts when making repairs Replacement parts must meet or exceed the specifications of the original equipment manufacturer Make sure all nuts bolts snap rings and o...

Page 3: ...gs 10 Install 11 Pistons and Connecting Rods Repair 12 Remove and Disassemble 12 Clean 12 Inspect and Repair 12 Pistons 12 Piston Rings 12 Connecting Rods and Bearings 13 Assemble and Install 13 Cylin...

Page 4: ...25 LPG Engines AISAN 25 Engine Specifications 25 Engine Data 25 Thermostat 25 Cylinder Head 26 Valve Mechanism 26 Camshaft 26 Crankshaft 27 Connecting Rods 27 Cylinder Block 27 Pistons 27 Oil Pump 27...

Page 5: ...ot disconnect an electric wire before the en gine is stopped and the key switch is OFF Do not cause a short circuit by connection of the electric wires to the wrong terminals Make sure a correct ident...

Page 6: ...iming Belt Covers 7 Loosen capscrews for timing belt tensioner and re move spring Remove capscrews and timing belt tensioner 8 Use chalk to mark direction of timing belt rotation See Figure 2 Remove t...

Page 7: ...der head in proper se quence See Figure 6 15 Lift cylinder head from the block Figure 6 Cylinder Head Removal Sequence 16 Use valve spring compressor to remove valve re tainers springs and valves from...

Page 8: ...components do not meet specifications replace rocker arm s or rocker shaft s as necessary Camshaft 1 Check camshaft for cracks or damage 2 Use dial indicator on end of camshaft to check movement of c...

Page 9: ...NT OIL SEAL SURFACE 2 FRONT JOURNAL NO 1 3 CENTER JOURNALS NOS 2 3 AND 4 4 REAR JOURNAL NO 5 5 FUEL PUMP LOBE Figure 10 Camshaft Inspection Figure 11 Camshaft Check 1 PLASTIC GAUGE 2 SCALE Figure 12 C...

Page 10: ...IDTH 2 EXHAUST VALVE SEAT 3 INTAKE VALVE SEAT Figure 14 Valve Seat Specifications Valves 1 Inspect stem of each valve for wear Use microme ter to measure outside diameter of stem See Fig ure 15 Minimu...

Page 11: ...cylinder head and surface of en gine block 2 Install new gasket and cylinder head on engine block 3 Install capscrews and washers for cylinder head Tighten capscrews to 82 to 88 N m 60 to 65 lbf ft i...

Page 12: ...Figure 21 Use new gasket and install front hous ing on cylinder head Tighten capscrews for front housing to 19 to 26 N m 14 to 19 lbf ft 8 With dowel pin at top of camshaft install camshaft pulley Che...

Page 13: ...ply spring tension on belt Rotate crankshaft pulley clockwise two complete turns and check timing marks If timing marks are correct tighten lock bolt for ten sioner to 20 to 35 N m 15 to 26 lbf ft Che...

Page 14: ...steps Then remove capscrews caps and crankshaft INSPECT AND REPAIR Crankshaft 1 Inspect crankshaft for wear cracks or other dam age Replace crankshaft if it has cracks 2 Use micrometer to measure dia...

Page 15: ...bear ings if necessary Lubricate bearings with clean en gine oil 2 Install crankshaft 3 Install top half of main bearings in caps and lu bricate with oil Use identification marks to install main beari...

Page 16: ...6 Push connecting rod and piston from cylinder block 7 Carefully remove piston rings from pistons Use tool to push piston pin from connecting rod CLEAN WARNING Cleaning solvents can be flammable and...

Page 17: ...gs and crankshaft journals To check bearings for wear measure clearance be tween rod bearings and journals See Figure 32 a Put plastic gauge material on crankshaft jour nals and install rod caps Tight...

Page 18: ...in Lu bricate rings with engine oil 4 Apply clean engine oil to piston assembly Install bearings for connecting rods Install piston into cor rect cylinder making sure F is toward front timing belt end...

Page 19: ...1 Remove bracket for cooling fan 2 Remove upper and lower timing belt covers See Figure 37 3 Loosen capscrews for timing belt tensioner and re move spring Remove capscrews and timing belt tensioner 4...

Page 20: ...008 to 0 013 in If clearance is more than 0 35 mm 0 014 in repair as necessary b Measure clearance between crescent and teeth of inner gear Correct clearance is 0 267 to 0 380 mm 0 0105 to 0 0150 in...

Page 21: ...te oil seal with en gine oil See Figure 41 2 Use adhesive sealant to install oil pump housing on cylinder block Make sure there is no sealant in oil port Tighten M10 capscrews to 38 to 53 N m 28 to 39...

Page 22: ...LLEY 3 HUB 4 SNAP RING 5 SHAFT 6 SUPPORT BRACKET 7 BRACKET Figure 43 Fan Assembly Assemble and Install 1 Use press to install shaft and bearing in bracket See Figure 43 Push bearing in until it touche...

Page 23: ...aring in the pump body Make sure the shaft turns smoothly 4 Install water pump with a new gasket Tighten cap screws to 19 to 26 N m 14 to 19 lbf ft 5 Clean any oil or grease from pulleys Install timin...

Page 24: ...MOVE 1 Rotate crankshaft until No 1 piston is at TDC on compression stroke Make note of position of dis tributor rotor See Figure 48 2 Disconnect wires at spark plugs 3 Remove capscrew from flange of...

Page 25: ...moved note position of chamfer on teeth 1 Use hammer and chisel to break ring gear See Figure 50 Be careful to not damage flywheel Figure 50 Ring Gear Removal WARNING Parts are hot Wear protective clo...

Page 26: ...or the torque converter housing was removed install it on engine See Figure 51 Tighten capscrews to 43 to 51 N m 32 to 38 lbf ft 2 Install flange and flywheel on crankshaft 3 Apply thread locking adhe...

Page 27: ...3 mm 0 012 in To adjust clearance loosen lock nut and turn ad justment screw Tighten lock nut to 16 to 21 N m 12 to 15 lbf ft NOTE During adjustment of valves check position of balls in ends of rocke...

Page 28: ...compression gauge and do same tests as described in Step 3 If pressure reading increases to normal read ing low pressure was caused by worn or damaged piston rings Cylinder bore may also be damaged If...

Page 29: ...r Cylinders Bore Stroke FE 86 mm 3 39 in 86 mm 3 39 in Bore Stroke F2 86 mm 3 39 in 94 mm 3 70 in Displacement FE 1998 cm3 121 9 in 3 Displacement F2 2184 cm3 133 2 in 3 Firing Order 1 3 4 2 Compressi...

Page 30: ...50 8 mm 2 00 in Spring Free Length Outer F2 52 2 mm 2 055 in Service Limit F2 50 6 mm 1 992 in Spring Free Length Inner FE 45 7 mm 1 799 in Service Limit FE 44 3 mm 1 744 in Spring Free Length Inner...

Page 31: ...mm 0 0059 in Bore Diameter 86 00 to 86 019 mm 3 3858 to 3 3866 in Wear Limit 0 15 mm 0 0059 in PISTONS Diameter 85 944 to 85 964 mm 3 3836 to 3 3844 in Clearance Between Piston and Bore 0 036 to 0 075...

Page 32: ...4 to 136 N m 84 to 100 lbf ft Fuel Pump 16 to 22 N m 142 to 195 lbf in Intake Manifold 19 to 31 N m 14 to 23 lbf ft Main Bearing Cap 84 to 90 N m 62 to 66 lbf ft Oil Pan 7 to 12 N m 62 to 106 lbf in O...

Page 33: ...t timing Fuel line has a restriction Clean or use new fuel lines Fuel filter has a restriction Install new fuel filter Ignition system does not operate cor rectly Check and repair ignition system The...

Page 34: ...ir cooling system Valves are not adjusted correctly Adjust valves The bearings for the connecting rods are worn or damaged Install new bearings The pistons are worn or damaged Install new pistons Valv...

Page 35: ...The belt for the water pump is worn or not adjusted correctly Check and adjust the belt The thermostat has damage Install new thermostat The exhaust system has restrictions Check and repair exhaust sy...

Page 36: ...________________________________________ ____________________________________________________________ ____________________________________________________________ _____________________________________...

Page 37: ......
Page 38: ...Yale Materials Handling Corp 1400 Sullivan Dr Greenville NC 27834 2011 600 YRM 496 1 02 Printed in U S A...

Reviews: