background image


10 

OPERATING YOUR APPLIANCE 

Recommended temperatures for Chilling Wine: 

Red Wines: 

15 ~ 18°C  (59 ~ 64.4°F) 

Dry / White Wines: 

9 ~ 14°C  (48.2 ~ 57.2°F) 

Sparkling Wines: 

5 ~ 8°C 

(41 ~ 46.4°F) 


The appliance should be placed where the ambient temperature is between 10~38°C (50~100°F). If the ambient 
temperature  is  above  or  below  this  range,  the  performance  of  the  unit  may  be  affected.  Placing  your  unit  in 

extreme cold or hot conditions may cause interior temperatures to fluctuate. 


Connect power cord to a properly grounded outlet. 


This appliance is equipped with Memory IC 

– should there be a power interruption, unit will auto recover at last 

setting.


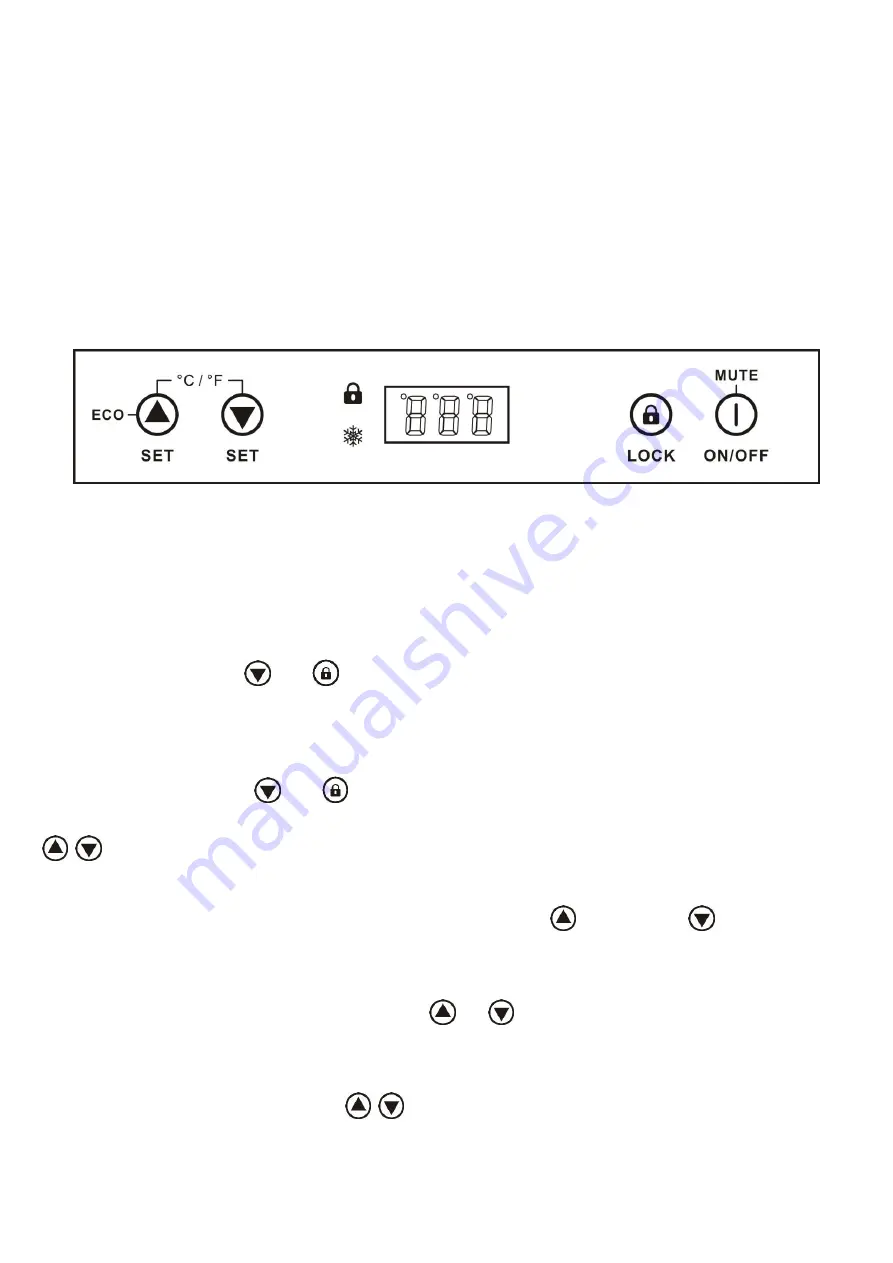
Control Panel: 


Smart control mode


When the door is opened, inner light automatically start up and inner fan stop working.


When the door is closed, inner light automatically shut down.


Door ajar alarm

: When the door is opened more than 5 minutes, will send out alarming sound, compressor and 

outer fan will stop working.


Force Quit the Smart control mode   


Press and hold the buttons 

  and 

  simultaneously for 5 seconds, the small dot in the upper left corner of the 

LED will bright. 


After quit the Smart control mode, the alarm will not sound when the door is open for more than 5 minutes.   

Notice: The interior light can only be controlled by pressing the button. 


Press and hold the buttons 

  and 

  simultaneously for 5 seconds to re-enter the Smart control mode. 


  Setting the temperature Control


Adjustable temperature: 1°C to 18°C (34°F to 65°F) 


Set the desired temperature by pressing the corresponding buttons, 


to increase or 

  to decrease. Each 

press is in 1-degree increment. Once released, set temperature will flash for approximately 5 seconds then revert 

back to display the internal temperature. 


To  view  your  set  temperature,  press  either  the 

  or 

  button  once  and  LED  display  will  flash  set 

temperature for 5 seconds. 


The  appliance  has  the  capability  to  display  temperature  in  either  Celsius  or  Fahrenheit.  To  change  the 

temperature scale, press and hold both 


  buttons simultaneously for approx. 3 seconds. 

Note:

  The  temperature  inside  may  vary  slightly  depending  on  whether  or  not  the  interior  bulb  is  ON  or  OFF  and 

where the bottles are located (upper/middle or lower section). 

Summary of Contents for PURBD51SS1

Page 1: ...Instruction Manual Model BEFORE USE PLEASE READ AND FOLLOW ALL SAFETY RULES AND OPERATING INSTRUCTIONS KEEP THIS MANUAL IN A SECURE LOCATION PURBD51SS1...

Page 2: ...ltiple portable socket outlets or portable power supplies at the rear of appliance WARNING Keep ventilation openings in the appliance enclosure or in the built in structure clear of obstruction WARNIN...

Page 3: ...ctrical shock or death Do not attempt to repair or replace any part of your appliance unless it is specifically recommended in this manual All other servicing should be referred to a qualified technic...

Page 4: ...or other than residential purposes This appliance is CFC and HFC free and contains small quantities of Isobutane R600a which is environmentally friendly but flammable It does not damage the ozone laye...

Page 5: ...mize the risk of possible ignition due to incorrect parts or improper service WARNING Risk of child entrapment Before you throw away your old refrigerator or freezer Take off the doors Leave the shelv...

Page 6: ...ng from the power cord Any questions concerning power and or grounding should be directed toward a certified and authorized products service center This appliance is intended to be installed in a spac...

Page 7: ...the floor using screws 5 Slide appliance into position and make sure the leg engages the anti tip bracket The measurements for the anti tip bracket installation are illustrated below NOTE If the appli...

Page 8: ...8 Panel Installation Overlay Panel Dimension Door Panel Width 23 43 Door Panel Height 29 76 Door Panel Depth 3 4 max Same Panel For Top Bottom Drawers...

Page 9: ...See image 2 Save all these screws for later reinstallation 4 Place the new overlay panel under the drawer body and fix it with clamps to ensure that the two remain aligned and do not move The clamp e...

Page 10: ...he buttons and simultaneously for 5 seconds the small dot in the upper left corner of the LED will bright After quit the Smart control mode the alarm will not sound when the door is open for more than...

Page 11: ...ght will illuminate to signify that cooling mode is currently in operation Demo mode Press and hold buttons and simultaneously for 10 seconds it can enter or exit demo mode In this mode the display pa...

Page 12: ...perature alarm will be activated the LED will display LL the buzzer will sound continuously the cooling system will stop working The display return to normal until the low temperature is relieved NOTE...

Page 13: ...th Power Failure Most power failures are corrected within a few hours If your power is going to be off for a longer period of time you need to take the proper steps to protect your contents Transporti...

Page 14: ...bottles has been added to the unit Put the appliance in a cooler place Leave the appliance to work for a while until the set temperature has been reached The light does not work Appliance is not conn...

Reviews: