background image

5

An ASSA ABLOY Group brand

P/N AYRT-220-INST-FUL Rev B

INSTALL LOCK

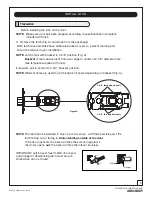
   Preparation

A.  Remove the latch (Fig. A) and strike from the packaging.

If required, pull to extend to 2-3/4" backset position.

NOTE

: Different holes are used for (2) through bolt posts depending on backset (Fig. A).

Figure A

2-3/8" through bolt posts

2-3/4" through bolt posts

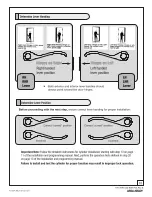
Before installing the lock on the door:

NOTE

: The latch can be installed in only one of two ways - with the 

bevel

 (slope) of the    


            latch facing out or facing in 

while standing outside of the door.

NOTE

 Both latch face and strike have adhesive-backed covers to  prevent marring and  
 should be removed upon installation.

IMPORTANT: Latch bevel must match door bevel 
and plunger of deadlocking latch must stop on 
strike when door is closed.

Make sure door has been prepped according to specifications in template 
included with lock.

If the door opens 

in

, the bevel will face the exterior (regular); if 

the doors opens 

out

, the bevel will face the interior (reverse).

Strike

Plunger

NOTE

: Latch ships with backset in 2-3/8" position (Fig. A).


Backset

 is the measurement from door edge to center of 2-1/8" diameter hole       

            (see template supplied with lock).

Summary of Contents for RealLiving YRT210

Page 1: ......

Page 2: ......

Page 3: ...y compris l interf rence qui peut causer l op ration peu d sir e For the U4A YRHCPZB0 and 6982A YRHCPZB0 the following statement applies This equipment complies with FCC IC radiation exposure limits s...

Page 4: ......

Page 5: ...facing in while standing outside of the door NOTE Both latch face and strike have adhesive backed covers to prevent marring and should be removed upon installation IMPORTANT Latch bevel must match doo...

Page 6: ......

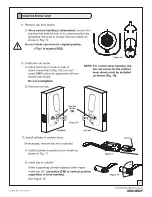
Page 7: ...marked BLACK Tailpiece horizontal Posts are inserted in holes according to backset adjustment Refer to Fig A under Lock Preparation 4 Remove the interior mounting plate with gasket from the back door...

Page 8: ......

Page 9: ......

Page 10: ......

Page 11: ......

Page 12: ......

Page 13: ......

Page 14: ......

Page 15: ...o connect with a network controller One Touch Locking When the latch is retracted activating the keypad will extend the latch during Automatic Re lock duration or when Automatic Re lock is disabled Wh...

Page 16: ......

Page 17: ...ctory default see the following The following procedure returns the lock to its factory defaults by deleting all user codes including the Master PIN code and returning all programming features to thei...

Page 18: ......

Page 19: ...amming Through Menu Mode Using Master PIN code 1 Touch the screen with the back of your hand or fingers to activate 2 Enter the 4 8 digit Master PIN code followed by the key Lock Response Menu mode en...

Page 20: ......

Page 21: ...r The same PIN code cannot be used for multiple users Registration management of PIN codes is set by the authority of Master PIN Code The Master PIN code must be registered prior to adding any users C...

Page 22: ......

Page 23: ...___ User ___ User ___ User ___ User ___ User ___ User ___ User ___ User ___ User ___ User ___ User ___ User ___ User ___ User ___ User ___ User ___ User ___ User ___ User ___ User ___ User ___ User _...

Page 24: ......

Reviews: