background image

8

Record

6

REC Config

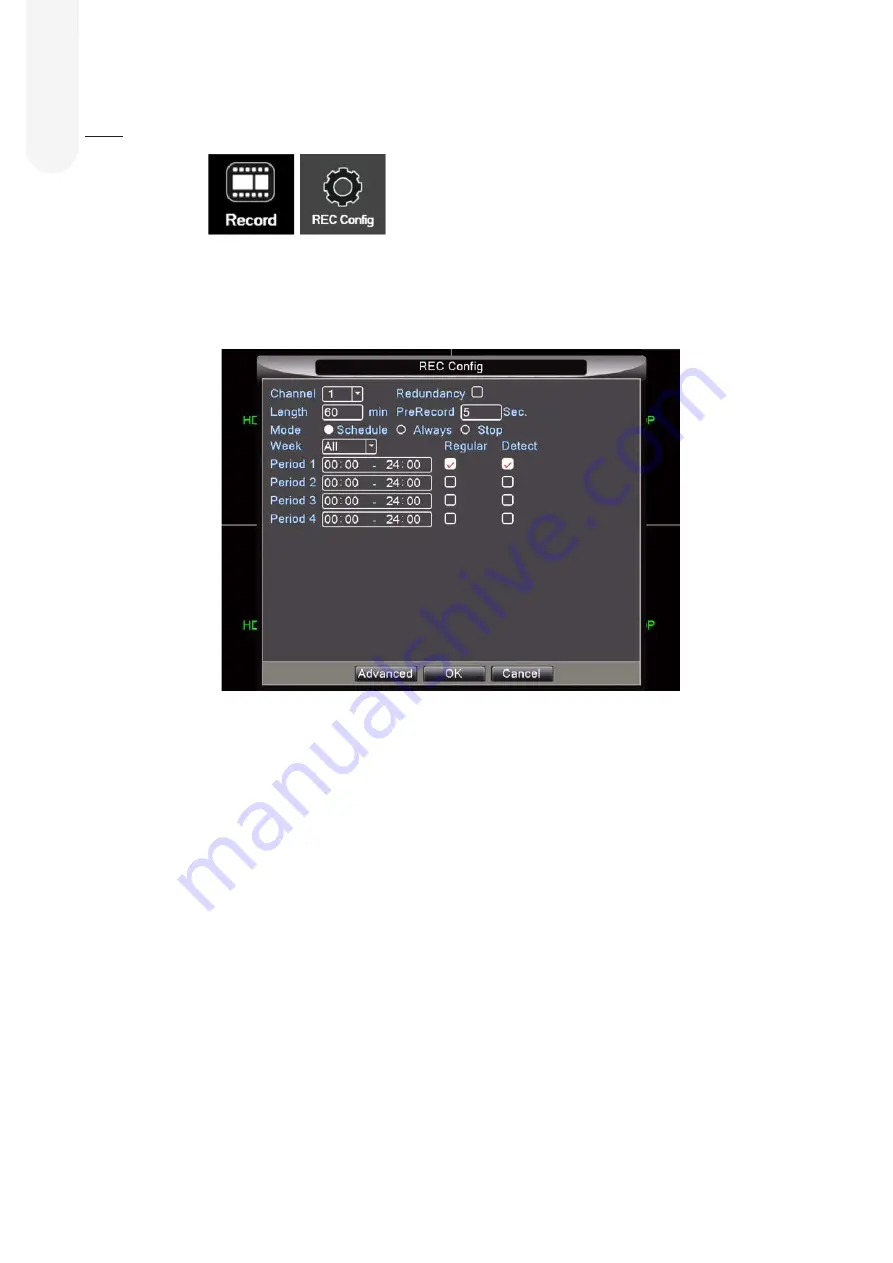
From the Main Menu, hover over ‘Record’ and then move the mouse over ‘REC Config’ and left click to select.
Here you will be able to set your DVR to different recording formats (Schedule, Always or Stop).
First select the Channel you wish to configure. 
Channel 1 = Camera 1 etc…

Redundancy: 

This should remain un-selected.

Length: 

Recording clip size. We recommend using the default 60 minutes.

Pre-record: 

Video pre-recording. We recommend using the default 5 seconds.

Select the mode that you want the channels/cameras to perform. Your 3 options are:

1.   Schedule 

– To specify days and times of recordings. You have the option of up to 4 time periods per day to  

  set start and end time for recordings (i.e. start 7pm end 7am to record through the night.)
  You can set different start and end times on specific days.


Tick the ‘Regular’ box for continuous recording by left clicking.


• 


Tick the ‘Detect’ box to record on motion detection by left clicking.

2. Always

 – Continuous recording (scheduling not applicable. By default, the oldest recording will be  


 overwritten. 

3.   Stop

 – No options as this setting 

Does Not Record

 (Only allows you to view live footage on the TV/Monitor  

  with no playback facility).

  Once you have specified your preferences left click on‘OK’.

  You do not have to change any details within the ‘Advanced Menu’.

Summary of Contents for Y402A-HD

Page 1: ...ile data speed could effect quality and connection Information and illustrations are subject to change within this document Yale reserves the right to alter the specification and product design at any...

Page 2: ...supplied HD High Definition 720 1080 are both High Definition video quality PTZ Pan Tilt Zoom Movable camera with Zoom functionality HDD Hard Disk Drive Where the video footage is stored within the D...

Page 3: ...For connecting a television or PC Monitor with a HDMI cable 6 Network Port You are able to connect the DVR to a network router or switch with an Ethernet Cable supplied This will allow the option of u...

Page 4: ...hange the DVR to a different resolution in order to show on a HD TV DO NOT expose the DVR to moisture or water Avoid dusty or dirty locations DO NOT open the DVR case unless you want to change the Har...

Page 5: ...g via internet Click Next to continue You will be presented with a QR code for App registration Click Cancel to exit this screen to continue DVR setup You can access this QR code after installation by...

Page 6: ...DVR Setup Setting General To change Date Time Language Setting the Date and Time 1 Right Click on the mouse then left click on Main Menu This opens up the Main Menu screen 2 Hover over Settings then...

Page 7: ...lts Bits per sec On line User Upgrade Auto maintain Import Export Factory Reset System Info LOG DVR NVR Mode Alarm System Arm Home Disarm Unlock Function Location Change Password Please ensure you set...

Page 8: ...are 1 Schedule To specify days and times of recordings You have the option of up to 4 time periods per day to set start and end time for recordings i e start 7pm end 7am to record through the night Yo...

Page 9: ...snip button 3 then select your desired end time and left click the snip button 3 again This will trim the video clip as desired To save this to the USB Flash Drive left click the Hard Drive button 7 F...

Page 10: ...need to left click the Backup button underneath Detect 4 You will see a list of recordings in the box on screen as shown in the image above This will prompt you to select a clip based on dates for bac...

Page 11: ...l camera Your DVR will automatically be set to HD720 HD1080 depending on model You can change the quality of the Hard Drive recording left column and internet streaming right column We recommend these...

Page 12: ...lect the channel camera you wish to enable from the drop down menu by left clicking 2 Left click on the Enable box next to Channel Middle sensitivity is recommended 3 Left Click Set next to Region You...

Page 13: ...to record a number of channels cameras even if only 1 is activated e g by motion If camera 1 is triggered then all cameras will start recording for maximum coverage TOUR Same as above but the DVR wil...

Page 14: ...a covered lens The dafault setting for this when covered lens is enabled is 24 7 RECORD CHANNEL Select which other channels cameras you want to start recording if the channel camera selected gets cove...

Page 15: ...ss of signal The default setting for this when signal loss is enabled is 24 7 RECORD CHANNEL Select which other channels cameras you want to start recording if the channel camera selected loses signal...

Page 16: ...O LOGOUT You can enter the number of minutes the DVR will remain inactive before you are logged out and you have to enter your password again MACHINE NAME Rename as appropriate e g home office etc Loc...

Page 17: ...s that an event has taken place TRANSPARENCY Change the darkness of the menu over the cameras i e makes the menu lighter over the camera stream RESOLUTION Change the display output NOTE please check y...

Page 18: ...stem with the Yale CCTV App you will need an internet connection Please make sure you change your password for security MODIFY PASSWORD Leave Old as blank then enter your new password should you forge...

Page 19: ...mera 1 for 5 seconds then camera 3 for 5 seconds then camera 4 for 5 seconds Under Alarm Tour Type upon detection of an event it will show the relevant camera for the specified length of time Logout F...

Page 20: ...could be split to 500GB Read Write and the other 500GB Read only HDD Info This section allows you to see what Hard Drive you have the size capacity the amount of space left on the Hard Drive and the c...

Page 21: ...l if your product is registered Auto Maintain This option allows you to periodically reboot your DVR and to delete old files Rebooting will extend the DVR and its mechanical Hard Drive Default is set...

Page 22: ...6 Your DVR LOG details are now saved on your USB Flash Drive To Export Import DVR Configuration details 1 Enter a USB Flash Drive into the top USB port in the DVR 2 Your USB Flash Drive name will appe...

Page 23: ...eset to factory settings Simply left click the box of the area you want to reset or left click Select All followed by OK to reset Details you can reset are General Video Encode Record Configurations A...

Page 24: ...o you can see exactly how the system is used DVR NVR Mode This feature enables the DVR to work as a Network Video Recorder This means IP Cameras that are connected to the same router as the DVR can be...

Page 25: ...onse 4 You are now in alarm learn mode 5 Press the two buttons one by one on the CCTV Alarm Link Adaptor to trigger learning in signals The CCTV Alarm Link Adaptor will transmit radio signals to your...

Page 26: ...Link Adaptor is inserted into the USB port of the CCTV DVR and the Yellow Yale Module is inserted into the Smart Lock Please note The batteries must be removed whilst inserting the Module 3 Wake up th...

Page 27: ...ode Disarm Press the Disarm button on the DVR screen or Yale CCTV App The alarm will now be disarmed Door Unlock Press the unlock button on the DVR screen or Yale CCTV App The lock will now open Camer...

Page 28: ...CTV App Please search and download Yale CCTV App from iOS iPhone App Store or Google Play Store Compatible with iOS 9 and Android 4 4 iOS and Android version requirement may change in the future due t...

Page 29: ...not be connected please restart the App or press the camera icon within the picture frame to reload Please also check and ensure your DVR is connected to the internet Please name your DVR followed by...

Page 30: ...X SR RS EF INTBOX SR SR EF Easy Fit Alarm Kits SR EIR SR SR SR WS SR CO SR HUB SR HUL SR HSL SR MZ8 SR Smart Home Alarm kits SR Standard Alarm kits SR Smartphone Alarm kits Is are in conformity with t...

Reviews: