background image

01X   Owner’s Manual (Supplementary Manual)

Recording/Playback/Remote Control

71

Before Using

Basics Section

Appendix

Getting Started

Reference

Using multiple output buses

Normally, individual tracks are all assigned to the same 
output(s).  However, if you’ve set up the output configu-
ration for multiple stereo outputs, you can assign differ-
ent tracks to different outputs and create separate 
group buses for similar tracks.  For example, you could 
route all drum tracks to one group, strings and pad 
sounds to a second group, and backing vocals to a 
third, and so on.

1

From the Devices menu, select “VST Connections.”  
(Or press F4, the default shortcut.)
Set the Output configuration as desired. In this exam-
ple, we’ve selected “4 stereo out.”

2

From the Devices menu, select “Mixer.” (Or press F3, 
the default shortcut.)

3

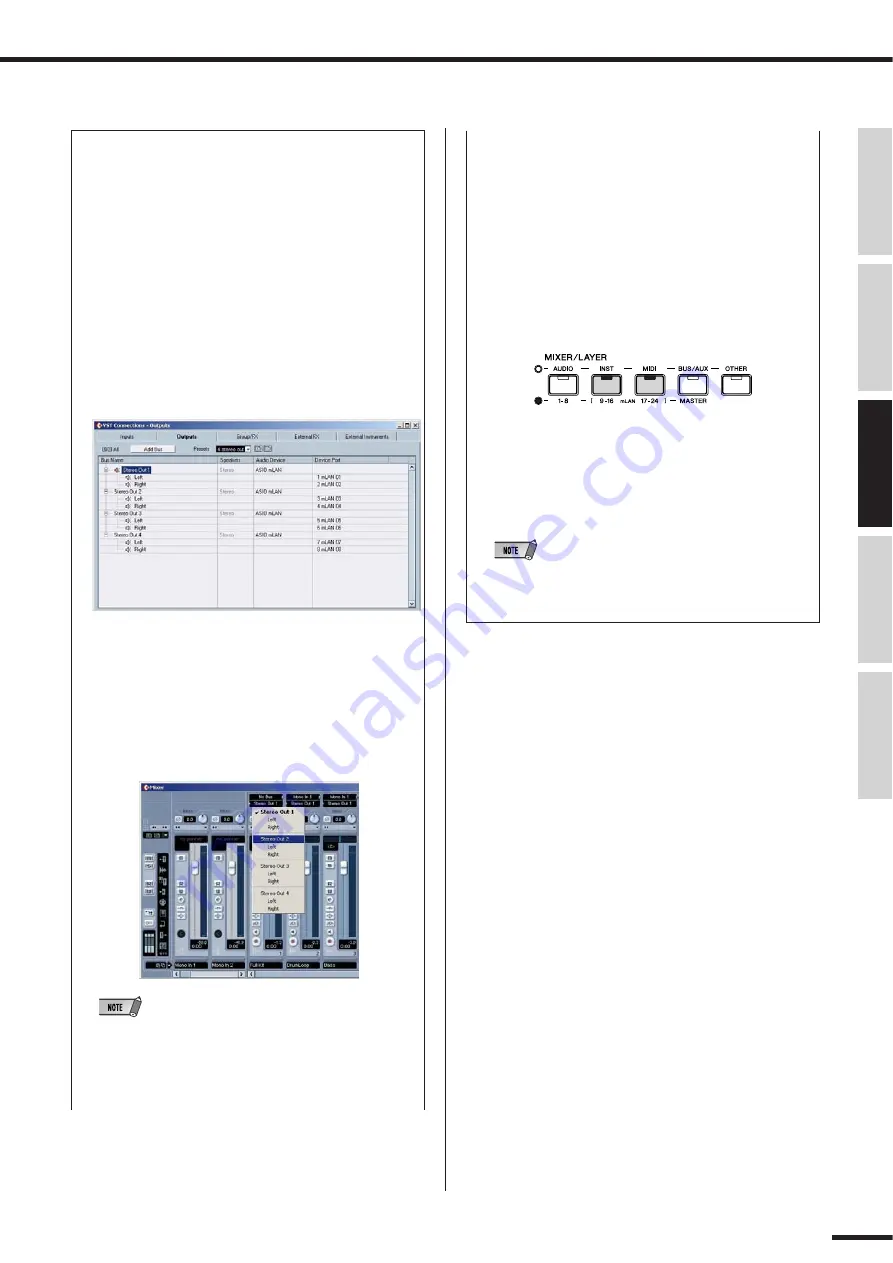
Make the desired stereo bus assignments for each 
track.
Click on the Output Routing box (the second box at 
the top of each audio channel strip), and select the 
desired output bus from the pull-down menu.

• The Routing boxes shown above only appear if audio tracks 

have been created.  Make sure to create the desired audio 

tracks before performing step 3.  (To create an audio track, 

select “Add Track” from the Project menu and click on “Audio” 

in the pull-down menu.)

4

Set the 01X to Internal operation by pressing the 
[INTERNAL] button (the lamp lights).

5

Enable Monitor B.  (Press the [MONITOR A/B] button 
so that the lamp is off.)

6

Use the MIXER/LAYER buttons on the 01X to select 
the appropriate mLAN output group.
Press the [INST] (9-16; mL1-8) button to select 
mLAN channels 9 - 16, and press [MIDI] (17-24; 
mL9-16) button to select mLAN channels 17 - 24.

7

Use the appropriate faders to set the levels. 
The mLAN outputs from the DAW/computer are now 
routed to the input channels of the 01X (channels 9 - 
24), and can be processed and mixed along with 
channels 1 - 8.

• When inputting stereo signals, use odd/even input channels 

in stereo pair configuration (for example, 9 and 10).  (See 

page 102.)

Summary of Contents for 01x

Page 1: ...l are for instructional purposes only and may appear some what different from those on your instrument Most of the computer display examples in this owner s manual are taken from the English version O...

Page 2: ...miliar with the concepts and basic functions covered here and are aware how they apply to your own particular sequencer you should have no problem learning from these instructions no matter what seque...

Page 3: ...or remote control of Cubase SX 3 Press the UTILITY button then press knob 1 to call up the REMOTE SELECT page Press knob 3 to select CUBASE NUENDO then press knob 8 YES Finally press the REMOTE button...

Page 4: ...ick on the arrow to call up the pull down menu for each setting Input and Output If you intend to use the 01X as a MIDI interface with the MIDI A and B termi nals on the rear panel set these to mLAN M...

Page 5: ...or each song However you can also save each assignment scheme as part of a project template and then instantly call up the desired template as needed For example you could have eight or more channels...

Page 6: ...an be acti vated is 16 Outputs q From the Devices menu select VST Connections w Click on the Outputs tab e Select the desired Output preset As with Inputs above there are a variety of common configura...

Page 7: ...Routing box the second box at the top of each audio channel strip and select the desired output bus from the pull down menu The Routing boxes shown above only appear if audio tracks have been created...

Page 8: ...70 3 Set up Cubase SX 3 for recording an audio track Use an existing audio track in the song or create a new audio track if necessary 4 Click on the newly created track in the Project win dow and cal...

Page 9: ...Control see the separate Installation Guide w Start your sequencer program Once your sequencer is up and running and a song has been loaded the 01X reads the data of the song track names level pan set...

Page 10: ...m a new one you can do this from the 01X too Move to the desired song position then press the WRITE button A new marker is set for the current postion Cycle playback In Cubase SX 3 you can loop playba...

Page 11: ...ally or horizontally as desired w Zoom can be used in the main Project view or in any of the editors Working in the Mixer window Mixer control using the faders and knobs q Hold down SHIFT and press th...

Page 12: ...f the channel you want to solo Using the EDIT button With a MIDI track selected pressing the EDIT button allows you to instantly call up the MIDI Channel Settings window for the track MIDI tracks MIDI...

Page 13: ...ader moves are completely automated as well moving along with the song playback The following is a brief explanantion on how to use the 01X to record and play back volume automation on a spe cific tra...

Page 14: ...g one of the EQ buttons calls up the EQ parameters from which you can change and write settings See page 79 Just remember to select the desired parameter page BEFORE starting playback in step 3 above...

Page 15: ...here by pressing the appropriate SEL button without having to leave the Channel Settings window You can also select plug in instrument channels for EQ process ing See the Hint Controlling effects for...

Page 16: ...n be then used as a send destination for the audio tracks The send level to the effect s is controlled independently from each track For further details and instructions on using the plug in effects w...

Page 17: ...ect send level for each effect 1 8 y If necessary turn the desired effect on or off Call up Page 2 of the Send parameters with the DIS PLAY Up Down buttons then use the corre sponding knob to turn the...

Page 18: ...he 01X Assigning the Function buttons 1 From the Devices menu select Device Setup 2 Select Yamaha 01X from the list Some Cubase versions enable you to select Yamaha 01X from the Devices menu 3 In the...

Page 19: ...ancel the last edit made and restore the previous condition of the song You can also execute Redo from the 01X Simply hold down the SHIFT button and press UNDO The last edit you made will be repeated...

Page 20: ...R G Pro Audio Digital Musical Instrument Division Yamaha Corporation 2005 Yamaha Corporation A0 Yamaha Web Site English only http www yamahasynth com Yamaha Manual Library http www yamaha co jp manua...

Reviews: