background image

iii 

En

1

To assure the finest performance, please read this manual 
carefully. Keep it in a safe place for future reference.

2

Install this unit in a well ventilated, cool, dry, clean place 
- away from direct sunlight, heat sources, vibration, dust, 
moisture, and/or cold. For proper ventilation, allow the 
following minimum clearances.
Top: 5 cm (2 in)
Rear: 5 cm (2 in)
Sides: 1 cm (3/8 in)

3

Locate this unit away from other electrical appliances, 
motors, or transformers to avoid humming sounds.

4

Do not expose this unit to sudden temperature changes 
from cold to hot, and do not locate this unit in an 
environment with high humidity (i.e. a room with a 
humidifier) to prevent condensation inside this unit, 
which may cause an electrical shock, fire, damage to this 
unit, and/or personal injury.

5

Avoid installing this unit where foreign objects may fall 
onto this unit and/or this unit may be exposed to liquid 
dripping or splashing. On the top of this unit, do not 
place:

Other components, as they may cause damage and/or 
discoloration on the surface of this unit.

Burning objects (i.e. candles), as they may cause fire, 
damage to this unit, and/or personal injury.

Containers with liquid in them, as they may fall and 
liquid may cause electrical shock to the user and/or 
damage to this unit.

6

Do not cover this unit with a newspaper, tablecloth, 
curtain, etc. in order not to obstruct heat radiation. If the 
temperature inside this unit rises, it may cause fire, 
damage to this unit, and/or personal injury.

7

Do not plug in this unit to a wall outlet until all 
connections are complete.

8

Do not operate this unit upside-down. It may overheat, 
possibly causing damage.

9

Do not use force on switches, knobs and/or cords.

10 When disconnecting the power cable from the wall 

outlet, grasp the plug; do not pull the cable.

11 Do not clean this unit with chemical solvents; this might 

damage the finish. Use a clean, dry cloth.

12 Only voltage specified on this unit must be used. Using 

this unit with a higher voltage than specified is dangerous 
and may cause fire, damage to this unit, and/or personal 
injury. Yamaha will not be held responsible for any 
damage resulting from use of this unit with a voltage 
other than specified.

13 To prevent damage by lightning, keep the power cable 

and outdoor antennas disconnected from a wall outlet or 
the unit during a lightning storm.

14 Do not attempt to modify or fix this unit. Contact 

qualified Yamaha service personnel when any service is 
needed. The cabinet should never be opened for any 
reasons.

15 When not planning to use this unit for long periods of 

time (i.e. vacation), disconnect the AC power plug from 
the wall outlet.

16 Be sure to read the “Troubleshooting” section on 

common operating errors before concluding that this unit 
is faulty.

17 Before moving this unit, press 

 to set this unit in 

standby mode, and disconnect the power supply cable 
from the wall outlet.

18 Condensation will form when the surrounding 

temperature changes suddenly. Disconnect the power 
supply cable from the outlet, then leave the unit alone.

19 Install this unit near the wall outlet and where the AC 

power plug can be reached easily.

20 The batteries shall not be exposed to excessive heat such 

as sunshine, fire or like.

21 Secure placement or installation is the owner’s 

responsibility. Yamaha shall not be liable for any accident 
caused by improper placement or installation of speakers.

Caution: Read this before operating your unit.

WARNING

TO REDUCE THE RISK OF FIRE OR ELECTRIC 
SHOCK, DO NOT EXPOSE THIS UNIT TO RAIN 
OR MOISTURE.

As long as this unit is connected to the AC wall outlet, 
it is not disconnected from the AC power source even 
if you turn off this unit by 

. In this state, this unit is 

designed to consume a very small quantity of power.

 (Power key)

Turns on the power of this unit or sets it to the standby 
mode.

Summary of Contents for ATS-1010

Page 1: ...U Front Surround System ATS 1010 OWNER S MANUAL ...

Page 2: ...s or when unused for long periods of time 14 Refer all servicing to qualified service personnel Servicing is required when the apparatus has been damaged in any way such as power supply cord or plug is damaged liquid has been spilled or objects have fallen into the apparatus the apparatus has been exposed to rain or moisture does not operate normally or has been dropped IMPORTANT SAFETY INSTRUCTIO...

Page 3: ...h these requirements provides a reasonable level of assurance that your use of this product in a residential environment will not result in harmful interference with other electronic devices This equipment generates uses radio frequencies and if not installed and used according to the instructions found in the users manual may cause interference harmful to the operation of other electronic devices...

Page 4: ...unit with chemical solvents this might damage the finish Use a clean dry cloth 12 Only voltage specified on this unit must be used Using this unit with a higher voltage than specified is dangerous and may cause fire damage to this unit and or personal injury Yamaha will not be held responsible for any damage resulting from use of this unit with a voltage other than specified 13 To prevent damage b...

Page 5: ...es grow old the effective operation range of the remote control decreases considerably If this happens replace the batteries with two new ones as soon as possible Do not use old batteries together with new ones Do not use different types of batteries such as alkaline and manganese batteries together Read the packaging carefully as these different types of batteries may have the same shape and colo...

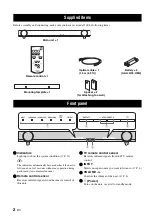
Page 6: ... 2 Remote control sensor Receives infrared signals from the remote control of this unit 3 TV remote control sensor Receives infrared signals from the TV remote control 4 INPUT Selects an input source you want to listen to P 6 5 VOLUME Controls the volume of the unit P 8 6 Power Turns on the unit or sets it to standby mode Supplied items Front panel Remote control 1 Battery 2 AAA R03 UM4 Spacer 2 f...

Page 7: ...ially available screws and the supplied spacers at the marks 3 Hang the unit on the screws using the brackets on the rear of the unit Do not attach the unit to a wall that is made of weak materials such as plaster or veneered woods Doing so may cause the unit to fall Use commercially available screws that can support the weight of the installation Make sure you use specified screws to attach the u...

Page 8: ...eakers to off Connection Connecting a TV The unit plays the audio output from your TV Connect input components such as a BD player etc to your TV first and check the components play properly before connecting to the unit See the manuals of your TV and BD player etc for details After that connect the unit to your TV as the illustration below Setting your TV OPTICAL OUTPUT SYSTEM CONNECTOR SUBWOOFER...

Page 9: ...D player STB etc to the unit directly in the following cases When the unit does not play the sound output from the components connected to your TV P 4 When your TV does not have any audio input jacks to connect input components such as a BD player etc SYSTEM CONNECTOR SUBWOOFER OUT SYSTEM CONNECTOR MONAURAL INPUT OPTICAL OUTPUT COAXIAL OUTPUT SYSTEM CONNECTOR SUBWOOFER OUT System connector cable c...

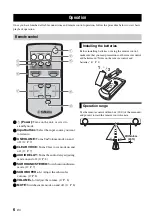
Page 10: ...elay adjusting mode on and off P 8 6 SURROUND STEREO Switch surround stereo mode P 7 7 SUBWOOFER Adjust the subwoofer volume P 8 8 VOLUME Adjust the volume P 8 9 MUTE Switches mute mode on and off P 8 Before installing batteries or using the remote control make sure that you read precautions on the remote control and batteries in Notes on the remote control and batteries P 1 Use the remote control...

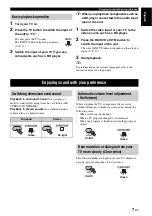
Page 11: ...refer to the instruction manual for the product Playback in surround sound You can enjoy a realistic sound effect using Yamaha s exclusive AIR SURROUND XTREME Playback in stereo sound An extended sound is achieved for a 2 channel source While watching the TV compensate the excessive volume differences to make it easier to hear during the following cases When switching the channel When a TV program...

Page 12: ...y and red a longer delay 3 Press AUDIO DELAY to exit the adjustment mode y The adjustment mode is canceled if the unit is left for 20 seconds without any operation being performed Although the unit has a subwoofer built in you can use commercially available powered subwoofer of your choice Refer to Alternative connections P 5 1 Set the unit to standby mode 2 Press both the VOLUME button and button...

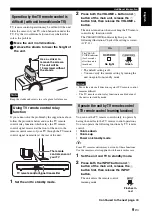
Page 13: ...ify the current setting by turning the unit on again from standby mode Move the unit in all directions again if TV remote control remains difficult The TV remote control relay function is enabled even if the unit is in standby mode You can use the TV remote control solely to operate by having the unit learn the TV remote control operations You can operate the following functions by TV remote contr...

Page 14: ...disturb TV remote control learning 1 Set the unit to standby mode 2 Press both the INPUT button and button of the main unit release the button first then release the INPUT button 3 Press the INPUT button of the main unit again for more than 3 seconds 4 Release the INPUT button of the main unit when qD DTS indicator flashes Press the button of the main unit for more than 3 seconds to finish the rem...

Page 15: ...ation immediately after turning on the unit Playback of the subwoofer P 8 TV remote control relay function P 9 Indicators Built in subwoofer Off External subwoofer Off Built in subwoofer On External subwoofer On Indication of the setting mode Setting mode Indicators Audio delay control P 8 TV remote control learning P 9 Normal indication INPUT TV BD DVD STB Stand by SURROUND Surround playback Ster...

Page 16: ...y back the source in surround effect 7 No bass The external subwoofer makes no sound The volume of the subwoofer channel may be set to minimum level Adjust the volume level of the subwoofer 8 Opposite setting of subwoofer is selected Select collect setting of subwoofer 8 The source does not contain low frequency signals The cable between the unit and the subwoofer not connected when selecting play...

Page 17: ...your TV is opposite from the beginning Press the power button of TV remote control to set your TV and the unit to standby mode after pressing the power button of your TV itself and of the unit to set both your TV and the unit to on 9 The TV remote control is out of work even if you use TV remote control relay function The unit and TV are too close far from one another Try to use the TV remote cont...

Page 18: ... Jacks Optical 2 TV BD DVD Coaxial 1 STB Output Jacks Subwoofer 1 System Connector for subwoofer power interlock 1 General Power Supply AC 120 V 60 Hz Power Consumption 22 W Standby Power Consumption Less than 0 5 W Dimensions W H D With stands 890 107 120 5 mm 35 1 8 4 1 4 4 3 4 in Weight 4 2 kg 9 3 lbs Specifications are subject to change without notice This system employs new technologies and a...

Page 19: ......

Page 20: ... 2011 Yamaha Corporation Printed in Malaysia ZA81330 ...

Reviews: