5
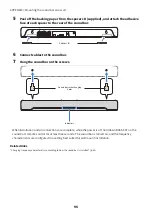
Peel off the backing paper from the spacers B (supplied), and attach the adhesive
face of each spacer to the rear of the sound bar.
Spacers B
6
Connect cables to the sound bar.
7
Hang the sound bar on the screws.
Sound bar screw-hanging
holes
Indicators
When installation and all connections are complete, while the power is off, hold down BASS EXT on the
sound bar’s remote control for at least five seconds. The sound bar is turned on, and the frequency
characteristics are configured to a setting best suited for wall mount installation.
Related links
“Changing frequency characteristics according to how the sound bar is installed” (p.54)
96
APPENDIX > Mounting the sound bar on a wall


