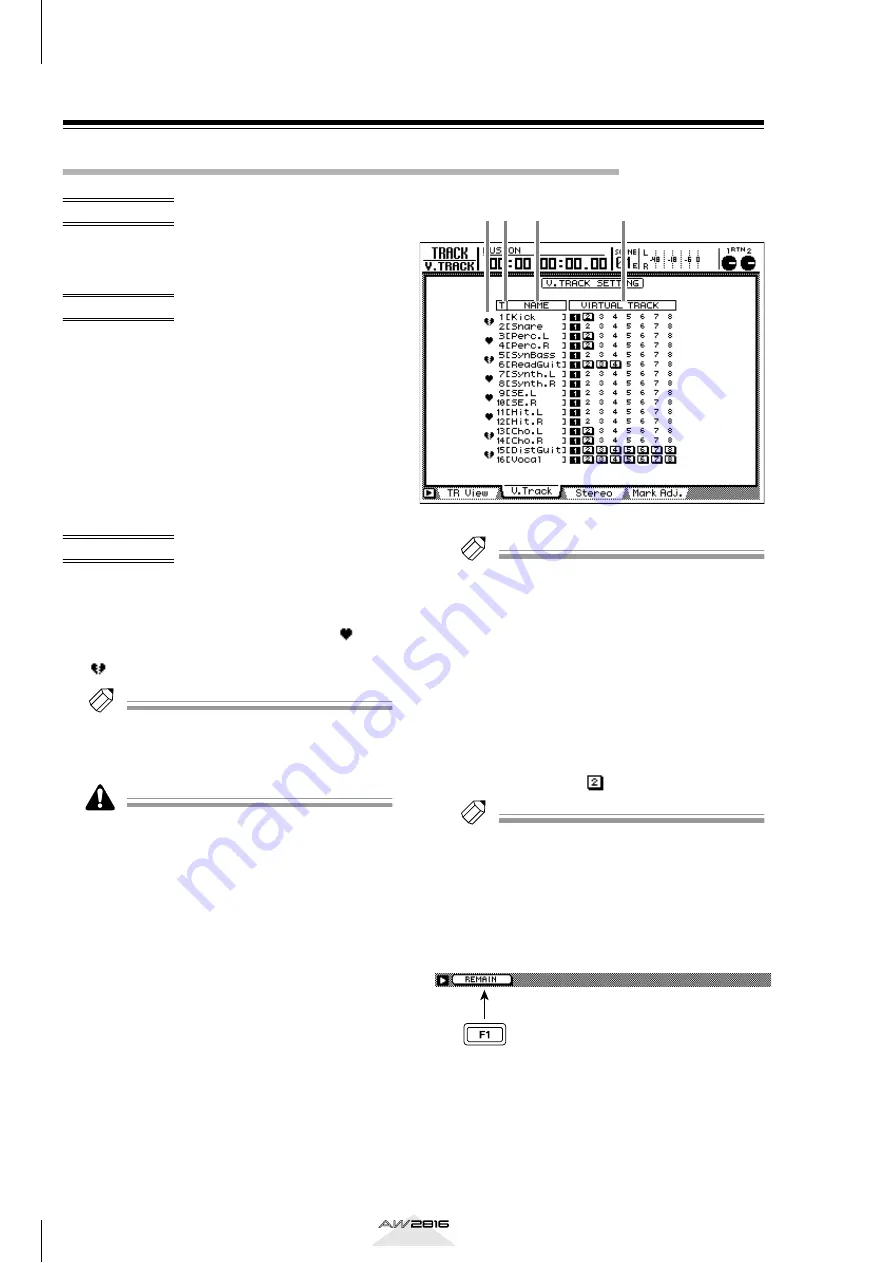
TRACK screen
324
Reference section
V. Track page
Select the virtual track for each track
Switch the virtual track assigned to each
track 1–16, and set/cancel pairing
between tracks.
• [TRACK] key
→
[F2] (V. Track) key
• Repeatedly press the [TRACK] key until
the screen shown at the right appears.
A
Pairing
Move the cursor to this area and press the [ENTER]
key to enable (or cancel) pairing for adjacent odd-
numbered
→
even-numbered tracks. The “ ” sym-
bol will be displayed when pairing is enabled, and
“
” when pairing is disabled.
Tip!
Paired tracks will be linked when you switch virtual
tracks, or when you select them for track editing. This
is convenient when you want tracks on which stereo
sources are recorded to be handled together.
Enabling/disabling of pairing does not affect the pair-
ing settings of the monitor channels. Pairing of moni-
tor channels is performed in the Pair page of the PAN/
ROUTE screens.
B
T (track)
These are the track numbers 1–16.
C
NAME
This area displays the name of the virtual track cur-
rently selected for each track 1–16. Tracks on
which nothing has been recorded will be dis-
played as “-NO REC-”. When you record some-
thing on such a track, a name of “V.Tr x-y” (x=
track number 1–16, y= virtual track number 1–8)
will be assigned automatically.
Tip!
• A name of up to 16 character can be assigned to a
virtual track, but only the first 8 characters will be
displayed in the NAME column (
3
).
• The name of the currently selected virtual track can
be edited in the EDIT screen/TR Edit page.
D
VIRTUAL TRACK
Move the cursor to this area and press the [ENTER]
key to select the virtual track that will be used for
each track 1–16. The highlighted number indicates
the number of the virtual track that is currently
selected for each track 1–16. Of the remaining vir-
tual track numbers, tracks that have been recorded
will be displayed as “
.”
Tip!
For details on using virtual tracks, refer to page 66.
■
Additional functions in the V. Track
page
In the V. Track page you can press the [SHIFT] key to
assign the following additional function to [F1].
• [F1] (REMAIN) key
Displays the remaining available recording time
(hours: minutes) in the counter located in the
upper part of the screen. Hold down the [SHIFT]
key and press the [F1] key once again to return to
the normal counter display.
12 3
4


