METER screen
352
Reference section
the state of the REC TRACK SELECT [1]–[16] keys
and READY buttons (
6
), and on the current run-
ning mode.
Tip!
When the INDI. button of the INPUT MONITOR area
(
9
) is on, you can move the cursor to these buttons
and press the [ENTER] key to select for each track the
type of signal that will be monitored.
H
MUTE buttons
These buttons indicate the mute on/off status of
tracks 1–16 as “
” or “
” symbols respectively.
You can move the cursor to this area and press the
[ENTER] key to switch muting on/off. Track mute
on/off settings do not affect the [ON] keys of the
monitor channels.
• On the AW2816, the number of tracks that can play
back simultaneously may be limited depending on
the number of tracks that are set to record-ready
mode. In this case, muting will forcibly be turned on
for tracks that cannot play back.
• If you want to defeat muting for a track that was
forcibly muted, you must first mute another track. If
you attempt to defeat muting without increasing the
number of muted tracks, a message of “CANNOT
CHANGE MUTE” will appear, and the operation will
not occur.
• By pressing the [ALL SAFE] key, you can defeat
record-ready mode and muting for all tracks.
I
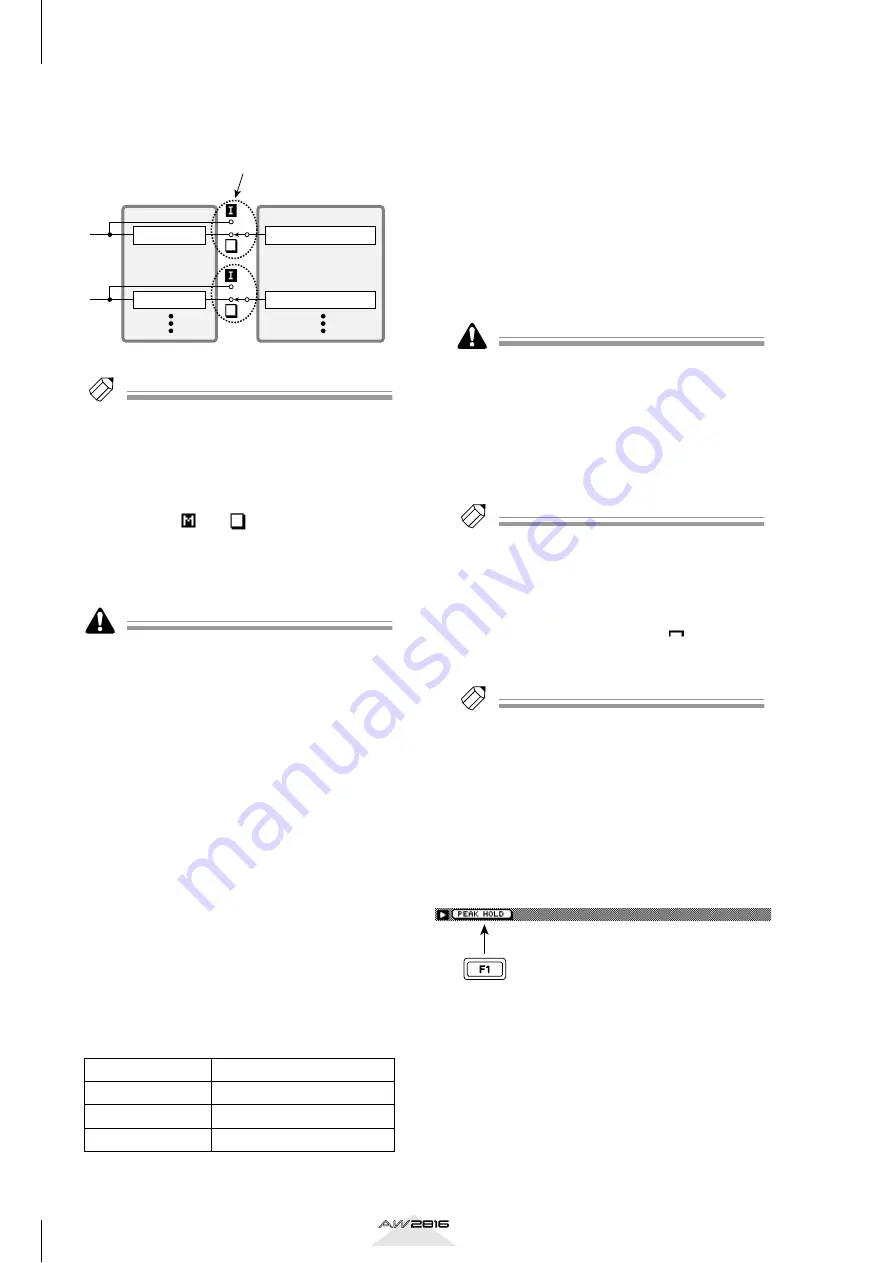
INPUT MONITOR
Use the following three buttons to select the input
monitor mode (the way in which input monitoring
will be switched for each track).
• AUTO button
When this button is on, the monitored signal for
record-ready tracks will change automatically
depending on the running mode, as shown in the
following table (Auto Input Monitor). Use this
method for normal recording or for punch-in/out
recording.
• INDI. (Individual) button
When this button is on, the input monitor setting
can be changed for each track individually, regard-
less of the running mode or the record-ready state
(Individual Input Monitor). Move the cursor to an
INPUT button (
7
) and press the [ENTER] key to
switch the input monitor setting of the correspond-
ing track.
• ALL button
When this button is on, the input source will be
monitored for all tracks, regardless of the running
mode or the state of the REC TRACK SELECT [1]–
[16] keys (All Input Monitor).
When the AUTO button/ALL button are on, it will not
be possible to manually change the setting of the
INPUT buttons.
J
FINE button
When this button is on, the level meter (
5
) display
range will switch from –48–0 dB to –18–0 dB. This
setting is convenient when you want to make
detailed level adjustments in the range near 0 dB.
Tip!
The FINE button setting affects only the level meters in
the Meter 1/Meter 2 pages.
K
PEAK HOLD button
This button sets/cancels the peak hold function of
the level meters. When this button is turned on,
peak hold will be enabled, and a “
” symbol
indicating the peak level will be maintained in the
level meter.
Tip!
The peak hold setting affects the level meters displayed
in pages other than the EQ/ATT/GRP screen and the
DYN/DLY screen.
■
Additional functions in the Meter 1
page
In the Meter 1 page, holding down the [SHIFT] key
will assign the following additional function to the
[F1] key.
• [F1] (PEAK HOLD) key
Sets/cancels peak hold. This is the same function
as the PEAK HOLD button (
K
).
Running mode
Monitored signal
Stopped
Track input source
Playing
Track playback
Recording
Track input source
Input monitor
Recorder section
Mixer section
Track 1
Monitor channel 1
Track 2
Monitor channel 2


