background image

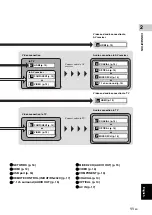
HOME/MEDIA MENU

21

 En

PLA

Y

B

A

CK

3

Eng

lish

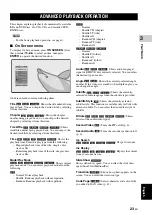
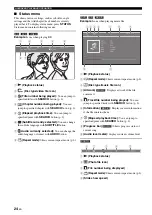
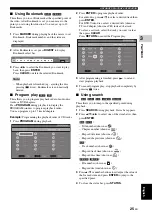
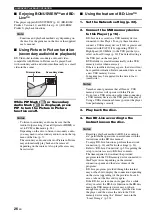
Using network content

This Player is a DLNA certified digital media player. You 
can manage photo, music and video contents stored on 
DLNA servers on your home network.

About DLNA

DLNA (Digital Living Network Alliance) provides easy 
sharing of digital media through network in the home, and 
you can enjoy digital contents stored on your DLNA-
server-software-installed PC or other DLNA compatible 
device with your TV via this Player. To connect this 
Player to your DLNA servers, some settings for the 
DLNA server or device are required. For details, refer to 
your DLNA server software or DLNA device.

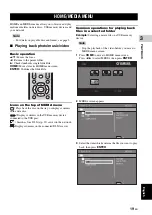
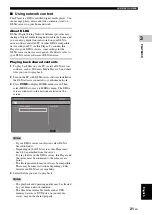
Playing back shared contents

1

To play back files on your PC, install a DLNA server 
software, such as Windows Media Player 12, and share 
files you want to play back.

2

Turn on the PC with DLNA server software installed or 
the DLNA device connected to your home network.

3

Press 

HOME

 to display HOME menu screen. Then 

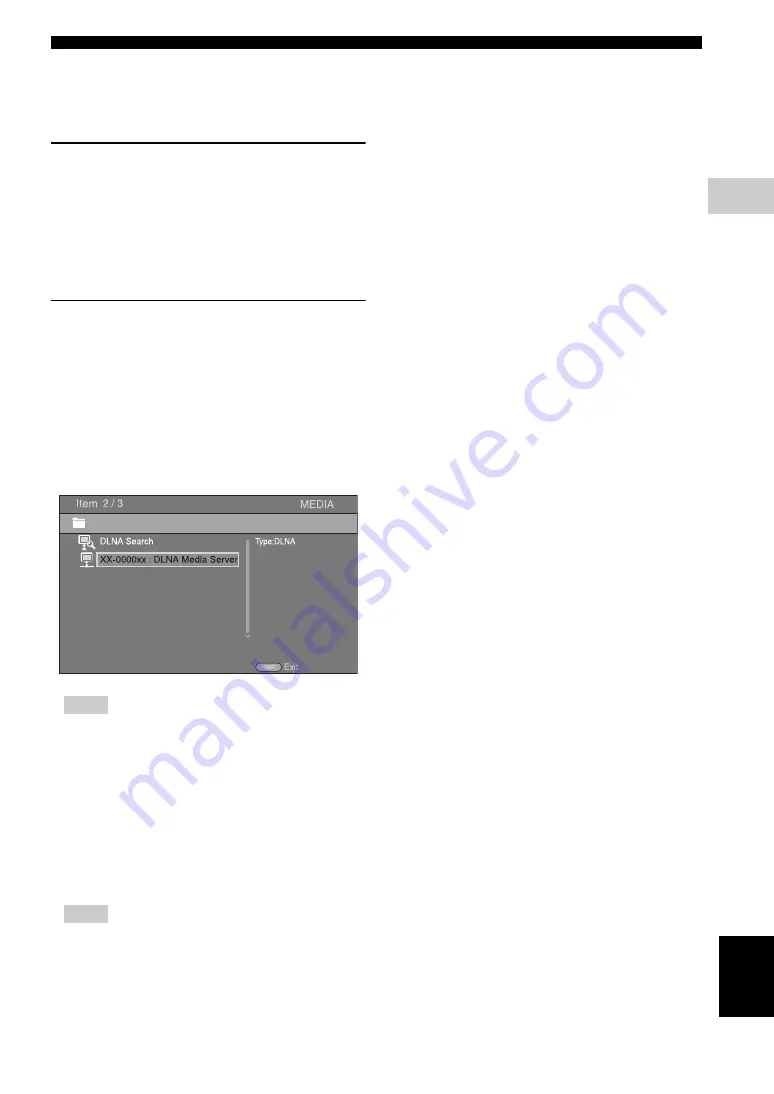
select MEDIA to move to MEDIA menu. The DLNA 
servers connected to the network are listed on the 
screen.

– If your DLNA server is not listed, select DLNA 

Search to find it.

– Depending on the DLNA server, this Player may 

need to be permitted from the server.

– To play the file on the DLNA server, this Player and 

the server must be connected to the same access 
point.

– The file requirements may not always be compatible. 

There may be some restrictions depending on file 
features and DLNA sever capability.

4

Select the file you want to play back.

– The playback and operating quality may be affected 

by your home network condition.

– The files from removable media such as USB 

memory devices or DVD-drive on your media 
server, may not be shared properly.

Notes

Notes

Summary of Contents for BD-A1010

Page 1: ...Yamaha Corporation Printed in Malaysia WZ02530 BLU RAY DISC PLAYER BD A1010 OWNER S MANUAL MANUAL DE INSTRUCCIONES 사용 설명서 KALVP 전원 키 본 기기의 전원을 켜거나 대기 모드에 맞추십시오 00_BD A1010_K_cv fm Page 1 Tuesday April 19 2011 2 52 PM ...

Page 2: ...use of this unit with a voltage other than specified 13 To prevent damage by lightning keep the power cable disconnected from a wall outlet or this unit during a lightning storm 14 Do not attempt to modify or fix this unit Contact qualified Yamaha service personnel when any service is needed The cabinet should never be opened for any reasons 15 When not planning to use this unit for long periods o...

Page 3: ...feature of BD Live 26 SETUP MENU 27 Example of SETUP menu operation 29 General Setting 30 Display Setting 32 Audio Setting 34 System Information 34 About the audio output formats 35 About the video output formats 36 SOFTWARE UPGRADE 37 Upgrading the software 37 TROUBLESHOOTING 38 Power 38 Basic operation 38 Disc playback 38 Picture 39 Sound 39 Network 40 Messages on the screen 40 GLOSSARY 41 SPECI...

Page 4: ...ideo Music Photo files on a disc p 19 This Player can play back discs you recorded Play back Video Music Photo files on a disc USB memory device p 19 Files recorded on discs USB memory devices can be played back with this Player Play back Video Music Photo files on a Home Network Server p 21 PC contents can be played back with TV or AV receiver by connecting this Player to a network server Operati...

Page 5: ...so that it will play in other players recorders as well as this Player Only finalized discs will play back in this Player This Player does not have a function to finalize discs Playback of all files on the disc USB memory device and network is not guaranteed ABOUT DISCS AND FILES Disc Type Recording Format Data Format BD ROM BD R BD RE BD Video DVD ROM DVD Video DVD Audio DVD R DVD R DL DVD RW DVD...

Page 6: ...ratched disc may not be able to be played back Handle discs with care and store them in a safe place Proper disc storage Handling precautions Cleaning the pick up lens Never use commercially available cleaning discs The use of these discs can damage the lens Request the nearest service center approved by Yamaha to clean the lens Hint Note 1 2 3 Super Audio CD disc type Single layer disc HD layer D...

Page 7: ...Direct mode is set to mode 1 mode 2 Loading the batteries in the remote control Do not subject the remote control unit to shock water or excessive humidity The remote control unit may not function if the Player s remote sensor is in direct sunlight or any other strong light Incorrect use of batteries may cause them to leak or burst Read the battery warnings and use the batteries properly Do not mi...

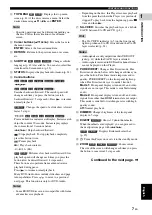
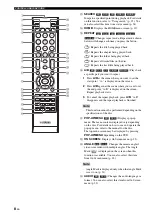
Page 8: ...umbers or during playback jumps to the track chapter corresponding to the number you input These buttons may not be available depending on the disc type and playback condition 7 CLEAR Clears entered number set item 8 SETUP Displays SETUP menu screen p 27 9 PIP Turns on off the Picture in Picture p 26 PIP Mark is displayed on the screen when this function is available You can also select this item ...

Page 9: ...ible with frame advance reverse playback Depending on the disc this Player resumes playback from the point that where the Player was previously stopped To play back from the beginning press twice and then G SA CD CD Switches the playback layer of a hybrid SA CD between SA CD and CD p 4 The SA CD CD indicator p 5 on the front panel lights up when an SA CD is loaded and the SA CD layer is selected p...

Page 10: ...at playback starts 3 To cancel the repeat playback press A B A B disappears and the repeat playback is finished This function cannot be performed depending on the specifications of the disc Q POP UP MENU Displays pop up menu The menu contents displayed vary depending on the disc For details on how to see and operate the pop up menu refer to the manual for the disc The top menu screen may be displa...

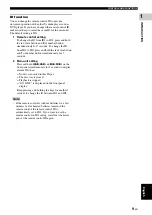
Page 11: ...old the red color button and 1 of number button simultaneously for 7 seconds 2 Main unit setting Press and hold and on the front panel simultaneously for 2 seconds to display current ID when No disc is inserted in this Player The disc tray is closed Playback is stopped NO DISC is displayed on the front panel display Keep pressing and holding the keys for another 2 seconds to change the ID between ...

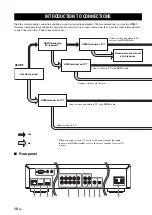
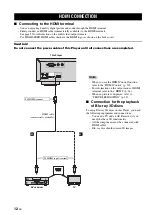
Page 12: ...O CONNECTIONS Yes No Use AV receiver HDMI terminal on AV receiver HDMI terminal on TV HDMI terminal on TV HDMI terminal on TV Connect video and audio to TV with HDMI cable Connect video to TV Connect video to TV with HDMI cable Connect video to AV receiver Connect video and audio to AV receiver with HDMI cable Refer to owner s manual of AV receiver START When you connect to an AV receiver that can...

Page 13: ... Connect audio to AV receiver Video connection to TV Connect audio to TV HDMI p 12 A Video and audio connection to AV receiver Audio connection to AV receiver Video and audio connection to TV Audio connection to TV HDMI p 12 A COMPONENT p 13 B VIDEO p 13 C to TV to AV receiver or COMPONENT p 13 B VIDEO p 13 C or COAXIAL p 14 D OPTICAL p 14 E or MIXED 2CH p 15 F or COAXIAL p 14 D OPTICAL p 14 E or ...

Page 14: ...ECTION HDMI IN This Player To HDMI terminal HDMI cable commercially available When you use the HDMI Control function refer to the HDMI Control p 30 For information on the output mode of HDMI terminal refer to the HDMI p 34 When no picture is displayed refer to TROUBLESHOOTING p 39 Connection for the playback of Blu ray 3D discs To enjoy Blu ray 3D discs on this Player you need the following equipm...

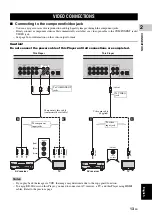
Page 15: ...ions are completed If you play back the image via VCR the image may deteriorate due to the copy guard function To enjoy BD 3D discs on this Player you need to connect an AV receiver a TV and this Player using HDMI cables Refer to the previous page VIDEO CONNECTIONS COMPONENT IN Y PB PR This Player Component video cable commercially available AV receiver TV Green Blue Red Green Blue Red To COMPONEN...

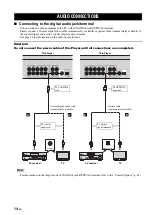
Page 16: ...rmation on the audio output formats Caution Do not connect the power cable of this Player until all connections are completed For information on the output mode of COAXIAL jack OPTICAL terminal refer to the Coaxial Optical p 34 AUDIO CONNECTIONS Hint AV INPUT COAXIAL DIGITAL AUDIO IN OPTICAL This Player To OPTICAL terminal TV AV receiver Optical cable commercially available Coaxial digital audio c...

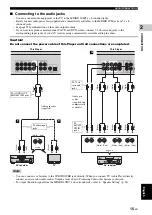
Page 17: ...l connections are completed You can connect a subwoofer to the SUBWOOFER jack directly When you connect TV to this Player directly connect an active subwoofer such as Yamaha Active Servo Processing Subwoofer System to this jack To output the audio signal from the MIXED 2CH 7 1 ch surround jacks refer to Speaker Setting p 34 AUDIO AUDIO IN L R To AUDIO OUT MIXED 2CH jacks Audio pin cable supplied W...

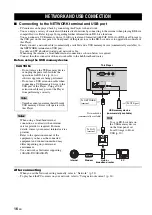
Page 18: ...Network p 32 To play back the PC contents on your network refer to Using network content p 21 NETWORK AND USB CONNECTION LAN This Player When using a broadband internet connection a contract with an internet service provider is required For more details contact your nearest internet service provider Refer to the operation manual of the equipment you have as the connected equipment and connection m...

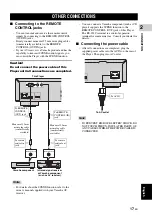
Page 19: ...CD player supports the SCENE function to the REMOTE CONTROL OUT jack of this Player The RS 232C terminal is a control expansion terminal for commercial use Consult your dealer for details Connecting the power cable After all connections are completed plug the supplied power cable into the AC IN on the rear of the Player Then plug into AC outlet TO PREVENT RISK OF ELECTRIC SHOCK DO NOT TOUCH THE UN...

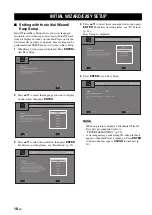
Page 20: ...ress 5 a to select the resolution then press ENTER For details on setting items see Resolution p 33 4 Press 5 a to select the screen aspect ratio then press ENTER For details on setting items see TV Screen p 32 Easy Setup is completed 5 Press ENTER to exit Easy Setup When no picture is displayed after Initial Wizard Easy Setup is completed refer to TROUBLESHOOTING p 39 A warning message concerning...

Page 21: ...or displays contents in the data disc Displays contents in the USB memory device connected to the USB port Searches for a DLNA p 21 server on the network Displays contents on the connected DLNA server Common operations for playing back files in a selected folder Example Selecting a movie file on a USB memory device Stop the playback of the video before you move to MEDIA menu screen 1 Press HOME to...

Page 22: ... photo file is selected slide show starts To enjoy slide show with music press HOME to return to the HOME menu screen while music is played back and select photo file The displayed file may not be played back depending on the content Operations for viewing photos While viewing photos the buttons on the remote control work as shown below Stops slide show and returns to the file browser Pauses a sli...

Page 23: ...ia Player 12 and share files you want to play back 2 Turn on the PC with DLNA server software installed or the DLNA device connected to your home network 3 Press HOME to display HOME menu screen Then select MEDIA to move to MEDIA menu The DLNA servers connected to the network are listed on the screen If your DLNA server is not listed select DLNA Search to find it Depending on the DLNA server this ...

Page 24: ...nly be available for specific countries and may be presented in specific languages Yamaha does not represent or warrant that content services will continue to be provided or available for a particular period of time and any such warranty express or implied is disclaimed You can watch movies from YouTube over the internet using this Player The services may be changed without notice 1 Press HOME to ...

Page 25: ...le Shuffle All Random CH chapter Random TT title Random All Normal Shuffle F folder Shuffle All Random F folder Random All Audio Shows audio language signal of BD DVD disc currently selected You can select the desired type of audio Angle Shows the currently selected angle number If the video is recorded with multiple angles you can change the angle Subtitle Shows the currently selected subtitle la...

Page 26: ...ton 7 Audio currently selected You can change the audio language or format with AUDIO button 8 Repeat mode Shows current repeat mode p 8 Example Icons when playing music file 1 Playback status 2 Repeat mode Shows current repeat mode p 8 3 Disc type music file icon 4 Artwork Displays artwork if the file contains it 5 Track file number being played You can jump to specified track with SEARCH button ...

Page 27: ...M during playback 2 Press ENTER to program playback order For audio disc press 5 a to select a desired track then press ENTER For DVD Video disc select a desired title shown as TT and chapter shown as CH instead of a track To clear a set track select the track you want to clear then press CLEAR Press RETURN to cancel the Program play 3 After programming is finished press to set and start program p...

Page 28: ...rt on the rear panel BUDA folder is created automatically in the USB memory device when necessary If there is insufficient storage space the data will not be copied downloaded Delete unneeded data or use a new USB memory device Some time may be required for the data to load read write Yamaha cannot guarantee that all brands USB memory devices will operate with this Player Do not use a USB extensio...

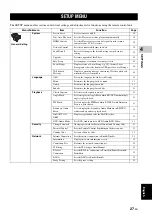
Page 29: ...nguage for disc menu 31 Audio Prioritizes the language for audio 31 Subtitle Prioritizes the language for subtitle 31 Playback Closed Caption Sets the closed caption to on off 31 Angle Mark Sets to display the Angle Mark when BD DVD with multiple angles is played back 31 PIP Mark Sets to display the PIP Mark when BD DVD with Picture in Picture is played back 31 Secondary Audio Mark Sets to display...

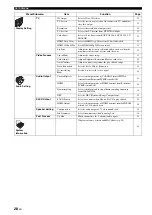
Page 30: ...back image 33 Noise Reduction Sets the level of Noise Reduction 33 De interlacing Mode Sets how to detect the video signal 34 Audio Setting Audio Output Coaxial Optical Selects the output mode of COAXIAL jack OPTICAL terminal from Bitstream PCM Reencode Off 34 HDMI Selects the output mode of HDMI terminal from Bitstream PCM Reencode Off 34 Downsampling Selects the digital audio signal down samplin...

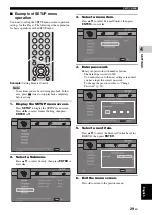
Page 31: ...ral Setting then press ENTER or a 2 Select a Submenu Press 5 a to select Security then press ENTER or cursor 3 3 Select a menu item Press 5 a to select Parental Control then press ENTER or cursor 3 4 Enter password Enter your password with number buttons The default password is 0000 You cannot move to the next setting screen until you have input the correct password To change the password refer to...

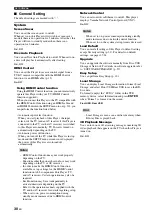
Page 32: ...een Front USB Rear USB Local Storage is used as an auxiliary memory when Blu ray Disc is played back 3D Playback Message You can turn on or off a warning message concerning 3D video playback that appears on the TV when this Player is turned on On Off Using HDMI Control function Using the HDMI Control function you can interactively operate this Player with your TV HDMI Control function supported Wh...

Page 33: ...when no disc is loaded Security Change Password You can set the password for changing the Parental Control Level and Country Code Refer to Parental Control p 31 and Country Code p 31 The default password is 0000 If you forget the password refer to TROUBLESHOOTING p 38 and set all the Security settings to their default settings Parental Control In some BD DVD discs a control level for disc viewing ...

Page 34: ...t a new one and the screen aspect ratio of the connected TV changes you will have to change the TV Screen setting Auto Select to automatically configure the network settings of this Player with the DHCP server Manual Select to configure the network settings IP Address Subnet Mask Default Gateway and DNS manually Hints Permitted Allows all BD Live discs to connect the network Partial Permitted Allo...

Page 35: ... You can adjust Brightness Saturation Hue for each color Red Green Blue Yellow Cyan Magenta To use this function set Video Mode to Custom For details on the setting items see Video Mode p 33 The default settings are 0 Auto Contrast Adjusts contrast to optimize the played back image To use this function set Video Mode to Custom Off On Noise Reduction You can set the Noise Reduction to a level of 0 ...

Page 36: ...CD is played back Speaker Setting Configuration You can set the output of 7 1 ch surround depending on the connected speaker or amplifier 1 Press 5 a to select a speaker you want to configure then press ENTER 2 Adjust the figures below Note that some of items are not displayed depend on the selected speaker 3 Press RETURN to go back to speaker selection 2ch Downmix You can select down mix method t...

Page 37: ...Digital PCM up to 5 1ch Dolby Digital Dolby Digital PCM 2ch Dolby Digital 2ch 5 1ch with SA or BCS Dolby Digital Plus Dolby Digital Plus PCM up to 7 1ch Dolby Digital Plus Dolby Digital PCM 2ch Dolby Digital 2ch 7 1ch with SA or BCS Dolby Digital Dolby TrueHD Dolby TrueHD PCM up to 7 1ch Dolby TrueHD Dolby Digital PCM 2ch Dolby Digital with SA or BCS Dolby Digital DTS DTS PCM up to 5 1ch DTS DTS P...

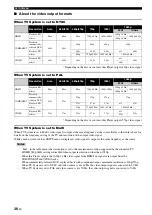
Page 38: ...IDEO jacks When commercially released DVD is played back with component output maximum resolution is 480p 576p When TV System is set to NTSC and video source is not 60 Hz the video output signal is converted to 60 Hz When TV System is set to PAL and video source is not 50 Hz the video output signal is converted to 50 Hz Resolution Auto 480i 576i 480p 576p 720p 1080i 1080p 24Hz Others HDMI Playback...

Page 39: ...the software 1 Prepare for the software upgrade When you upgrade the software from Disc USB Storage 1 Save the upgrade file package to the appropriate folder on the disc USB memory device For more details refer to the procedure document attached with the upgrade file package 2 Load the disc or connect the USB memory device When the disc is loaded software upgrade is started automatically Skip step...

Page 40: ...Player To completely reset this Player unplug the power cable from the AC outlet for 10 seconds or more plug the power cable to the AC outlet again and then turn on this Player Password is forgotten Press and hold and on the front panel simultaneously when no disc is inserted and playback is stooped to set the Player to default setting Security setting p 31 is also reset After the power is turned ...

Page 41: ...s with analog copy protection Some discs contain a copy prohibiting signal If you try to play back such discs through a VCR or record to a VCR and play back the signal the copy protection will prevent normal playback Audio is not output or images are not played back properly The audio may not be output or the images may not be played back properly for some discs in which copyright protected conten...

Page 42: ...rk cable properly Turn on the connected equipment such as broadband router or the server Confirm the Player and the server are connected to the same access point Set the proper value s in the network setting Check Network p 32 Depending on the DLNA server the Player may need to be permitted from the server Cannot a play the file on the home network server Make sure the file is playable p 3 Check y...

Page 43: ...B or YCbCr color space DivX DivX is a popular media technology created by DivX Inc DivX media files contain highly compressed video with high visual quality that maintains a relatively small file size DivX files can also include advanced media features like menus subtitles and alternate audio tracks Many DivX media files are available for download online and you can create your own using your pers...

Page 44: ...tles These are the lines of text appearing at the bottom of the screen which translate or transcribe the dialog They are recorded on many DVD and BD discs Top menu In a BD Video DVD Video this is the menu for selecting things like the chapter to be played back and the subtitle language In some DVD Videos the top menu may be called the Title Menu x v Color x v Color reproduces a greater range of co...

Page 45: ...stems Inc in the United States and or other countries This product is licensed under the AVC patent portfolio license and VC 1 patent portfolio license for the personal and non commercial use of a consumer to i encode video in compliance with the AVC Standard and VC 1 Standard AVC VC 1 Video and or ii decode AVC VC 1 Video that was encoded by a consumer engaged in a personal and non commercial act...

Page 46: ...ara impedir daños debidos a relámpagos desconecte el cable de alimentación de la toma de corriente durante una tormenta eléctrica 14 No intente modificar ni arreglar este aparato Póngase en contacto con el personal de servicio Yamaha cualificado cuando necesite realizar alguna reparación La caja no deberá abrirse nunca por ninguna razón 15 Cuando no piense utilizar este aparato durante mucho tiemp...

Page 47: ... de BD Live 26 MENÚ SETUP 27 Ejemplo de funcionamiento del menú SETUP 29 Configuración General 30 Configuración de pantalla 32 Configuración de audio 34 Sistema de Información 34 Formatos de salida de audio 35 Acerca de los formatos de salida de vídeo 36 ACTUALIZACIÓN DE SOFTWARE 37 Actualización del software 37 RESOLUCIÓN DE PROBLEMAS 38 Alimentación 38 Funcionamiento básico 38 Reproducción de di...

Page 48: ...to de un disco pág 19 Este reproductor puede reproducir los discos que usted grabe Reproducción de archivos de Vídeo Música Foto de un disco dispositivos de memoria USB pág 19 Con este reproductor se pueden reproducir archivos grabados en discos dispositivos de memoria USB Reproducción de archivos de Vídeo Música Foto de un servidor doméstico de red pág 21 El contenido del PC se puede reproducir e...

Page 49: ...o del grabador sobre un disco grabado para que se pueda reproducir en otros reproductores grabadores así como en este reproductor Sólo se podrán reproducir en el reproductor los discos que se hayan finalizado Este reproductor no dispone de función para finalizar discos No se garantiza la reproducción de todos los archivos del disco dispositivo de memoria USB y red INFORMACIÓN SOBRE DISCOS Y ARCHIV...

Page 50: ...eda reproducir un disco con arañazos Maneje los discos con cuidado y almacénelos en un lugar seguro Almacenamiento apropiado de los discos Precauciones para el manejo Limpieza de la lente lectora No utilice nunca discos de limpieza de venta en el comercio La utilización de esos discos podría dañar la lente Solicite la limpieza de la lente en el centro de atención al cliente aprobado por Yamaha más...

Page 51: ...esactivado Este botón se enciende cuando el modo Pure Direct se sitúa en modo 1 modo 2 Instalación de las pilas en el mando a distancia No someta al mando a distancia a golpes agua ni humedad excesiva El mando a distancia podría no funcionar si el sensor del reproductor está expuesto a la luz solar directa o cualquier otra luz fuerte El uso incorrecto de las pilas puede provocar que revienten o te...

Page 52: ...e la reproducción saltar a la pista capítulo correspondiente al número introducido Es posible que estos botones no estén disponibles en función del tipo de disco y la situación de reproducción 7 CLEAR Borra el número introducido o elemento establecido 8 SETUP Muestra la pantalla de menú SETUP pág 27 9 PIP Permite encender apagar la función Imagen en imagen pág 26 Marca PIP se muestra en pantalla c...

Page 53: ...a una página anterior o siguiente Esta función sirve solamente para los DVD Audio Algunos discos BD DVD no son compatibles con la reproducción de avance retroceso de fotograma En función del disco el reproductor reanuda la reproducción desde el punto en el que se paró anteriormente el reproductor Para reproducir desde el principio pulse dos veces y después G SA CD CD Cambia la capa de reproducción...

Page 54: ... En la pantalla se muestra A 2 Vuelva a pulsar A B en la escena donde desee establecer el punto final En la pantalla se muestra A B Se inicia la reproducción de repetición 3 Para cancelar la reproducción de repetición pulse A B A B desaparece y finaliza la reproducción de repetición Es posible que esta función no se pueda realizar dependiendo de las especificaciones del disco Q POP UP MENU Muestra...

Page 55: ...os simultáneamente durante 7 segundos Para modificar el ID de ID2 a ID1 mantenga pulsado el botón de color rojo y el botón 1 de los botones numéricos simultáneamente durante 7 segundos 2 Configuración de la unidad principal Mantenga pulsado y en el panel delantero simultáneamente durante 2 segundos para mostrar el ID actual si No hay ningún disco en el reproductor La bandeja portadiscos está cerra...

Page 56: ... en el receptor de A V Terminal HDMI en el televisor Terminal HDMI en el televisor Terminal HDMI en el televisor Conecte el vídeo y el audio al televisor mediante cable HDMI Conecte el vídeo al televisor Conecte el vídeo al televisor mediante cable HDMI Conecte el vídeo al receptor de AV Conecte el vídeo y audio al receptor de A V mediante cable HDMI Consulte el manual de instrucciones del recepto...

Page 57: ...e AV Conexiones de vídeo al televisor Conecte el audio al televisor HDMI pág 12 A Conexión de audio y vídeo al receptor de A V Conexiones de audio para el receptor de A V Conexiones de vídeo y audio al televisor Conexiones de audio al televisor HDMI pág 12 A COMPONENT pág 13 B VIDEO pág 13 C al televisor al receptor de A V o COMPONENT pág 13 B VIDEO pág 13 C o COAXIAL pág 14 D OPTICAL pág 14 E o M...

Page 58: ... CONEXIONES HDMI IN Este reproductor Al terminal HDMI Cable HDMI de venta en el comercio Cuando utilice la función Control HDMI consulte Control HDMI pág 30 Para más información sobre el modo de salida del terminal HDMI consulte HDMI pág 34 Si no se muestra la imagen consulte RESOLUCIÓN DE PROBLEMAS pág 39 Conexión para la reproducción de discos 3D de Blu ray Para disfrutar de discos 3D de Blu ray...

Page 59: ...oduce la imagen mediante una videograbadora la imagen puede deteriorarse debido a la función de protección contra la copia Para disfrutar de discos BD 3D en este reproductor necesita conectar un receptor de A V un televisor y este reproductor con cables HDMI Consulte la página anterior CONEXIONES DE VÍDEO COMPONENT IN Y PB PR Este reproductor Cable de vídeo componente de venta en el comercio Recep...

Page 60: ...a de audio en la página 35 Precaución No conecte el cable de alimentación del reproductor hasta haber finalizado todas las conexiones Para más información sobre el modo de salida de la toma COAXIAL o terminal OPTICAL consulte Coaxial Optica pág 34 CONEXIONES DE AUDIO Consejo AV INPUT COAXIAL DIGITAL AUDIO IN OPTICAL Este reproductor Al terminal OPTICAL TV Receptor de A V Cable óptico de venta en e...

Page 61: ...s las conexiones Puede conectar un altavoz de graves directamente a la toma SUBWOOFER Si conecta el televisor directamente a este reproductor conecte un altavoz de graves activo como el Yamaha Active Servo Processing Subwoofer System a esta toma Para emitir la señal de audio desde las tomas MIXED 2CH de sonido envolvente de 7 1 canales consulte Ajuste de altavoz pág 34 AUDIO AUDIO IN L R A las tom...

Page 62: ... red consulte Uso del contenido de red pág 21 CONEXIÓN DE RED Y USB LAN Este reproductor Cuando utilice una conexión a Internet de banda ancha es necesario un contrato con un proveedor de servicios de Internet Para más información póngase en contacto con su proveedor de servicios de Internet más cercano Consulte el manual de manejo de su equipo ya que el equipo conectado y el método de conexión pu...

Page 63: ...E CONTROL OUT de este reproductor El terminal RS 232C es un terminal de ampliación de control para usos comerciales Solicite más información a su distribuidor Conexión del cable de alimentación Después de realizar todas las conexiones enchufe el cable de alimentación suministrado a la AC IN de la parte trasera del reproductor A continuación enchúfelo en una toma de CA PARA PREVENIR EL RIESGO DE DE...

Page 64: ...Para obtener detalles sobre la configuración de elementos consulte Resolución pág 33 4 Pulse 5 a para seleccionar la relación de aspecto de pantalla a continuación pulse ENTER Para más detalles sobre la configuración de elementos consulte Pantalla de TV pág 32 La Configuración Sencilla se ha completado 5 Pulse ENTER para salir de Configuración Sencilla Si no se muestra la imagen tras completar Asi...

Page 65: ...bandeja o muestra el contenido del disco de datos Muestra el contenido del dispositivo de memoria USB conectado al puerto USB Busca un servidor DLNA pág 21 en la red Muestra el contenido del servidor DLNA conectado Operaciones comunes para la reproducción de archivos en una carpeta seleccionada Ejemplo Selección de un archivo de película en un dispositivo de memoria USB Detenga la reproducción del...

Page 66: ...sfrutar del pase de diapositivas con música pulse HOME para volver a la pantalla de menú HOME mientras se reproduce la música y seleccione archivo de fotos Es posible que el archivo mostrado no se reproduzca dependiendo del contenido Operaciones para visualización de fotos Mientras se ven fotos los botones del mando a distancia funcionan como se indica a continuación Detiene el pase de diapositiva...

Page 67: ...os archivos que desee reproducir 2 Encienda el PC con el software de servidor DLNA instalado o el dispositivo DLNA conectado a su red doméstica 3 Pulse HOME para mostrar la pantalla de menú HOME Seleccione MEDIA para pasar al menú MEDIA Los servidores DLNA conectados a la red aparecen en pantalla Si su servidor DLNA no aparece en la lista seleccione Buscar DLNA para buscarlo Dependiendo del servid...

Page 68: ...aíses específicos y que se presente en idiomas específicos Yamaha no representa ni garantiza que los servicios de contenido se seguirán proporcionando o estarán disponibles durante un periodo de tiempo concreto y se rechaza cualquier garantía de este tipo ya sea expresa o implícita Puede ver películas desde YouTube a través de Internet mediante este reproductor Los servicios pueden modificarse sin...

Page 69: ...e TT título Shuffle All Aleatorio CH capítulo Aleatorio TT título Aleatorio All Normal Shuffle F carpeta Shuffle All Aleatorio F carpeta Aleatorio All Audio Muestra el idioma señal de audio del disco BD DVD seleccionado actualmente Puede seleccionar el tipo de audio deseado Ángulo Muestra el número del ángulo seleccionado actualmente Si el vídeo se ha grabado con varios ángulos puede cambiar el án...

Page 70: ... formato o idioma de audio con la tecla AUDIO 8 Modo repetición Muestra el modo repetición actual pág 8 Ejemplo Iconos cuando se reproduce un archivo de música 1 Estado de reproducción 2 Modo repetición Muestra el modo repetición actual pág 8 3 Icono de tipo de disco archivo de música 4 Gráficos Muestra gráficos si están contenidos en el archivo 5 Número de pista archivo que se reproduce Puede sal...

Page 71: ...ra un disco de audio pulse 5 a para seleccionar una pista deseada y a continuación pulse ENTER Para un disco DVD Vídeo seleccione un título deseado mostrado como TT y capítulo mostrado como CH en lugar de una pista Para borrar una pista establecida seleccione la pista que desea borrar y a continuación pulse CLEAR Pulse RETURN para cancelar la reproducción del programa 3 Una vez finalizada la progr...

Page 72: ...ro La carpeta BUDA se crea automáticamente en el dispositivo de memoria USB cuando es necesario Si el espacio de almacenamiento es insuficiente los datos no se copiarán descargarán Elimine datos innecesarios o utilice un nuevo dispositivo de memoria USB Puede requerirse algún tiempo para que se carguen lectura escritura los datos Yamaha no puede garantizar que todas las marcas de dispositivos de m...

Page 73: ... menú en pantalla 31 Menú Permite dar prioridad al idioma del menú del disco 31 Audio Permite dar prioridad al idioma del audio 31 Subtítulo Permite dar prioridad al idioma de los subtítulos 31 Reproducción Subtítulos Activa o desactiva los subtítulos 31 Marca de Angulo Ajuste para mostrar la Marca de Angulo cuando se reproducen BD DVD con ángulos múltiples 31 Marca PIP Ajuste para mostrar la Marc...

Page 74: ...Ajusta el nivel de Reducción de ruido 33 Modo desentrelazado Ajusta cómo detectar la señal de vídeo 34 Configuración de audio Salida de audio Coaxial Optica Permite seleccionar el modo de salida de la toma COAXIAL terminal OPTICAL entre Bitstream PCM Recodificar Desactivar 34 HDMI Permite seleccionar el modo de salida del terminal HDMI entre Bitstream PCM Recodificar Desactivar 34 Downsampling Per...

Page 75: ...o a 2 Seleccione un submenú Pulse 5 a para seleccionar Seguridad a continuación pulse ENTER o el cursor 3 3 Seleccione un elemento del menú Pulse 5 a para seleccionar Control Paterno a continuación pulse ENTER o el cursor 3 4 Introduzca la contraseña Introduzca la contraseña con las teclas numéricas La contraseña predeterminada es 0000 No puede ir a la siguiente pantalla de configuración hasta que...

Page 76: ...do en la pantalla USB Frontal USB Trasera Almacenamiento Local se utiliza como memoria auxiliar cuando se reproduce el disco Blu ray Mensaje Reproducción 3D Puede activar o desactivar un mensaje de advertencia acerca de la reproducción de vídeo en 3D que aparezca en el televisor cuando este reproductor está activado Activar Desactivar Utilización de la función Control HDMI Con la función de Contro...

Page 77: ... cargado Seguridad Cambiar Contraseña Puede ajustar la contraseña para cambiar el nivel de Control Paterno y Código de país Consulte Control Paterno pág 31 y Código de país pág 31 La contraseña predeterminada es 0000 Si olvida la contraseña consulte RESOLUCIÓN DE PROBLEMAS pág 38 y configure todos los ajustes de Seguridad en sus valores predeterminados Control Paterno En algunos discos de BD DVD e...

Page 78: ...o de la pantalla del televisor conectado cambia también tendrá que cambiar el ajuste Pantalla de TV Auto Seleccione este valor para configurar automáticamente los ajustes de red de este reproductor con el servidor DHCP Manual Seleccione este valor para configurar los ajustes de red Dirección IP Máscara de subred Default Gateway y DNS manualmente Consejos Autorizada Permite que todos los discos de ...

Page 79: ...ajo Ajuste de color Ajusta Brillo Saturación Tonalidad para cada color Rojo Verde Azul Amarillo Cian Magenta Para utilizar esta función configure Modo de Vídeo como Particularizado Para obtener detalles sobre la configuración de elementos consulte Modo de Vídeo pág 33 Los valores predeterminados son 0 Contraste automático Ajusta el contraste para optimizar la imagen reproducida Para utilizar esta ...

Page 80: ...uede definir la salida de sonido envolvente de 7 1 canales dependiendo del altavoz o amplificador conectado 1 Pulse 5 a para seleccionar el altavoz que desea configurar y a continuación pulse ENTER 2 Ajuste las cifras siguientes En función del altavoz seleccionado algunos elementos no aparecen 3 Pulse RETURN para volver a la selección del altavoz Mezcla descendente 2 Canales Puede seleccionar 2 ca...

Page 81: ...l PCM hasta 5 1 canales Dolby Digital Dolby Digital PCM 2 canales Dolby Digital 2 canales 5 1 canales con AS o SCB Dolby Digital Plus Dolby Digital Plus PCM hasta 7 1 canales Dolby Digital Plus Dolby Digital PCM 2 canales Dolby Digital 2 canales 7 1 canales con AS o SCB Dolby Digital Dolby TrueHD Dolby TrueHD PCM hasta 7 1 canales Dolby TrueHD Dolby Digital PCM 2 canales Dolby Digital con AS o SCB...

Page 82: ... de 1080p 24 Hz desde HDMI no se emiten señales desde las tomas COMPONENT y VIDEO Cuando se reproduce un DVD comercial con salida de componente la resolución máxima es 480p 576p Cuando Sistema de TV se define en NTSC y el origen de vídeo no es 60 Hz la salida de vídeo se convierte a 60 Hz Cuando Sistema de TV se define en PAL y el origen de vídeo no es 50 Hz la salida de vídeo se convierte a 50 Hz...

Page 83: ... 1 Guarde el paquete de archivos de actualización en la carpeta correspondiente en el disco dispositivo de memoria USB Para más información consulte el documento de procedimientos adjunto con el paquete de archivos de actualización 2 Cargue el disco o conecte el dispositivo de memoria USB Al cargar el disco la actualización de software se inicia automáticamente Omita el paso 2 Si actualiza el soft...

Page 84: ...etamente el reproductor desenchufe el cable de alimentación de la toma de CA durante 10 segundos o más vuelva a enchufarlo y a continuación encienda el reproductor Se ha olvidado la contraseña Mantenga pulsado y en el panel delantero a la vez si no hay ningún disco insertado y con la reproducción detenida para situar el reproductor en la configuración predeterminada el ajuste de Seguridad pág 31 t...

Page 85: ...tección contra copias analógicas Algunos discos contienen una señal de prohibición de copia Si intenta reproducir tales discos a través de una videograbadora o grabar a una videograbadora y reproducir la señal la protección contra copia impedirá la reproducción normal No hay salida de audio o las imágenes no se reproducen adecuadamente En algunos discos en los que se ha grabado contenido protegido...

Page 86: ...o un enrutador de banda ancha o el servidor Asegúrese de que el reproductor y el servidor están conectados al mismo punto de acceso Configure correctamente el valor o valores de la red Compruebe Red pág 32 Dependiendo del servidor DLNA es posible que sea necesario autorizar al reproductor desde el servidor No se puede reproducir el archivo en el servidor doméstico de red Asegúrese de que el archiv...

Page 87: ...edia DivX contienen vídeo muy comprimido con una alta calidad visual que mantiene un tamaño de archivo relativamente pequeño Los archivos DivX también pueden incluir características multimedia avanzadas como menús subtítulos y pistas de audio alternativas Muchos archivos multimedia DivX están disponibles para descarga en línea y puede crear sus propios archivos utilizando su propio contenido y her...

Page 88: ...lemas auditivos mientras que los segundos lo están para personas que no oyen Los subtítulosnosuelenmostrartodoelaudio Laaudiodescripción muestra efectos de sonido por ejemplo un suena el teléfono y ruido de pasos mientras que los subtítulos no lo hacen Antes de seleccionar este ajuste asegúrese de que el disco contiene información de audiodescripción Menú principal En un Vídeo BD Vídeo DVD es el m...

Page 89: ...un Microsystems Inc en los Estados Unidos y o otros países Este producto se otorga con licencia bajo la licencia de cartera de patentes AVC y la licencia de cartera de patentes VC 1 para su uso personal y no comercial por parte de un consumidor para i codificar vídeo que cumpla con las normas AVC y VC 1 AVC VC 1 Video y o ii descodificar vídeo AVC VC 1 codificado por un consumidor dedicado a una a...

Page 90: ...지정된 전압만을 사용하십시오 지정된 전압 이외의 전압을 사용하는 것은 매우 위험하며 화재가 발생하거나 본 기기가 손상되거나 사용자가 부상당할 수도 있습니다 지정된 전압 이외의 전압을 사용하여 발생한 손 상에 대해서 Yamaha는 어떠한 책임도 지지 않습니다 13 번개에 의한 손상을 방지하려면 뇌우시 전원 케이블을 콘센 트에서 분리하십시오 14 본 기기를 개조하거나 수리하지 마십시오 서비스가 필요한 때에는 공인 Yamaha 정비사에게 의뢰하십시오 어떤 이유 로든지 절대로 캐비닛을 열지 마십시오 15 오랜 기간 동안 본 기기를 사용하지 않는 경우 예 휴가 전원을 콘센트에서 분리하십시오 16 본 기기의 고장을 결정하기 전에 일반 조작 에러의 문제 해 결 장을 반드시 읽어 보십시오 17 본 기기를 옮기기 전에 을 ...

Page 91: ...ture 기능 사용 보조 오디오 비디오 재생 26 BD Live 기능 사용 26 SETUP 메뉴 27 SETUP 메뉴 조작 예 29 General Setting 30 Display Setting 32 Audio Setting 34 System Information 34 오디오 출력 형식에 대하여 35 비디오 출력 형식에 대하여 36 소프트웨어 업그레이드 37 소프트웨어 업그레이드 37 문제 해결 38 전원 38 기본 조작 38 디스크 재생 38 사진 39 사운드 39 네트워크 40 화면의 메시지 40 용어집 41 제품 사양 42 일반 사항 42 오디오 성능 42 입력 출력 42 저작권 43 본 설명서 끝 본 사용 설명서에 대하여 본 설명서는 리모콘을 사용할 수 있는 경우 리모콘 으로 본 플레이어를 조작하는 ...

Page 92: ...D Live 등 재생 26페이지 최신 BD 디스크에서 동영상을 즐길 수 있습니다 디스크에서 비디오 음악 사진 파일 재생 19페이지 녹화한 디스크를 본 플레이어에서 재생할 수 있습니다 디스크 USB 메모리 장치에서 비디오 음악 사진 파일 재생 19페이지 디스크 USB 메모리 장치에 녹화된 파일을 본 플레이어에서 재생할 수 있습니다 홈 네트워크 서버에서 비디오 음악 사진 파일 재생 21페이지 본 플레이어를 네트워크 서버에 연결하면 TV 또는 AV 리시버에서 PC 컨텐츠를 재생할 수 있습니다 리모콘으로 TV AV 리시버 등 조작 30페이지 HDMI 케이블을 사용하여 장치를 연결하면 HDMI Control 기능을 사용하여 리모콘 하나로 여러 장치를 조작할 수 있습니다 네트워크 서비스 상의 스트리밍 재생 컨텐츠 22...

Page 93: ...장치 및 네트워크 를 통해 재생할 수 없습니다 MP3 WMA WAV 오디오 파일 요구사항 샘플링 주파수 32 48 kHz MP3 WMA LPCM 44 1 kHz 16 비트 스테레오 WAV 비트 전송률 8 320 kbps MP3 이내 32 192 kbps WMA 디스크 및 파일에 대하여 디스크 유형 녹화 형식 데이터 형식 BD ROM BD R BD RE BD Video DVD ROM DVD Video DVD Audio DVD R DVD R DL DVD RW DVD Video DVD VR AVCHD 데이터 디스크 DivX WMV MP3 WAV WMA JPEG DVD R DVD R DL DVD RW DVD Video DVD VR AVCHD 데이터 디스크 DivX WMV MP3 WAV WMA JPEG CD ROM ...

Page 94: ...다 스크래치가 있는 디스크는 재생되지 않을 수 있습니다 디스크를 조심해서 다 루고 안전한 장소에 보관하십시오 적절한 디스크 보관 취급 시 주의 사항 픽업 렌즈 청소 시판용 클리닝 디스크는 절대 사용하지 마십시오 렌즈가 손상될 수 있습니다 렌즈를 청소하려면 가까운 공인 Yamaha 서비스 센터에 요청하십시오 힌트 참고 참고 1 2 3 Super Audio CD 디스크 종류 단층 디스크 HD 계층 이층 디스크 하이브리드 디스크 HD 계층 CD 계층 HD 계층 Hybrid Super Audio CD 디스크 모든 CD 플레이어에서 재생되는 CD 계층 고화질 DSD 스테레오 고화질 DSD 멀티 채널 다음이 포함된 고밀도 계층 디스크를 디스크 케이스의 가운데에 넣고 케이스와 디스크를 똑바로 세워 보관하십 시오 직사광선...

Page 95: ...시 정지 A 정지 B PURE DIRECT Pure Direct 모드 7페이지 가 모드 1 모드 2 Off로 변경됩니다 Pure Direct 모드가 모드 1 모드 2로 설정된 경우 버튼이 점등됩니다 리모콘에 배터리 넣기 리모콘에 충격을 가하거나 물이나 습기가 심한 곳 에 놓아두지 마십시오 플레이어의 리모콘 센서가 직사광선 또는 다른 강 한 빛에 노출된 경우 리모콘이 작동하지 않을 수 있습니다 배터리를 잘못 사용하면 누액되거나 파열될 수 있 습니다 배터리 경고를 읽고 배터리를 올바로 사용 하십시오 쓰던 배터리와 새 배터리를 혼용하거나 브랜드가 다른 배터리를 혼용하지 마십시오 리모콘을 장기간 사용하지 않을 경우 배터리를 꺼 내놓으십시오 해당 지역의 규정에 따라 배터리를 폐기하십시오 대략적인 리모콘 작동 범위 각...

Page 96: ...자를 입력하거나 재생 도중 입력한 숫 자에 해당하는 트랙 챕터로 이동합니다 디스크 종류 및 재생 조건에 따라 이 버튼을 사용하지 못할 수 있 습니다 7 CLEAR 입력한 숫자 설정 항목을 지웁니다 8 SETUP SETUP 메뉴 화면 27페이지 을 표시합니다 9 PIP Picture in Picture 26페이지 를 설정 해 제합니다 이 기능을 사용할 수 있으면 PIP Mark 가 화면에 표시됩니다 On Screen 메뉴 23페 이지 에서 이 항목을 선택할 수도 있습니다 PIP Mark가 On으로 설정된 경우에만 PIP Mark가 표시됩니다 31페이지 0 2ND AUDIO Picture in Picture 26페이지 또 는 오디오 방송의 보조 오디오를 선택합니다 이 기 능을 사용할 수 있으면 Secondary...

Page 97: ...DVD Audio에만 해당됩니다 일부 BD DVD 디스크에서는 프레임 순방향 역방 향 재생 기능이 호환되지 않습니다 본 플레이어는 디스크에 따라 플레이어가 이전에 정지된 지점부터 재생이 다시 시작됩니다 처음부 터 재생하려면 를 두 번 누른 다음 를 누르 십시오 G SA CD CD 하이브리드 SA CD의 재생 계층을 SA CD 및 CD 중에서 전환합니다 4페이지 SA CD를 넣고 SA CD 계층을 선택하면 앞면 패 널의 SA CD CD 표시등 5페이지 이 점등됩니다 34페이지 SA CD 계층을 선택한 경우 오디오 신호는 AUDIO OUT 잭 11페이지 에서만 출력됩니다 DSD 멀티 채널 형식으로 녹음된 오디오 신호는 본 플레이어에서 재생되지 않습니다 H PURE DIRECT Pure Direct 모드를 변경합...

Page 98: ...다 반복 재생이 시작됩니다 3 반복 재생을 취소하려면 A B를 누릅니다 A B 가 사라지고 반복 재생이 종료됩니다 디스크의 사양에 따라 이 기능을 수행하지 못할 수 있습니다 Q POP UP MENU 팝업 메뉴를 표시합니다 표시되는 메뉴 내용은 디스크에 따라 다릅니다 팝업 메뉴의 표시 및 조작 방법에 대한 자세한 내용은 디스 크 설명서를 참조하십시오 DVD에 따라 POP UP MENU를 누르면 맨 처음 메뉴가 표시되기도 합니다 R ON SCREEN On Screen 메뉴 23페이지 를 표시합니다 S ANGLE 비디오가 여러 앵글로 녹화된 경우 카메라 앵글을 변경합니다 이 기능을 사용할 수 있으면 Angle Mark 가 화면에 표시됩니다 On Screen 메뉴 23페이지 에서 이 항목을 선택할 수도 있습니다 A...

Page 99: ...면 빨간색 버튼과 숫자 버튼 2를 동시에 7초 동안 누릅니다 ID를 ID2에서 ID1로 변경하려면 빨간색 버튼과 숫자 버튼 및 1을 동시에 7초 동안 동시에 누릅니다 2 기본 기기 설정 다음과 같은 경우 앞면 패널의 및 를 동시에 2초간 누르고 있으면 현재 ID가 표시됩니다 플레이어에 디스크가 들어있지 않은 경우 디스크 트레이가 닫혀 있는 경우 재생이 중지된 경우 NO DISC 가 표시창에 표시된 경우 키를 2초 동안 더 누르고 있으면 ID가 ID1과 ID2 중에서 변경됩니다 리모콘 배터리를 몇 분간 빼 놓거나 다 쓴 배터리 를 리모콘에 그대로 두면 리모콘 ID가 자동으로 ID 1로 설정됩니다 리모콘을 ID2로 설정하고 사 용하려면 새 배터리를 넣고 리모콘 ID를 다시 설정 하십시오 참고 ...

Page 100: ...뒷면 패널 연결 방법 예 아니오 AV 리시버를 사용합니까 AV 리시버에 HDMI 단자가 있습니까 TV에 HDMI 단자가 있습니까 TV에 HDMI 단자가 있습니까 TV HDMI 단자가 있습니까 HDMI 케이블을 사용하여 비디오 및 오디오를 TV에 연결합 니다 비디오를 TV에 연결합니다 HDMI 케이블을 사용하여 비디오를 TV에 연결합니다 비디오를 AV 리시버에 연결합니다 HDMI 케이블을 사용하여 비디오 및 오디오를 AV 리시버에 연결합 니다 AV 리시버의 설명서를 참조하십시오 시작 사운드 입력이 HDMI 단자로 출력되지 않는 AV 리시버에 연결한 경 우 AV 리시버의 설명서를 참조하십시오 6 7 0 A 9 3 2 1 4 8 5 ...

Page 101: ...OPTICAL 14페이지 A AC IN 17페이지 비디오 연결 오디오를 AV 리시버 에 연결합니다 TV에 비디오 연결 오디오를 TV에 연결합 니다 HDMI 12페이지 A AV 리시버에 비디오 및 오디오 연결 AV 리시버에 오디오 연결 TV에 비디오 및 오디오 연결 TV에 오디오 연결 HDMI 12페이지 A COMPONENT 13페이지 B VIDEO 13페이지 C TV에 연결 AV 리시버에 연결 또는 COMPONENT 13페이지 B VIDEO 13페이지 C 또는 COAXIAL 14페이지 D OPTICAL 14페이지 E 또는 MIXED 2CH 15페이지 F 또는 COAXIAL 14페이지 D OPTICAL 14페이지 E 또는 MIXED 2CH 15페이지 F 또는 HDMI 12페이지 A 7 1ch 서라운드 15페이...

Page 102: ... 본 플레이어의 전원 케이블을 연결하지 마십시오 HDMI 연결 HDMI IN 본 플레이어 HDMI 단자에 연결 HDMI 케이블 시판용 HDMI Control 기능을 사용하는 경우 HDMI Control 30페이지 을 참조하십시 오 HDMI 단자의 출력 모드에 대해서는 HDMI 34페이지 를 참조하십시오 아무 사진도 표시되지 않으면 문제 해결 39페이지 을 참조하십시오 Blu ray 3D 디스크 재생을 위한 연결 본 플레이어에서 Blu ray 3D 디스크를 재생하려 면 다음과 같은 장비를 연결해야 합니다 3D 기능을 갖춘 TV 및 필요한 경우 AV 리 시버 모든 구성품은 HDMI 케이블을 이용하여 연 결해야 합니다 Blu ray 디스크에는 3D 이미지가 있어야 합니다 힌트 AV 리시버 TV A A HDMI 입...

Page 103: ...이어의 전원 케이블을 연결하지 마십시오 VCR을 통해 화상을 재생하는 경우 복제 방지 기능으로 인해 화질이 저하될 수 있습니다 본 플레이어에서 BD 3D 디스크를 즐기려면 HDMI 케이블을 이용하여 AV 리시버 TV 및 본 플레이어를 연결 해야 합니다 이전 페이지를 참조하십시오 비디오 연결 COMPONENT IN Y PB PR 본 플레이어 컴포넌트 비디오 케이블 시판용 AV 리시버 TV 녹색 파란색 빨간색 녹색 파란색 빨간색 COMPONENT 잭에 연결 컴포넌트 입력 잭 에 연결 B B 녹색 파란색 빨간색 녹색 파란색 빨간색 VIDEO AV INPUT 본 플레이어 비디오 핀 케이블 부속품 AV 리시버 TV 노란색 노란색 노란색 VIDEO 잭 에 연결 비디오입력 잭에 연결 노란색 C C 참고 ...

Page 104: ...결하십시오 오디오 출력 형식에 대한 자세한 내용은 35페이지를 참조하십시오 주의 모든 연결이 완료될 때까지 본 플레이어의 전원 케이블을 연결하지 마십시오 COAXIAL 잭 OPTICAL 단자의 출력 모드에 대한 자세한 내용은 Coaxial Optical 34페이지 을 참조하십시 오 오디오 연결 힌트 AV INPUT COAXIAL DIGITAL AUDIO IN OPTICAL 본 플레이어 OPTICAL 단자 에 연결 TV AV 리시버 광 케이블 시판용 동축 디지털 오디오 케이블 시판용 본 플레이어 AV 리시버 D D COAXIAL 잭에 연결 동축 입력 잭에 연결 광 입력 단자에 연결 TV D E E ...

Page 105: ... SUBWOOFER 잭에 직접 연결할 수 있습니다 본 플레이어에 TV를 직접 연결할 경우 Yamaha Active Servo Processing Subwoofer System 같은 활성 서브우퍼를 이 잭에 연결하십시오 MIXED 2CH 7 1ch 서라운드 잭에서 오디오 신호를 출력하려면 Speaker Setting 34페이지 을 참조하십시 오 AUDIO AUDIO IN L R AUDIO OUT MIXED 2CH 잭에 연결 오디오 핀 케이블 부속품 흰색 빨간색 흰색 빨간색 TV AV 리시버 본 플레이어 오디오 입력 잭에 연결 F F 흰색 빨간색 흰색 빨간색 MULTICH IN SURROUND L R SURROUND BACK L R FRONT L R CENTER SUBWOOFER AV 리시버 본 플레이어 G 흰...

Page 106: ...한 후에 Network 설정을 수동으로 설정하려면 Network 32페이지 를 참조하십시오 네트워크에서 PC 컨텐츠를 재생하려면 네트워크 컨텐츠 사용 21페이지 을 참조하십시오 네트워크 및 USB 연결 LAN 본 플레이어 광대역 인터넷 연결을 사용하는 경우 인터 넷 서비스 제공자와 계약을 해야 합니다 자세한 내용은 가까운 인터넷 서비스 제공 자에 문의하십시오 인터넷 환경에 따라 연결하는 기기 및 연결 방법이 다를 수 있으므로 사용하는 기기의 사용 설명서를 참조하십시오 10BASE T 100BASE TX를 지원하는 네트워크 케이블 라우터를 사용하십시오 주의 BD Live 26페이지 를 조작하거나 소 프트웨어 업그레이드를 수행 중일 때는 USB 메모리 장치를 분리하거나 전원 케이블을 뽑지 마십시오 USB 메모리...

Page 107: ... 참조하십시오 SCENE 기능이 지원되는 Yamaha 컴포넌트 예 CD 플레이어 를 본 플레이어의 REMOTE CONTROL OUT 잭에 연결할 수 있습니다 RS 232C 단자는 시판되는 제어 확장 단자입니다 자세한 내용은 가까운 대리점에 문의하십시오 전원 케이블 연결 모든 연결을 완료한 후 부속된 전원 케이블을 플레 이어 뒷면의 AC IN에 꽂으십시오 그런 다음 AC 전원에 꽂으십시오 감전 사고를 방지하려면 전원 케이블이 연결된 경 우 케이블에서 절연되지 않은 부분을 만지지 마십 시오 기타 연결 힌트 REMOTE CONTROL IN REMOTE CONTROL OUT 본 플레이어 REMOTE CONTROL IN 잭에 연결 모노 3 5 mm 미니 플러그 케이블 시판용 리모콘 출력 잭에 연결 Yamaha 컴포넌...

Page 108: ...상도를 선택한 다음 ENTER를 누릅니 다 설정 항목에 대한 자세한 내용은 Resolution 33페이지 를 참조하십시오 4 5 a를 눌러 화면 비율을 선택한 다음 ENTER를 누 릅니다 설정 항목에 대한 자세한 내용은 TV Screen 32페이지 을 참조하십시오 Easy Setup이 완료되었습니다 5 ENTER를 눌러 Easy Setup을 종료합니다 Initial Wizard Easy Setup이 완료된 후에 아무 사 진도 표시되지 않으면 문제 해결 39페이지 을 참 조하십시오 본 플레이어를 켜면 3D 비디오 재생에 관한 경고 메시지가 표시됩니다 ENTER를 눌러 메시지를 닫거 나 CLEAR를 눌러 메시지를 비활성화시키십시오 30페이지 INITIAL WIZARD EASY SETUP 참고 ENTER Fini...

Page 109: ...을 확인합니다 MEDIA 메뉴 상단의 아이콘 트레이에 있는 디스크를 재생하거나 데이터 디스 크의 내용을 표시합니다 USB 포트에 연결된 USB 메모리 장치의 내용을 표시합니다 네트워크에서 DLNA 21페이지 서버를 검색합니 다 연결된 DLNA 서버의 내용을 표시합니다 선택한 폴더의 파일 재생 시 일반적인 조작 예 USB 메모리 장치에서 동영상 파일 선택 MEDIA 메뉴 화면으로 이동하기 전에 비디오 재생 을 중지하십시오 1 HOME을 눌러 HOME 메뉴 화면으로 이동합니다 2 3를 눌러 MEDIA를 선택한 다음 ENTER를 누릅니 다 2 MEDIA 화면이 나타납니다 3 재생하려는 파일이 포함된 항목을 선택한 다음 ENTER를 누릅니다 HOME MEDIA 메뉴 참고 TOP MENU POP UP MENU RET...

Page 110: ...면이 표시되고 재생 이 시작됩니다 사진 파일을 선택한 경우 슬라이드 쇼가 시작됩니다 음악이 있는 슬라이드 쇼를 즐기려면 음악이 재생 되는 동안 HOME을 눌러 HOME 메뉴 화면으로 돌아 가 사진 파일을 선택합니다 파일 내용에 따라 표시된 파일이 재생되지 않을 수 있습니다 사진을 보기 위한 조작 사진을 보는 동안에는 리모콘 버튼이 아래와 같이 작동 합니다 슬라이드 쇼를 정지하고 파일 찾아보기로 돌아갑니 다 슬라이드 쇼를 일시 정지합니다 슬라이드 쇼를 재생합니다 다음 사진으로 이동합니다 이전 사진으로 이동합니다 슬라이드 쇼의 속도가 3단계로 빨라집니다 슬라이드 쇼의 속도가 3단계로 느려집니다 5 사진을 뒤집습니다 a 사진을 반사합니다 2 사진을 시계 반대 방향으로 회전합니다 3 사진을 시계 방향으로 회전합니다...

Page 111: ... 공유 컨텐츠 재생 1 PC에서 파일을 재생하려면 Windows Media Player 12 같은 DLNA 서버 소프트웨어를 설치하고 재생하려는 파일을 공유합니다 2 DLNA 서버 소프트웨어가 설치된 PC 또는 홈 네트워 크에 연결된 DLNA 장치를 켭니다 3 HOME을 눌러 HOME 메뉴 화면을 표시합니다 그런 다 음 MEDIA를 선택하여 MEDIA 메뉴로 이동합니다 네트워크에 연결된 DLNA 서버가 화면에 표시됩니다 사용하는 DLNA 서버가 표시되지 않을 경우 DLNA Search를 선택하고 서버를 찾아보십시오 DLNA 서버에 따라 서버에서 본 플레이어를 허가 해야 할 수도 있습니다 DLNA 서버에서 파일을 재생하려면 본 플레이어 와 서버가 동일한 액세스 포인트에 연결되어 있어 야 합니다 파일 요구 사항...

Page 112: ...일부 컨텐츠는 특정 국가에서만 사용이 가능할 수 있으며 일부 언어로만 제공될 수도 있습니다 Yamaha는 특정 기간 동안의 컨텐츠 서비스에 대한 지속적 제공이나 가용성에 대한 진술이나 보증을 제공하지 않으며 명시적이든 암묵적이든 그러한 모든 보증에 대한 책임이 없습니다 본 플레이어를 이용하여 인터넷을 통해 YouTube에서 영화를 시청할 수 있습니다 해당 서비스들은 예고 없이 변경될 수 있습니다 1 HOME을 눌러 HOME 메뉴 화면을 표시합니다 모델에 따라 HOME 메뉴 화면은 다를 수 있습니다 2 5 a 2 3를 눌러 YouTube를 선택한 다음 ENTER 를 누릅니다 HOME 메뉴 화면으로 돌아가려면 RETURN을 누릅 니다 네트워크 서비스 사용 참고 YouTube 에서 비디오 재생 힌트 힌트 ...

Page 113: ...ndom TT 타이틀 Random All Normal Shuffle F 폴더 Shuffle All Random F 폴더 Random All Audio 현재 선택된 BD DVD 디 스크의 오디오 언어 신호를 표시합니다 원하는 오디오 유형을 선택할 수 있습니다 Angle 현재 선택된 앵글을 표시합니다 비 디오가 여러 앵글로 녹화된 경우 앵글을 변경할 수 있습 니다 Subtitle 자막이 제공되는 경우 현재 선택된 자막 언어를 표시합니다 Subtitle Style 현재 선택된 자막 스타일을 표시 합니다 이 기능은 비디오 파일 외부 자막인 경우에만 사용할 수 있습니다 자막의 텍스트 스타일을 선택할 수 있습니다 Bitrate 오디오 비 디오 신호의 비트 전송률을 표시합니다 Second Video PIP를 설정 해제합...

Page 114: ...어를 변경할 수 있습니다 7 현재 선택된 오디오 AUDIO 버튼을 사용하여 오디오 언어 또는 형식을 변경할 수 있습니다 8 반복 모드 현재 반복 모드 8페이지 를 표시합니 다 예 음악 파일 재생 시 아이콘 1 재생 상태 2 반복 모드 현재 반복 모드 8페이지 를 표시합니 다 3 디스크 유형 음악 파일 아이콘 4 아트워크 파일에 아트워크가 포함된 경 우 아트워크를 표시합니다 5 재생 중인 트랙 파일 번호 SEARCH 버튼 8페 이지 을 사용하여 지정한 트랙으로 이동할 수 있습니 다 6 정보 파일에 음악 정보가 포함된 경우 음 악 정보를 표시합니다 7 경과된 재생 시간 SEARCH 버튼 8페이지 을 사 용하여 지정한 지점으로 이동할 수 있습니다 8 진행률 막대 현재 곡의 진행 상태를 표시 합니다 9 오디오 레벨...

Page 115: ...트랙의 재생 순서 프로그래밍 1 재생 도중 PROGRAM을 누릅니다 2 ENTER를 눌러 재생 순서를 프로그래밍합니다 오디오 디스크의 경우 5 a를 눌러 원하는 트랙을 선택한 다음 ENTER를 누릅니다 DVD Video 디스크의 경우 트랙 대신 원하는 타이 틀 TT로 표시됨 및 챕터 CH로 표시됨 를 선택합니 다 설정 트랙을 지우려면 지우려는 트랙을 선택한 다음 CLEAR를 누릅니다 프로그램 재생을 취소하려면 RETURN을 누릅니다 3 프로그래밍을 완료한 다음 를 눌러 설정하면 프 로그램 재생이 시작됩니다 4 프로그램 재생을 취소하려면 를 두 번 눌러 재생 을 완전히 중지합니다 검색 사용 재생 도중 지정한 지점으로 이동할 수 있습니다 1 재생 도중 SEARCH를 누릅니다 상태 표시줄이 나타납 니다 2 5 a...

Page 116: ...s 를 지원하는 USB 메 모리 장치 2GB 이상 FAT 32 16 포맷 를 Local Storage에서 선택한 USB 포트에 연결하십시오 30페이지 기본 설정은 후면 패널에 있는 USB 포트입니다 필요할 경우 USB 메모리 장치에 BUDA 폴더가 자 동으로 생성됩니다 저장 공간이 충분하지 않을 경우 데이터가 복사 다 운로드되지 않습니다 불필요한 데이터를 삭제하 거나 새 USB 메모리 장치를 사용하십시오 데이터를 로드 읽기 쓰기 하는 데 시간이 걸릴 수 있습니다 Yamaha는 본 플레이어에서 모든 브랜드의 USB 메모리 장치가 작동된다고 보증하지 않습니다 USB 메모리 장치를 플레이어의 USB 포트에 연결 할 때 USB 확장 케이블을 사용하지 마십시오 USB 확장 케이블을 사용하면 플레이어가 올바로 실행되지...

Page 117: ... 부여합니다 31 Subtitle 자막 언어에 우선 순위를 부여합니다 31 Playback Closed Caption 자막 방송을 설정 해제합니다 31 Angle Mark 앵글이 여러 개인 BD DVD를 재생하는 경우 Angle Mark가 표시되도록 설정합니다 31 PIP Mark Picture in Picture가 있는 BD DVD를 재생하는 경우 PIP Mark가 표시되도록 설정합니다 31 Secondary Audio Mark 보조 오디오가 있는 BD DVD를 재생하는 경우 Secondary Audio Mark가 표시되도록 설정합니다 31 DivX R VOD DRM DivX R 비디오의 등록 코드를 표시합니다 31 DVD Audio Mode DVD Audio 모드를 DVD Audio DVD Video로 ...

Page 118: ... Contrast 컨트라스트를 조정하여 재생되는 화상을 최적화합니다 33 Noise Reduction Noise Reduction 레벨을 설정합니다 33 De interlacing Mode 비디오 신호 감지 방법을 설정합니다 34 Audio Setting Audio Output Coaxial Optical COAXIAL 잭 OPTICAL 단자의 출력 모드를 Bitstream PCM Reencode Off 중에서 선택합니다 34 HDMI HDMI 단자의 출력 모드를 Bitstream PCM Reencode Off 중에서 선택합니다 34 Downsampling 디지털 오디오 신호의 다운 샘플링 주파수를 48k 96k 192k 중에서 선택합니다 34 DRC DRC Dynamic Range Compression 를...

Page 119: ...ng을 선택한 다음 ENTER 또는 a를 누릅니다 2 하위 메뉴를 선택합니다 5 a를 눌러 Security를 선택한 다음 ENTER 또는 커서 3를 누릅니다 3 메뉴 항목을 선택합니다 5 a를 눌러 Parental Control을 선택한 다음 ENTER 또는 커서 3를 누릅니다 4 암호를 입력합니다 숫자 버튼으로 압호를 입력합니다 기본 암호는 0000입니다 올바른 암호를 입력해야 다음 설정 화면으로 이 동할 수 있습니다 암호를 변경하려면 Change Password 31페 이지 를 참조하십시오 5 다음 항목을 선택합니다 5 a를 눌러 BD DVD의 Parental Control 레벨을 선택한 다음 ENTER를 누릅니다 6 메뉴 화면을 종료합니다 2를 누르면 이전 메뉴로 돌아갑니다 참고 TOP MENU POP...

Page 120: ...cal Storage 정보를 표시하고 Local Storage를 포 맷하고 Front USB Rear USB를 선택하여 BD Live 데 이터를 저장할 수 있습니다 USB 메모리 장치에서 BUDA 폴더를 포맷하려면 비 우려면 Information을 선택하고 화면에 Format 표 시되면 ENTER를 누릅니다 Front USB Rear USB Local Storage는 Blu ray 디스크를 재생하는 경 우 보조 메모리로 사용됩니다 3D Playback Message 본 플레이어를 켜면 TV에 표시되는 3D 비디오 재생에 관한 경고 메시지를 켜거나 끌 수 있습니다 On Off HDMI Control 기능 사용 HDMI Control 기능을 사용하면 본 플레이어와 TV HDMI Control 기능 지원 를 대화...

Page 121: ... DVD Audio 디스크에는 DVD Audio 컨텐츠 이 외에 DVD Video 컨텐츠도 포함되어 있습니다 DVD Audio 모드 또는 DVD Video 모드를 선택할 수 있습니 다 이 설정은 디스크를 넣지 않은 경우에만 사용할 수 있습니다 Security Change Password Parental Control 레벨 및 Country Code를 변경하기 위한 암호를 설정할 수 있습니다 Parental Control 31페이지 및 Country Code 31페이지 를 참조하십시오 기본 비밀번호는 0000입니다 비밀번호를 잊은 경우 문제 해결 38페이지 를 참조하여 모든 Security 설정값을 기본값으로 설 정하십시오 Parental Control 일부 BD DVD 디스크의 경우 시청자 나이에 따라 디스...

Page 122: ...있습니다 TV Screen 연결된 TV의 화면 비율을 설정하고 비디오 출력을 조 정할 수 있습니다 TV를 바꾸거나 예를 들면 새로 구입 연결된 TV의 화 면 비율을 변경하면 TV Screen 설정을 변경해야 합니 다 Auto 이 기능을 선택하면 본 플레이어와 DHCP 서버의 네트워크 설정을 자동으로 구성합니다 Manual 이 기능을 선택하면 네트워크 설정 IP Address Subnet Mask Default Gateway DNS 을 수동으 로 구성할 수 있습니다 힌트 Permitted 모든 BD Live 디스크를 네트워크에 연결할 수 있 습니다 Partial Permitted 소유자 인증이 있는 디스크만 연결할 수 있습니다 Prohibited 모든 BD Live 디스크의 네트워크 연결이 금지됩니 다 Ena...

Page 123: ...기능을 설정 조정할 수 있습니다 Video Process Video Mode 다음과 같은 Video Mode를 선택할 수 있습니다 Color Adjust 각 색상 Red Green Blue Yellow Cyan Magenta 에 대해 Brightness Saturation Hue를 조정할 수 있습니 다 이 기능을 사용하려면 Video Mode를 Custom으로 설정하십시오 설정 항목에 대한 자세한 내용은 Video Mode 33페이지 를 참조하십시오 기본 설정은 0입니다 Auto Contrast 명암 대비를 조정하여 재생되는 화상을 최적화합니다 이 기능을 사용하려면 Video Mode를 Custom으로 설 정하십시오 Off On Noise Reduction Noise Reduction을 레벨 0에서 3으로 ...

Page 124: ...ti ch 2 ch HDMI Output SA CD를 재생하는 경우 HDMI 단자에서 출력되는 오 디오 신호를 선택할 수 있습니다 Speaker Setting Configuration 연결된 스피커 또는 앰프에 따라 7 1채널 서라운드 출력 을 설정할 수 있습니다 1 5 a를 눌러 구성하려는 스피커를 선택한 다음 ENTER를 누릅니다 2 아래와 같은 값을 조정합니다 선택한 스피커에 따라 일부 항목이 표시되지 않을 수 있습니다 3 RETURN을 눌러 스피커 선택으로 돌아갑니다 2ch Downmix 아날로그 2채널로 다운믹스하는 방법을 Stereo 또는 Lt Rt 중에서 선택할 수 있습니다 Post Process Up Mix 2채널 오디오 신호를 멀티 채널화할 수 있습니다 멀티 채널화하려면 NEO6를 선택한 다...

Page 125: ...Dolby Digital PCM 2ch Dolby Digital 2채널 5 1채널 SA 또는 BCS 사용 Dolby Digital Plus Dolby Digital Plus PCM 최대 7 1채널 Dolby Digital Plus Dolby Digital PCM 2ch Dolby Digital 2채널 7 1채널 SA 또는 BCS 사용 Dolby Digital Dolby TrueHD Dolby TrueHD PCM 최대 7 1채널 Dolby TrueHD Dolby Digital PCM 2ch Dolby Digital SA 또는 BCS 사용 Dolby Digital DTS DTS PCM 최대 5 1채널 DTS DTS PCM 2ch DTS 2채널 5 1채널 SA 또는 BCS 사용 DTS HD High Resolut...

Page 126: ...다 TV System이 NTSC로 설정된 경우 비디오 소스가 60 Hz가 아니면 비디오 출력 신호가 60 Hz로 변환됩니 다 TV System이 PAL로 설정된 경우 비디오 소스가 50 Hz가 아니면 비디오 출력 신호가 50 Hz로 변환됩니다 Resolution Auto 480i 576i 480p 576p 720p 1080i 1080p 24Hz 기타 HDMI BD 재생 최대 최대 최대 720p 60 Hz 1080i 60 Hz 1080p 24 Hz 1080p 60 Hz 기타 1080p 60 Hz COMPONENT 상용 DVD 재 생 480i 480i 480p 480p 480p 480p BD 재생 480i 480i 480i 끔 480i 기타 480p 720p 60 Hz 1080i 60 Hz 1080i 60 Hz...

Page 127: ... LAN 케이블을 뽑 지 마십시오 소프트웨어 업그레이드 1 소프트웨어 업그레이드를 준비합니다 디스크 USB 저장 장치에서 소프트웨어를 업그레 이드하는 경우 1 업그레이드 파일 패키지를 디스크 USB 메모리 장치의 적절한 폴더에 저장합니다 자세한 내용 은 업그레이드 파일 패키지에 부속된 설명서를 참조하십시오 2 디스크를 넣거나 USB 메모리 장치를 연결합 니다 디스크를 넣으면 소프트웨어 업그레이드가 자 동으로 시작됩니다 단계 2를 건너뜁니다 네트워크에서 소프트웨어를 업그레이드하는 경우 본 플레이어가 네트워크에 연결되어 있는지 확 인하십시오 2 업그레이드 방법을 선택하고 SETUP 메뉴에 서 업그레이드를 시작합니다 1 SETUP을 눌러 SETUP 메뉴 화면을 표시합니다 2 General Setting Syste...

Page 128: ...시오 본 플레이어를 완전히 재설정하려면 AC 콘센트에서 전원 케이블을 10초 이상 동안 뽑아 놓은 후에 전원 케이블을 AC 콘센트에 다시 꽂은 다음 본 플레이어를 켜십시오 암호를 잊어버렸다 플레이어에 디스크가 들어 있지 않고 재생이 정지된 상태에서 앞면 패널의 및 를 동시에 눌러 플레이어를 기본 설정으로 설정하십시오 Security 설정 31페이 지 도 재설정됨 전원이 자동으로 꺼진 후에 p를 눌러 전원을 다시 켜십시오 문제 원인 및 해결 방법 플레이어에서 디스크를 재생할 수 없다 디스크를 꺼내 청소하여 주십시오 4페이지 디스크가 올바로 들어 있는지 확인하십시오 라벨 면이 위로 되어 있고 디스크 트레이 의 제자리에 들어 있는지 확인 4페이지 본 플레이어에서 지원하는 디스크를 사용하십시오 3페이지 디스크를 꺼...

Page 129: ...생하면 재생 화면이 고르지 못하다 본 플레이어는 아날로그 복사 방지 규정을 준수합니다 일부 디스크에는 복사 방지 신 호가 포함되어 있습니다 이러한 디스크를 VCR을 통해 재생하려고 하거나 VCR에 녹 화하고 신호를 재생하려고 하면 복사 방지로 인해 올바로 재생되지 않습니다 오디오가 출력되지 않거나 화상이 올바로 재 생되지 않는다 복사 방지 컨텐츠가 녹화된 일부 디스크의 경우 오디오가 출력되지 않거나 화상이 올 바로 재생되지 않을 수 있습니다 문제 문제 및 해결 방법 사운드가 출력되지 않거나 왜곡된다 오디오 케이블이 올바로 연결되어 있는지 확인하십시오 10페이지 정지화상 모드 슬로 모션 재생 빨리감기 및 빨리되감기 도중에는 사운드가 출력되지 않습니다 7페이지 오디오 컨텐츠에 오디오 신호 이외의 오디오 또는 비...

Page 130: ... 서버 등 연결된 기기의 전원을 켜십시오 플레이어 및 서버가 동일한 액세스 포인트에 연결되어 있는지 확인하십시오 네트워크 설정에서 올바른 값을 설정하십시오 Network 를 확인하십시오 32페이 지 DLNA 서버에 따라 서버로부터 플레이어를 허가 받아야 할 수도 있습니다 홈 네트워크 서버에서 파일을 재생할 수 없 다 재생 가능한 파일인지 확인하십시오 3페이지 DLNA 서버의 설정을 확인하십시오 홈 네트워크 조건에 따라 재생 및 작동 상태가 영향을 받을 수 있습니다 오류 메시지 원인 및 해결 방법 Not Support This File 파일이 본 플레이어에서 지원되지 않습니다 본 플레이어에서 사용할 수 있는 디스크 파일 유형 3페이지 을 참조하십시오 Wrong region code 디스크의 지역 코드가 호환되...

Page 131: ...고도로 압축된 비디오가 포함되어 있습니다 또한 DivX 파일에는 메뉴 자막 및 대체 오디오 트랙 같은 고급 미디어 기능이 포함되 어 있습니다 많은 DivX 미디어 파일을 온라인에서 다운로드할 수 있으며 DivX com에서 개인 콘텐츠와 간단한 툴을 사용하여 직접 만들 수 있습니다 Dolby Digital Dolby Laboratories Inc 에서 개발한 사운드 시스템 으로 제품을 Dolby Digital 프로세서 또는 앰프에 연 결하면 영화관과 같은 오디오 출력이 제공됩니다 Dolby Digital Plus Dolby Digital의 확장으로서 개발된 사운드 시스템 입니다 이 오디오 코딩 기술은 7 1 멀티 채널 서라운 드 사운드를 지원합니다 Dolby TrueHD Dolby TrueHD는 차세대 광 디...

Page 132: ... 서 맨 처음 메뉴를 타이틀 메뉴 라고도 합니다 x v Color x v Color는 전보다 넓은 범위의 색상을 재현할 수 있 어서 인간의 눈으로 감지할 수 있는 거의 모든 색상을 표시할 수 있습니다 일반 사항 전원 미국 및 캐나다 모델 AC 110 240 V 60 Hz 중남미 모델 AC 110 240 V 50 60 Hz 유럽 및 러시아 모델 AC 230 V 50 Hz 호주 모델 AC 110 240 V 50 Hz 아시아 모델 AC 220 240 V 50 60 Hz 대만 모델 AC 110 120 V 50 60 Hz 한국 모델 AC 220 V 60 Hz 소비 전력 일반 25 W 소비 전력 대기 0 5 W 이하 크기 W H D 435 96 316 mm 무게 4 05 kg 오디오 성능 오디오 출력 레벨 1 kHz ...

Page 133: ...가에서 Sun Microsystems Inc 의 상표 또는 등록 상표입니다 이 제품은 AVC 특허 포트폴리오 및 VC 1 특허 포 트폴리오 라이센스 하에서 다음과 같은 개인적이 고 비상업적인 용도로 사용하는 경우에 한하여 허 가를 받았습니다 i AVC 표준 및 VC 1 표준 AVC VC 1 비디오 에 호환되는 비디오 인코딩 및 또는 ii 개인적이고 비상업적인 업무에 종사하 는 사용자가 인코딩한 AVC VC 1 비디오의 디코 딩 및 또는 AVC VC 1 비디오 배급 허가가 있는 비디오 공급자가 제공한 AVC VC 1 비디오의 디 코딩 그 외 용도로는 라이센스가 허가되거나 묵시 적으로도 인정되지 않습니다 자세한 내용은 MPEG LA LLC에서 얻을 수 있습니다 http www mpegla com을 참조하십시오 ...

Page 134: ... to the modified work as a whole If identifiable sections of that work are not derived from the Program and can be reasonably considered independent and separate works in themselves then this License and its terms do not apply to those sections when you distribute them as separate works But when you distribute the same sections as part of a whole which is a work based on the Program the distributi...

Page 135: ...e instead of this License About glibc libmtp libusb libusb compat DirectFB GNU LESSER GENERAL PUBLIC LICENSE Version 2 1 February 1999 Copyright C 1991 1999 Free Software Foundation Inc 59 Temple Place Suite 330 Boston MA 02111 1307 USA Everyone is permitted to copy and distribute verbatim copies of this license document but changing it is not allowed This is the first released version of the Less...

Page 136: ...hen offering equivalent access to copy the source code from the same place satisfies the requirement to distribute the source code even though third parties are not compelled to copy the source along with the object code 5 A program that contains no derivative of any portion of the Library but is designed to work with the Library by being compiled or linked with it is called a work that uses the L...

Page 137: ...AL INCIDENTAL OR CONSEQUENTIAL DAMAGES ARISING OUT OF THE USE OR INABILITY TO USE THE LIBRARY INCLUDING BUT NOT LIMITED TO LOSS OF DATA OR DATA BEING RENDERED INACCURATE OR LOSSES SUSTAINED BY YOU OR THIRD PARTIES OR A FAILURE OF THE LIBRARY TO OPERATE WITH ANY OTHER SOFTWARE EVEN IF SUCH HOLDER OR OTHER PARTY HAS BEEN ADVISED OF THE POSSIBILITY OF SUCH DAMAGES END OF TERMS AND CONDITIONS How to A...

Page 138: ...ry least This license was inspired by the BSD Artistic and IJG Independent JPEG Group licenses which all encourage inclusion and use of free software in commercial and freeware products alike As a consequence its main points are that o We don t promise that this software works However we will be interested in any kind of bug reports as is distribution o You can use this software for whatever you w...

Page 139: ...y to perform conversion between JPEG and some other popular image file formats The library is intended to be reused in other applications In order to support file conversion and viewing software we have included considerable functionality beyond the bare JPEG coding decoding capability for example the color quantization modules are not strictly part of JPEG decoding but they are essential for outp...

Page 140: ...eeting in Geneva Switzerland Thank to John Korejwa and Massimo Ballerini for inviting me to fruitful consultations in Boston MA and Milan Italy Thank to Hendrik Elstner Roland Fassauer and Simone Zuck for corresponding business development Thank to Nico Zschach and Dirk Stelling of the technical support team at the Digital Images company in Halle for providing me with extra equipment for configura...

Page 141: ...ansfer of data 1 5 Executable means Covered Code in any form other than Source Code 1 6 Initial Developer means the individual or entity identified as the Initial Developer in the Source Code notice required by Exhibit A 1 7 Larger Work means a work which combines Covered Code or portions thereof with code not governed by the terms of this License 1 8 License means this document 1 8 1 Licensable m...

Page 142: ...ive Works If You create or use a modified version of this License which you may only do in order to apply it to code which is not already Covered Code governed by this License You must a rename Your license so that the phrase gSOAP or any confusingly similar phrase do not appear in your license except to note that your license differs from this License and b otherwise make it clear that Your versi...

Page 143: ...able to Fonts or Font Software that has been modified and is distributed under the Bitstream Vera names The Font Software may be sold as part of a larger software package but no copy of one or more of the Font Software typefaces may be sold by itself THE FONT SOFTWARE IS PROVIDED AS IS WITHOUT WARRANTY OF ANY KIND EXPRESS OR IMPLIED INCLUDING BUT NOT LIMITED TO ANY WARRANTIES OF MERCHANTABILITY FI...

Page 144: ...Yamaha Corporation Printed in Malaysia WZ02530 BLU RAY DISC PLAYER BD A1010 OWNER S MANUAL MANUAL DE INSTRUCCIONES 사용 설명서 KALVP 전원 키 본 기기의 전원을 켜거나 대기 모드에 맞추십시오 00_BD A1010_K_cv fm Page 1 Tuesday April 19 2011 2 52 PM ...

Reviews: