background image

IMPORTANT!
Please record the serial number of this
unit in the space below.

Model:
Serial No.:

The serial number is located on the rear
of the unit.
Retain this Owner’s Manual in a safe
place for future reference.

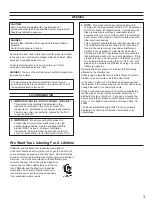
WARNING
TO REDUCE THE RISK OF FIRE OR
ELECTRIC SHOCK, DO NOT EXPOSE
THIS UNIT TO RAIN OR MOISTURE.

RISK OF ELECTRIC SHOCK

DO NOT OPEN

CAUTION:  TO REDUCE THE RISK OF

ELECTRIC SHOCK, DO NOT REMOVE

COVER (OR BACK), NO USER-SERVICEABLE

PARTS INSIDE, REFER SERVICING TO

QUALIFIED SERVICE PERSONNEL.

The lightning flash with arrowhead
symbol, within an equilateral triangle,
is intended to alert you to the
presence of uninsulated “dangerous
voltage” within the product’s
enclosure that may be of sufficient
magnitude to constitute a risk of
electric shock to persons.

The exclamation point within an
equilateral triangle is intended to alert
you to the presence of important
operating and maintenance
(servicing)  instructions in the
literature accompanying the
appliance.

• Explanation of Graphical Symbols

CAUTION

Natural Sound Compact Disc Player

5-Disc Carousel Auto-changer

PLAYXCHANGE; Disc changing capability while playing another

Random Access Programmable Play

Random-Sequence Play

Single Track/Entire Disc/All Disc Repeat Play

Program Data Filing Capability

5-Mode Digital Equalizer

10-Disc Relay Play by Connecting Two CDC-835s

Display Brightness Changing Capability

Concealed Control Panel

Remote Control Capability

CDC-835

Thank you for selecting this YAMAHA compact disc player.

OWNER’S MANUAL

CONTENTS

Safety Instructions ................................... 2
Connections ............................................ 4
Identification of Components ................... 5
Loading the Disc/Disc Play...................... 6
Random-Sequence Play ....................... 11
Program Play......................................... 12
Repeat Play ........................................... 16
Index Search ......................................... 16
Track Programming for 

Recording to Tape............................... 17

Relay Play ............................................. 20
Notes about the Remote Control 

Transmitter........................................... 22

Notes about Handling Compact Discs... 22
Troubleshooting..................................... 23
Specifications ........................................ 23

S

Summary of Contents for CDC-835

Page 1: ...to alert you to the presence of important operating and maintenance servicing instructions in the literature accompanying the appliance Explanation of Graphical Symbols CAUTION Natural Sound Compact Disc Player 5 Disc Carousel Auto changer PLAYXCHANGE Disc changing capability while playing another Random Access Programmable Play Random Sequence Play Single Track Entire Disc All Disc Repeat Play Pr...

Page 2: ...bjects do not fall into and liquids are not spilled into the inside of the unit 15 Damage Requiring Service The unit should be serviced by qualified service personnel when A The power supply cord or the plug has been damaged or B Objects have fallen or liquid has been spilled into the unit or C The unit has been exposed to rain or D The unit does not appear to operate normally or exhibits a marked...

Page 3: ... or another product use only high quality shielded cables Cable s supplied with this product MUST be used Follow all installation instructions Failure to follow instructions could void your FCC authorization to use this product in the USA WARNING 3 NOTE This product has been tested and found to comply with the requirements listed in FCC Regulations Part 15 for Class B digital devices Compliance wi...

Page 4: ... right R LINE OUT terminals are connected to the corresponding left and right terminals of the amplifier or other component Connect the LINE OUT terminals to the CD or AUX terminals of the amplifier If the amplifier does not have such terminals use the TAPE PB terminals For additional details concerning these connections refer to the operation instructions for the amplifier being used Adjust the l...

Page 5: ...SC4 DISC5 SKIP SEARCH REMOTE CONTROL TRANSMITTER select button TIME display mode Display panel Remote control sensor POWER switch Disc tray OPEN CLOSE button button DISC SKIP STOP button button button PLAYXCHANGE PLAY PAUSE DISC select buttons RANDOM button PHONES jack REPEAT button select button LEVEL control PROG button SEARCH button SKIP button OUTPUT Disc play MODE POWER FILE SAVE AUTO DISPLAY...

Page 6: ... the total recorded time of the disc to be played for a few seconds Additionally you can close the disc tray by pressing the PLAY PAUSE button a DISC select button a numeric button or the RANDOM button or by pressing the front edge of the disc tray gently If the tray is closed in these ways play will begin automatically however the display will not show the total number of tracks and the total rec...

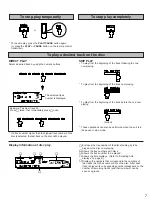
Page 7: ...m the beginning of the track before the one now playing twice These operations can also be performed when the unit is in the pause or stop mode Display information at disc play Encloses the tray number of the disc standing by to be played or the disc now playing Shows the tray numbers with discs Shows the track number to be played Shows the time displays Refer to Selecting time displays on page 9 ...

Page 8: ...nce or reverse play rapidly MANUAL SEARCH To advance rapidly To reverse rapidly The sound can be heard although slightly garbled during manual search in either direction This is convenient for locating a precise position within a track or for reviewing the contents quickly Manual search can also be performed while disc play is paused though no sound will be heard press and hold press and hold On t...

Page 9: ...otal remaining time on the disc Changing brightness of the display You can change the brightness of the display or turn off the illumination by pressing the DIMMER button During play Normal illumination Dim OFF While the display illumination is off the AUTO DISPLAY OFF indicator on the front panel illuminates Except during play Normal illumination Dim Dim The AUTO DISPLAY OFF indicator illuminates...

Page 10: ...l will also vary the level of the signal output to the amplifier If the DIGITAL OUT COAXIAL terminal on the rear of this unit is used for the connection to the amplifier the PHONES jack cannot be used Open close the control door When it is not necessary to operate controls inside the control door close the door To close the door To open the door PHONES OUTPUT LEVEL DOWN UP or ...

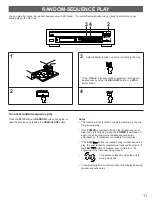
Page 11: ...unctioning when the POWER is switched on again the unit will begin the random sequence play automatically This feature is available for timer play If the SKIP button is pressed during random sequence play the next randomly programmed track will be played If the SKIP button is pressed play will return to the beginning of the track now being played This indication appears while the unit is mixing up...

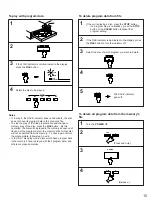
Page 12: ...ime will not be displayed 12 1 Stop the unit 4 If necessary select any desired DEQ mode 2 3 If necessary select the desired disc 5 Select the desired track 6 When the programming is completed Repeat step 3 5 to set more programs Display information during programming or 1 2 3 4 5 DISC DEQ CLASSIC VOCAL JAZZ ROCK 1 10 2 3 4 5 6 7 8 9 0 2 3 6 1 3 4 5 PROGRAM PLAY You can enjoy listening to your favo...

Page 13: ...H and button can be used during playing to search through all tracks including unprogrammed tracks To stop program play Press the STOP button The first track number programmed will be displayed To resume play press the PLAY PAUSE button Play will begin from the beginning of the program To cancel a programmed setting There are several methods as described below Press the CLEAR button while the unit...

Page 14: ...esired disc by pressing the SKIP button 4 Select a desired DEQ mode The indicator for the mode will flash on and off for about 3 seconds However if the DEQ is turned off FLAT all indicators will flash 5 Press the FILE button while the indicator is flashing If the indicator stops flashing before you press the FILE button follow step 4 again If this procedure is done to a disc for which program data...

Page 15: ... call out the program data follow step 3 and 4 In the ALL disc play mode discs which have program data in the memory s file are played with their program data and others are played normally To delete program data from file 1 If the unit is playing a disc press the STOP button If a program play is on standby press the STOP button or the CLEAR button tocancel that program setting 2 If the FILE indic...

Page 16: ...umber can be designated only while the INDEX number display is illuminated 16 SINGLE REPEAT S REP A single track is repeatedly played This is also available in the programmed play mode and the random sequence play mode If the repeat play mode is switched off the programmed play mode or the random sequence play mode will be resumed FULL REPEAT F REP In the SINGLE disc play mode A designated disc is...

Page 17: ... possible recording time manually Example For a C 64 tape 32 minutes on each side 6 By pressing the REPEAT button the unit automatically programs tracks for side A and side B separately considering the tape s total time 7 Begin recording on the tape deck and press the PLAY PAUSE button on this unit at the same time 8 The unit will pause at the end of side A of the tape Turn the tape over to side B...

Page 18: ...same time press the PLAY PAUSE button on this unit Notes If you will program tracks from more than one disc before you press the PROG button check the total recorded time of each disc on the disc tray by pressing the DISC SKIP button in turn Without this operation the total remaining time of each side of the tape and previously programmed track numbers and also unprogrammed track numbers will not ...

Page 19: ...he amount of time remaining at the end of the tape also changes accordingly If the tape s length is not enough all tracks cannot be programmed In this case exchange the tape for a longer one In step 2 you can check the program data for side A and side B Shows the number of programmed tracks for each side Shows the total time of programmed tracks for each side Shows the programmed track numbers for...

Page 20: ... other automatically Disc play If the power of both the units is switched on simultaneously you can begin play from the first disc in the main unit The operating methods are the same as the normal disc play COAXIAL DIGITAL OUT ON OFF 2nd CHANGER INPUT MAIN 2nd CONTROL L R LINE OUT RELAY PLAY COAXIAL DIGITAL OUT ON OFF 2nd CHANGER INPUT MAIN 2nd CONTROL L R LINE OUT RELAY PLAY To amplifier Main uni...

Page 21: ...iscs which have their own program data in the memory s file are played with the program data Random sequence play in relay play In the SINGLE disc play mode random sequence play is performed in each disc In the ALL disc play mode random sequence play is performed in all discs of each unit Repeat play in relay play When a unit is in the repeat play mode relay play can not be performed If any DISC s...

Page 22: ...pose discs to direct sunlight high temperature or high humidity for a long period of time because these might warp or otherwise damage the disc To play a 3 inch 8 cm CD Place it in the inner recessed area of the disc tray Do not put a normal 5 inch 12 cm CD on top of a 3 inch CD 22 Battery installation Battery replacement If you find that the remote control transmitter must be used closer to the m...

Page 23: ...Sound hums Noise from a nearby tuner Noise from inside of the disc tray The remote control transmitter does not work PROBABLE CAUSE The power cord is not connected or not completely connected A foreign object is obstructing the tray The disc has been loaded upside down The disc is damaged There is moisture on the laser pickup The disc has been loaded upside down The disc is dirty The disc may be s...

Page 24: ...EI HAMBURG F R OF GERMANY YAMAHA ELECTRONIQUE FRANCE S A RUE AMBROISE CROIZAT BP70 CROISSY BEAUBOURG 77312 MARNE LA VALLEE CEDEX02 FRANCE YAMAHA ELECTRONICS UK LTD YAMAHA HOUSE 200 RICKMANSWORTH ROAD WATFORD HERTS WD1 7JS ENGLAND YAMAHA SCANDINAVIA A B J A WETTERGRENS GATA 1 BOX 30053 400 43 VÄSTRA FRÖLUNDA SWEDEN YAMAHA MUSIC AUSTRALIA PTY LTD 17 33 MARKET ST SOUTH MELBOURNE 3205 VIC AUSTRALIA VN...

Reviews: