CDR-HD1500
29
CDR-HD1500
操作手順
1)電源を入れます。
「System Utility」
に
「Sys ID write」
メニューおよび
「Sys ID
check」メニューが自動的に追加されます。
2) MENU キーを押します。
3) MULTI JOG つまみを回して、「Sys Utility」を選びます。
MULTI JOG つまみを押します。
4) MULTI JOG つまみを回して、「Sys ID Write」を選び
ます。
MULTI JOG つまみを押します。
5) M U L T I J O G つまみを回して、モデル名に応じて
「CDR-HD1500」を選びます。
MULTI JOG つまみを押します。
6)
「Y000000XZ」が表示されます。
本体のリアパネル、またはシャーシ内側に表示されてい
るシリアルナンバーを入力します。
6)-1 MULTI JOG つまみを右に回します。
右に回すと文字が表示されます。文字はアルファ
ベット大文字、アルファベット小文字、数字、記
号の順番に並んでいますので、適切なものを選択
してください。
6)-2 MULTI JOG つまみを押して、選択した文字を確
定します。
カーソルが次の位置へ移動します。同様の操作を
繰り返してタイトルをつけてください。
入力した文字を修正するには
キーまたは
キー(リモコン
では
キーまたは
キー)を押してカーソル
を修正したい文字の位置に移動し、 CLEAR キーを押
してその文字を消してから、新規に文字を入力し、確定
してください。
7) COMPLETE キーを押します。
8)
「Complete」が表示されます。
これで書き込みは完了しました。
9)電源を切ります。
10)治具基板および治具ケーブル(2P)を取り外します。
11)外したケーブルを元通りに接続します。
ID確認
書き込んだIDを確認します。
1)電源を入れます。
2)
キーを押しながら MODE キーを押します。
3) MENU キーを押します。
4) MULTI JOG つまみを回して、「Sys Utility」を選びます。
MULTI JOG つまみを押します。
5) MULTI JOG つまみを回して、「Sys ID Check」を選び
ます。
MULTI JOG つまみを押します。
6)
「シリアルナンバー:リミットナンバー」が表示されます。
注)リミットナンバーは書き込み可能な残りの回数で
す。
表示されたシリアルナンバーが、本体リアパネルに表示
されたシリアルナンバーと一致することを確認します。
7) MULTI JOG つまみを回すとモデル名が表示されます。
モデル名が正しいことを確認します。
8)電源を切ります。
9)トップカバーを取り付けます。
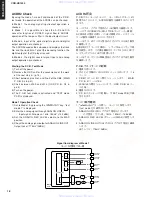
Operation Procedure
1) Turn on the power.
“Sys ID write” menu and “sys ID check” menu are
added automatically to “System Utility”.
2) Press the “MENU” key.
3) Turn the “MULTI JOG” knob to select “Sys Utility” and
then press the “MULTI JOG” knob.
4) Turn the “MULTI JOG” knob to select “Sys ID Write”
and then press the “MULTI JOG” knob.
5) Turn the “MULTI JOG” knob to select “CDR-HD1500”
depending on the model and then press the “MULTI
JOG” knob.
6) “Y000000XZ” is displayed. Input the serial number
indicated on the rear panel of the main unit or inside of
the chassis.
6)-1 Turn the “MULTI JOG” knob clockwise.
When the “MULTI JOG” knob is turned clockwise,
characters are displayed in the order of
alphabetical capital letters, alphabetical lower
case letters, numbers, and symbols. Select the
character you wish to use for the title.
6)-2 Press the “MULTI JOG” knob to confirm the
selected character.
The cursor moves to the next space. Repeat steps
1 and 2 until the title is complete.
Correcting the characters
Move the cursor to the character to be corrected by
pressing “
” or “
” key (“
” or
“
” key on the remote control). Press “CLEAR” key
to cancel the character before a new character is
entered. Then enter and confirm the new character.
7) Press the “COMPLETE” key.
8) “Complete” is displayed. This completes the writing
procedure.
9) Turn off the power.
10) Remove the jig P.C.B. and jig cables (2P).
11) Reconnect the disconnected cables as originally
Check the written ID.
1) Turn on the power.
2) While pressing the “
” key, press the “MODE” key.
3) Press the “MENU” key.
4) Turn the “MULTI JOG” knob to select “Sys Utility” and
then press the “MULTI JOG” knob.
5) Turn the “MULTI JOG” knob to select “Sys ID Check”
and then press the “MULTI JOG” knob.
6) “Serial number : Limit number” is displayed.
Note) The limit number means the remaining number
of write enable times.
Check that the displayed serial number matches
with the serial number displayed on the rear
panel of the main unit.
7) Turn the “MULTI JOG” knob, and the model name is
displayed. Check that the model name is correct.
8) Turn off the power.
9) Install the top cover.
www. xiaoyu163. com
QQ 376315150
9
9
2
8
9
4
2
9
8
TEL 13942296513
9
9
2
8
9
4
2
9
8
0
5
1
5
1
3
6
7
3
Q
Q
TEL 13942296513 QQ 376315150 892498299
TEL 13942296513 QQ 376315150 892498299


