CDR-HD1500
9
CDR-HD1500
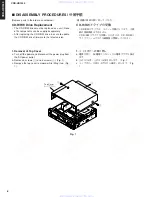
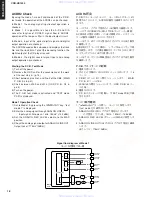
2. Removal of Sub Chassis Unit, Tray Guide Unit
and HDD Tray Unit
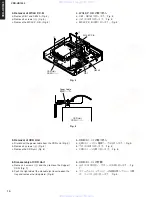
a. Loosen 2 screws (
3
) and open the HDD slot door. (Fig.
2)
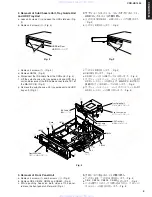
b. Remove 2 screws (
4
). (Fig. 3)
2. サブシャーシユニット、トレイガイドユニット、
HDDトレイユニットの取り外し
a.
3
のネジ2本をゆるめ、HDDスロットドアを開きます。
(Fig. 2)
b.
4
のネジ2本を外します。(Fig. 3)
3
HDD Slot Door
HDDスロットドア
Fig. 2
4
Fig. 3
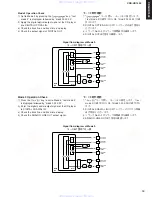
c. Remove 2 screws (
5
) . (Fig. 4)
d. Remove CB702. (Fig. 4)
e. Disconnect the IDE cable from the CDR unit. (Fig. 4)
f. Lift the sub chassis unit, tray guide unit and HDD tray
unit and disconnect the IDE cable connected to TE1 of
the MAIN P.C.B. (Fig. 4)
g. Remove the sub chassis unit, tray guide unit and HDD
tray unit. (Fig. 4)
c.
5
のネジ2本を外します。(Fig. 4)
d. CB702を外します。(Fig. 4)
e. CDRユニットからIDEケーブルを外します。(Fig. 4)
f. サブシャーシユニット、トレイガイドユニットおよび
HDDトレイユニットを持ち上げ、MAIN P.C.B.のTE1に
接続されているIDEケーブルを外します。(Fig. 4)
g. サブシャーシユニット、トレイガイドユニットおよび
HDDトレイユニットを取り外します。(Fig. 4)
Fig. 4
5
5
IDE Cable
IDEケーブル
IDE Cable
IDEケーブル
CB702
CB204
CB3
CB203
TE1
7
6
6
Hook
フック
Hook
フック
Sub Chassis Unit
サブシャーシユニット
HDD Tray Unit
HDDトレイユニット
Tray Guide Unit
トレイガイドユニット
3. Removal of Front Panel Unit
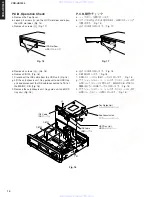
a. Remove 4 screws (
6
) and 4 screws (
7
). (Fig. 4)
b. Remove CB3, CB203, CB204 and CB550. (Fig. 4)
c. While pushing hooks on both sides of the panel,
remove the front panel unit forward. (Fig. 4)
3. フロントパネルユニットの取り外し
a.
6
のネジ4本、
7
のネジ4本を外します。(Fig. 4)
b. CB3、CB203、CB204、CB550を外します。(Fig. 4)
c. パネル両サイドのフックを押し込みながら、フロントパ
ネルユニットを前方に外します。(Fig. 4)
www. xiaoyu163. com
QQ 376315150
9
9
2
8
9
4
2
9
8
TEL 13942296513
9
9
2
8
9
4
2
9
8
0
5
1
5
1
3
6
7
3
Q
Q
TEL 13942296513 QQ 376315150 892498299
TEL 13942296513 QQ 376315150 892498299


