background image

14

Optional settings for

RDS functions

The tuner has the following functions which make use of
the RDS data service. These are originally in operation
ON. However, you can turn these functions OFF, if so
desired.

1

Select the FM band by pressing 

TUNER

.

2

Press 

DISPLAY

 to display the current time.

3

Press 

FREQ/RDS

.

4

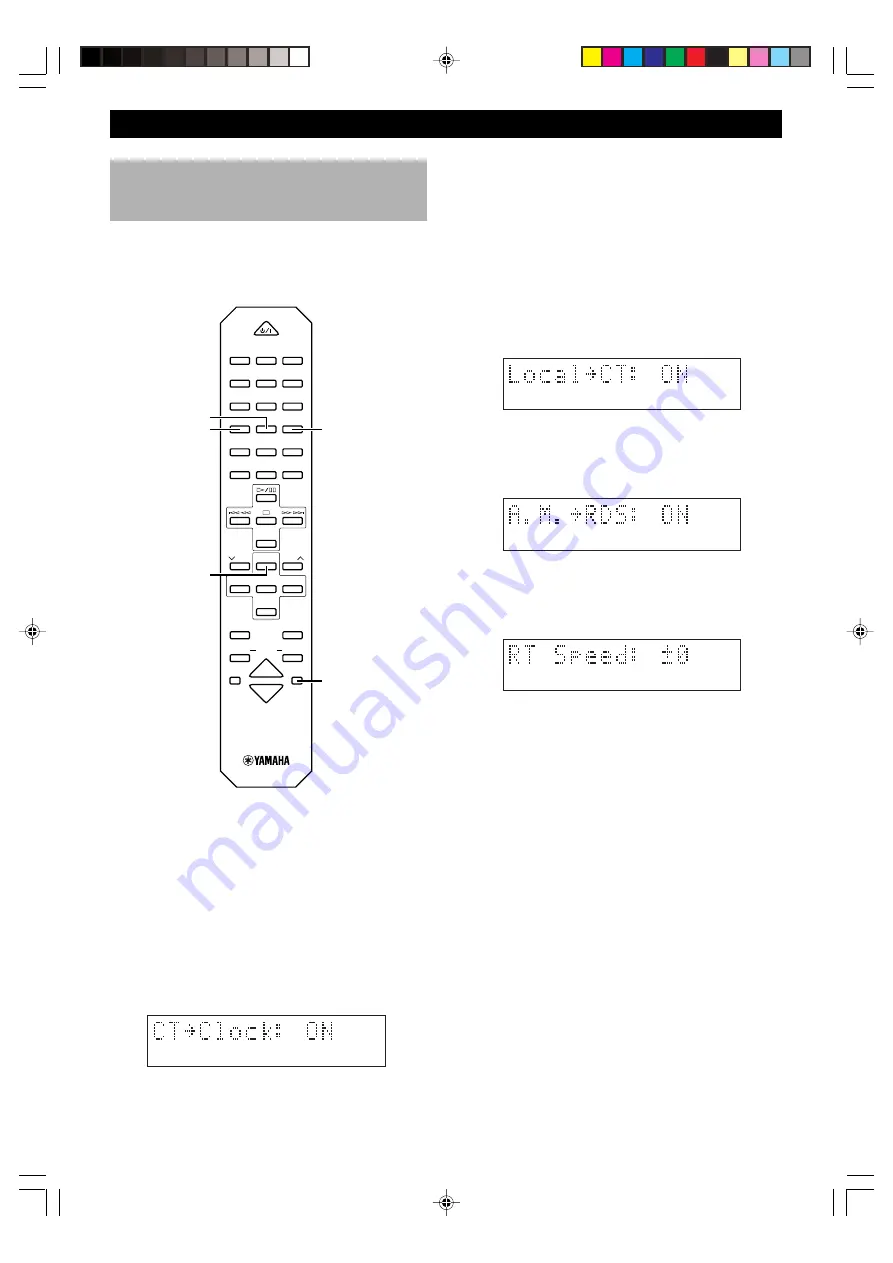
Each time you press 

PTY SEEK MODE

 the display

will change as follows:

1. CT 

=

 CLOCK (ON/OFF)

The tuner corrects the time of the built-in clock
automatically by synchronizing it with the CT
data on the RDS station being received.

• If you receive an RDS station of some other

country, the built-in clock is synchronized with
the time setting of the country.

• If the built-in clock is not yet set for the current

time or reset due to a power failure, etc., it will be
set for the time of the CT data automatically,
whether this setting is ON or OFF.

2. LOCAL 

=

 CT (ON/OFF)

If the RDS station being received employs the
local time (summer time, etc.) data service, its
time is displayed in the CT mode.

3. A.M. 

=

 RDS (ON/OFF)

RDS stations are searched instead of all FM
stations by the automatic preset tuning operation
when the setting is ON. (Refer to page 11.)

4. RT SPEED: ±0

Changes the scrolling speed of the radio text
decreasing the value and, in turn, reducing the
speed.

Control Range: ±0 to ±3 (Preset value: ±0)

5

Choose the function ON or OFF by pressing 

PTY

SEEK START

, confirming it in the display. Press

PTY SEEK START

 repeatedly to change the value

for RT SPEED.
• If there is no operation for about 20 seconds, this

mode is cancelled and turns into the frequency
display. If the station has PS data, it turns into the
PS mode.

6

Press 

FREQ/RDS 

again to restore the frequency

display mode.

PTY SEEK MODE

PTY SEEK START

FREQ/RDS

TUNER

POWER

1

2

3

1

2

3

4

5

6

4

5

6

7

8

9

7

8

0

+10

+100

FREQ/RDS MODE–PTY SEEK–START

REP

RANDOM

PROG

A

B

C

TEXT/TIME

R. TIME

D

E

TAPE

DIRECTION

     PRESET

TUNER

PRESET     

MD

CD

TAPE

AUX

MD

REC/PAUSE

TAPE

REC/PAUSE

MODE

SLEEP

DISPLAY

DUBBING

VOLUME

START

DISPLAY

RECEIVING RDS STATIONS

0107CRXE400(M).12-14.E

02.6.13, 7:16 PM

14

Summary of Contents for CDX-E400

Page 1: ...CEDEX02 FRANCE YAMAHA ELECTRONICS UK LTD YAMAHA HOUSE 200 RICKMANSWORTH ROAD WATFORD HERTS WD1 7JS ENGLAND YAMAHA SCANDINAVIA A B J A WETTERGRENS GATA 1 BOX 30053 400 43 V STRA FR LUNDA SWEDEN YAMAHA...

Page 2: ...e cabinet should never be opened for any reason 15 When not planning to use this unit for long periods of time i e vacation disconnect the AC power plug from the wall outlet 16 Be sure to read the Tro...

Page 3: ...g the speakers and antennas 4 Connecting the system 5 Setting the clock 6 Adjusting the brightness of the display 6 RX E400 NAMES OF BUTTONS AND CONTROLS Front panel 7 Display 7 Remote control 8 BASIC...

Page 4: ...reparably damage the disc s surface Do not expose discs to direct sunlight high temperature or high humidity for a long period of time because these might warp or otherwise damage the disc This compac...

Page 5: ...th clothing etc Clean the battery compartment thoroughly before installing new batteries Remote control operation range Notes There should be no large obstacles between the remote control and the main...

Page 6: ...t 3 Connect the FM Antenna 4 Connect the AC power cord to a wall outlet Notes Use external FM AM antennas if you need better reception Consult your dealer The AM loop antenna should be placed apart fr...

Page 7: ...external component to the AUX terminal of RX E400 4 Connect DIGITAL OPTICAL OUT of CDX E400 to DIGITAL OPTICAL IN of MDX E300 Take off the covers of the optical fiber cable plug the DIGITAL OPTICAL OU...

Page 8: ...wer cord is disconnected for more than five minutes you must reset the clock Adjusting the brightness of the display You can adjust the brightness of the display If you have connected the CD player CD...

Page 9: ...SET indicator P 11 4 STEREO indicator P 10 5 TUNED indicator P 10 6 AUTO indicator P 10 RX E400 NAMES OF BUTTONS AND CONTROLS 9 VOLUME P 9 0 PHONES P 9 q Remote control sensor P 3 w BASS P 9 e TREBLE...

Page 10: ...terminal P 5 e SLEEP P 16 r DISPLAY P 15 t VOLUME P 9 Note 8 w are operation buttons and input selectors for each component RX E400 NAMES OF BUTTONS AND CONTROLS POWER 1 2 3 1 2 3 4 5 6 4 5 6 7 8 9 7...

Page 11: ...requency response BALANCE Adjust the balance of the output volume from the left and right speakers to compensate for sound imbalance caused by the speaker location or listening room conditions When yo...

Page 12: ...he desired station try manual tuning as described next When an FM stereo broadcast with sufficient signal strength is received STEREO appears on the display and you can listen to stereo sound Listenin...

Page 13: ...input source by turning INPUT 2 Press MEMORY for about 2 seconds The unit starts presetting stations AUTO and MEMORY will flash on the display Received stations are stored to A1 A2 A8 sequentially Af...

Page 14: ...received is displayed You can make this unit search for a station which is broadcasting a program of a desired program type Refer to PTY program mode in the next section for details RT Information ab...

Page 15: ...rs on the display 5 Repeat step 4 until the desired station is located If there is no station broadcasting the program type you select NO PTY appears on the display then the Program Service name or fr...

Page 16: ...local time summer time etc data service its time is displayed in the CT mode 3 A M RDS ON OFF RDS stations are searched instead of all FM stations by the automatic preset tuning operation when the se...

Page 17: ...ANDBY ON to turn on this unit To cancel the timer play setting Press DISPLAY to show the current time then press TIMER so that TIMER goes off from the display You can also cancel by pressing TIMER in...

Page 18: ...me changes as follows About 4 seconds after setting the normal display will resume SLEEP will appear in the display 3 The unit will turn off automatically when the selected sleep time is reached SLEEP...

Page 19: ...op P 19 1 Multi information Display 2 Pause indicator 3 Play indicator 4 A B Tape side indicator P 25 5 Music calendar 5 Play Pause P 19 6 Display this page 7 Skip Search Backward Skip Search Forward...

Page 20: ...6 Play Pause P 19 7 Stop P 19 8 Skip Seach Backward P 19 9 Skip Seach Forward P 19 0 CD input P 19 POWER 1 2 3 1 2 3 4 5 6 4 5 6 7 8 9 7 8 0 10 100 FREQ RDS MODE PTY SEEK START REP RANDOM PROG A B C T...

Page 21: ...than the last track number on the disc These operations can also be performed when the unit is in the pause or stop mode During stop mode if or is pressed the track number successively changes to hig...

Page 22: ...rrent track Total remaining time on the disc will not be displayed during random sequence play Random sequence play The unit can play all the tracks in a random sequence RANDOM Selecting the time disp...

Page 23: ...gain 5 Press to start program play Program play By creating a program you can enjoy listening to your favourite tracks in any desired order As many as 30 tracks can be programmed in sequence PROG Repe...

Page 24: ...gram To change program data 1 Follow the preceding procedure described in To check program data 2 Display the track number to be changed by pressing 3 Press the numeric button of the desired track The...

Page 25: ...E KX E300 1 Play 2 Fast foward 3 Rewind 4 Stop 5 TAPE input 6 TAPE REC PAUSE POWER 1 2 3 1 2 3 4 5 6 4 5 6 7 8 9 7 8 0 10 100 FREQ RDS MODE PTY SEEK START REP RANDOM PROG A B C TEXT TIME R TIME D E TA...

Page 26: ...bbing setting There are six different combinations of components Once you choose a certain mode recording starts and ends automatically in a certain way for each mode DUBBING START DUBBING MODE 1 2 1...

Page 27: ...rding 2 Automatic tape programming 1 Repeat steps 1 and 2 of Manual tape programming 2 Press REP to start programming Programming is done in the order on the CD from side A to side B When complete the...

Page 28: ...ng stereo broadcasts Stereo broadcasts are noisy and STEREO indicator blinks on and off Cannot select preset stations Buzzing or static during AM broadcasts AM broadcast sensitivity is poor Cannot set...

Page 29: ...lace the batteries with new ones Use within 6 meters and 60 degree radius Change the position of the unit Relocate this unit away from the TV or cover the TV s remote control sensor The disc is damage...

Page 30: ...Australia model AC 240 V 50 Hz U K and Europe models AC 230 V 50 Hz General model AC 110 120 220 240 V 50 60 Hz Power consumption U S A and Canada models 110 W U K Europe Australia and General models...

Page 31: ...nicht in dieser Anleitung aufgef hrt sind kann zu einem Kontakt mit gef hrlichen Laserstrahlen f hren OBSERVERA Anv ndning av kontroller och justeringar eller genomf rande av procedurer andra n de so...

Page 32: ...CEDEX02 FRANCE YAMAHA ELECTRONICS UK LTD YAMAHA HOUSE 200 RICKMANSWORTH ROAD WATFORD HERTS WD1 7JS ENGLAND YAMAHA SCANDINAVIA A B J A WETTERGRENS GATA 1 BOX 30053 400 43 V STRA FR LUNDA SWEDEN YAMAHA...

Reviews: