CVP-205/CVP-205M
51
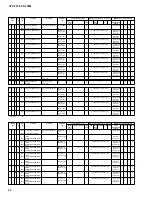
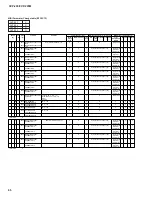
No.
LCD (initial)
Test Function and Judgment criteria
15
16
17
18
19
20
22
23
24
25
26
27
28
29
31
32
33
34
35
40
41
015: Pitch Check
016: Output R Check
017: Output L Check
018: EQ Low Check
019: EQ Mid Check
020: EQ High Check
022: D/A Noise Check
023: SW, LED Check
024: All Panel LED On Check
025: Red LED On Check
026: Green LED On Check
027: All Key LED On Check
028: All LCD On Check
029: All LCD Off Check
031: LCD Brightness Check
032: Soft Pedal Check
033: Sostenuto Pedal Check
034: Damper Pedal Check
035: Aux Pedal Check
040: MIDI Check
041: TO HOST Check
Pitch check: Connect the frequency counter to the [PHONES] jack (33 ohm load).
Outputs the sine wave at 440 +/-0.2 Hz. (PAN = Center)
Decline quantity check of the volume: Connect the level meter (with a JIS-C filter) to the [PHONES] jack.
Set the [MASTER VOLUME] at MIN and check the output level.
PHONES L, R: less than -80.0 dBm
Connect the level meter (with a JIS-C filter) to each terminal (PHONES, AUX OUT L/L+R, R, AUX OUT
(LEVEL FIXED) L, R).
Set the [MASTER VOLUME] at MAX and check the R channel output level. (1 kHz sine wave, PAN=R) (PHONES
L, R: 33 ohm load AUX OUT L/L+R, R: 10 kohm load AUX OUT (LEVEL FIXED) L, R: 10 kohm load)
PHONES L: less than -31.5 dBm
PHONES R: +8.5 dBm +/-2 dB
AUX OUT L/L+R: less than -38.0 dBm
AUX OUT R: +12.0 dBm +/-2 dB
AUX OUT (LEVEL FIXED) L: less than -39.5 dBm AUX OUT (LEVEL FIXED) R: +10.5 dBm +/-2 dB
Connect the level meter (with a JIS-C filter) to each terminal (PHONES, AUX OUT L/L+R, R, AUX OUT
(LEVEL FIXED) L, R).
Set the [MASTER VOLUME] at MAX and check the L channel output level. (1 kHz sine wave, PAN=L) (PHONES
L, R: 33 ohm load AUX OUT L/L+R, R: 10 kohm load AUX OUT (LEVEL FIXED) L, R: 10 kohm load)
PHONES L: +8.5 dBm +/-2 dB
PHONES R: less than -31.5 dBm
AUX OUT L/L+R: +12.0 dBm +/-2 dB
AUX OUT R: less than -38.0 dBm
AUX OUT (LEVEL FIXED) L: +10.5 dBm +/-2 dB AUX OUT (LEVEL FIXED) R: less than -39.5 dBm
Check the sine wave output of EQ-Low frequency at about 65.4 Hz (C1). (PAN=Center)
Check the sine wave output of EQ-Mid frequency at about 523 Hz (C4). (PAN=Center)
Check the sine wave output EQ-High frequency at about 4186 Hz (C7). (PAN=Center)
It is the item inspecting in the factory.
Check the switches on the panel and LED.
Press the switches on the LCD as instructed. A pre-assigned note is output when the switch is pressed. (See 53-
page table 1). When the switch with LED is pressed, that LED will light up. As the check result appears on the
LCD when all the switches are pressed as instructed. Check that OK is displayed. For the dial check, confirm
that the turning the data dial clockwise will increase the numerical value from 50 to 100 and turning it
counterclockwise will reduce it from 100 to 0.
Check that all panel LEDs are on. The 2-colors LED light up in orange.
Check that all red LEDs are on. The 2-colors LED light up in red.
Check that all green LEDs are on. The 2-colors LED light up in green.
Check that all key LEDs are on.
Check that all LCD dots are on.
Check that all LCD dots are off.
Press the [1] to [4] switches of [ONE TOUCH SETTING] in order. The brightness of the LCD grows lighter
every time a switch is pressed.
Check that the C3 note is output when pressing and releasing the soft pedal, and that the C4 note is output when
pressing it again.
Check that the C3 note is output when pressing and releasing the sostenuto pedal, and that the C4 note is output
when pressing it again.
Check that the C3 note is output when pressing and releasing the damper pedal, and that the C4 note is output
when pressing it again.
Connect the foot volume (FC-7) to the [AUX PEDAL 1] jack.
Check that the C3 note is output when fully pressing the pedal to the back (to maximum), and that the C4 note is
output when fully pressing the pedal to rhe front (to minimum).
After connecting the [MIDI IN] jack and [MIDI OUT] jack with a MIDI cable, execute the test. Set the [HOST
SELECT]switch to “MIDI”.
Check that the C4 note is output and that the LCD displays “MIDI Check OK”. If there is no input after one
second since signal output, it is judged NG.
Connect pin 3 to pin 5 and pin 6 to pin 8 of the [TO HOST] terminal, and execute the test.
Check that the following note sounds when changing the [HOST SELECT] switch position according to the
LCD indication; the LCD will display “TO HOST Check OK”. (PC1: note C3; PC2: note C4; MAC: note C5) If
there is no input after one second since signal output, it is judged NG.
Summary of Contents for Clavinova CVP-103M
Page 34: ...CVP 205 CVP 205M 34 DM Circuit Board 2NA V716590 2 2 Pattern side ...
Page 37: ...B B PNR Circuit Board CVP 205 CVP 205M 37 2NA V713520 2 1 ...
Page 38: ...ENC Circuit Board B B CVP 205 CVP 205M 38 Pattern side Pattern side 1 PNR ENC 2NA V713520 2 ...
Page 43: ...to DM CN10 SWX Circuit Board CVP 205 CVP 205M 43 2NA V716050 1 Pattern side Component side ...
Page 100: ...CVP 205 CVP 205M 24 SIDE BOARD ASSEMBLY Top view Side view 1 9 8 6 6a 6b 11 7 7 4 2 3 5 ...


