background image


DM2000/02R96/DM1000 Version2 System Software Installation Guide


4


Installation Procedure


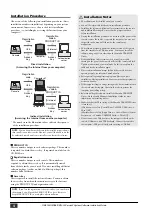
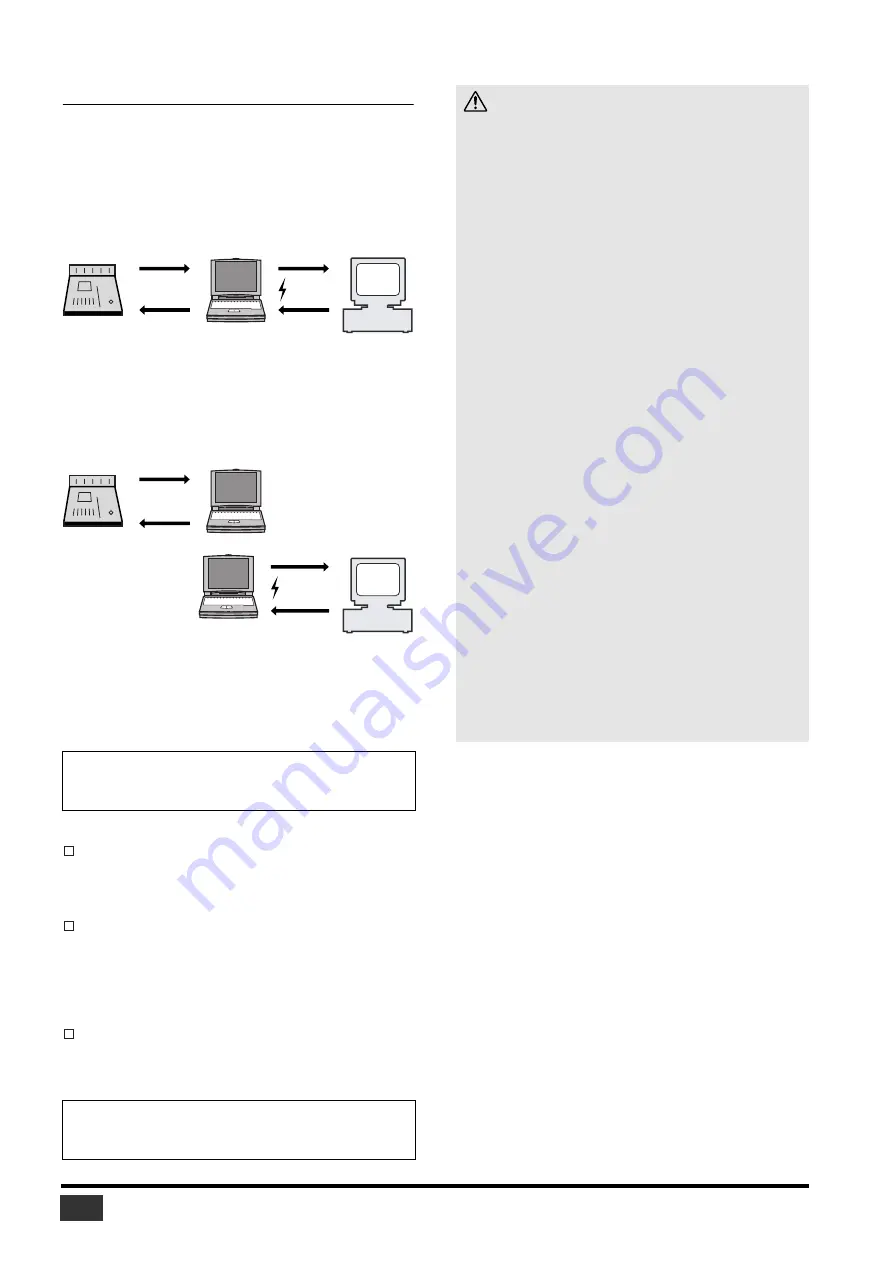
Choose one of the following two installation procedures (direct 
installation or indirect installation) depending on your system 
environment. In most cases, choose the direct installation 
procedure (i.e., installing by accessing the Internet from your 
computer).

* The numbers in the illustrations above indicate the sequence 

of the installation procedure.


PRODUCT ID


This is a number unique to each software package. This number 
is required to obtain the access key. It is printed on a label on the 
CD-ROM case.


Registration code


This is a number unique to each console. This number is 
required to obtain the access key. It is automatically created 
from the data inside your console. If you are installing a different 
software package (such as an Add-On Effects package), this 
number will be different.


Access key


This is required to install the system software. You must obtain 
the access key from the authentication server via the Internet 
using the PRODUCT ID and registration code.


NOTE: 


You can de-authorize the license of the installed system software, 

then install it on another console. However, you will be unable to use the 
de-authorized console until you re-install or re-authorize the software.


NOTE: 


If you lose the registration code or access key, you can obtain 

them again. You will need the PRODUCT ID to do so. Be sure to 
keep the PRODUCT ID in a safe place after installation.

1

2

4

3

Registration 

code

Console

Registration 

code & 

PRODUCT ID

USB

Internet

Access 

key

Computer

Access 

key

Authentication

server

Direct installation

(Accessing the Internet from your computer)

1

2

4

3

Registration 

code

Console

Registration 

code & 

PRODUCT ID

USB

Internet

Access 

key

Computer #2

Access 

key

Authentication

server

Indirect installation

(Accessing the Internet from another computer)

Computer #1


Installation Notes


The software can be installed on only one console.


You will be responsible for the entire installation procedure.


Installing the software will erase all user memories in the console 
and initialize all settings. Be sure to back up important data 
before installation.


During the installation procedure, do not turn off the power to the 
console, remove the cables, or operate the computer in a way not 
instructed in this manual. Otherwise, the console may 
malfunction.


This software program updates the system version of the console 
from the computer via USB connection. You cannot install the 
software using any driver other than the Yamaha USB-MIDI 
Driver.


If the installation fails for reasons such as a defective cable, 
turning on the power to the console will start the console in Flash 
Update mode, instead of normal mode. In this case, replace the 
cable and try the installation again.


If a second installation attempt fails and the console does not 
operate properly, consult your Yamaha dealer.


Exit or quit all open application programs before you start 
installation. During installation, do not execute other programs or 
activate a window.


If the computer sleeps in energy saving mode, data transmission to 
the console may be stopped. Cancel such modes to prevent the 
computer from falling asleep.


Before installing the software, install the Yamaha USB-MIDI 
Driver. See the Studio Manager Installation Guide for more 
information on installing drivers.


Make sure that the Thru setting of the Yamaha USB-MIDI Driver 
is turned off. 
(Windows users: Select [Control Panel 


 MIDI-USB Driver 


Thru OFF].)
(Macintosh users: Select [Apple Menu 


 Control Panels (System 

Preferences) 


 Yamaha USB MIDI Patch 


 Thru Off].)


Do not connect any USB devices to the computer other than the 
console, USB mouse, and USB keyboard. Connect the console to 
the computer’s USB port directly without using a USB hub.

Summary of Contents for DM2000V2K

Page 1: ...erfügung Bitte lesen Sie sich diese Installationsanleitung vollständig durch um die Funktionen des DM2000V2K 02R96V2K DM1000V2K auch wirklich nutzen zu können Merci d avoir opté pour le PROGRAMME UPDATE DM2000V2K 02R96V2K DM1000V2K de Yamaha Le DM2000V2K 02R96V2K DM1000V2K est un ensemble logiciel de mise à jour du système d exploitation de la DM2000 02R96 DM1000 Cette mise à jour étend en outre l...

Page 2: ... registered trademarks of their respective companies OMS is a trademark of Opcode Systems Inc SmartMedia is a trademark of Toshiba Corporation Yamaha Professional Audio web site http www yamahaproaudio com Contents About the Package 2 Package Contents 2 Contents of the CD ROMs 2 Contents of Manuals 2 Installing System Software 3 System Requirements 3 Contents of the Firmware CD ROM 3 Installation ...

Page 3: ...ide for information on system requirements for Studio Manager OS Windows 98SE Me 2000 XP Home Edition XP Professional Computer PC that features a USB port and an Intel Pentium or Celeron family processor of 433 MHz or higher Memory 128 MB or more Hard disk Available space of 10 MB or more Display 1024 x 768 pixels 256 colors or more High Color 16 bit or more recommended Other requirements Access t...

Page 4: ...ntication server Indirect installation Accessing the Internet from another computer Computer 1 Installation Notes The software can be installed on only one console You will be responsible for the entire installation procedure Installing the software will erase all user memories in the console and initialize all settings Be sure to back up important data before installation During the installation ...

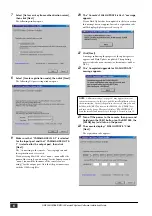
Page 5: ...the console turn on the power of the console Continue holding down the key until the display blinks FLASH UPDATE DM2000 Transport REC key 02R96 MACHINE CONTROL REC key DM1000 MONITOR CLEAR key 3 Insert the included CD ROM Firmware into the CD ROM drive 4 Locate the Upgrade folder on the CD ROM Mac OS 9 Upgrade for Mac OS 9 Mac OS X Upgrade for Mac OS X then copy the folder onto the hard disk Do no...

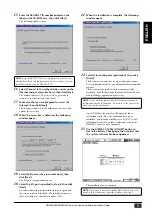
Page 6: ...ars If your Flash Update has been updated to the latest version this message does not appear Instead a registration code will be displayed please proceed to step 14 11 Click Next A message indicating the progress of the update process appears and Flash Update is updated The updating process takes about one minute or five minutes on Mac OS X 12 The Completed upgrade for FLASH UPDATE message appears...

Page 7: ...nline user registration then click Finish The browser starts and the user registration page opens User registration entitles you to additional information and support The user memories in the console are automatically initialized Load the data from the SmartMedia disk or the Studio Manager application if necessary On the DM1000 the console will display the fader calibration screen Since the calibr...

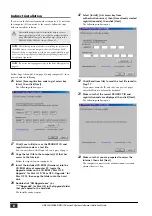
Page 8: ...ard disk The installer window opens 21 Select Install Get access key from authentication server then Have already created registration code then click Next The following window opens 22 Click Read from file to read the text file saved in Step 17 If you wrote down the ID and code on a piece of paper enter the ID and code from the keyboard 23 Make sure that the correct PRODUCT ID and registration co...

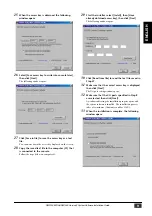
Page 9: ...ole Follow the steps below on computer 1 29 Start the installer select Install then Have already obtained access key then click Next The following window opens 30 Click Read from file to read the text file saved in Step 27 31 Make sure that the correct access key is displayed then click Next The I O port setting window opens 32 Make sure that the I O ports specified in Step 8 are selected then cli...

Page 10: ... to place it in Flash Update mode If you are using the DM2000 make sure that the Flash Update in the console has been updated to the latest version If the error persists turn off and on the power to the console and restart the installer This version has already been installed No need to install To cancel installation click Do not install To install and overwrite the current software click Reinstal...

Page 11: ...installation or authorization is complete you can use the system software Q The computer does not communicate with the console A The installer does not function with any driver other than the Yamaha USB MIDI Driver First install Yamaha USB MIDI Driver and connect the computer and the console using a USB cable A Mac OS 9 users must install and set up OMS Also make sure that you have specified the c...

Page 12: ...e SOFTWARE with other computers You may transfer ownership of the SOFTWARE and the accompanying written materials on a permanent basis provided that you retain no copies and the recipient agrees to the terms of the licensing agreement 3 TERMINATION The licensing condition of the software program becomes effective on the day that you receive the SOFTWARE If any one of the copyright laws or clauses ...

Page 13: ...88 SWEDEN Yamaha Scandinavia AB J A Wettergrens Gata 1 Box 30053 S 400 43 Göteborg Sweden Tel 031 89 34 00 DENMARK YS Copenhagen Liaison Office Generatorvej 6A DK 2730 Herlev Denmark Tel 44 92 49 00 NORWAY Norsk filial av Yamaha Scandinavia AB Grini Næringspark 1 N 1345 Østerås Norway Tel 67 16 77 70 OTHER EUROPEAN COUNTRIES Yamaha Music Central Europe GmbH Siemensstraße 22 34 25462 Rellingen Germ...

Reviews: