background image

DME Designer Installation Guide  

9

English

Windows 2000

1

Select [Start] 

 [Settings] 

 [Control Panel] 

 [Network 

and Dial-Up Connections] 

 [Local Area Connection].

The “Local Area Connection Status” dialog box will be 
displayed.

2

Click [Properties] on the [General] tab.

The “Local Area Connection Properties” dialog box will 
be displayed.

3

Click [Internet Protocol (TCP/IP)] on the [General] tab, 
then click [Properties].

The “Internet Protocol (TCP/IP) Properties” dialog box will 
be displayed.

4

Click [Advanced…], then [Properties] on the [Options] 
tab. 

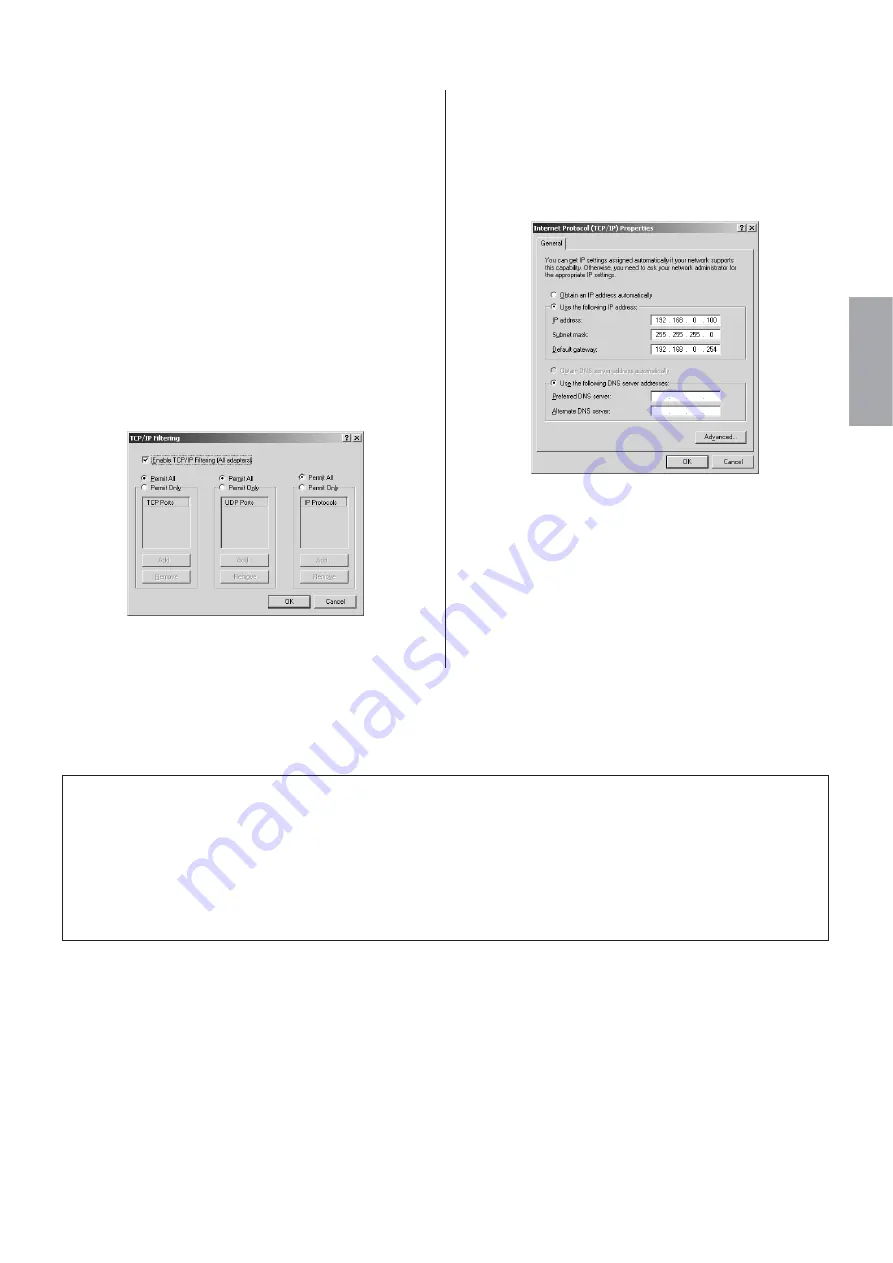
The “TCP/IP Filtering” dialog will be displayed.

5

Select “Permit All” for TCP Ports, then click [OK].

The display returns to the “Advanced TCP/IP Settings” 
dialog. Click [OK] to return to the “Internet Protocol (TCP/
IP) Properties” dialog.

6

Click [Use the following IP address] on the [General] tab.

7

Enter your computer’s IP address into [IP address], the 
Gateway's IP address into [Default gateway], and 
“255.255.255.0” into [Subnet mask].

n

When installing on the same subnet as the DME unit(s), set 
the  gateway's host address to 254.


8

Click [OK]. 

9

Restart your computer. 

Set the computer’s IP address so that it does not conflict with (i.e. is not a duplicate of) DME units with host 
addresses in the 1 ~ 153 range.
Set the subnet mask to “255.255.255.0”.
The default gateway does not need to be set if you will not be connecting to an external network. If you will be 
connecting to an external network set the host address to 254.
Use TCP-IP filtering to enable all TCP ports.
When using Windows XP SP2, disable the Internet connection firewall. 

n

Set DME and SP2060 device group master/slave status and IP addresses via the DME64N/24N or SP2060 front panel. DME8i-C/
DME8o-C/DME4io-C units can be set from the DME Designer application. Refer to the appropriate owner’s manuals for details.

Summary of Contents for DME Designer

Page 1: ...arat bekanntgegeben Le logiciel et ce mode d emploi sont sous copyright exclusif de Yamaha Corporation L usage de ce logiciel et de ce manuel est régi par le contrat de licence auquel l acheteur déclare souscrire sans réserve lorsqu il ouvre l emballage scellé du logiciel Veuillez donc lire attentivement l accord de licence du logiciel situé à la fin de ce manuel avant d installer le logiciel Tout...

Page 2: ...however this does not include the DME32 CD ROM Installation Procedure CD ROM Contents Folder Content Description Relevant pages USBdrv2k_ YAMAHA USB MIDI Driver Enables your computer to communicate with the DME when your computer and the DME are connected using a USB cable 3 Networkdrv_ YAMAHA DME N Network Driver Enables your computer to communicate with the DME when your computer and the DME are...

Page 3: ... the installation is complete the system displays Completing the Found New Hardware Wizard Click Finish n Some computers may take about ten seconds to show this screen after installation is complete 8 Restart the computer The driver has been installed Windows XP 1 Start the computer 2 Select Start Control Panel If the control panel shows Pick a category click Switch to Classic View in the upper le...

Page 4: ... selecting the appropriate MIDI IN port of the computer application to correspond to the port number of the USB MIDI signal received by the computer MIDI THRU setting For selecting the port number of the USB MIDI input output signals passing through the computer Thru ON OFF Switches MIDI THRU on off Send All Note OFF Transmits All Note OFF signal to all MIDI OUT ports Send All Note ON Transmits Al...

Page 5: ...dow appears 2 Click Change Remove for the YAMAHA DME N Network Driver Follow the onscreen instructions to uninstall the driver n The button names or menus may differ depending on the computer OS n If you attempt to reinstall the software after uninstalling it without first restarting your computer the following message will appear and the install process will be aborted Restart your computer then ...

Page 6: ...tton will be grayed out and inaccessible immediately after an undo operation or after the control panel is launched 2 Device Information When a device that is registered for communication with the YAMAHA DME N Network Driver is selected in the Target Device List the communication parameters for that device can be viewed and edited in the Device Information fields Device Name This is the name of th...

Page 7: ...d device list 6 to be updated accordingly This button is grayed out and is not accessible during automatic detection 5 Abort Button Aborts automatic detection This button is grayed out when automatic detection is not in progress 6 Detected Device List This list shows all detected devices that are capable of communication with the YAMAHA DME N Network Driver No devices will be displayed initially A...

Page 8: ...perties The Internet Protocol TCP IP Properties dialog box will be displayed 6 Click Advanced then Properties on the Options tab The TCP IP Filtering dialog will be displayed 7 Select Permit All for TCP Ports then click OK The display returns to the Advanced TCP IP Settings dialog Click OK to return to the Internet Protocol TCP IP Properties dialog 8 Click Use the following IP address on the Gener...

Page 9: ... General tab 7 Enter your computer s IP address into IP address the Gateway s IP address into Default gateway and 255 255 255 0 into Subnet mask n When installing on the same subnet as the DME unit s set the gateway s host address to 254 8 Click OK 9 Restart your computer Set the computer s IP address so that it does not conflict with i e is not a duplicate of DME units with host addresses in the ...

Page 10: ...lled to your computer If you do not have Adobe Acrobat Reader you can download it for free from the Adobe website below http www adobe com Uninstalling Method 1 1 Select Start All Programs YAMAHA OPT Tools DME Designer Setup The YAMAHA DME Designer dialog box appears 2 Select Remove in YAMAHA DME Designer dialog box and click Next The dialog box for confirmation appears 3 Click Yes DME Designer is...

Page 11: ...AHA USB OUT 0 1 cannot be used Have you selected the same USB ports in both the DME Designer and another relevant MIDI application Change the setting of the USB port so that both the DME Designer and the other MIDI application match Are you using the latest YAMAHA USB MIDI driver The latest driver can be downloaded from the Yamaha website address given at the end of this manual Have you selected U...

Page 12: ...ned to Yamaha or an authorized Yamaha dealer within fourteen days with a copy of the receipt Yamaha is not responsible for replacing media damaged by accident abuse or misapplication TO THE FULLEST EXTENT PERMITTED BY LAW YAMAHA EXPRESSLY DISCLAIMS ANY IMPLIED WARRANTIES ON THE TANGIBLE MEDIA INCLUDING THE IMPLIED WARRANTIES OF MERCHANTABILITY AND FITNESS FOR A PARTICULAR PURPOSE 5 DISCLAIMER OF W...

Page 13: ...n Japan Yamaha Manual Library http www yamaha co jp manual This document is printed on chlorine free ECF paper with soy ink Auf Umweltpapier mit Sojatinte gedruckt Ce document a été imprimé sur du papier non blanchi au chlore avec de l encre d huile de soja Este documento se ha impreso en papel sin cloro alguno con tinta de soja ...

Reviews: