background image

65

DTX-PRO Owner’s Manual

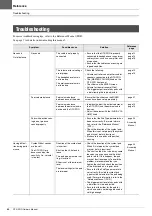
Troubleshooting

Reference

Having difficul-
ties during perfo-
mance

Sound is produced with-
out striking the pad

Sound is produced by a 
pad that was not struck
(Crosstalk is occurring)

For more information, refer to the “Refer-
ence Manual” (PDF).

Reference 

Manual 

(PDF)

Cannot choke

Cannot mute

Check the direction of the cymbal pad. 
When the direction of the pad is improper, 
the cymbal pad may not function fully.

page 24

Assembly 

Manual

Foot closed hi-hat 
sounds cannot be played

It is difficult to produce 
closed hi-hat sounds

• Make sure that you are fully and firmly 

operating the hi-hat controller.

• Ensure that the foot controller is cor-

rectly connected to the [CONTROL] 
jack.

Assembly 

Manual

Pads with position sens-
ing do not produce 
sounds properly

• Ensure that the Pad Type parameter has 

been set correctly. (For more informa-
tion, refer to the “Reference Manual” 
(PDF).)

• Check the direction of the cymbal pad. 

When this is not set properly, the cymbal 
pad may not be fully functional.

• Make sure to use pads with position 

sensing.

page 24

Assembly 

Manual

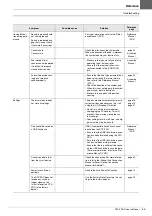
Settings

The drum module does 
not store its settings

The drum module automatically stores its 
system settings whenever you turn it off 
using the [

] (Standby/On) button.

• Do not turn off the drum module by 

unplugging the AC adaptor. This will 
prevent it from storing storing the sys-
tem settings.

• User settings for kits, click sets, and trig-

gers must be stored manually.

page 18
page 15
page 37

Data cannot be saved on 
a USB flash drive

USB 1.1 compatible flash drives cannot 
be used on the DTX-PRO.

• Ensure that the USB flash drive in ques-

tion has been formatted using the DTX-
PRO.

• Ensure that the USB flash drive in ques-

tion has not been write-protected.

• Ensure that there is sufficient free space 

on the USB flash drive to save the data. 
(For more information, refer to the “Ref-
erence Manual” (PDF).)

Reference 

Manual 

(PDF)

Cannot send data to or 
from the smart device

Check the connection. For more informa-
tion, refer to the iPhone/iPad Connection 
Manual or Smart Device Connection 
Manual for Android™.

page 60

Power turns off unex-
pectedly

Disable the Auto Power-Off function.

page 19

The DTX-PRO does not 
receive any switch or 
trigger signals at all
I want to reset the DTX-
PRO to the factory 
default

Use the Factory Reset to restore the set-
tings to the factory defaults.

page 20

Symptom

Possible cause

Solution

Reference 

page

Summary of Contents for DTX-PRO

Page 1: ...Owner s Manual Drum Trigger Module EN Contents Specifications page 9 page 66 Features of the DTX PRO page 8...

Page 2: ...ollowing Battery Notice This product MAY contain a small non rechargeable battery which if applicable is soldered in place The average life span of this type of battery is approximately five years Whe...

Page 3: ...d in the users manual may cause interference harmful to the operation of other electronic devices Compliance with FCC regulations does not guarantee that interference will not occur in all installatio...

Page 4: ...lug has two blades and a third grounding prong The wide blade or the third prong are provided for your safety If the provided plug does not fit into your outlet consult an electrician for replacement...

Page 5: ...licable collection points in accordance with your national legislation By disposing of these products correctly you will help to save valuable resources and prevent any potential negative effects on h...

Page 6: ...ng the wrong adaptor can result in damage to the instrument or overheating Check the electric plug periodically and remove any dirt or dust which may have accumulated on it This instrument contains no...

Page 7: ...the wing bolts included with the module holder Failure to do so could cause damage to the internal components or result in the instrument falling over Take care when setting up cables If anyone were...

Page 8: ...s Copying of the commercially available musical data including but not limited to MIDI data and or audio data is strictly prohibited except for your personal use This product incorporates and bundles...

Page 9: ...5 DTX PRO Owner s Manual MEMO...

Page 10: ...ual be sure to store it in a safe place so that you can refer back to it again as needed Included Accessories Owner s Manual this book AC adaptor Module holder Module holder wing bolts 4 Cubase AI Dow...

Page 11: ...ther reference materials Reference Manual The Reference Manual provides a description of all of the functions that can be accessed by pressing the MENU but ton Data List This provides lists of Kit and...

Page 12: ...next level page 45 Wide variety of training songs and drum phrases supervised by Yamaha drums master trainers will broaden your range of expression page 45 You can record or playback your songs using...

Page 13: ...Settings 19 Using a USB Flash Drive 21 Basic Guide 23 Structure of the Kit 23 Playing the Pads 24 Basic Operation of the DTX PRO 29 Changing the Drum Set Sound Building Your Own Drum Set 35 Using the...

Page 14: ...nob COMP knob EFFECT knob Increases or decrease the value s The knob is useful for changing multiple values while the buttons are useful for changing the value in steps In this manual the knob the but...

Page 15: ...dby On switch page 17 Switches the power between standby off and on Click Tempo Display TEMPO knob page 39 Adjusts the tempo START STOP Click Start Stop button Starts or stops the click metronome The...

Page 16: ...output jack is a standard stereo phone plug 6 3 mm Use a 3 5 mm stereo mini to 6 3 mm stereo adaptor to connect headphones or ear phones with a stereo mini plug 3 5 mm to the jack CAUTION Do not use h...

Page 17: ...erminal page 61 Connect a computer or smart device such as a smart phone or a tablet to send and receive digital signals audio and MIDI Additional parts are required for connecting a smart device For...

Page 18: ...ion refer to the Assembly Manual User the included module holder page 6 to attach the standard drum hardware See Integrating Electronic Acoustic Drums on page 59 Place on a flat surface After installi...

Page 19: ...otice any abnormalities during operation turn the power off immedi ately and unplug the AC adaptor WARNING For AC adaptors with a removable plug only use the AC adaptor with the plug attached and keep...

Page 20: ...C adaptor cord and create a fire hazard Ensure therefore that the power cord is not bent at an extreme angle when wrapped around the hook CAUTION Even when the Standby On switch is in standby status p...

Page 21: ...Setup page will be displayed On this page you will be required to specify the following When you specify the model number the DTX PRO will automatically optimize the trigger output levels for all of...

Page 22: ...er the volume to its minimum 3 Hold down the Standby On switch The DTX PRO is in Standby and the display and lights are off NOTICE The DTX PRO automatically stores settings when the power is turned of...

Page 23: ...hen the DTX PRO is turned off with the Auto Power Off function Always store data before turning the power off In certain modes of operation the Auto Power Off function will not turn off the DTX PRO wh...

Page 24: ...irst make sure that the DTX PRO is turned off Then while holding down the and buttons press the Standby On button to perform the Factory Reset function NOTICE A factory reset overwrites any settings y...

Page 25: ...be used on the DTX PRO the amount of time for saving to or loading from the USB device may differ depending on the type of data or the status of the instrument Using a USB Flash Drive NOTE For more i...

Page 26: ...e refer to the Reference Manual PDF MENU File Format To Protect Your Data Write Protection To prevent important data from being inadvertently erased write protect the USB flash drive When you are savi...

Page 27: ...and you can change the drum set sounds by selecting another kit or by changing the sound modifier settings Each drum or percussion instrument in the drum set is called an instrument or Inst and you c...

Page 28: ...Playing the Pads Pad Type Multi Piezo Single Piezo Number of Zones 2 1 2 3 Produces two differ ent sounds one for each zone Produces the same sound regardless of where the pad is struck Also called t...

Page 29: ...sound changes depending on how far from the rim you strike Open rim shorts Strike the head and the rim at once to produces a rim shot sound Multi piezo pads with position sensing You can use normal ri...

Page 30: ...by striking the hi hat pad with the hi hat con troller s pedal fully pressed Different hi hat sound is produced depending on the how much the pedal is opened or pressed Bow shots Striking the main su...

Page 31: ...s a bow shot sound With the ride cymbal strike the front side of the bow section near the Yamaha logo you can create natural tonal changes according to the location within the Zone 2 3 Edge shots Stri...

Page 32: ...same sound 4 With the crash cymbal pad included in the DTX6K X kit grasp the sensor area of the cymbal pad for choking and muting Muting Striking the pad while holding the front side of the outer edg...

Page 33: ...NOTE If you ve inadvertently selected another Kit before storing the Kit being edited you can use the recall function to recall the edited contents For more information refer to the Reference Manual...

Page 34: ...elow MIX FX F3 For more information see Changing the Effect Type and Amount of Effect to Apply page 32 AMBIENCE knob Adjusts the amount of ambience or the reflective sounds of the virtual room COMP kn...

Page 35: ...pad Zone press the MENU button to change the Voice volume settings For more information refer to the Reference Manual PDF 2 Use the buttons below or F1 or F2 to select the desired pad 3 Use the contro...

Page 36: ...you control with the EFFECT knob Master Effect effect applied to the overall sound Effect 1 and Effect 2 effects whose amounts can be set independently for each Inst are available 1 Press the button b...

Page 37: ...lers to select the effect type For Effect 1 and Effect 2 Set the amount of effect to apply to each Inst q Strike the pad whose instrument effect you wish to change The pad name appears on the upper ri...

Page 38: ...cts being applied to the sound To set Effect 1 and Effect 2 you can use the graphic overview for adjusting the setting of each pad 1 Press the button below F2 Setting screen appears 2 Strike a pad or...

Page 39: ...detailed changes to the settings press the MENU button For more information refer to the Ref erence Manual PDF MENU Kit Edit Inst or MENU Kit Edit Voice 1 Use the button below INST F1 Inst Selection...

Page 40: ...ing the parameter value to Kick1 Kick2 Snare1 Snare2 Tom1 Tom2 Tuning Determines the tuning pitch Muffling Simulates the effect of changing the degree of muffling or how much the drum head is muted Cy...

Page 41: ...e Using a USB Flash Drive page 21 Saving a Customized Kit under a New Name 1 Press the STORE button The KIT STORE screen appears 2 Press the button below NAME F2 to open the NAME screen 3 Use the butt...

Page 42: ...ation is complete the display returns to the Kit screen NOTE You cannot save an edited Kit to a Preset Kit NOTICE When overwriting a Kit the current Kit settings are replaced with the new settings Bef...

Page 43: ...ress the START STOP button to start the Click Click sounds are played at the tempo shown in the Click Tempo display The lamp next to the START STOP button flashes in sync with the tempo while the Clic...

Page 44: ...Individual Click Timing 2 Press the button below VOLUME F2 3 8 6 8 9 8 12 8 15 8 beats only have settings for Acc dot ted quarter eighth and sixteenth notes Press the button below F3 to switch betwee...

Page 45: ...tomized Click Setting under a New Name The Click settings you have customized can be saved in the same way as saving a kit See Saving a Customized Kit under a New Name page 37 Using Saved Click Settin...

Page 46: ...you finish playing press the button below F1 to stop recording Playing Back NOTE This is not displayed when there is no recorded song 2 Press the button F2 to start playback While playing back the el...

Page 47: ...1 to stop recording The RECORDER SAVE screen appears 6 Press the button below SAVE F3 and save the file Press the button below CANCEL F2 if you do not want to save the file NOTE If you want to change...

Page 48: ...he root directory on a USB flash drive Recording Yourself Playing Along with the Accompaniment Song 1 Use the controllers to select the accompaniment you have prepared 2 Press the button below F1 and...

Page 49: ...the Training Feature Learning to Play Various Songs 1 TRAINING SONG Play along with various music categories and phrases 2 PART MUTE Practice phrases with one instrument or one part at a time 3 SONG P...

Page 50: ...n the duration of the training timer setting or the difficulty level press the button below SETTING F3 For more information refer to the Reference Manual PDF 3 Press the button below START F1 or STAND...

Page 51: ...To restart the training press the button below RETRY F1 and to end the training press the button below OK F3 Training results are not shown at the end of TRAINING SONG and PART MUTE With MEASURE BREA...

Page 52: ...aining Types 1 TRAINING SONG You can play along various music categories and phrases What you can do during training 1 Use the controllers to select a train ing song 2 Play the drums along with the tr...

Page 53: ...snare part of the training song or for tightening up your rhythm section skills by practicing only with a bass guitar sound Keep in mind that this exercise is not scored What you can do during traini...

Page 54: ...ises before trying Song Part Gate Then try Song Score Gate page 51 to play through all sections of the training song The score PDF is available at the Yamaha website https download yamaha com After ac...

Page 55: ...50 before working on Song Score Gate The score PDF is available at the Yamaha website https download yamaha com After accessing the Support website and clicking on Manual Library enter the appropriat...

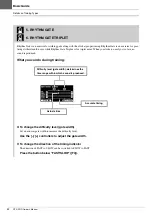
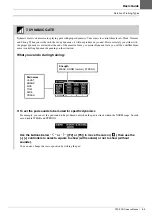
Page 56: ...hen you strike too early or too late no sound is produced What you can do during training To change the difficulty level gate width Set a narrower gate width to increase the difficulty level Use the c...

Page 57: ...you will be a skillful drum mer at controlling dynamics depending on the situation What you can do during training To set the pad sounds to be muted for specific dynamics For example you can set the p...

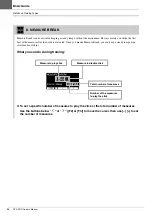
Page 58: ...ak is evaluated Once you master Measure Break you can keep a steady tempo even after breaks or fill ins What you can do during training To set a specific number of measures to play the click or the to...

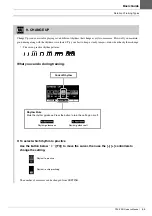
Page 59: ...ady tempo even when the rhythms change The seven practice rhythm patterns What you can do during training To select which rhythm to practice Use the button below F3 to move the cursor then use the con...

Page 60: ...drumming Strike the pads as many times as possible within a time limit Strike the pads as many times as possible within the time limit The timer starts counting when you start striking the pads The re...

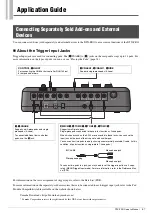
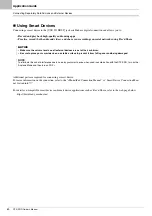
Page 61: ...out prior notice Connecting Separately Sold Add ons and External Devices CONTROL 1HI HAT For connecting the HH65 hi hat controller RHH135 real hi hat pad and others 0CRASH2 oCRASH1 iRIDE Supports sing...

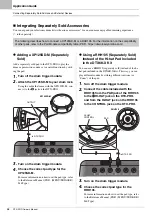
Page 62: ...F MENU TRIGGER Pad Type Using a RHH135 Separately Sold Instead of the Hi hat Pad Included in the DTX6K X Kit You can use a RHH135 separately sold instead of the hi hat pad included in the DTX6K X Kit...

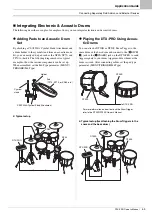
Page 63: ...set up When assembled set the Pad Type parameter MENU TRIGGER Pad Type Typical setup Playing the DTX PRO Using Acous tic Drums You can attach a DT50K or DT50S Drum Trigger to the snare drum or the bas...

Page 64: ...For more information on the connection refer to the iPhone iPad Connection Manual or Smart Device Connection Man ual for Android For details on compatible smart devices and smart device applications...

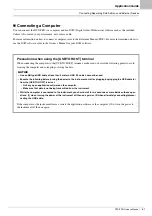
Page 65: ...owing points to avoid freezing the computer and corrupting or losing the data If the computer or the instrument freezes restart the application software or the computer OS or turn the power to the ins...

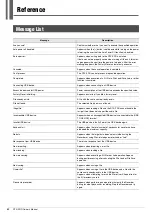
Page 66: ...found The selected file type was not found Illegal file Appears when loading a file and the DTX PRO cannot handle the tar get file or does not support the audio file Incompatible USB device Appears w...

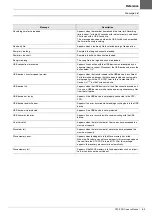
Page 67: ...TX PRO refer to the Compatible USB Device List 1 on the Yamaha web site USB device full Appears when the USB device is full and files cannot be saved on it Use a new USB device or make space by erasin...

Page 68: ...IO VOL UME knob page 10 page 13 Pads with position sens ing do not produce sounds properly Ensure that the Pad Type parameter has been set correctly For more informa tion refer to the Reference Manual...

Page 69: ...does not store its settings The drum module automatically stores its system settings whenever you turn it off using the Standby On button Do not turn off the drum module by unplugging the AC adaptor...

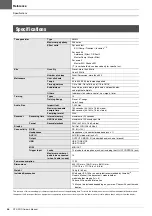
Page 70: ...volume control wav import timer Training Types 10 Training Songs Preset 37 songs User 1 song Audio files Import limit 1 000 files Maximum loadable sample time 760 seconds 44 1 kHz 16 bit mono 380 sec...

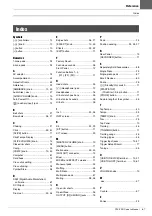
Page 71: ...25 Headphone jack 12 Headphones 16 Hi hat clutch positions 35 Hi hat splash sounds 26 Hi hats 26 I Inst 23 35 INST screen 11 K Kit 23 29 KIT button 11 KIT screen 29 M MASTER VOLUME knob 10 MENU button...

Page 72: ...God or f RFI EMI Interference noise caused by improper grounding or the improper use of either certified or uncertified equipment if applicable Any evidence of alteration erasing or forgery of proof...

Page 73: ...69 DTX PRO Owner s Manual...

Page 74: ...Fillial of Yamaha Music Europe GmbH Tyskland Generatorvej 8C ST TH 2860 S borg Denmark Tel 45 44 92 49 00 FINLAND F Musiikki Oy Antaksentie 4 FI 01510 Vantaa Finland Tel 358 0 96185111 NORWAY Yamaha M...

Page 75: ...MEMO...

Page 76: ...MEMO...

Page 77: ...MEMO...

Page 78: ...MEMO...

Page 79: ...MEMO...

Page 80: ...Manual Development Group 2020 Yamaha Corporation Published 01 2020 POMA A0 VCR2350...

Reviews: