background image

Practicing in Training Mode

38

Basic Techniques

DTX402K DTX432K DTX452K Owner’s Manual

8. PART MUTE

1.

Press the 

Mode switch

 to turn the “TRAINING” light 

on.

2.

Press 

number button [8]

 to select Part Mute.

The 

[

]  button

 flashes, indicating that the drum 

module is set to standby.

3.

To mute drum parts/instrument parts, press the corre-
sponding 

number buttons [1] to [5]

 or 

[9] to [10]

. The 

number button of the muted part will be turned off (see 
illustration above).  To unmute, press the 

number but-

ton

 again. The number button lights up.

4.

Press the 

[

] button

 to start the exercise.

5.

Play along the song on the pads.

6.

To end the exercise, press the 

[

]  button

.

Practicing by parts:

 • • • • • • • • • • • • • • • • • • • • • • • • • • • • • • • • • • • • • • • • • • • • • • • • • • • • • • • • • • • • • • • • • • • • • • • • •

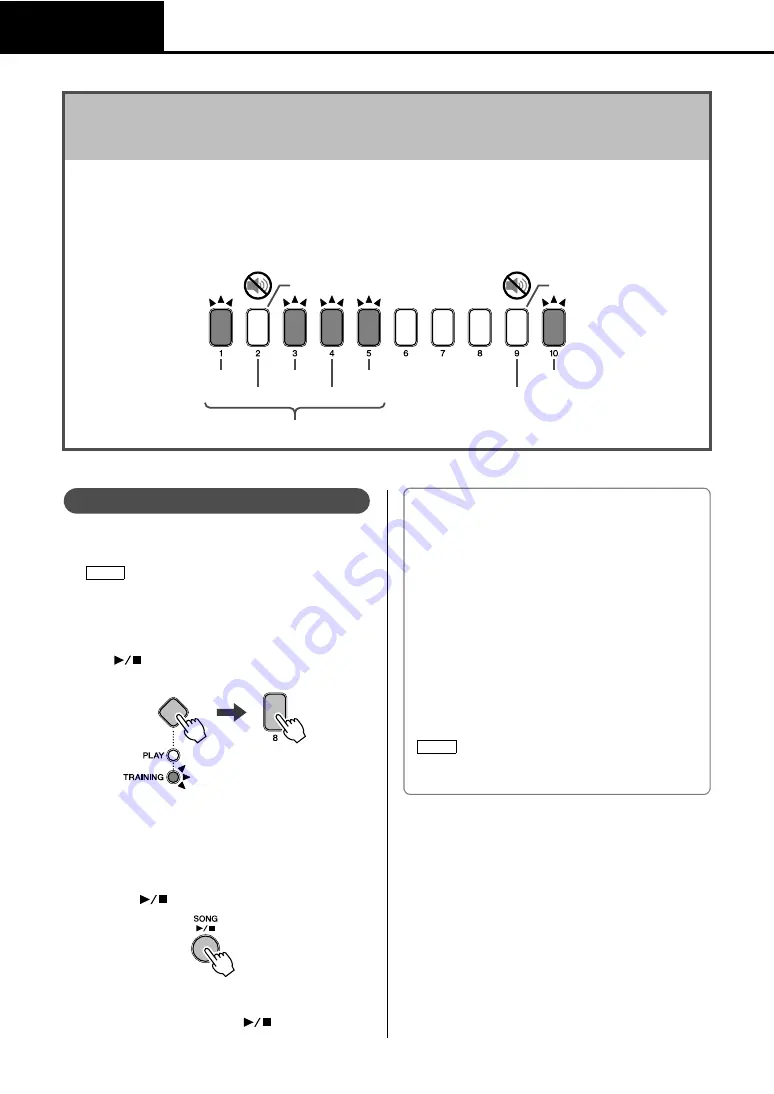
8. PART MUTE

Part Mute is an exercise which you can mute any or all of the drum parts (such as snare and kick) and the instru-
ment parts (non-drum parts) from a song. You can select the drum parts/instrument parts to be muted by pressing 
the corresponding number buttons. Part Mute can be useful in many ways—for example, for practicing only the 
snare part of a rhythm, or for tightening up your rhythm section skills by practicing only with a bass guitar sound. 
Keep in mind that this exercise is not scored.

Hi-hat

Kick

Cymbal

Other song parts

Bass part 

Snare

Tom

Drum parts

 (off)

 (off)

When the “TRAINING” light is ON, press the Mode switch to 
turn on the “PLAY” button, and then press the Mode switch 
again to turn on the “TRAINING” light.

Procedure

NOTE

TIPS

Drum parts can be muted by striking the pads.

- Press the 

[DRUM ON/OFF] button

 (so that it is 

half-lit).

- Strike the pad corresponding to the part from the 

practice drum pattern you wish to mute. The 
selected part will be muted and the corresponding 
number button will be half lit.

- If the pad corresponding to the muted drum part is 

not struck for certain period of time, it will be auto-
matically unmuted and the corresponding number 
button will light up.

- Press the 

[DRUM ON/OFF] button

 (so that it is 

fully lit) to end the mute settings.

If the part is already muted (the corresponding number but-
ton is turned off), the pad remains muted.

NOTE

Summary of Contents for DTX402K

Page 1: ...Owner s Manual ELECTRONIC DRUM KIT DTX402K DTX432K DTX452K EN ...

Page 2: ...sincerely believe that our products and the production methods used to produce them meet these goals In keep ing with both the letter and the spirit of the law we want you to be aware of the following Battery Notice This product MAY contain a small non rechargeable battery which if applicable is soldered in place The average life span of this type of battery is approximately five years When replac...

Page 3: ...ions found in the users manual may cause interference harmful to the operation of other electronic devices Compliance with FCC regulations does not guarantee that interference will not occur in all installations If this product is found to be the source of interference which can be determined by turning the unit OFF and ON please try to eliminate the problem by using one of the following measures ...

Page 4: ... with the manufacturer s instructions 8 Do not install near any heat sources such as radiators heat registers stoves or other apparatus including amplifiers that produce heat 9 Do not defeat the safety purpose of the polarized or grounding type plug A polarized plug has two blades with one wider than the other A grounding type plug has two blades and a third grounding prong The wide blade or the t...

Page 5: ...28 Importing a MIDI song 28 Using the Metronome 29 Starting and Stopping the Metronome 29 Adjusting the Metronome Volume 29 Confirming Tempo 29 Adjusting the Tempo 30 Other Settings 30 Practicing in Training Mode 31 Before Training 31 Detailed Training settings 31 After Training 31 Switching to a different exercise 31 1 RHYTHM GATE 32 2 RHYTHM GATE 32 3 DYNAMIC GATE 33 4 SONG PART GATE 34 5 SONG S...

Page 6: ...age is printed on the name plate of the instrument Use the specified adaptor page 64 only Using the wrong adaptor can result in damage to the instrument or overheating Check the electric plug periodically and remove any dirt or dust which may have accumulated on it Under no circumstances should any of the components of this product be taken apart or customized Doing so could result in electric sho...

Page 7: ...material wooden floor etc may be damaged if the instrument is placed directly on the floor We recommend that you place it on carpet or the like Before moving the instrument remove all connected cables to prevent damage to the cables or injury to anyone who might trip over them When setting up the product make sure that the AC outlet you are using is easily accessible If some trouble or malfunction...

Page 8: ... tightly wrung out Information About copyrights Copying of the commercially available musical data including but not limited to MIDI data and or audio data is strictly prohibited except for your personal use This product incorporates and bundles contents in which Yamaha owns copyrights or with respect to which Yamaha has license to use others copyrights Due to copyright laws and other relevant law...

Page 9: ...g the electronic drum kit Describes the setting of parameters and other more advanced modes of use Describes troubleshooting techniques and contains other reference materials MIDI Reference Manual This provides MIDI related reference information Drum Scores This provides drum scores for preset songs of the drum module iPhone iPad Connection Manual Describes how to connect smart devices such as an ...

Page 10: ...ecessary connections Connect the pads to the drum module using the cables provided See page 20 Connect the AC adaptor to the drum module and turn on the module See page 21 Play your electronic drum kit Basic techniques used when operating and playing the electronic drum kit are described in the Basic Techniques section pages 25 to 40 More complex methods are described in the Advanced Tech niques s...

Page 11: ...s are present DTX402K Rack Large Stopper Rack Small Hi hat holder Cymbal holders 2 No Stopper Cymbal hi hat pads 2 Crash cymbal pad Drum module Sensor bumps HH40 Hi hat controller KU100 Kick unit Nine channel snake cable Drum key Cable bands 2 AC adaptor May not be included depending on your particular area Please check you re your Yamaha dealer Owner s Manual this booklet ...

Page 12: ...t pedal Nine channel snake cable Drum key Cable bands 2 Rack Large Stopper Rack Small Hi hat holder Cymbal holders 2 No Stopper Cymbal hi hat pads 2 Crash cymbal pad Drum module Sensor bumps AC adaptor May not be included depending on your particu lar area Please check you re your Yamaha dealer Owner s Manual this booklet ...

Page 13: ...KP65 Kick pad FP6110A Foot pedal Nine channel snake cable Drum key Cable bands 2 Cymbal hi hat pads 2 Crash cymbal pad Drum module Sensor bumps AC adaptor May not be included depending on your particu lar area Please check you re your Yamaha dealer Owner s Manual this booklet Rack Large Stopper Hi hat holder Cymbal holders 2 No Stopper ...

Page 14: ...ion In addition the assembly steps should be completed one at a time in the order described The assistance of at least one other person will be required when assembling the elec tronic drum kit Once a piece has been assembled be sure to tighten the corresponding key bolts To disassemble your electronic drum kit carry out the assembly sequence in reverse Step 8 Step 7 Step 6 Step 4 Step 3 Step 2 St...

Page 15: ...sen the key bolt using the drum key 3 Pull the shorter leg towards you Standing up the Small rack 1 Stand up the Small rack as shown in the figure and support it by hand 2 Loosen the key bolt 3 Open the lower pipe approximately 70 as shown in the Top view For the DTX452K the snare pad will be attached to the Small rack in the following step Step 1 Rack Large Toms Step 2 Rack Small 70 Top view ...

Page 16: ...hten the S wing bolt Five or six turns is sufficient 2 Place the snare pad on the hexagonal rod and slide it fully back Then tighten the S wing bolt to secure the snare pad in place 3 Loosen the key bolt and adjust the angle of the snare pad When finished retighten the key bolt to secure the snare pad in place For the DTX452K the snare pad will be attached to the Small rack in the following step C...

Page 17: ...are part 2 Insert the hi hat holder into the back of the snare part as shown in the figure When correctly inserted the tip of the hi hat holder will protrude slightly from the bottom of the snare part When correctly oriented the hi hat holder will be horizontal to the snare part as shown in the Top view 3 Tighten the two key bolts to secure the hi hat holder For DTX402K and DTX432K For DTX452K For...

Page 18: ...ce the hi hat pad which does NOT have a sticker labeled CRASH on the hi hat holder with the stopper also passing through the hole provided 3 Replace the felt pad removed in Step 1 above the hi hat pad 4 Replace the washer removed in Step 1 above the felt pad 5 Tighten the wing nut to secure the hi hat pad in place Attaching the drum module 1 Loosen the key bolt on the back left of the rack and tur...

Page 19: ...r key bolts to secure the cymbal holders in place Assembling the cymbal pads 1 Remove the wing nut and the upper felt pad from the cymbal holder Do not remove the lower felt pad 2 Place the cymbal pad on the cymbal holder with the holder passing through the central hole 3 Replace the felt pad removed in Step 1 above the cymbal pad 4 Tighten the wing nut to secure the cymbal pad in place The two cy...

Page 20: ...the tip protrudes approximately 15 mm from the rear and then tighten the beater bolt using the drum key 5 Turn the foot pedal s T bolt counter clockwise to loosen it 6 Fit the raised section at the front of the kick pad holder into the foot pedal s assembly bracket 7 Turn the foot pedal s T bolt clock wise to secure the parts together 8 Operate the pedal and confirm whether the beater head strikes...

Page 21: ... the positions of the pads and the drum module to your liking IMPORTANT The hi hat controller and the kick unit from the DTX402K are almost identical in appearance They can be told apart by the sticker on the base section CAUTION Be sure to always retighten any key bolt after you have finished adjusting the corresponding part Before moving on to the next step ensure that all key bolts have been ti...

Page 22: ...our electronic drum kit Here is a left handed setup Please assemble the drum kit referring to the image The sticker on each of the snake cable s plugs indicates the name of the corresponding pad For the kick pad KP65 in the DTX432K and DTX452K use the OUT DTX jack No sound will be played when the PAD IN jack is used Excessive bending can damage the cables Ensure therefore that they are not bent at...

Page 23: ... damage to the instrument or overheating When using the AC adaptor with a removable plug make sure to keep the plug attached to the AC adap tor Using the plug alone can cause electric shock or fire Never touch the metallic section when attaching the plug To avoid electric shock short circuit or dam age also be careful that there is no dust between the AC adaptor and plug Cord clip AC adaptor cord ...

Page 24: ...verify that the drum module turns off 2 Turn on the drum module while holding down the VOLUME button and the VOLUME button The drum module s lights will flash and the Factory Reset will be restored Turning On the Drum Module Connect the hi hat controller before turning on the drum module Please do not turn the drum module on with the hi hat controller depressed The drum module can not identify the...

Page 25: ...ng Mode it is also used to start and stop train ing sessions b TEMPO buttons page 30 Use these buttons to increase or decrease the tempo in steps of one BPM In Menu Mode it is also used to increase or decrease set tings n VOLUME buttons page 26 Use these buttons to adjust the overall volume of the drum module Press the button to increase it and the button to decrease it m Standby On button page 22...

Page 26: ...and play along with your favorite tunes 1 PHONES OUTPUT jack page 21 Use this standard stereo audio jack to connect head phones an amplifier a mixer or other similar equip ment 2 Cord clip page 21 Wrap the AC adaptor cord around this clip to prevent accidental unplugging during use 3 connector page 21 Use this connector for the AC adaptor that came with your drum module 4 Trigger input jacks page ...

Page 27: ...ed If using an HH65 Hi hat Controller with the DTX432K and DTX452K you can operate the pedal to recreate the sound of a closing hi hat Foot closed You can depress the hi hat controller s pedal to create a foot close sound without having to strike the hi hat pad Hi hat splash Depressing the hi hat controller s pedal and then imme diately releasing it produces a hi hat splash sound Choke You can imm...

Page 28: ...nge depending on how hard you strike the pads Sensitivity can be adjusted to ten different levels While holding the Mode switch press either the VOL UME or VOLUME button Each time you press the VOLUME button you increase the sensitivity by one level This means that louder sounds can be more easily produced with softer drumming Each time you press the VOLUME button you decrease the sensitivity by o...

Page 29: ...e VOL UME or VOLUME button Each time you press the VOLUME button you increase the song volume by one Each time you press the VOLUME button you decrease the song volume by one Performing with a Song The score PDF is available at the Yamaha website https download yamaha com After accessing the Support website and clicking on Man ual Library enter the appropriate model name If you wish to mute the pr...

Page 30: ...ne By pressing the DRUM ON OFF button once again you can unmute the drum parts and restore their normal vol umes Using apps compatible with the drum module you can eas ily import a MIDI song on your drum module For details on compatible smart devices and applications refer to the web page below For more information on how to connect refer to the iPhone iPad Connection Manual PDF on the web page be...

Page 31: ...e VOLUME button you decrease the metronome volume by one Whenever necessary you can confirm the drum module s current tempo from the flashing pattern of the number but ton lights and the voice guidance The larger the value the faster the tempo becomes Press either the TEMPO or TEMPO button once Or Press and hold the button Each digit of the tempo will be flashed in sequence Example When the tempo ...

Page 32: ...s see the description of the Metro nome Settings parameter group from Menu Mode page 42 Metronome pattern Metronome length in beats Metronome sound Number button lighting pattern when using the metro nome Adjusting the Tempo Increasing or decreasing using the TEMPO or TEMPO button Directly inputting a BPM using the number buttons Tapping the tempo on the pads The drum module supports tempos betwee...

Page 33: ...st score while number button 1 represents the lowest In addition the Voice Guidance announces the results of scoring using the five levels shown below Try your best to get a high score To start a different exercise you need to reenter the training mode 1 Press the Mode switch to turn the PLAY light on Play Mode 2 Press the Mode switch again to turn the TRAINING light on Training Mode Basic trainin...

Page 34: ...trike too early or too late no sound is produced Using Rhythm Gate can greatly help you improve your sense of rhythm Struck early Struck late Perfect Timing flash together Sound produced half lit Timing of current strike flashes When the TRAINING light is ON press the Mode switch to turn on the PLAY button and then press the Mode switch again to turn on the TRAINING light Please change the beats o...

Page 35: ... see page 31 Playing with dynamics 3 DYNAMIC GATE Dynamic Gate is an exercise for playing pads with proper dynamics Your aim is to control three levels Weak Normal and Strong When you strike with the wrong dynamics it will not produce any sound How accurately you strike with the proper dynamics is evaluated at the end of the exercise Once you master Dynamic Gate you will be a skillful drummer at c...

Page 36: ... at the Yamaha website https download yamaha com After accessing the Support website and clicking on Man ual Library enter the appropriate model name NOTE When the TRAINING light is ON press the Mode switch to turn on the PLAY button and then press the Mode switch again to turn on the TRAINING light The available exercises may differ depending on the current music category For details refer to the...

Page 37: ...download yamaha com After accessing the Support website and clicking on Manual Library enter the appropriate model name NOTE When the TRAINING light is ON press the Mode switch to turn on the PLAY button and then press the Mode switch again to turn on the TRAINING light Procedure NOTE TIPS You can change the music category by pressing a corresponding number key The volume of the song can be adjust...

Page 38: ...ely you strike the first beat of the measure after the break is evaluated Once you master Measure Break you can keep a steady tempo even after breaks or fill ins Evaluate the first beat With Metronome fully lit Without Metronome half lit When the TRAINING light is ON press the Mode switch to turn on the PLAY button and then press the Mode switch again to turn on the TRAINING light Procedure NOTE S...

Page 39: ...t is ON press the Mode switch to turn on the PLAY button and then press the Mode switch again to turn on the TRAINING light Procedure NOTE TIPS The volume of the practice rhythm can be adjusted While holding down the button press the VOLUME button The practice rhythm can be muted Press the DRUM ON OFF button To unmute press it again You can skip among the seven rhythms as you practice by pressing ...

Page 40: ...tons Part Mute can be useful in many ways for example for practicing only the snare part of a rhythm or for tightening up your rhythm section skills by practicing only with a bass guitar sound Keep in mind that this exercise is not scored Hi hat Kick Cymbal Other song parts Bass part Snare Tom Drum parts off off When the TRAINING light is ON press the Mode switch to turn on the PLAY button and the...

Page 41: ...by the voice guidance in English as well To check your score once again press any of the num ber buttons 1 to 10 Playing as fast as you can 9 FAST BLAST Fast Blast is an exercise for striking pads as fast as possible within a time limit 60 seconds The half lit number buttons indicates the remaining time The exercise ends when the number buttons are all turned off The number of times you have struc...

Page 42: ...r performances You can use those recordings not only for listening back and checking your progress but also for playing along with yourself Keep in mind that this training is not scored When the TRAINING light is ON press the Mode switch to turn on the PLAY button and then press the Mode switch again to turn on the TRAINING light Procedure NOTE TIPS You can play along with a song Press the button ...

Page 43: ...Page 43 x Kit Settings 2 1 Pad Sound Page 43 2 2 Pad Volume Page 43 2 3 Pad Tuning Page 44 2 4 Double Bass Drum Page 44 2 5 Reverb Page 44 c MIDI Settings 3 1 Local Control Page 45 3 2 Note Number Page 45 v Hi hat Settings 4 1 Clutch Position Page 46 4 2 Splash Sensitivity Page 46 4 3 Foot Close Position Page 46 4 4 Foot Close Velocity Page 47 4 5 Kick Velocity Page 47 b Trigger Settings 5 1 Pad V...

Page 44: ...ber button 2 to select the Beats parameter 4 Select a new metronome length in beats using the corre sponding number button 1 to 9 1 3 Sound You can set the sound played by the metronome to for example a standard click sound a cowbell a drumsticks sound or a spoken count 1 Hold down the Mode switch to activate Menu Mode 2 Press number button 1 to select the Metronome Set tings parameter group 3 Pre...

Page 45: ...ate Menu Mode 2 Press number button 2 to select the Kit Settings parameter group 3 Press number button 1 to select the Pad Sound parameter 4 Strike a pad to select it 5 Enter a new drum sound number using the TEMPO buttons For a list of sounds and numbers see the Voice List page 62 2 2 Pad Volume You can adjust the volume of the kit s pads 1 Hold down the Mode switch to activate Menu Mode 2 Press ...

Page 46: ...r using number button 1 or 2 The available settings are as follows 2 5 Reverb Reverb effects add a warm ambience to sounds simulating the complex reflections of actual performance spaces such as a concert hall or a small club Use the following proce dure to select a reverb effect for the current kit 1 Hold down the Mode switch to activate Menu Mode 2 Press number button 2 to select the Kit Setting...

Page 47: ...vailable settings are as follows 3 2 Note Number You can set the MIDI note number that is output when each of the pads is played 1 Hold down the Mode switch to activate Menu Mode 2 Press number button 3 to select the MIDI Settings parameter group 3 Press number button 2 to select the Note Number parameter 4 Strike a pad to select it 5 Enter a new note number using the TEMPO but tons c MIDI Setting...

Page 48: ...umber button 4 to select the Hi hat Settings parameter group 3 Press number button 2 to select the Splash Sensitiv ity parameter 4 Enter a new splash sensitivity using the TEMPO buttons 4 3 Foot Close Position You can adjust the position at which the hi hat switches from open to closed when you operate the hi hat controller The lower the value the smaller the virtual opening between the top and bo...

Page 49: ...wer of kick sounds pro duced using the hi hat controller In order for the Kick Velocity parameter to have an effect Double Bass Drum must be set to On for the current kit page 44 1 Hold down the Mode switch to activate Menu Mode 2 Press number button 4 to select the Hi hat Settings parameter group 3 Press number button 5 to select the Kick Velocity parameter 4 Enter a new velocity using the TEMPO ...

Page 50: ...ode 2 Press number button 5 to select the Trigger Settings parameter group 3 Press number button 1 to select the Pad Velocity Curve parameter 4 Strike a pad to select it 5 Enter a new velocity curve setting using the TEMPO buttons b Trigger Settings Steps Hold down the Mode switch 5 1 Setting Setting 1 to 25 Setting 1 2 3 4 5 6 7 8 9 10 Velocity Trigger input level Velocity Trigger input level 11 ...

Page 51: ...n 5 to select the Trigger Settings parameter group 3 Press number button 3 to select the Snare Pad Type parameter 4 Select a new snare pad type using the corresponding number button 1 to 6 Steps Hold down the Mode switch 5 2 Setting Setting 0 to 99 Setting Steps Hold down the Mode switch 5 3 Setting Number button Setting 1 Automatic identification only for 2 and 3 2 TP70S 3 Snare pad that comes wi...

Page 52: ...de 2 Press number button 5 to select the Trigger Settings parameter group 3 Press number button 6 to select the Minimum Level parameter 4 Strike a pad to select it 5 Enter a new setting using the TEMPO but tons Steps Hold down the Mode switch 5 4 Setting Number button Setting Hi hat controller Kick pedal 1 Automatic identification only for 2 and 3 2 HH65 KP65 3 HH40 KU100 4 HH40 KP65 5 HH65 KU100 ...

Page 53: ...Menu Mode 2 Press the number button 6 to select the Training Set tings 3 Press the number button 2 to select Difficulty Level 4 Select your preferred difficulty level using the number button 1 to 5 The higher the level the more diffi cult the training 6 3 Ignore Timing For the following trainings you can set whether the pads produce sound whenever they are struck or only when they are struck exact...

Page 54: ...ress the number button 6 to select the Training Set tings 3 Press the number button 5 to select Dynamic Gate Low Limit 4 Set the threshold value using the TEMPO but tons 6 6 Dynamic Gate High Limit For Dynamic Gate page 33 you can set the high limit the threshold value between Normal and Strong 1 Hold down the Mode switch to activate Menu Mode 2 Press the number button 6 to select the Training Set...

Page 55: ...ngs 3 Press the number button 1 to select Voice Guidance Volume 4 Set your preferred volume using the number button 1 to 10 7 2 Operation Sound Volume 1 Hold down the Mode switch to activate Menu Mode 2 Press the number button 7 to select the Other Set tings 3 Press the number button 2 to select Operation Sound Volume 4 Set your preferred volume using the number button 1 to 10 Steps Hold down the ...

Page 56: ...in level 1 Hold down the Mode switch to activate Menu Mode 2 Press the number button 7 to select the Other Set tings 3 Press the number button 4 to select USB Audio Out put Gain 4 Select the gain level using the number button 1 to 5 7 5 Auto Power Off Time You can set the time until the Auto Power Off function page 22 activates or you can disable this function 1 Hold down the Mode switch to activa...

Page 57: ...t The number button 1 will light up 6 Press the number button 1 The number button will start to flash If you do not wish to proceed with initialization press the Mode switch now to exit Menu Mode 7 Press the number button 1 The kit will be initialized 7 8 Delete Song You can delete an imported MIDI song on the drum module 1 Hold down the Mode switch to activate Menu Mode 2 Press the number button ...

Page 58: ... Factory Reset The number button 1 will light up 4 Press the number button 1 The number button will start to flash If you do not wish to proceed with initialization press the Mode switch now to exit Menu Mode 5 Press the number button 1 The settings will be initialized You can also restore the Factory Reset by turning on the drum module with the VOLUME and buttons held down page 22 Steps Hold down...

Page 59: ... on page 18 2 Turn off the drum module The KP65 Kick Pad must be connected with the drum module turned off 3 Disconnect the cable from the KU100 and plug it into the OUT DTX jack on the back on the KP65 4 Turn on the drum module 5 Set the kick type to KP65 For more details see the description of the Pedal Types parameter from Menu Mode page 50 6 Play the KP65 Kick Pad Replacing the bundled hi hat ...

Page 60: ...to MIDI and creating music with a com puter is provided in the MIDI Reference Manual The MIDI Reference Manual PDF is available for download at the following web page https download yamaha com After accessing the Support website and clicking on Manual Library enter the appropriate model name USB cable is not included NOTE USB TO HOST terminal bottom panel Computer USB cable Drum module USB termina...

Page 61: ... turned fully down Also when directly inputting the volume with numerical values by using the number buttons try pressing the number buttons in rapid succession See page 41 Adjust the following parameters from Menu Mode Pad Volume See page 43 Gain See page 50 Pad Velocity Curve See page 48 Crosstalk See page 49 Snare Pad Type See page 49 Pedal Type See page 50 Local Control See page 45 If kick sou...

Page 62: ...rum sounds produced by the various pads are poorly balanced proceed as follows Adjust the Pad Volume parameter from Menu Mode for each pad See page 43 Ensure that the Stereo Mono parameter from Menu Mode is set correctly See page 55 If the drum module s volume is not well balanced with that of the device connected to the AUX IN jack such as a portable music player proceed as follows Ensure that th...

Page 63: ...tion See page 22 How do I reset all of the drum module s parameters to the settings they had when I last turned it on You can do this using the Revert to Last Power On function See page 56 How do I reset only a desired drum kit to the default setting Initialize the kit from Menu Mode See page 55 How do I stop the drum module turning off while I m using it Disable the Auto Power Off function See pa...

Page 64: ... MapleCustm 32 Big Gate 33 Rock 34 Vintage50s 35 Vintage70s 36 Metal 37 BirchCustm 38 Jazz 39 HipHop 1 40 HipHop 2 41 EDM 42 T8 43 T9 44 Analog 45 Gate 1 46 Gate 2 47 Gate 3 48 Electro 1 49 Electro 2 50 Electro 3 51 Electro 4 52 Break 53 DNB 54 Clap 1 55 Clap 2 56 Clap 3 57 Clap 4 58 Clap 5 59 Clap 6 60 Clap 7 61 Clap 8 62 Clap 9 63 Clap 10 64 Clap 11 65 Clap 12 66 Clap 13 67 Clap 14 68 Snap 1 69 ...

Page 65: ...Op 211 Dundun Op 212 Dundun Cl 213 Darbuka Op 214 Darbuka Sl 215 Darbuka Mt 216 Sangban Op 217 Kenkeni Op 218 AfricanBlH 219 AfricanBlL 220 Tombak Op 221 Daf Open 222 Daf Slap 223 Daf Mute 224 Riq Open 225 Riq Slap 226 Riq Shake 227 Riq Hit 228 Sagat Op 229 Sagat Cl 230 Sagat Sw 231 Tabla Na 232 Bayan Ge 233 Dhol RH Op 234 Dhol RH Cl 235 Dhol LH Op 236 Dhol LH Cl 237 KanjiraHit 238 KanjiraSlp 239 ...

Page 66: ...7 Keyboard 128 Drum kits 10 all of which may be edited and overwritten Songs 10 Reverb 9 types Metronome Tempo 30 to 300 BPM Tap Tempo and Voice Guidance functions Beats 1 4 to 9 4 Other Jacks and terminals SNARE mini stereo audio TOM1 mini mono audio TOM2 mini mono audio TOM3 mini mono audio RIDE mini mono audio CRASH mini stereo audio HI HAT mini mono audio HI HAT CTL mini stereo audio KICK PAD ...

Page 67: ... 39 Foot closed 25 FP6110A 10 11 G Gain 50 H Head shots 25 Headphones 21 HH40 Hi hat controller 9 HH65 Hi hat controller 10 11 25 57 Hi hat holder 9 10 11 Hi hat splash 25 K Kick Unit 57 Kit 26 KP65 10 11 57 KU100 Kick unit 9 M MEASURE BREAK 36 Menu Mode 23 41 Metronome 29 MIDI Reference 58 MIDI Reference Manual 7 MIDI Settings 45 Mode switch 23 Music category list 62 Music Player 21 Mute 28 N Nin...

Page 68: ... prevent any potential negative effects on human health and the environment which could otherwise arise from inappropriate waste handling For more information about collection and recycling of old products please contact your local municipality your waste disposal service or the point of sale where you purchased the items For business users in the European Union If you wish to discard electrical a...

Page 69: ...67 DTX402K DTX432K DTX452K Owner s Manual ...

Page 70: ...EMI Interference noise caused by improper grounding or the improper use of either certified or uncertified equipment if applicable Any evidence of alteration erasing or forgery of proof of purchase documents will cause this warranty to be void This warranty covers only the Original Owner and is not transferable In Order to Obtain Warranty Service Warranty service will only be provided for defectiv...

Page 71: ... Ave Ortakoy P O Box 475 Lefkoşa Cyprus Tel 392 227 9213 RUSSIA Yamaha Music Russia LLC Room 37 entrance 7 bld 7 Kievskaya street Moscow 121059 Russia Tel 7 495 626 5005 OTHER EUROPEAN COUNTRIES Yamaha Music Europe GmbH Siemensstrasse 22 34 25462 Rellingen Germany Tel 49 4101 303 0 Yamaha Music Gulf FZE JAFZA 16 Office 512 P O Box 17328 Jebel Ali FZE Dubai UAE Tel 971 4 801 1500 TURKEY Yamaha Musi...

Page 72: ...Manual Development Group 2018 Yamaha Corporation Published 04 2018 POMA A0 ZZ03340 Yamaha web site https www yamaha com Yamaha Downloads https download yamaha com ...

Reviews: