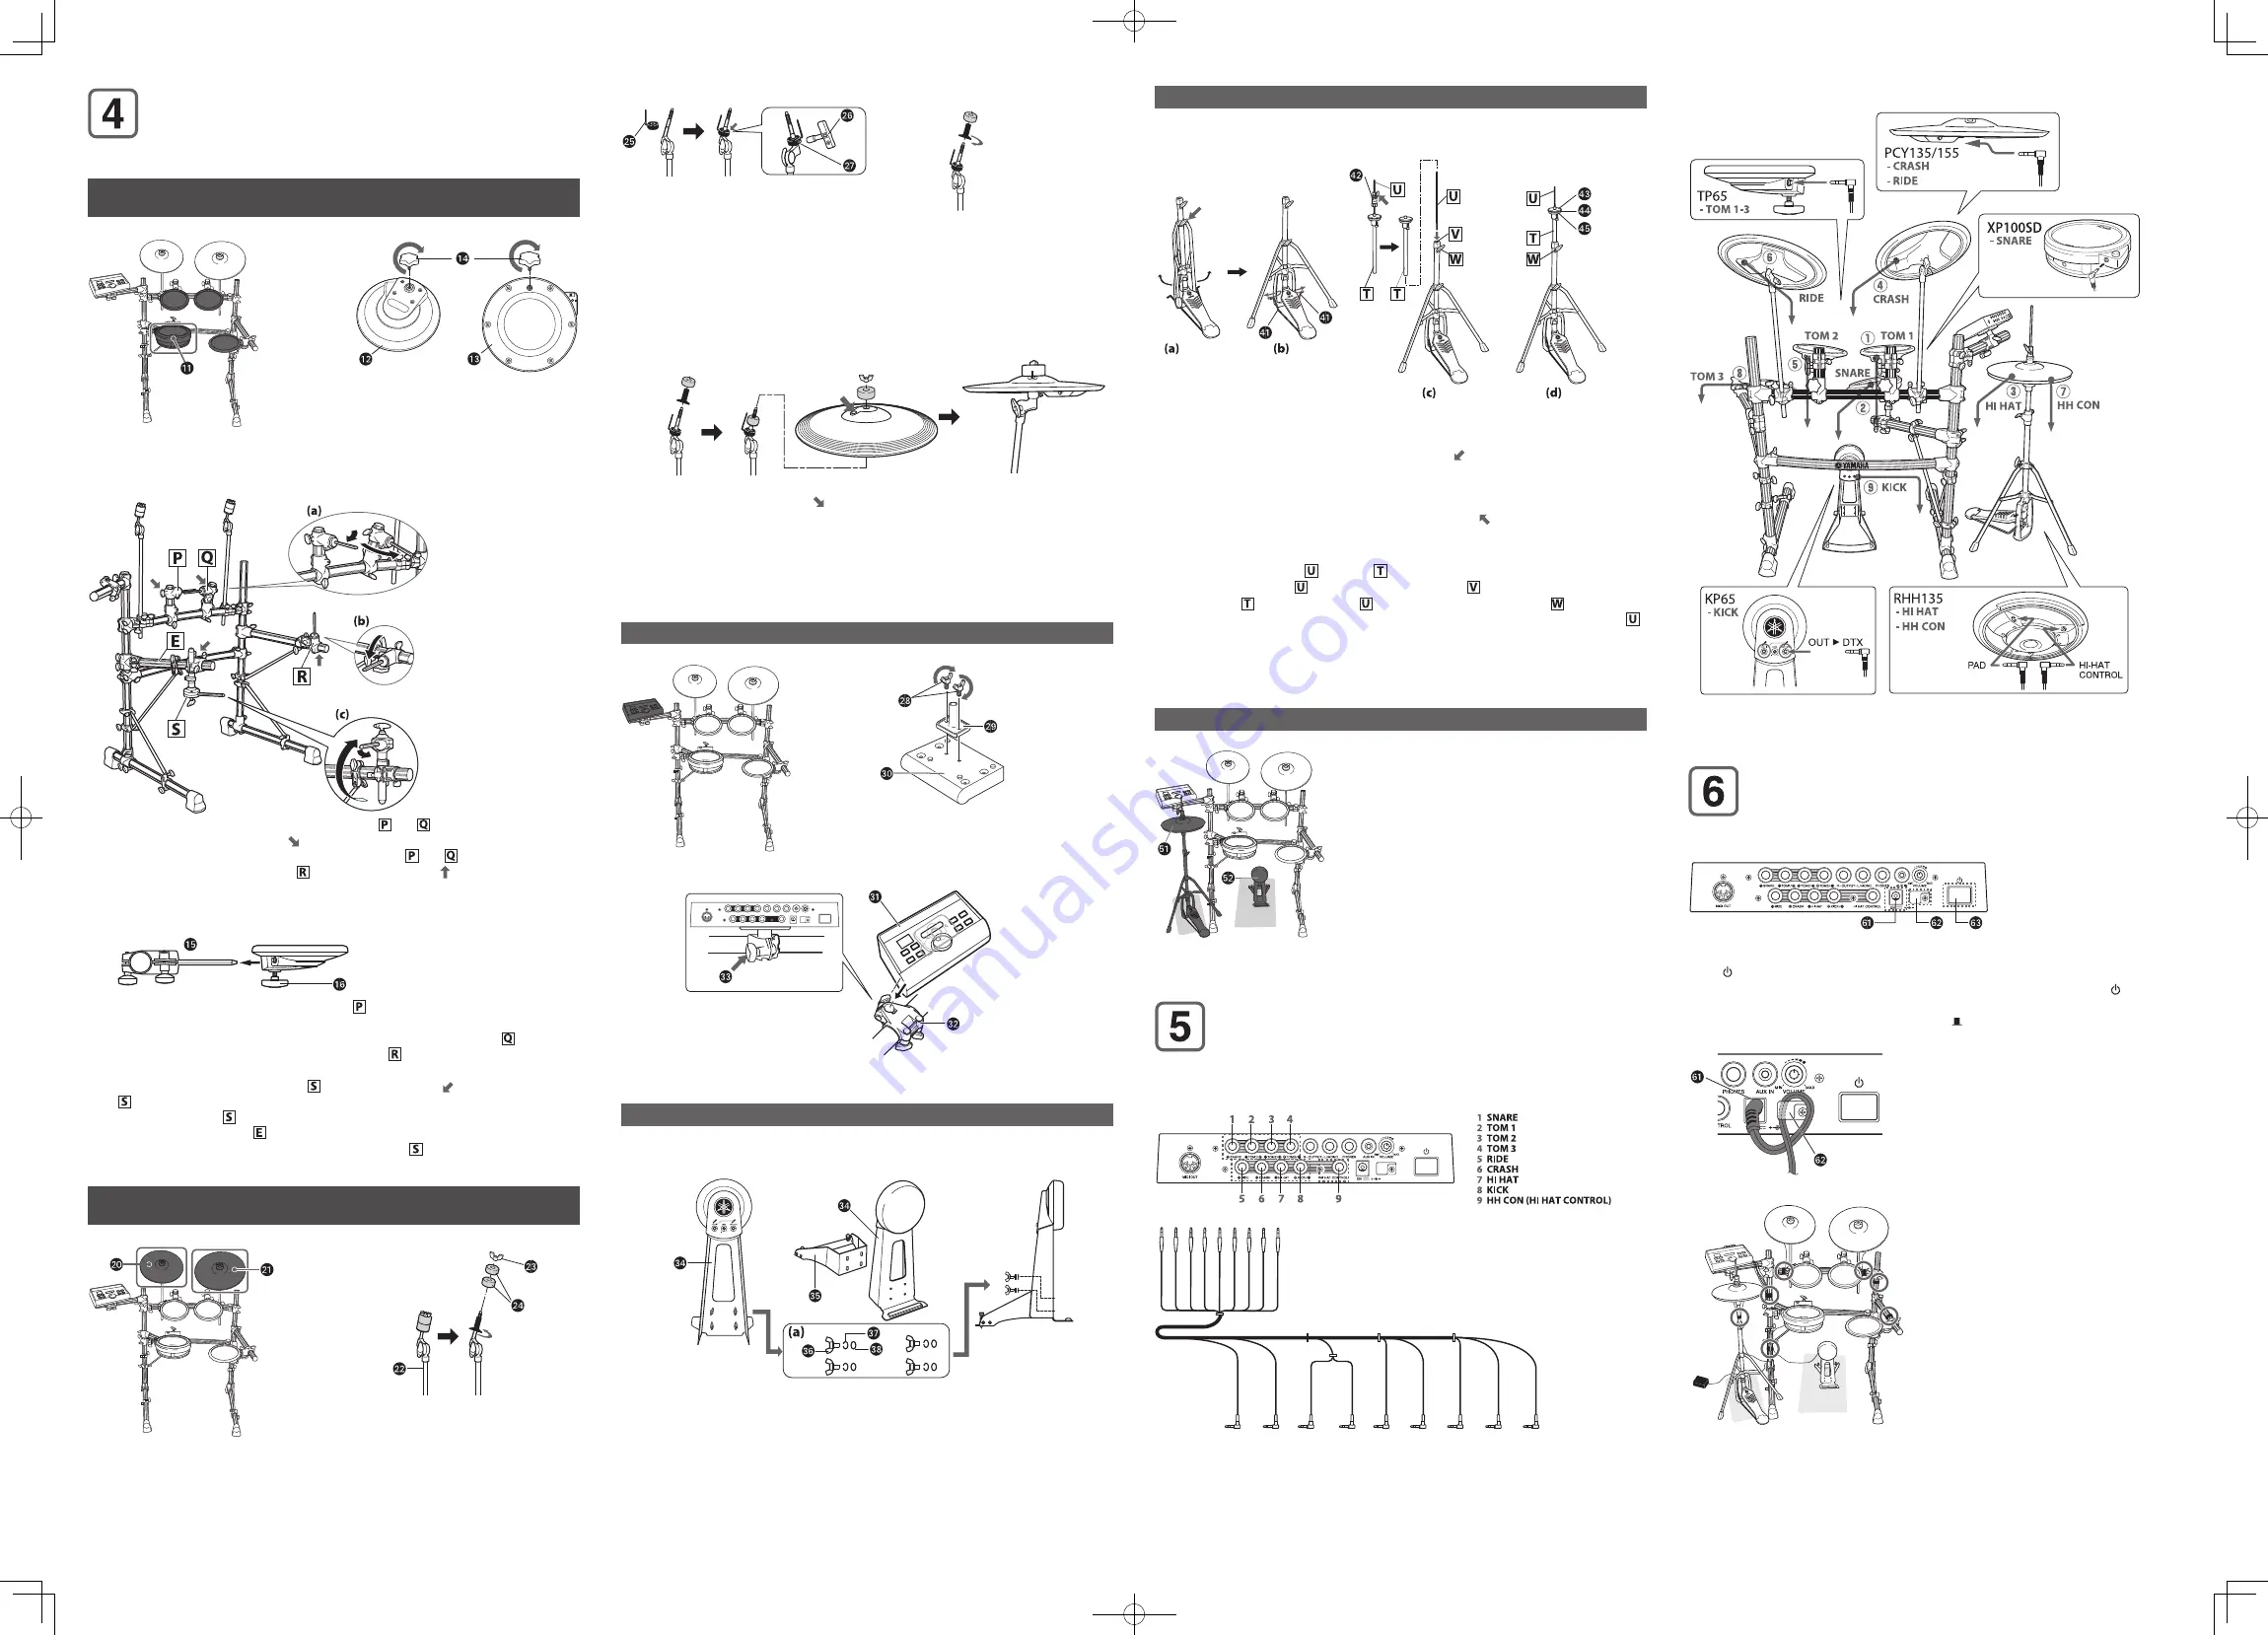
Mounting the pads and the trigger module on the
electronic drum rack
Mount the pads and the trigger module on the electronic drum rack. Then
position the kick pad and the hi-hat.
Mounting the TP65 (Drum pads) and XP100SD (3-zone Drum pad)
on the electronic drum rack
Figure 11: Pads Assembly-1 Figure 12: TP65 and XP100SD
!1
XP100SD
!2
TP65 (Rear side)
!3
XP100SD (Rear side)
!4
Clamp bolt
1
See Figure 12.
Attach the clamp bolts (
!4
) on TP65s (
!2
) and XP100SD (
!3
). Tighten the clamp bolts five to
six turns each.
Figure 13: Pads Assembly-2
2
See Figure 13. Loosen the knobs of the tom holders and at the center of the
electronic drum rack (shown with ). Move the tom holders as shown in Figure 13-
(a)
. Then
tighten the knobs and fix the position of the tom holders and .
3
Loosen the knob of the tom holder on the right (shown with ). Move the tom holder
inward as shown in Figure 13-
(b)
. Tighten the knobs and attach the tom holder firmly at a
position where it points slightly downward.
Figure 14: Tom Holder and Drum Pad
!5
Tom holder
!6
Clamp bolt
4
Attach the TP65 (Drum pad) to the tom holder as shown in Figure 14. Tighten the clamp
bolt and attach the drum pad TP65 firmly.
5
See Figure 13 again. Repeat step 3 and 4 in the same manner for tom holder at the
center of the electronic drum rack and for tom holder on the right, and attach the TP65
(Drum pad) to each tom holder.
6
Loosen the knobs of the snare holder on the left (shown with ). Turn the snare holder
as shown with the big arrow in Figure 13-
(c)
and set it up vertically. Turn the metal stick
on the upper part of as shown with the small arrow in Figure 13-
(c)
until it is pointing
slightly outward than pipe .
7
Attach the 3-zone drum pad XP100SD to the snare holder set up in step 6. Tighten the
clamp bolt and attach the 3-zone drum pad XP100SD firmly.
Mounting the PCY135 and PCY155 (Cymbal pads)
on the electronic drum rack
Figure 15: Pads Assembly-3 Figure 16: Cymbal holder-1
@0
PCY135
@1
PCY155
@2
Cymbal holder
@3
Wing nut
@4
Felt washer
1
See Figure 16.
Remove the wing nut (
@3
) and the two felt washers (
@4
) from the cymbal holder (
@2
). Then
turn the black plastic part in a counterclockwise direction and remove it.
Figure 17: Cymbal holder-2 Figure 18: Cymbal holder-3
@5
Stopper
@6
Drum key
@7
Key bolt
2
See Figure 17. Attach the stopper to the cymbal holder, and fix at a position where the
L-shaped part of the stopper is on the opposite side from you. To fix the position of the
stopper (
@5
), use the drum key (
@6
) and tighten the key bolt (
@7
) firmly.
3
See Figure 18. Attach the black plastic part removed in step 1 to the cymbal holder, and
tighten it in a clockwise direction.
4
Attach one of the felt washers removed in step 1 to the cymbal holder. The other felt washer
will not be used within the standard assembly described in this manual.
Figure 19: Cymbal holder and Cymbal pad
5
See Figure 19. Insert the end of the L-shaped part of the stopper into the oval-shaped hole
on the cymbal pad (shown with ) to set the cymbal pad on the cymbal holder.
* Cymbal pad PCY135 is very similar to Real High-Hat Pad RHH135. Check the part num-
ber on the reverse side.
6
Attach the included round-shaped felt with a large hole-diameter to the cymbal holder,
then attach the wing nut removed in step 1 and tighten it. Turn the wing nut until you are
certain that the cymbal pad is attached. The cymbal pad is designed to shake when you hit
the surface, even when the wing nut is tightened securely.
Mounting the DTX500 (Trigger module)
Figure 20: Pads Assembly-4 Figure 21: Module stand
@8
Wing nut
@9
Module stand
#0
DTX500 (Rear side)
1
Attach the module stand (
@9
) onto the rear side of the DTX500 (
#0
) using the wing nuts (
@8
).
Figure 22: Module stand and clamp
#1
Module stand
#2
Clamp
#3
Knob
2
Attach the module stand (
#1
) onto the clamp (
#2
). Tighten the knob (
#3
) and fix the
position.
Assembling the KP65 (Kick pad)
1
If a drum mat (sold separately) is not available, lay a cardboard on the floor to prevent
scratching the surface.
Figure 23: KP65 Assembly
#4
Body
#5
Base
#6
Wing bolt
#7
Spring washer
#8
Washer
2
Remove the wing bolt (
#6
), the spring washer (
#7
) and the washer (
#8
) from the body (
#4
),
and keep the four sets nearby in the order removed.
* If the wing bolt, the spring washer and/or the washer are separated from each other, set
them as illustrated in Figure 23-(a).
3
Set the base (
#5
) on the body (
#4
), and attach them using the wing bolt, the spring washer
and the washer removed in step 2.
Assembling the HS650A (Hi-Hat stand)
1
If a drum mat (sold separately) is not available, lay a cardboard on the floor to prevent
scratching the surface.
Figure 24: HS650A Assembly
$1
Radius rod
$2
Hi-Hat clutch
$3
Felt washer
$4
Cymbal support plate
$5
Cymbal support
2
Loosen the wing bolt of the hi-hat stand (shown with in Figure 24-
(a)
).
3
Spread out the legs of the tripod part of the hi-hat stand until it stands stable. Tighten the
wing bolt loosened in step 2.
4
Insert the radius rod (
$1
) into the hole of the frame as shown in Figure 24-
(b)
.
5
Loosen the wing bolt of the hi-hat clutch (
$2
) (shown with in Figure 24-
(c)
).
* The hi-hat clutch is not used within the standard assembly described in this manual. Use
the hi-hat clutch included in RHH135.
6
Pull out the hi-hat shaft from pipe .
7
Insert the hi-hat shaft removed in step 6 into the nut shown in Figure 24-
(c)
.
8
Insert pipe into the hi-hat shaft from above. Tighten the wing bolt at the position
where the cymbal support plate will be positioned at the middle area of the hi-hat shaft .
9
Remove the felt washer (
$3
) attached above the cymbal support plate. They are not used
within the standard assembly described in this manual.
10
Set the real hi-hat pad RHH135.
* For the next step, see "Setting Up" in the RHH135 Owner's manual.
Installing the Hi-Hat and KP65 (Kick pad)
Figure 25: Hi-Hat and KP65
1
If a drum mat (sold separately) is not available, lay
a cardboard on the floor to prevent scratching the
surface.
2
Place the hi-hat (
%1
) on the left side of the RS85A
(electronic drum rack).
3
Place the KP65 (Kick pad) (
%2
) at the bottom center of
the electronic drum rack.
%1
Hi-Hat
%2
KP65 (Kick Pad)
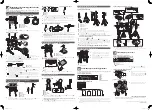
Connecting the pads to the Trigger Module
Connect the output jacks of the pad and the input jacks of the trigger module
with the 9-channel snake cable.
Figure 26: DTX500 (Rear panel)
Figure 27: 9-channel Snake Cable
* Each straight plug is labeled indicating the input jacks to which they are to be connected.
1
Insert the straight plugs (Figure 27-
(a)
) of the 9-channel snake cable into the input jacks on
the rear panel of the trigger module. For standard assembly, connect the straight plugs to
the input jacks in accordance with the indication on each label.
* The stereo phone cable that comes with the XP100SD will not be used within the standard assembly described in
this manual.
Figure 28: Diagram of standard connection
SNARE
KICK
2
Insert the L-shaped plugs (Figure 27-
(b)
) of the 9-channel snake cable into each
corresponding pad. It is recommended to connect the cables in order from numbers
q
to
o
shown in Figure 28 (from the shortest cable to the longest cable).
Connecting to a power source
Connect the AC adaptor to the DTX500.
Figure 29: Power switch (DTX500 rear panel)
^1
DC IN terminal (12V)
^2
Cable clip
^3
Standby/On Switch
1
Make sure to turn the power off Standby/
On Switch (
^3
) is set to the standby position
( )).
Figure 30: Cable clip (DTX500 rear panel)
2
Attach the AC adaptor to connect to a power
source.
Insert the DC plug into the DC IN terminal (
^1
)
and twist the cable around the cable clip (
^2
)
to prevent the DC plug from falling out.
Figure 31: Using Cable Band
3
Use the cable bands to bind the cables to the
pipes at the points shown with the circles.
The assembly is now completed.
* For information about the next steps such as turning the power on/off and checking the actual sound, refer to
“Setting Up” in the Owner’s Manual of the Drum Trigger Module.
U.R.G., Pro Audio & Digital Musical Instrument Division, Yamaha Corporation
©2010 Yamaha Corporation
WU50020 002PO-01A0
DTX550K_EN.indd 2
2010/01/26 11:49:46


