File Mode [FILE]
Reference
114
DTX900 Owner’s Manual
Saving a File
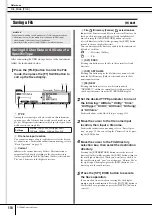
[F1] SAVE
After connecting the USB storage device to the instrument,
follow the instructions below.
1
Press the [FILE] button to enter the File
mode, then press the [F1] SAVE button to
call up the Save display.
1
TYPE
Among the various types of data created on this instrument,
you can save all of them or data created in each mode to a sin-
gle file. This parameter determines which specific type of data
will be saved to a single file.
B
File name input location
You can enter a name of up to eight characters for the file you
are about to save. For detailed instructions on naming, refer to
“Basic Operation” on page 15.
C
Current
Indicates the current directory (folder). This indication is
automatically changed according to the current directory
(folder) specified in the File/Directory (Folder) selection box.
The “root” directory is the highest directory.
D
File
/Directory (Folder)
selection box
Indicates the directories and files in the current Directory. In
this box, the directories and files are listed in alphabetical
order. Pressing the [ENTER/STORE] button enters the
selected directory (folder) while pressing the [EXIT] button
returns to the next highest directory.
You can distinguish the directory and file by the indicator at
left end of each line.
........... Directory (Folder)
............ File
E
[SF1] EXEC
Pressing this button saves the file to the currently selected
directory.
F
[SF2] SET NAME
Pressing this button copies the file/directory name selected
from the File/Directory (Folder) selection box to the File
name input location.
G
[F6] NEW
Pressing this button creates a new directory named
“NEWDIR**” within the currently selected directory. You
can change this name from the [F3] RENAME display.
2
Set the desired TYPE parameter to one of
the following: “AllData,” “Utility,” “Click,”
“AllTrigger,” “AllKit,” “AllChain,” “AllSong,”
or “AllVoice.”
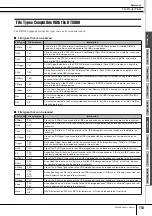
For details about each of the file types, see page 113.
3
Move the cursor to the file name input
location, then input a file name.
For detailed instructions on naming, refer to “Basic Opera-
tion” on page 15. You can call up the Character List by press-
ing the [SF6] button.
4
Move the cursor to the File/Directory
selection box, then select the destination
directory.
Pressing the [ENTER/STORE] button enters the selected
directory (folder) while pressing the [EXIT] button returns to
the next highest directory. When you want to save the file to
the root directory and “root” is not shown as “Current Dir” at
the right top of the display, press the [EXIT] button a few
times to go to the root directory.
5
Press the [SF1] EXEC button to execute
the Save operation.
If you are about to overwrite an existing file, the display
prompts you for confirmation. Press the [INC/YES] button to
execute the Save operation, or press the [DEC/NO] button to
cancel it.
While the data is being saved, make sure to follow these precautions:
• Never remove or eject the media from the device (USB storage).
• Never unplug or disconnect any of the devices.
• Never turn off the power of the DTX900 or the relevant devices.
Saving All User Data or All Data of a
Specific Type
Settings
AllData, Utility, Click, AllTrigger, AllKit,
AllChain, AllSong, AllVoice, Wav, Aiff
NOTICE
4
3
1
5
2
7
6

