background image

SERVICE MANUAL

This manual has been provided for the use of authorized YAMAHA Retailers and their service personnel.
It has been assumed that basic service procedures inherent to the industry, and more specifically YAMAHA Products, are already
known and understood by the users, and have therefore not been restated.

WARNING:

Failure to follow appropriate service and safety procedures when servicing this product  may result in personal
injury, destruction of expensive components, and failure of the  product to perform as specified. For these reasons,
we advise all YAMAHA product owners that any service required should be performed by an authorized YAMAHA
Retailer or the appointed service representative.

IMPORTANT:

The presentation or sale of this manual to any individual or firm does not constitute authorization,  certification  or
recognition  of  any  applicable  technical  capabilities,  or establish a principle-agent relationship of any form.

The data provided is believed to be accurate and applicable to the unit(s) indicated on the cover.  The research, engineering, and service
departments of YAMAHA are continually striving  to improve YAMAHA products. Modifications are, therefore, inevitable and
specifications are subject to change without notice or obligation to retrofit. Should any discrepancy appear to exist, please contact the
distributor's Service Division.

WARNING:

Static discharges can destroy expensive components. Discharge any static electricity your body may have
accumulated by grounding yourself to the ground buss in the unit (heavy gauge black wires connect to this buss).

IMPORTANT:

Turn the unit OFF during disassembly and part replacement. Recheck all work before you apply power to the unit.

IMPORTANT NOTICE

1 0 1 0 0 4

SERVICE MANUAL

DV-C6860

DVD PLAYER

© 2006                                          All rights reserved.

This manual is copyrighted by YAMAHA and may not be copied or

redistributed either in print or electronically without permission.

DV-C6860

■ 

CONTENTS

TO SERVICE PERSONNEL  . . . . . . . . . . . . . . . . . . 2–3
PREVENTION OF ELECTROSTATIC DISCHARGE  . . . 4
LOCALE MANAGEMENT INFORMATION  . . . . . . . . 4
FRONT PANEL  . . . . . . . . . . . . . . . . . . . . . . . . . . . . . . 5
REAR PANEL  . . . . . . . . . . . . . . . . . . . . . . . . . . . . . . . 5
REMOTE CONTROL  . . . . . . . . . . . . . . . . . . . . . . . . . . 5
SPECIFICATIONS  . . . . . . . . . . . . . . . . . . . . . . . . . . . . 6
DIMENSIONS  . . . . . . . . . . . . . . . . . . . . . . . . . . . . . . . . 7
INTERNAL VIEW  . . . . . . . . . . . . . . . . . . . . . . . . . . . . . 7

REPAIR NOTES  . . . . . . . . . . . . . . . . . . . . . . . . . . . . . . 8

DISASSEMBLY PROCEDURES  . . . . . . . . . . . . . . 9–10
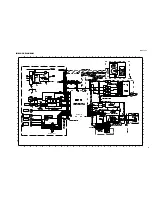
BLOCK DIAGRAM  . . . . . . . . . . . . . . . . . . . . . . . . . . . 11
PRINTED CIRCUIT BOARDS  . . . . . . . . . . . . . . . 12–21
SCHEMATIC DIAGRAMS  . . . . . . . . . . . . . . . . . . 22–30
REPLACEMENT PARTS LIST  . . . . . . . . . . . . . . 31–32

‘06. 02

For U model

Summary of Contents for DV-C6860 - DVD Changer

Page 1: ...search engineering and service departments of YAMAHA are continually striving to improve YAMAHA products Modifications are therefore inevitable and specifications are subject to change without notice or obligation to retrofit Should any discrepancy appear to exist please contact the distributor s Service Division WARNING Static discharges can destroy expensive components Discharge any static elect...

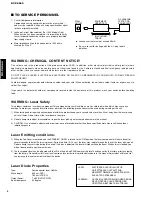
Page 2: ...g pre cautions must be used during servicing of the unit 1 When testing and or repairing any component within the product keep your eyes and skin more than 30 cm away from the laser pick up unit at all times Do not stare at the laser beam at any time 2 Do not attempt to readjust disassemble or repair the laser pick up unless noted elsewhere in this manual 3 CAUTION Use of controls adjustments or p...

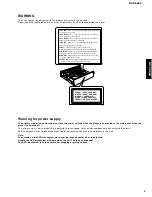
Page 3: ... or giving shocks CLA SS 1 LAS ER PRO DUC T LAS ER KLA SSE 1 PRO DUK T LUO KAN 1 LAS ERL AITE KLA SS 1 LAS ER APP ARA T PRO DUIT LAS ER DE CLA SSE 1 CLASS 1 LASER PRODUCT LASER KLASSE 1 PRODUKT LUOKAN 1 LASERLAITE KLASS 1 LASER APPARAT PRODUIT LASER DE CLASSE 1 CAUTION VISIBLE AND INVISIBLE LASER RADIATION WHEN OPEN AVOID EXPOSURE TO BEAM ADVARSEL SYNLIG OG USYNLIG LASERSTRÅLING VED ÅBNING UNDGÅ U...

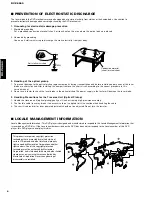
Page 4: ... electrostatic damage when servicing or handling the DVD mechanism 1 Grounding for electrostatic damage prevention 1 Worktable grounding Put a grounded conductive material sheet or iron sheet on the area where the optical pickup is placed 2 Human body grounding Use an anti static wrist strap to discharge the static electricity from your body 2 Handling of the optical pickup 1 To prevent damage to ...

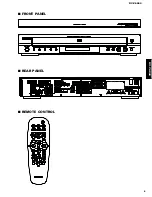
Page 5: ...DV C6860 5 DV C6860 REAR PANEL FRONT PANEL REMOTE CONTROL ...

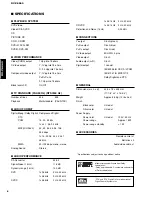
Page 6: ...fs 96 kHz 2 Hz 44 kHz fs 48 kHz 2 Hz 22 kHz SVCD fs 48 kHz 2 Hz 22 kHz fs 44 1 kHz 2 Hz 20 kHz CD VCD fs 44 1 kHz 2 Hz 20 kHz Distortion and Noise 1 kHz 0 0035 CONNECTIONS Y output Cinch green PB CB output Cinch blue PR CR output Cinch red S Video output Mini DIN 4 pins Video output Cinch Audio output L R Cinch Digital output 1 coaxial IEC60958 for CDDA LPCM IEC61937 for MPEG 1 2 Dolby Digital and...

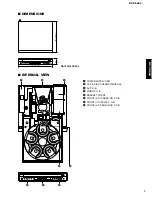
Page 7: ...NTERNAL VIEW 1 POWER SUPPLY UNIT 2 DVD 5 DISC CHANGER MODULE 3 AV P C B 4 MONO P C B 5 BRACKET FRONT 6 FRONT 2 STANDBY ON P C B 7 FRONT 1 DISPLAY P C B 8 FRONT 3 OPEN CLOSE P C B 75 3 425 16 3 4 435 17 1 8 Unit mm inch 1 2 4 6 7 8 5 3 ...

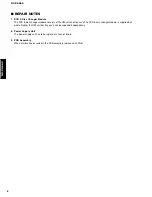
Page 8: ...he CM unit and tray ass y The DVD 5 disc changer module is supplied as a whole Neither the CM unit nor tray ass y can be supplied independently 2 Power Supply Unit The power supply unit has to be replaced in case of failure 3 PCB Assembly When a failure has occurred in the PCB assembly replace each P C B ...

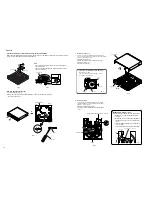
Page 9: ...lly eject the tray Remove 5 cable connections 1500 1503 1505 1508 1512 Remove 5 screw 252 P C B to rear panel Remove 2 screw 260 P C B to bottom frame Dismount AV P C B Power Supply Unit 1000 Open tray Fig 3 See how to manually eject the tray Remove 3 cable connections CN1 CN3 CN4 Remove 2 screws 260 P C B to bottom frame Release 2 spacers locking P C B to bottom frame Dismount power supply unit B...

Page 10: ...changer module a Remove the top cover b Open tray see How to manually eject the tray c Remove 1 screw 2 d Remove the tray ass y 2 Removal of Table The table cannot be supplied independently The table is contained in DVD 5 disc changer module and supplied as a DVD 5 disc changer module a Remove the plate table in Fig 6 b Remove 1 screw 2 and then take off the table in Fig 6 b d Top Cover Tray Ass y...

Page 11: ...N MUTEA G 10 M C D 3 8 16 L M 9 GND IN OUT TL431 GND P 1 5 6 N 1 2 MCLK O 7 8 15 H I F AOUTR 16 17 E 5 A MUTEB K 4 3 2 H SDATA L 11 18 IN GND TL431 13 A LD1117 11 B 20 14 I 12 E 10 15 17 LM317 4 LRCK C D RstN Audio Interface Control AUDIO OUT L R DIGITAL OUT COAXIAL DVD 5 DISC CHANGER MODULE POWER SUPPLY UNIT VIDEO S VIDEO FRONT 4 Board MONO Board FRONT 1 Board FRONT 2 Board FRONT 3 Board VIDEO OU...

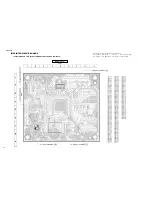
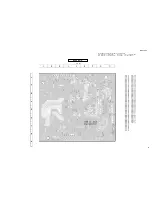
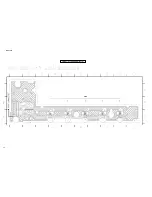
Page 12: ...TION ONLY NO REPLACEMENT PARTS WILL BE AVAILABLE MONO Side A SD 8 1 The first digit of a component indicates the component type 1xxx Connector 3xxx Resistor 5xxx Coil 7xxx IC Transistor FET 2xxx Capacitor 4xxx SMD jumper 6xxx Diode 9xxx Wire jumper ...

Page 13: ...860 13 MONO Side B SD 8 1 The first digit of a component indicates the component type 1xxx Connector 3xxx Resistor 5xxx Coil 7xxx IC Transistor FET 2xxx Capacitor 4xxx SMD jumper 6xxx Diode 9xxx Wire jumper ...

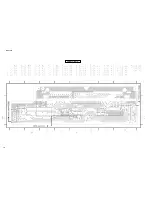
Page 14: ...DV C6860 14 FRONT 1 Side A ...

Page 15: ...DV C6860 15 FRONT 1 Side B ...

Page 16: ...DV C6860 16 FRONT 2 STANDBY ON Side A ...

Page 17: ...DV C6860 17 FRONT 2 STANDBY ON Side B ...

Page 18: ...DV C6860 18 FRONT 3 EJECT PLAY Side A ...

Page 19: ...DV C6860 19 FRONT 3 EJECT PLAY Side B ...

Page 20: ...DV C6860 20 FRONT 4 AV Side A ...

Page 21: ...DV C6860 21 FRONT 4 AV Side B ...

Page 22: ...1102 1 2 T112 10u 50V 100n 2107 5 6 7 8 9 2111 1101 1 2 3 4 100n B10B EH A 10K 2108 T109 3107 T116 100n 2119 10R 3102 100n 2105 100n 2104 4K7 3108 16V 2118 220u 1N4148 6101 2106 IR DV33 IRR VSTB VSCK VSDA DV33 100n Standby 5V standby 5V AVCC 5V standby ALRCK LED_ON 5V URST V18 5V 5V IRR RFV33 LDO_AV33 5V standby 5V standby Standby ON DV33 D 3 TO 1111 of FRONT 1 Board Page 26 TO POWER SUPPLY UNIT M...

Page 23: ...RA2 RA3 RA4 RA5 RA6 RA7 RA8 RA9 RAS_ RCLK OP_INP OP_OUT OSN OSP PLLVDD3 PLLVSS PRST_ PWMOUT1_ADIN0 RA0 RA1 RA10 LPFON LPFOP MA MB MC MC_DATA_INT2_ MD MDI1 MDI2 OP_INN IOCS_ IOOE_ IOWR_ IR IREF JITFN JITFO LDO1 LDO2 LPFIN LPFIP IOA18 IOA19 IOA2 IOA20 IOA21_GPIO IOA3 IOA4 IOA5 IOA6 IOA7 HIGHA3 HIGHA4 HIGHA5 HIGHA6 HIGHA7 HRFZC ICE IDACEXLP INT0_ IOA0 IOA1 GPIO0_VSYN GPIO1_HSYN GPIO2 GPIO3 GPIO4 GPIO...

Page 24: ...7 16 9 23 22 21 20 19 18 8 7 25 24 6 5 4 3 2 1 48 M29W160ET70 7303 2Mx8 1Mx16 FLASH 5301 100n 2302 100n 2309 10p 2323 28 41 54 6 12 46 52 16 39 15 36 40 18 1 14 27 3 9 43 49 51 53 5 7 8 10 11 13 42 44 17 37 38 19 2 4 45 47 48 50 22 35 25 26 29 30 31 32 33 34 20 21 7302 IS42S16400B 7T 23 24 Φ DRAM 1M X 16 X 4 2311 100n 3307 680R 5302 100n 2308 3310 2 2 7 33R 100n 2312 8 33R 3310 1 1 FLASH_VCC SD33 ...

Page 25: ... 18 19 2 20 21 22 23 1401 1 10 11 12 13 33R 3406 HLEM26S 1R T416 SACLK SLRCK SBCLK Y3 Y4 Y5 Y6 ACLK ALRCK ABCK ASDAT0 ASDAT1 ASDAT2 SDAT0 L SDAT1 SDAT2 R IOA21 ASDA ASCL FS1 FS0 Y6 Y5 Y4 Y3 MUTE_DAC ASPDIF SDAT2 R SDAT0 L SLRCK SBCLK SACLK SDAT1 MIC_IN C 1 TO 1505 of FRONT 4 Board Page 30 Components having special characteristics are marked Z and must be replaced with parts having specifications e...

Page 26: ... 41 1 10 1112 13 1415 16 7100 22p 2113 3108 GND 4R7 I127 100K 3150 2103 100n I130 3178 47R 3101 10K 3180 47R 6100 PDZ5 6 B 100K 3153 2R2 3105 I126 3116 10K 3158 I115 100K 3156 100K I123 51 4100 23 9 1 2 3 4 14 33 45 34 35 15 36 16 17 18 19 20 21 22 52 24 25 26 27 28 29 30 31 32 37 7 10 11 12 13 50 49 48 47 46 8 6 5 44 43 42 41 40 39 38 DRIVER CONTROLLER FIP Φ UPD16311GC AB6 7101 100K 3161 3176 100...

Page 27: ...YE 1n0 2203 GND 3200 10K 100n 2206 1n0 2204 I212 3 4 5 6 7 8 9 15 16 1 10 11 12 13 14 2 14FMN SMT A TF 1210 6205 LTL 816YE LTL 816YE 6204 I214 I213 I211 I202 330R 3204 1212 3205 330R 1n0 2205 2200 3207 1n0 10R 3202 330R LTL 816YE 6201 1215 I203 I201 I204 I205 3201 10K 1n0 2202 1n0 2201 3208 10R 1216 GND 1211 3206 330R 330R 3203 LTL 816YE 6203 SegKS3 5Vstby LED5 LED4 LED3 LED2 StandByOn 5VL Key3 Ke...

Page 28: ... B2 I308 B2 I309 B2 GND 2304 1n0 1n0 2303 1n0 1n0 2302 1n0 2300 2301 2 GND 1 OUT 3 VS 7300 1315 GND 47R 3302 GND I300 1316 4300 47p 2307 2305 4u7 3301 10K 3300 10K 1311 1313 1312 I309 I308 I301 I307 I305 I306 I304 I302 I303 3 4 5 6 7 8 9 11 12 1310 10FMN SMT A TF 1 10 2 1314 100n 2306 SegKS1 SegKS2 SegKS3 Key2 Key1 5Vstby SegKS2 SegKS3 Key1 Key2 5VL 5Vstby IR SegKS1 F 3 TO 1112 of FRONT 1 Board Pa...

Page 29: ...520 J920G 3483 100R 100R 1R0 3459 100n 2427 2442 100n 100n 2463 I418 I419 I415 I417 I412 I410 470R 3481 10K 3480 3478 10K 16V 10u 2468 2467 10u 16V 10n 2498 5 7 14 6 100n 2497 7440 3 2496 100n 2494 6 3V 22u 2495 16V 22u 4 5 8 2 3 6 7 7437 LD1117D33 1 22u 6 3V 2470 15K 1 3447 470R 3448 3450 47K 1 10n 2451 10K 3428 3436 4K7 10R 3442 470R 3441 10K 3429 470R 3433 8 4K7 3439 7440 4 9 7 14 7441 5 11 7 1...

Page 30: ...0R 3532 100R 4514 1 2 3 4 5 6 7 8 1500 B8B EH A 5 100R 3510 B5B EH A 1503 1 2 3 4 100R I501 3538 2529 27p I504 100R 3529 1u0 2533 2538 47p 6Vvid 12VL I515 6Vvid T2B SQ 1510 1 2 220u 10V 10K 3525 2543 1u8 5506 4501 4506 I510 I509 2528 47p I540 3517 330R I537 3552 100R 2524 100n 2512 100n 68K 3535 3523 3539 100R 330R 6Vvid 2541 1u0 PDZ15 B 6502 3544150R I530 I531 I547 7505 1 3 2 150R 3527 3530 BC847...

Page 31: ...01 252 252 270 107 270 161 333 338 270 270 270 260 260 270 270 240 260 344 336 260 260 252 252 251 1001 1002 1002 1 1004 2 1004 3 8502 8501 Tray Ass y Bracket Front CM Unit DVD 5 Disc Changer Module The DVD 5 Disc Changer Module consists of the CM Unit and Tray Ass y The DVD 5 Disc Changer Module is supplied as a whole Neither the CM Unit nor Tray Ass y can be supplied independently 270 1004 1 140...

Page 32: ... BL 3x6 MFZN2BL 2511 077 00039 260 AAX23650 PAN HEAD TORX S TIGHT SCREW SI 3x6 MFNI33 2511 077 01039 270 AAX23640 PAN HEAD TORX S TIGHT SCREW 3x6 MFZN2BL 2511 077 00039 Z 336 AAX47750 POWER CABLE 1 8m 2422 070 98235 344 AAX53540 BUSH 450H259010 3139 114 26671 Z 1001 AAX76590 POWER SUPPLY UNIT 05P15 3139 247 12181 1002 AAX76450 DVD 5 DISC CHANGER MODULE SD5 5 3139 247 12371 1002 1 VQ776900 BELT V 1...

Reviews: