PREPARATION FOR FIRST OPERATION
7
ENGLISH
PREPARATION FOR FIRST OPERATION
3
CAUTION:
To avoid personal injury:
¡
To avoid personal injury from
contact with moving parts;
¡
N e v e r o p e n t h e d o o r o r
generator side cover while the
engine is running.
¡
DO NOT touch muffler or
exhaust pipes while they are
hot; Severe burns could result.
�
How to Open the Door
Open the machine door and hold it open with the
door rod
q
.
(1) Door rod
�
Battery
The battery is shipped in dry, charged condition
without electrolyte.
The battery must be charged properly before using
for the first time.
3
DANGER:
To avoid the possibility of battery
explosion:
The battery comes in two types:
refillable and non-refillable. For using
the refillable type battery, follow the
instructions below.
¡
DO NOT use or charge the battery if
the fluid level stands below the
LOWER (lower limit level) mark.
Otherwise, the battery component
parts may get deteriorated earlier
than expected, which may shorten
the battery's service life or cause an
explosion.
Immediately, add distilled water
until the battery's fluid level comes
somewhere between the UPPER
and LOWER levels.
¡
Keep all sparks and flames away
from the battery and fuel tank. A
battery, especially when charging,
will give off hydrogen and oxygen
gases which can explode and
cause serious personal injury.
1. Remove the vent plugs.
2. Fill cells up to the upper level with electrolyte.
[Specific gravity of sulfuric acid 1.270 to 1.290 (at
20
°
C=68
°
F)]
3. Allow the battery to sit for about one hour after filling.
4. If the electrolyte level is dropped, refill with electrolyte
up to the upper level.
5. Charge the battery at the normal charging current of
6.0 amperes.
6. Replace the vent plugs, and wash off any electrolyte
which may have spilled.
(1) Vent plug opening
(A) Upper level
(2) Electrolyte level indication tube
(B) Lower level
(3) Indicated level
NOTE:
¡
The duration of dry charged efficiency, will decrease
in proportion to the period of time elapsed after
shipment and during storage. To obtain the longest
service life of the battery, it is necessary for the
battery to be charged for a sufficient period of time.
Continue to charge until all cells are gassing freely,
and the voltage and specific gravity reading in all
cells remain constant for 3 or more successive
readings taken at 30 minute intervals.
¡
When the battery has been charged fully, the
specific gravity of electrolyte should be 1.270 to
1.290 (at 20˚C=68˚F).
T E M P E R A T U R E C O R R E C T I O N F O R
HYDROMETER READING
S20=St+{0.0007 (t-20)}
S20 .......................... Sp. Gravity at 20˚C (After
temperature correction)
St ............................. S p . G r a v i t y a t t ˚ C
(Hydrometer reading)
0.0007 ...................... Temperature correction
factor
t ................................ Observed temperature of
electrolyte
1
TIP
WARNING
The battery must be charged properly before using
for the first time.
9CGNO̲E̲p00-40.indd 23
2009/11/17 16:31:35
PREPARATION FOR FIRST OPERATION
7
ENGLISH
PREPARATION FOR FIRST OPERATION
3
CAUTION:
To avoid personal injury:
¡
To avoid personal injury from
contact with moving parts;
¡
N e v e r o p e n t h e d o o r o r
generator side cover while the
engine is running.
¡
DO NOT touch muffler or
exhaust pipes while they are
hot; Severe burns could result.
�
How to Open the Door
Open the machine door and hold it open with the
door rod
q
.
(1) Door rod
�
Battery
The battery is shipped in dry, charged condition
without electrolyte.
The battery must be charged properly before using
for the first time.
3
DANGER:
To avoid the possibility of battery
explosion:
The battery comes in two types:
refillable and non-refillable. For using
the refillable type battery, follow the
instructions below.
¡
DO NOT use or charge the battery if
the fluid level stands below the
LOWER (lower limit level) mark.
Otherwise, the battery component
parts may get deteriorated earlier
than expected, which may shorten
the battery's service life or cause an
explosion.
Immediately, add distilled water
until the battery's fluid level comes
somewhere between the UPPER
and LOWER levels.
¡
Keep all sparks and flames away
from the battery and fuel tank. A
battery, especially when charging,
will give off hydrogen and oxygen
gases which can explode and
cause serious personal injury.
1. Remove the vent plugs.
2. Fill cells up to the upper level with electrolyte.
[Specific gravity of sulfuric acid 1.270 to 1.290 (at
20
°
C=68
°
F)]
3. Allow the battery to sit for about one hour after filling.
4. If the electrolyte level is dropped, refill with electrolyte
up to the upper level.
5. Charge the battery at the normal charging current of
6.0 amperes.
6. Replace the vent plugs, and wash off any electrolyte
which may have spilled.
(1) Vent plug opening
(A) Upper level
(2) Electrolyte level indication tube
(B) Lower level
(3) Indicated level
NOTE:
¡
The duration of dry charged efficiency, will decrease
in proportion to the period of time elapsed after
shipment and during storage. To obtain the longest
service life of the battery, it is necessary for the
battery to be charged for a sufficient period of time.
Continue to charge until all cells are gassing freely,
and the voltage and specific gravity reading in all
cells remain constant for 3 or more successive
readings taken at 30 minute intervals.
¡
When the battery has been charged fully, the
specific gravity of electrolyte should be 1.270 to
1.290 (at 20˚C=68˚F).
T E M P E R A T U R E C O R R E C T I O N F O R
HYDROMETER READING
S20=St+{0.0007 (t-20)}
S20 .......................... Sp. Gravity at 20˚C (After
temperature correction)
St ............................. S p . G r a v i t y a t t ˚ C
(Hydrometer reading)
0.0007 ...................... Temperature correction
factor
t ................................ Observed temperature of
electrolyte
1
TIP
WARNING
The battery must be charged properly before using
for the first time.
9CGNO̲E̲p00-40.indd 23
2009/11/17 16:31:35
PREPARATION DE LA PREMIERE UTILISATION
7
Pour éviter toute blessure :
•
Evitez toute blessure résultant d’un
contact avec des pièces mobiles.
•
N’ouvrez jamais le capot ou le
cache latéral du générateur
pendant que le moteur tourne.
•
Ne touchez PAS le silencieux ni
les tuyaux d’échappement tant
qu’ils sont brûlants. De graves
brûlures pourraient en résulter.
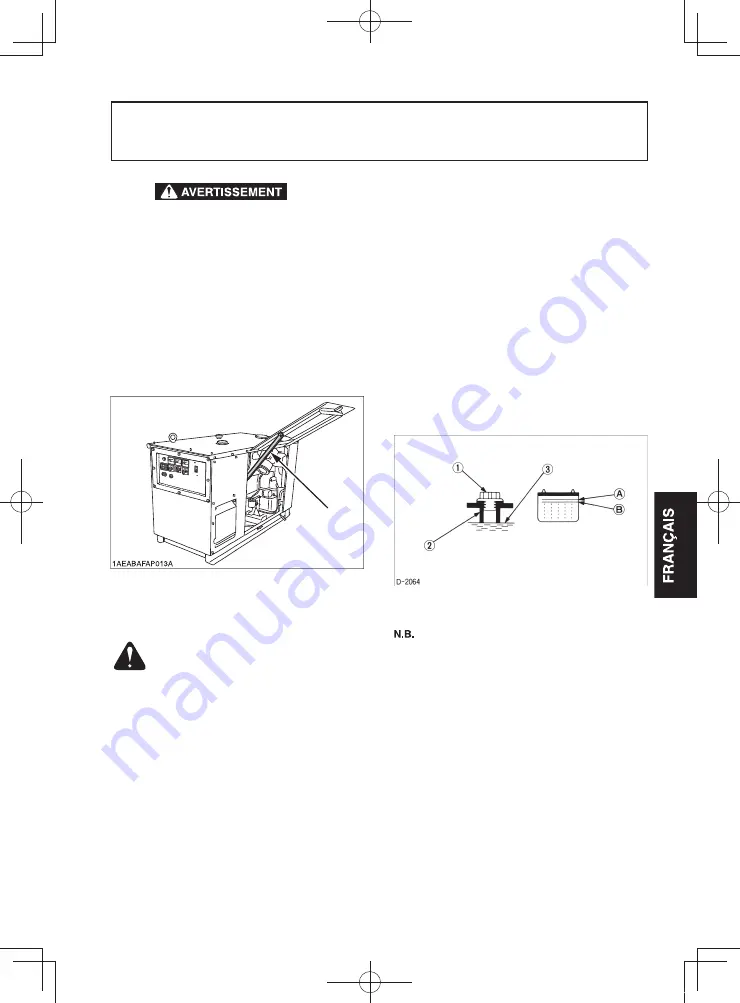
Comment ouvrir le capot
Ouvrez le capot du générateur et maintenez-le ouvert à
l’aide de la tige de capot
①
.
(1) Tige de capot
Batterie
La batterie doit être chargée correctement avant la
première utilisation.
DANGER
Pour éviter tout risque d’explosion
de la batterie :
Il existe deux types de batteries : ouverte
ou fermée. Si vous utilisez une batterie
ouverte, veuillez vous conformer aux
instructions ci-dessous.
•
N’utilisez PAS et ne chargez PAS la
batterie si le niveau d'électrolyte se
situe en dessous du repère inférieur
LOWER (niveau de limite inférieure).
Sinon, les composants risquent de se
détériorer plus tôt que prévu, ce qui
peut réduire la durée de vie utile de la
batterie ou provoquer une explosion.
Ajoutez immédiatement de l’eau distillée
jusqu’à ce que le niveau d’électrolyte
soit compris entre les niveaux inférieur
LOWER et supérieur UPPER.
■
■
•
Gardez la batterie et le réservoir de
carburant à l’écart des étincelles et
des flammes nues. Une batterie, en
particulier au cours de la charge, génère
des gaz d’hydrogène et d’oxygène qui
présentent un risque d’explosion, et
donc de blessures graves.
1. Déposez les bouchons d’aération.
2. Remplissez les cellules d’électrolyte jusqu’au niveau
supérieur. [Densité d’acide sulfurique de 1,270 à
1,290 (à 20 °C)]
3. Laissez la batterie reposer pendant environ une heure
après avoir fait l’appoint d’électrolyte.
4. Si le niveau d’électrolyte a baissé, refaites l’appoint
d’électrolyte jusqu’au niveau supérieur.
5. Chargez la batterie au courant de charge normal de
6,0 ampères.
6. Replacez les bouchons d’aération et essuyez les
éventuelles coulures d’électrolyte.
(1) Ouverture du bouchon d’aération
(2) Tube d’indication du niveau d’électrolyte
(3) Niveau indiqué
(A) Niveau supérieur
(B) Niveau inférieur
•
La durée d’efficacité de la charge sèche diminue
proportionnellement au temps écoulé depuis l’expédition ainsi
que pendant le stockage. Pour assurer une grande durée de
vie utile de la batterie, il est nécessaire de la charger pour
une durée suffisante. Continuez à charger la batterie jusqu’à
ce que les cellules émettent des vapeurs gazeuses et que les
valeurs de tension et de densité de l’électrolyte dans toutes
les cellules restent constantes lors de 3 relevés successifs
ou plus pris à des intervalles de 30 minutes.
•
Lorsque la batterie est complètement chargée, la
densité de l’électrolyte doit être comprise entre 1,270
et 1,290 (à 20 °C).
CORRECTION DE TEMPERATURE POUR VALEUR
DENSITOMETRIQUE
S20 = St + {0,0007 (t-20)}
S20 ........................... densité à 20 °C (après correction
de la température)
St .............................. densité à t °C (valeur
densitométrique)
0,0007 ...................... Facteur de correction de la
température
t ................................. Température relevée de
l’électrolyte
PREPARATION DE LA PREMIERE UTILISATION
9CGNO_F.indb 7
2009/12/11 9:41:24
Summary of Contents for EDL13000SDE
Page 2: ...9cg cover_blank indd 1 2009 12 22 10 25 35 ...
Page 66: ...9CGNO E p47 indd 2 9CGNO E p47 indd 2 2009 10 26 10 04 12 2009 10 26 10 04 12 ...
Page 105: ...9CGNO ES p00 40 indd 39 9CGNO ES p00 40 indd 39 2009 12 18 16 57 03 2009 12 18 16 57 03 ...
Page 192: ...Ё 䇁 㒓 9CGNO C p41 46 indd 6 9CGNO C p41 46 indd 6 2009 12 15 17 50 33 2009 12 15 17 50 33 ...
Page 194: ...9CGNO C p47 indd 2 9CGNO C p47 indd 2 2009 12 03 15 34 19 2009 12 03 15 34 19 ...
Page 214: ... SPECIFICATIONS 9CGNO_F indb 4 2009 12 11 9 41 22 ...
Page 230: ...20 FONCTIONNEMENT DU MOTEUR 9CGNO_F indb 20 2009 12 11 9 41 29 ...
Page 250: ...40 DEPANNAGE 9CGNO_F indb 40 2009 12 11 9 41 35 ...
Page 256: ...46 SCHEMA DE CABLAGE 9CGNO_F indb 46 2009 12 11 9 41 37 ...
Page 258: ...9CGNO_F indb 48 2009 12 11 9 41 37 ...
Page 278: ... 1 9CGNO E ТЕХНИЧЕСКИЕ ХАРАКТЕРИСТИКИ 9CGNO_R indb 4 2009 12 11 9 50 05 ...
Page 294: ...20 ЭКСПЛУАТАЦИЯ ДВИГАТЕЛЯ 9CGNO_R indb 20 2009 12 11 9 50 13 ...
Page 314: ...40 ПОИСК И УСТРАНЕНИЕ НЕИСПРАВНОСТЕЙ 9CGNO_R indb 40 2009 12 11 9 50 19 ...
Page 320: ...46 МОНТАЖНАЯ СХЕМА 9CGNO_R indb 46 2009 12 11 9 50 21 ...
Page 322: ...9CGNO_R indb 48 2009 12 11 9 50 21 ...
Page 323: ...9CGNO_R indb 48 2009 12 07 17 29 23 ...
Page 325: ... عريب األسالك لشبكة التخطيطى الرسم 46 00AR_9CGN0 indb 46 12 8 2009 9 58 11 AM ...
Page 331: ... عريب وإصالحه اخللل حتري 40 00AR_9CGN0 indb 40 12 8 2009 9 58 07 AM ...
Page 351: ... عريب املحرك تشغيل 20 00AR_9CGN0 indb 20 12 8 2009 9 57 56 AM ...
Page 367: ... عريب املواصفات 4 00AR_9CGN0 indb 4 12 8 2009 9 57 46 AM ...


