28
MAINTENANCE
ENGLISH
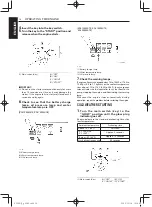
Evacuator Valve
Open the evacuator valve once a week under ordinary
conditions - or daily when used in dusty condition - to
get rid of large particles of dust and dirt.
IMPORTANT:
¡
If the dust cup is mounted incorrectly, dust or dirt
will not collect in the cup and allow the dust to
come into direct contact with the element and thus
require the element be replaced prematurely.
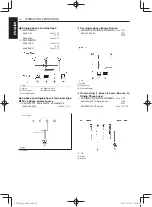
(1) Air cleaner body
(2) Secondary element
(3) Primary element
(4) Dust cup
(5) “TOP” mark
Air Cleaner with Dust Cup
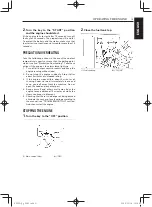
Remove and clean out the dust cup once a week
under normal conditions or daily in extreme
conditions.
Do not allow the dust cup to fill above half way
regardless of conditions.
Install the air cleaner dust cup with “TOP” indicated
on the rear of the cup in the upward position with
horizontally mounted air cleaner bodies or vertically
mounted air cleaner bodies, the cup may be
mounted in any direction.
Inspection Fuel Line
Check and retighten the fuel
line clamps
Every 100 hours
Replace the fuel filter
Every 500 hours
Replace the fuel line
Every two years
IMPORTANT:
¡
After bleeding the air, make sure that the fuel
injection pump cock is closed.
¡
Wipe any spilled fuel off generator.
¡
Always shut off the engine and allow it to cool
before inspecting the fuel system.
Checking Fuel Line
Check the fuel line clamps after every 100 hours of
operation.
1.
If the clamp is loose, tighten it securely after
coating the clamp screws with oil.
2.
The fuel line will deteriorate even if the generator
is not used. Replace it every two years.
When replacing the line, replace the line clamp
also.
3.
If the fuel line or clamp is damaged in less than
two years, replace it.
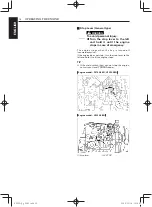
Draining Water in the Fuel Tank
The water in the tank can be drained by opening the
tap, as shown in the illustration.
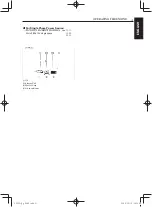
(1) Fuel tank drain tap
(A) “OPEN”
(B) “CLOSE”
NOTE:
¡
After replacing or repairing any parts in the fuel
injection system, bleed the air.
¡
When assembling any part of the fuel injection
system, make sure that dirt does not enter the fuel
line.
TIP
9CGNO̲E̲p00-40.indd 44
9CGNO̲E̲p00-40.indd 44
2009/12/18 16:56:50
2009/12/18 16:56:50
Summary of Contents for EDL13000SDE
Page 2: ...9cg cover_blank indd 1 2009 12 22 10 25 35 ...
Page 66: ...9CGNO E p47 indd 2 9CGNO E p47 indd 2 2009 10 26 10 04 12 2009 10 26 10 04 12 ...
Page 105: ...9CGNO ES p00 40 indd 39 9CGNO ES p00 40 indd 39 2009 12 18 16 57 03 2009 12 18 16 57 03 ...
Page 192: ...Ё 䇁 㒓 9CGNO C p41 46 indd 6 9CGNO C p41 46 indd 6 2009 12 15 17 50 33 2009 12 15 17 50 33 ...
Page 194: ...9CGNO C p47 indd 2 9CGNO C p47 indd 2 2009 12 03 15 34 19 2009 12 03 15 34 19 ...
Page 214: ... SPECIFICATIONS 9CGNO_F indb 4 2009 12 11 9 41 22 ...
Page 230: ...20 FONCTIONNEMENT DU MOTEUR 9CGNO_F indb 20 2009 12 11 9 41 29 ...
Page 250: ...40 DEPANNAGE 9CGNO_F indb 40 2009 12 11 9 41 35 ...
Page 256: ...46 SCHEMA DE CABLAGE 9CGNO_F indb 46 2009 12 11 9 41 37 ...
Page 258: ...9CGNO_F indb 48 2009 12 11 9 41 37 ...
Page 278: ... 1 9CGNO E ТЕХНИЧЕСКИЕ ХАРАКТЕРИСТИКИ 9CGNO_R indb 4 2009 12 11 9 50 05 ...
Page 294: ...20 ЭКСПЛУАТАЦИЯ ДВИГАТЕЛЯ 9CGNO_R indb 20 2009 12 11 9 50 13 ...
Page 314: ...40 ПОИСК И УСТРАНЕНИЕ НЕИСПРАВНОСТЕЙ 9CGNO_R indb 40 2009 12 11 9 50 19 ...
Page 320: ...46 МОНТАЖНАЯ СХЕМА 9CGNO_R indb 46 2009 12 11 9 50 21 ...
Page 322: ...9CGNO_R indb 48 2009 12 11 9 50 21 ...
Page 323: ...9CGNO_R indb 48 2009 12 07 17 29 23 ...
Page 325: ... عريب األسالك لشبكة التخطيطى الرسم 46 00AR_9CGN0 indb 46 12 8 2009 9 58 11 AM ...
Page 331: ... عريب وإصالحه اخللل حتري 40 00AR_9CGN0 indb 40 12 8 2009 9 58 07 AM ...
Page 351: ... عريب املحرك تشغيل 20 00AR_9CGN0 indb 20 12 8 2009 9 57 56 AM ...
Page 367: ... عريب املواصفات 4 00AR_9CGN0 indb 4 12 8 2009 9 57 46 AM ...

