background image

E-41

English

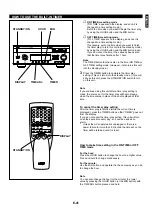
ON TIME/time setting mode
[“ON TIME” appears on the display, and soon it is
changed to a time setting mode.]
Set to the time when you want to begin the timer play
by using the HOUR button and the MIN button.

OFF TIME/time setting mode
[“OFF TIME” appears on the display, and soon it is
changed to a time setting mode.]
If necessary, set to the time when you want to finish
the timer play (to turn this unit into the standby mode)
by using the HOUR button and the MIN button. Even
if you do not set the time, it has already been set so
that the timer play finishes after 1 hour.

Note
The TIMER button functions also in the time (ON TIME or
OFF TIME) setting mode. (However, it also turns this unit
into the standby mode.)

3

Press the TIMER button to complete the timer play
setting. (This unit turns into the standby mode.) If you will
still use this unit, press the STANDBY/ON switch to turn
on this unit.

Note

If you continue using this unit after a timer play setting is
made, the source set for the timer play will begin playing
when the time comes in place of the source played at that
time.

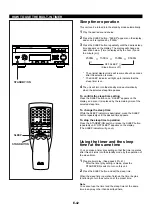
To cancel the timer play setting

After the timer play is finished (while the current time is
displayed), press the TIMER button so that “TIMER” goes out
from the display.
If you do not cancel the timer play setting, this unit will turn
on at the same time every day, so it can be used as an
alarm. 
*

Unless the AC supply lead is unplugged or there is a
power failure for more than 5 minutes, the time set on the
timer will be retained until it is reset.

How to make time setting in the ON TIME or OFF
TIME mode

For the hour:
Press the HOUR button to change the hour to a higher value.
Press and hold to change continuously.

For the minute:
Use the MIN button and operate it in the same way as you do
to change the hour.

Note

You can also change the hour (or the minute) to a lower
value by pressing the HOUR button (or the MIN button) with
the TIME ADJ button pressed and held.

HOW TO USE THE BUILT-IN TIMER

TIME

A

PROG

B

C

D

+

I0

E

CD

TUNER

1

1

2

2

3

3

4

4

5

5

6

6

7

7

8

8

9

0

PRESET

INPUT

MUSIC

PROGRAM

STANDBY/ON

DISPLAY

SLEEP

ECHO

FLAT

LEVEL

KARAOKE

VOLUME

DISC SKIP

STOP

PLAY/PAUSE

TUNER

CD

TEST

CENTER/REAR

/DELAY

OPEN/CLOSE

REPEAT

RANDOM

MODE

CD CHANGER RECEIVER EMX–120CD

PRESET/TUNING/BAND

A/B/C/D/E

OPEN/CLOSE

DISC 

1

DISC 

2

DISC 

3

DISC

CHANGE

VOLUME

INPUT SELECTOR

VCR•LD/TV•CD•TAPE/MD•TUNER

CD

TUNER

STANDBY/ON

PHONES

KARAOKE

PROGRAM

MEMORY

MUSIC

DISPLAY

MEMORY

AUTO/MAN’L

REPEAT

TIME

TIME ADJ

TIMER

HOUR

MIN

INPUT TRIM

MIC TONE

MIC

MIC MIXING

SOFT

NORMAL

MAX

MIN

ECHO

ECHO

DISPLAY

HOUR

MIN

STANDBY/ON

TIME ADJ

STANDBY/ON

DISPLAY

TIMER

Summary of Contents for EMX-120CD

Page 1: ...ANGER RECEIVER EMX 120CD PRESET TUNING BAND A B C D E OPEN CLOSE DISC CHANGE VOLUME INPUT SELECTOR VCR LD TV CD TAPE MD TUNER CD TUNER STANDBY ON PHONES KARAOKE PROGRAM MEMORY MUSIC DISPLAY MEMORY AUTO MAN L REPEAT TIME TIME ADJ TIMER HOUR MIN INPUT TRIM MIC TONE MIC MIC MIXING SOFT NORMAL MAX MIN ECHO ECHO DISC 1 DISC 2 DISC 3 ...

Page 2: ...IED ACCESSORIES After unpacking check that the following parts are contained ACCESORIOS INCLUIDOS Desembalar el aparato y verificar que los siguientes accesorios están en la caja TIME A PROG B C D I0 E CD TUNER 1 1 2 2 3 3 4 4 5 5 6 6 7 7 8 8 9 0 PRESET INPUT MUSIC PROGRAM STANDBY ON DISPLAY SLEEP ECHO FLAT LEVEL KARAOKE VOLUME DISC SKIP STOP PLAY PAUSE TUNER CD TEST CENTER REAR DELAY OPEN CLOSE R...

Page 3: ... REPEAT TIME TIME ADJ TIMER HOUR MIN INPUT TRIM MHz PRESET TOTAL REM NOR TEST PHANTOM TIMER SLEEP STEREO RANDOM TUNED MEMORY AUTO PROGRAM MUSIC ROCK POPS JAZZ USER 12 KARAOKE L R VOCAL CUT PRO LOGIC HALL ARENA DISCO 3 STEREO STADIUM MONO MOVIE 100 1K 10K VCD S F REP PBC PROG VOLUME OVER 1 2 3 4 7 8 9 10 13 14 15 5 11 6 12 KHz MIC TONE MIC MIC MIXING SOFT NORMAL MAX MIN 3 2 4 8 7 0 A B C D E F M G ...

Page 4: ...MEMORY AUTO MAN L REPEAT TIME TIME ADJ TIMER HOUR MIN INPUT TRIM MHz TRACK PRESET TOTAL REM NOR TEST PHANTOM TIMER SLEEP STEREO RANDOM TUNED MEMORY AUTO PTY HOLD PROGRAM MUSIC ROCK POPS JAZZ USER 12 PRO LOGIC HALL ARENA DISCO 3 STEREO STADIUM MONO MOVIE 100 1K 10K S F REP PROG VOLUME OVER 1 2 3 4 7 8 9 10 13 14 15 5 11 6 12 KHz MIC TONE MIC MIC MIXING SOFT NORMAL MAX MIN ECHO ECHO O V W P Q R S T ...

Page 5: ...AT LEVEL KARAOKE VOLUME DISC SKIP STOP PLAY PAUSE TUNER CD TEST CENTER REAR DELAY OPEN CLOSE REPEAT RANDOM MODE 2 1 3 4 A F E C G B D 5 7 8 9 0 6 H TIME A PROG B C D I0 E CD TUNER 1 1 2 2 3 3 4 4 5 5 6 6 7 7 8 8 9 0 PRESET DISC SKIP STOP PLAY PAUSE OPEN CLOSE REPEAT RANDOM MODE I J K L S R O N M P Q 3 1 3 2 4 30 30 0 2 m 6 m 8 20 5 ...

Page 6: ... VIDEO SIGNAL SUBWOOFER OUT OUT SPEAKERS CENTER REAR SPEAKERS FRONT R L CENTER REAR REAR REAR SINGLE CENTER 6Ω MIN SPEAKER 6Ω MIN SPEAKER SEE OWNER S MANUAL FOR CONNECTION SEE OWNER S MANUAL FOR CONNECTION REAR 4Ω MIN SPEAKER REAR SINGLE 8Ω MIN SPEAKER R L 50kHz 9kHz 10kHz 100kHz FM AM FREQUENCY STEP CENTER MODE NORMAL PHANTOM AC OUTLET UNSWITCHED 100W MAX VOLTAGE SELECTOR L R L R 6 Rear speakers ...

Page 7: ...FER R IN OUT IN OUT OUT VCR MONITOR OUT LD TV VIDEO SIGNAL ANTENNA AM FM GND 75Ω UNBAL IN OUT VIDEO SIGNAL SPEAKERS CENTER REAR R L CENTER REAR REAR REAR SINGLE CENTER 6Ω MIN SPEAKER SEE OWNER S MANUAL FOR CONNECTION REAR 4Ω MIN SPEAKER REAR SINGLE 8Ω MIN SPEAKER 50kHz 9kHz 10kHz 100kHz FM AM FREQUENCY STEP CENTER MODE NORMAL PHANTOM AC OUTLET UNSWITCHED 100W MAX VOLTAGE SELECTOR L R 7 White line ...

Page 8: ...T IN OUT OUT VCR MONITOR OUT LD TV VIDEO SIGNAL ANTENNA AM FM GND 75Ω UNBAL IN OUT VIDEO SIGNAL 50kHz 9kHz 10kHz 100kHz FM AM FREQUENCY STEP CENTER MODE NORMAL PHANTOM AC OUTLET UNSWITCHED 100W MAX VOLTAGE SELECTOR AUDIO OUT VIDEO OUT AUDIO OUT AUDIO IN VIDEO OUT VIDEO IN LINE OUT LINE IN VIDEO IN 8 LD player etc Tocadiscos de discos láser etc Monitor TV Monitor de TV Tape deck MD recorder etc Pla...

Page 9: ...TH THIS UNIT 29 USING GRAPHIC EQUALIZER 30 32 USING SOUND FIELD PROCESSOR 33 36 KARAOKE OPERATION 37 39 HOW TO USE THE BUILT IN TIMER 40 42 TROUBLESHOOTING 43 44 CARE OF COMPACT DISCS 44 SPECIFICATIONS 45 Thank you for purchasing this YAMAHA product We hope it will give you many years of trouble free enjoyment For the best performance read this manual carefully It will guide you in operating your ...

Page 10: ...ot use a disc with tape seals or paste on it because damage to the unit may result To assure the finest performance please read this manual carefully Keep it in a safe place for future reference Choose the installation location of this unit carefully Avoid placing it in direct sunlight or close to a source of heat Also avoid locations subject to vibration and excessive dust heat cold or moisture K...

Page 11: ...se specified herein may result in hazardous radiation exposure CAUTION 2 As the laser beam used in this unit is harmful to the eyes do not attempt to disassemble the cabinet Refer servicing to qualified personnel only Laser component in this product is capable of emitting radiation exceeding the limit for Class 1 PRECAUTIONS READ THIS BEFORE OPERATING YOUR UNIT This unit is classified as a CLASS 1...

Page 12: ...phone Connecting Capability MIC Mixing Level and MIC Tone Controls Karaoke Sound Recording Capability Recording Your Singing Voice and Karaoke Effects with the Music Source This unit employs a Dolby Pro Logic Surround decoder similar to professional Dolby Stereo decoders used in many movie theaters By using the Dolby Pro Logic Surround decoder you can experience the dramatic realism and impact of ...

Page 13: ...lector Button 7 PHONES Jack 8 KARAOKE Button 9 User Program MEMORY Button 0 Remote Control Sensor A DISPLAY Button B Tuner MEMORY TIME ADJUST Button C AUTO MAN L TIMER Button D REPEAT HOUR Button E TIME MIN Button F INPUT TRIM Button G CD INPUT SELECTOR Button H TUNER INPUT SELECTOR Button I INPUT SELECTOR Down Up Buttons J MIC TONE Microphone Tone Control K MIC Microphone Jacks L MIC MIXING Micro...

Page 14: ... the main unit with a soft cloth Exposing the sensor on the main unit to strong light especially an inverter type of fluorescent lamp etc may interfere with operation In this case reposition the main unit to avoid direct lighting Keep the remote control transmitter away from moisture excessive heat shock and vibrations The remote control transmitter s usable range is within 0 2m 8 and 6m 20 away f...

Page 15: ...peaker The center speaker is not used in this configuration If the sound field program PRO LOGIC is selected the center sound will be output from the left and the right front speakers although the program 3 STEREO is useless in this configuration However the sound effect of other programs can be almost the same as that of the 5 speaker configuration Be sure to set the center channel mode to the PH...

Page 16: ...rear speakers on a shelf rack or on the floor directly or hang them on the wall To mount the rear speakers on a wall 1 Attach the provided mounting bracket to the rear of the speaker by using the provided screws 2 Fasten screws into a firm wall or wall support as shown in the diagram and hang the holes of the mounting bracket on the protruding screws The holes are arranged so that the speakers can...

Page 17: ...es inside as figured left SETTING UP THE SPEAKERS Mounting the center speaker NX C70 Place the speaker on top of the TV or on the floor under the TV or inside the TV rack in a stable position When placing the speaker on top of the TV to prevent the speaker from falling down put the provided pads at four points on bottom of the speaker Notes Do not place the speaker on top of the TV whose area is s...

Page 18: ...How to connect the YAMAHA NS P30 speaker system separate purchase to this unit See figure 7 on page 7 7 If you connect the YAMAHA NS P30 speaker system to this unit read the following descriptions NX E70 Rear speakers Connect the push type input terminals on the rear of the speakers to the REAR SPEAKERS terminals of this unit with the provided speaker cables One side of the speaker cable has a whi...

Page 19: ...enna try reversing the wire connections from the upper terminal to the lower one and vice versa Do not place the AM loop antenna on the unit It will result in noise generation since the unit is equipped with digital electronics Place the AM loop antenna away from the unit 3 External FM antenna Use an external FM antenna instead of an indoor FM antenna if you need better reception Consult your deal...

Page 20: ...is outlet is 100 watts Connecting the AC supply lead After completing all connections plug the AC supply lead into a convenient AC outlet Unplug the AC supply lead from the AC outlet if the unit is not to be used for a long period of time SPEAKERS CENTER REAR SPEAKERS FRONT MAINS R L CENTER REAR REAR REAR SINGLE CENTER 6Ω MIN SPEAKER 6Ω MIN SPEAKER SEE OWNER S MANUAL FOR CONNECTION SEE OWNER S MAN...

Page 21: ...nit into the standby mode This unit will be automatically turned into the standby mode if 30 minutes pass without any operation on the control parts of this unit after a playback of CD ends This function is not available unless time setting is made on the built in clock INPUT MUSIC PROGRAM STANDBY ON DISPLAY SLEEP FLAT LEVEL VOLUME TUNER CD TEST CENTER REAR DELAY ECHO KARAOKE CD CHANGER RECEIVER E...

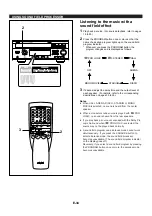
Page 22: ... the HOUR button and set the hour Press the HOUR button once to advance the time by 1 hour Press and hold to advance continuously 3 While holding the TIME ADJ button pressed press the MIN button and set the minute Press the MIN button once to advance the time by 1 minute Press and hold to advance continuously Australia model uses a 24 hour display For General model either the 24 hour display or th...

Page 23: ...rol 4 When you finish the adjustment release the INPUT TRIM button The selected value is memorized by this operation 5 In the same way adjust input level of other sources FREQ PS PTY RT CT INPUT TRIM FREQ PS PTY RT CT INPUT TRIM 1 2 3 INPUT SELECTOR VCR LD TV CD TAPE MD TUNER CD TUNER VOLUME Adjusting brightness of the display If desired you can adjust brightness of the display 1 Press and hold th...

Page 24: ...page 7 for details NORMAL For 5 speaker configuration Select this position when you use the center speaker PHANTOM For 4 speaker configuration Select this position when you do not use the center speaker The center sound will be output from the left and right front speakers 1 Press the STANDBY ON switch to turn the power on 2 Turn the VOLUME control counterclockwise to decrease the volume to minimu...

Page 25: ... speakers pressing the LEVEL control buttons change the output level of the rear speakers Pressing the button raises and the button lowers the level 7 When the adjustments are finished press the TEST button to cancel the test tone TEST disappears from the display Notes Once you have completed these adjustments you can adjust whole sound level on your audio system by using the VOLUME control or the...

Page 26: ...he music calendar will be displayed only for the number of tracks on the disc being selected If the compact disc contains more than 15 tracks the OVER indicator will light up on the music calendar 5 If necessary change the disc play mode by pressing the disc play MODE selector button on the remote control transmitter watching the display Single disc play mode Only a designated disc is played back ...

Page 27: ... the track number input buttons on the remote control transmitter any track you wish to listen to can be played back directly Use the track number input buttons to select the desired track number Playback will begin automatically A For example to choose selection 5 Press the 5 button B For example to choose selection 12 1 Press the 10 button 2 Within a few seconds press 2 button C For example to c...

Page 28: ...everse through the disc Press once for each track to be advanced or reversed Press once to advance to the track following the one now playing back Press once to return to the start of the track now playing back Press twice to return to the track before the track now playing back Notes This function can also be performed while the CD player is stopped Press the play pause button when your desired t...

Page 29: ...n 2 Within 3 seconds press the 2 button 5 Repeat steps 3 and 4 for any other track Up to 20 tracks can be programmed 6 Press the play pause button to start playback of programmed tracks Notes It is also possible to program a sequence of tracks while looking at the list of tracks on the surface of the disc before closing the disc table During playback or pause programming is not possible If the tot...

Page 30: ...To check program data 2 Display the track number to be corrected by pressing the or button 3 Press a track number input button to select a track to replace the one displayed The previously programmed track will be cleared from the memory and the new one will be programmed 4 When the correction is finished press the PROG button or play pause button once again COMPACT DISC PLAYER OPERATION CD CHANGE...

Page 31: ...ANDOM indicator will go out Note This feature will not function during programming or program play COMPACT DISC PLAYER OPERATION TIME A PROG B C D I0 E CD TUNER 1 1 2 2 3 3 4 4 5 5 6 6 7 7 8 8 9 0 PRESET INPUT MUSIC PROGRAM STANDBY ON DISPLAY SLEEP ECHO FLAT LEVEL KARAOKE VOLUME DISC SKIP STOP PLAY PAUSE TUNER CD TEST CENTER REAR DELAY OPEN CLOSE REPEAT RANDOM MODE CD CHANGER RECEIVER EMX 120CD PR...

Page 32: ...s on the disc table are played back repeatedly In the random play mode the random play is performed among all discs and repeated with a different order of tracks every time Note In the program play mode a sequence of programmed tracks is played back repeatedly To cancel the repeat play Press the REPEAT button once or more so that the S F REP indicator goes out COMPACT DISC PLAYER OPERATION TIME A ...

Page 33: ...utes and 58 seconds remain till the end of the second track The total play time of the disc will be displayed If the unit is in the program play mode the total play time of the programmed tracks will be displayed The total remaining play time from the point being played at that time will be displayed 41 minutes remain till the end of the disc Notes During random play the total remaining play time ...

Page 34: ...ual tuning 1 1 Follow steps 1 and 2 of the Automatic tuning method 2 2 Press the AUTO MAN L button so that AUTO disappears from the display In this mode stations are received in monaural 3 3 Press and hold the button to tune to a higher frequency or press and hold the button to tune to a lower frequency Release it just before reaching the desired frequency and then press it repeatedly until the de...

Page 35: ...ups in step 3 To recall a preset station 1 1 Select a group of preset stations by pressing the A B C D E button 2 2 Select the desired preset station number by pressing the or button repeatedly Notes A new setting can be programmed in place of the former one For presets the setting of the AUTO MAN L button is stored along with the station frequency For easier operation By using the preset station ...

Page 36: ...st there may be a case that 40 preset stations are occupied by FM stations only With this function only stations with sufficient signal strength are stored automatically If the station you want to program is weak in signal strength tune in to it with the Manual tuning method in monaural and program it by following the procedure of the section To store stations on the previous page You can replace ...

Page 37: ...INPUT SELECTOR buttons 2 2 Play back the source and then turn the VOLUME control up to confirm the input source 3 3 Begin recording on the tape deck or VCR etc connected with this unit Note Only when a karaoke mode is selected and one or two microphone s are connected to this unit you can record your vocal input from the microphone s along with the source onto a tape or MD by using the tape deck V...

Page 38: ...C D E OPEN CLOSE DISC 1 DISC 2 DISC 3 DISC CHANGE VOLUME INPUT SELECTOR VCR LD TV CD TAPE MD TUNER CD TUNER STANDBY ON PHONES KARAOKE PROGRAM MEMORY MUSIC DISPLAY MEMORY AUTO MAN L REPEAT TIME TIME ADJ TIMER HOUR MIN INPUT TRIM MIC TONE MIC MIC MIXING SOFT NORMAL MAX MIN ECHO ECHO MUSIC ROCK POPS JAZZ USER 12 PRO 3 STE 100 1K 10K 2 Listening to the music with a preset equalizer effect 1 Play back ...

Page 39: ...sted Turning the equalizer to flat the state with no equalization applied By one of the following methods the settings of preset graphic equalizer mode MUSIC and sound field program PROGRAM are turned off and the equalizer pattern is turned to flat Press the FLAT button on the remote control transmitter Press the MUSIC button and the PROGRAM button on the front panel at the same time USING GRAPHIC...

Page 40: ...stored in place of the former one In step 3 or 4 if the flashing indicators go off before operation return to step 2 To recall a user program 1 1 Play back a source For source playback refer to pages 18 to 29 2 2 Press the MUSIC button once or more so that the user preset number USER 1 or USER 2 you want to recall lights up USING GRAPHIC EQUALIZER CD CHANGER RECEIVER EMX 120CD PRESET TUNING BAND A...

Page 41: ... sound With this program 2 channel stereo sound is converted into 3 channels left front center and right front so the dialogs are emphasized on the center position by the use of the center speaker As no sound is output from the rear speakers this program is also effective in a simple Audio Video system without rear speakers In this program the center will appear to be deep behind the front speaker...

Page 42: ...multaneously If you press the KARAOKE button to select a karaoke mode the sound field processor becomes unavailable The sound field program indicator on the display goes off Reversely if you select a sound field program by pressing the PROGRAM button once or more the karaoke mode becomes unavailable USING SOUND FIELD PROCESSOR CD CHANGER RECEIVER EMX 120CD PRESET TUNING BAND A B C D E OPEN CLOSE D...

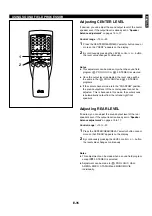
Page 43: ... because in this mode the center sound is automatically output from the left and right front speakers USING SOUND FIELD PROCESSOR TIME A PROG B C D I0 E CD TUNER 1 1 2 2 3 3 4 4 5 5 6 6 7 7 8 8 9 0 PRESET INPUT MUSIC PROGRAM STANDBY ON DISPLAY SLEEP ECHO FLAT LEVEL KARAOKE VOLUME DISC SKIP STOP PLAY PAUSE TUNER CD TEST CENTER REAR DELAY OPEN CLOSE REPEAT RANDOM MODE Adjusting REAR LEVEL If desired...

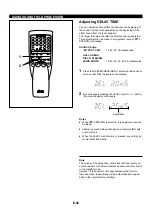
Page 44: ...button the value changes continuously Notes When 3 STEREO is selected this adjustment cannot be made Adding too much delay will cause an unnatural effect with some sources When the LEVEL control button is pressed sound may be momentarily interrupted Note The values of the delay time center level and rear level you set the last time will remain memorized even when this unit is in the standby mode H...

Page 45: ...T TRIM MIC TONE MIC MIC MIXING SOFT NORMAL MAX MIN ECHO ECHO MIC TONE MIC MIC MIXING SOFT NORMAL MAX MIN 1 TIME A PROG B C D I0 E CD TUNER 1 1 2 2 3 3 4 4 5 5 6 6 7 7 8 8 9 0 PRESET INPUT MUSIC PROGRAM STANDBY ON DISPLAY SLEEP ECHO FLAT LEVEL KARAOKE VOLUME DISC SKIP STOP PLAY PAUSE TUNER CD TEST CENTER REAR DELAY OPEN CLOSE REPEAT RANDOM MODE 4 2 5 6 2 Feature Signals on the left channel and the ...

Page 46: ... to decrease the level Note This adjustment can be made only when a Karaoke mode L R L R or VOCAL CUT is selected CD CHANGER RECEIVER EMX 120CD PRESET TUNING BAND A B C D E OPEN CLOSE DISC 1 DISC 2 DISC 3 DISC CHANGE VOLUME INPUT SELECTOR VCR LD TV CD TAPE MD TUNER CD TUNER STANDBY ON PHONES KARAOKE PROGRAM MEMORY MUSIC DISPLAY MEMORY AUTO MAN L REPEAT TIME TIME ADJ TIMER HOUR MIN INPUT TRIM MIC T...

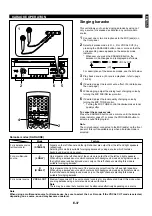
Page 47: ...e 5 Begin recording on the tape deck or MD recorder etc or VCR connected to this unit 6 Begin singing Karaoke Notes If VCR is selected as the input source recording cannot be made by using the VCR etc connected to the VCR OUT terminals on the rear of this unit If TAPE MD is selected as the input source recording cannot be made by using the tape deck etc connected to the TAPE MD OUT terminals on th...

Page 48: ...ed before the setting is completed call the mode again by pressing the DISPLAY button once or more Setting procedure Current time Check to be sure that the current time is correct and press the TIMER button so that TIMER lights up on the display Source selecting mode Select the source TUNER or CD to be played with the INPUT SELECTOR buttons If TUNER is selected soon it is changed to the frequency ...

Page 49: ...on so that TIMER goes out from the display If you do not cancel the timer play setting this unit will turn on at the same time every day so it can be used as an alarm Unless the AC supply lead is unplugged or there is a power failure for more than 5 minutes the time set on the timer will be retained until it is reset How to make time setting in the ON TIME or OFF TIME mode For the hour Press the H...

Page 50: ...on the display The SLEEP indicator will go out Using the timer and the sleep timer at the same time You can make a timer play setting so that the timer operates after this unit turns into the standby mode by the operation of the sleep timer 1 Prepare timer play See pages 40 to 41 After the timer play setting is made press the STANDBY ON switch to turn on this unit 2 Press the SLEEP button and set ...

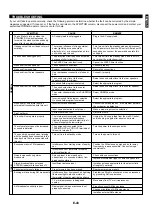
Page 51: ...ddenly soon after the power is turned on It happens that this unit does not work normally The sound suddenly goes off No sound from one speaker No sound from speakers No sound from the rear speakers No sound from the center speaker No sound or no picture from an external unit connected with this unit Can t set timer This unit will not operate properly The volume level cannot be increased or sound ...

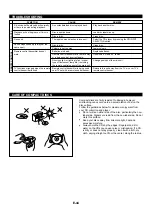
Page 52: ... back another disc Load disc label side up Clean disc Select the CD player by pressing the CD INPUT SELECTOR button Clean disc Lower volume Replace batteries Use within 6 m and 60 radius Change position of the main unit Relocate this unit away from the TV or cover TV s remote control sensor CD PLAYER REMOTE CONTROL Compact discs are fairly resistant to damage however mistracking can occur due to a...

Page 53: ... RELLINGEN BEI HAMBURG F R OF GERMANY YAMAHA ELECTRONIQUE FRANCE S A RUE AMBROISE CROIZAT BP70 CROISSY BEAUBOURG 77312 MARNE LA VALLEE CEDEX02 FRANCE YAMAHA ELECTRONICS UK LTD YAMAHA HOUSE 200 RICKMANSWORTH ROAD WATFORD HERTS WD1 7JS ENGLAND YAMAHA SCANDINAVIA A B J A WETTERGRENS GATA 1 BOX 30053 400 43 VÄSTRA FRÖLUNDA SWEDEN YAMAHA MUSIC AUSTRALIA PTY LTD 17 33 MARKET ST SOUTH MELBOURNE 3205 VIC ...

Reviews: