Appendix
24
EMX7 Owner’s Manual
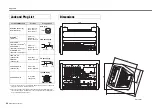
To prepare the mixer for rack mounting, use the RK-EMX7
(rack-mount brackets) sold separately. This mixer requires 7U*
of rack-mount space.
* 7U is approximately 312 mm.
Precautions for Rack Mounting
This mixer is rated for operation at ambient temperatures rang-
ing from 0 to 40 degrees Celsius. If you install this mixer along
with other devices in a poorly ventilated EIA standard rack, the
ambient temperature inside the rack may rise, resulting in ineffi-
cient performance. Be sure to rack-mount according to the fol-
lowing conditions so the mixer does not overheat.
• When mounting the mixer in a rack with devices such as
power amplifiers that generate a significant amount of heat,
leave more than 1U of space between it and other devices.
Also, either leave the open spaces uncovered or install appro-
priate ventilating panels to minimize the possibility of heat
buildup.
• To ensure sufficient airflow, leave the rear of the rack open. If
you have installed a fan kit in the rack, there may be cases in
which closing the rear of the rack will produce a greater cool-
ing effect. Refer to the rack and/or fan kit manual for more
details.
Rack Mounting
CAUTION
This mixer is heavy, and should be lifted by two people when
mounting onto a rack.
Assembly of the Rack-mount Brack-
ets
1.
Use a screwdriver to loosen and remove the 12 screws on the
mixer side pads.
2.
Use six of the screws you removed in Step 1 to securely
install the RK-EMX7 separately sold (rack-mount brackets)
onto the mixer.
NOTICE
During installing the rack-mount brackets, take care to
ensure that the screws do not damage surfaces such as
table tops. Place a soft cloth under the mixer for protec-
tion.
NOTICE
Be sure to use the same screws removed from the mixer
in Step 1. Using other screws may cause damage.
3.
Carefully store the remaining six screws that are not used in
Step 2 so they are not lost. Once the rack-mount brackets are
installed there will be a total of eight empty screw holes on
the both sides of the mixer.
4.
If you wish to remove the rack-mount brackets and reinstall
the side pads, ensure that they are installed on the correct
sides of the mixer. The inside surface of the side pads are
marked as “L” (Left) or “R” (Right).
NOTE
Separate screws for actually mounting the mixer in a rack are
not included with the mixer.
Empty screw holes
are on both sides of
the mixer.


