background image

CLP-280/270 Owner’s Manual

31

Basic Operation

Selecting and Playing Voices

Splitting the keyboard range and playing two differ-
ent voices (Split mode)

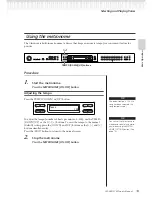
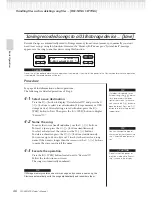
Split mode enables you to play two different voices on the keyboard — one with the left hand and another 
with the right hand. For example, you can play a bass part using the [WOOD BASS] or [E. BASS] voice with 
the left hand, and a melody with the right hand. Refer to “Voice Combination Examples (Dual and Split)” on 
page 108 for examples of effective voice combinations.

Procedure

1.

Enter Split mode.

Press the [SPLIT] button.

2.

Select a voice for the right hand.

Use the voice group buttons and the A [–] [+] buttons to select 
the voice for the right-hand area.

Refer to page 25 for details on 
how to select XG voice.

3.

Select a voice for the left hand.

Hold down the [SPLIT] button, and press a voice group button 
to select the voice group for the left-hand area.

Use the C [–][+] buttons to select a voice.

FUNCTION

iAFC

SETTING

CHORUS

REVERB

BRILLIANCE

MELLOW

BRIGHT

VOICE

SETTING

SPLIT

GUITAR

VIBRA-
PHONE

E.CLAVI-

CHORD

HARPSI-

CHORD

SYNTH.

PAD

WOOD

BASS

E.BASS

E.PIANO

2

E.PIANO

1

GRAND
PIANO 1

CHURCH

ORGAN

JAZZ

ORGAN

GRAND
PIANO 2

STRINGS

CHOIR

XG

CONTRAST

EXIT

B

D

NO

YES

A

C

METRONOME

ON/OFF

SETTING

DOWN

UP

TEMPO

EXTRA
PARTS

LEFT

RIGHT

SONG

SELECT

FILE/SONG

SETTING

PLAY/PAUSE

STOP

REC

SONG

NEW SONG

SYNC START

REPEAT

DEMO

SONG   BALANCE

KEYBOARD

SONG

MIN

MAX

MASTER  VOLUME

VOICE

2

2 3

1 3 4 5

3

4

Voice group buttons

TIP

Summary of Contents for EXCITER 270

Page 1: ...ge selector may be provided on the rear of the main keyboard unit near the power cord Make sure that the voltage selector is set for the voltage in your area The voltage selector is set at 240V when the unit is initially shipped To change the setting use a minus screwdriver to rotate the selector dial so that the correct voltage appears next to the pointer on the panel For information on assemblin...

Page 2: ...ncerely believe that our products and the production methods used to produce them meet these goals In keeping with both the letter and the spirit of the law we want you to be aware of the following Battery Notice This product MAY contain a small non rechargable battery which if applicable is soldered in place The average life span of this type of battery is approximately five years When replacemen...

Page 3: ...d by qualified Yamaha service personnel CAUTION Always follow the basic precautions listed below to avoid the possibility of physical injury to you or others or damage to the instrument or other property These precautions include but are not limited to the following When removing the electric plug from the instrument or an outlet always hold the plug itself and not the cord Pulling by the cord can...

Page 4: ...ument and do not use excessive force on the buttons switches or connectors Do not operate the instrument for a long period of time at a high or uncomfortable volume level since this can cause permanent hearing loss If you experience any hearing loss or ringing in the ears consult a physician Do not place the bench in an unstable position where it might accidentally fall over Do not play carelessly...

Page 5: ...nc registered in the U S and other countries Windows is the registered trademark of Microsoft Corporation SmartMedia is a trademark of Toshiba Corporation All other trademarks are the property of their respective holders Tuning Unlike an acoustic piano the Clavinova does not need to be tuned It always stays perfectly in tune Transporting If you move to another location you can transport the Clavin...

Page 6: ...unction and the preset songs 23 Selecting and Playing Voices 25 Selecting Voices 25 Using the pedals 26 Adding variation to the sound BRILLIANCE REVERB CHORUS 27 Combining two voices Dual mode 29 Splitting the keyboard range and playing two different voices Split mode 31 Using the metronome 33 Recording Your Performance 34 Recording a New Song 34 Recording a performance without specifying the reco...

Page 7: ...ter List 66 Making detailed settings 69 Detailed settings for recording and playback FILE SONG SETTING 71 Detailed settings for the metronome METRONOME SETTING 74 Detailed settings for the voices VOICE SETTING 75 Detailed settings for iAFC iAFC SETTING 81 Other settings FUNCTION 83 Message List 93 Questions about Operations and Functions 99 Appendix 101 Troubleshooting 102 Data Compatibility 104 P...

Page 8: ...anging the key Transpose on page 83 Changing tonal color Viewing the list of voices Preset Voice List on page 106 Simulating a concert hall REVERB on page 28 Combining two voices Combining two voices Dual mode on page 29 Playing different sounds with left and right hands Splitting the keyboard range and playing two different voices Split mode on page 31 Making a voice brighter and sharper or softe...

Page 9: ...ge 59 Raising the volume AUX OUT L R Pin jacks on page 59 Outputting other instruments sound from the Clavinova AUX IN L L R R jacks on page 59 Connecting to a USB storage device Connecting to a USB storage device on page 60 Connecting a computer Connecting a personal computer on page 63 Assembling Assemble disassemble the Clavinova CLP 280 270 Keyboard Stand Assembly on page 109 Quick solution Wh...

Page 10: ...a GH3 Graded Hammer 3 Keyboard that varies the key weight according to the key range while the CLP 280 boasts a Natural Wood Keyboard that enhances the GH3 features including real wood white keys to reproduce as closely as possible the experience of playing an actual acoustic grand piano Thanks to these two keyboard types you can use performance techniques previously possible only on grand pianos ...

Page 11: ...ts to the sound º BRILLIANCE MELLOW BRIGHT buttons page 27 For adjusting the brightness of the sound iAFC SETTING button pages 67 81 When iAFC is engaged the Clavinova will sound deeper more resonant and more similar to the sound of an actual acoustic instrument You can turn the iAFC func tion on or off or make detailed settings for the iAFC FUNCTION button pages 68 83 This lets you make detailed ...

Page 12: ... Panel Controls and Terminals on page 10 When you press a button related content or parameter is shown in the display For example when you press a voice button the voice name is shown or when you press the SONG SELECT button a song name is shown on the display After pressing a button check the display for the indication Selecting items parameters with the buttons on the side of the display Each fu...

Page 13: ...or can cel the operation Press the EXIT button to exit from a function The EXIT button is the means to leave a function After you ve used a function and want to exit from it press the EXIT button B D NO YES A C MetronomeVolume 100 B D NO YES A C Save Overwrite M 001 NewSong001 MID NO cancel YES execute FUNCTION iAFC SETTING CHORUS REVERB BRILLIANCE MELLOW BRIGHT VOICE SETTING SPLIT GUITAR VIBRA PH...

Page 14: ...ntil it is all the way down CAUTION Do not try to use the music rest in a half raised position When lowering the music rest do not release your hands from the music rest until it is all the way down About the music braces These braces are for holding the pages of music books in place CAUTION Hold the cover with both hands when opening or closing it Do not release it until it is fully opened or clo...

Page 15: ... contact your Yamaha dealer The use of an inappropriate replacement can pose a fire and shock hazard The type of AC power cord provided with the CLP 280 270 may be different depending on the country in which it is purchased In some areas a plug adaptor may be provided to match the pin configuration of the AC wall outlets in your area Do NOT mod ify the plug provided with the CLP 280 270 If the plu...

Page 16: ... on the Clavinova Install the headphone hanger using included two screws 4 10mm as shown in the figure CAUTION Do not hang anything other than the headphones on the hanger Otherwise the Clavinova or the hanger may be damaged Performing the iAFC automatic adjustment The CLP 280 270 features an iAFC Instrumental Active Field Control effect This produces sound from the speaker located on the rear of ...

Page 17: ...CLP 280 270 Owner s Manual 17 Basic Operation ...

Page 18: ... demo mode Press the DEMO button to engage the demo mode The indicators of the voice group buttons will blink in succession Voice group Tunes Composer GRAND PIANO1 Eintritt Waldszenen Op 82 R Schumann HARPSICHORD Gavotte J S Bach FUNCTION iAFC SETTING CHORUS REVERB BRILLIANCE MELLOW BRIGHT VOICE SETTING SPLIT GUITAR VIBRA PHONE E CLAVI CHORD HARPSI CHORD SYNTH PAD WOOD BASS E BASS E PIANO 2 E PIAN...

Page 19: ...demo mode Press the DEMO button TIP TIP TIP By holding down the DEMO button and pressing the A but ton to get the Piano Demo display you can hear the piano demo iAFC demo The piano demo lets you compare the result of enabling disabling each sampling technology The iAFC demo lets you compare the result of turning iAFC on off The demo songs are assigned to the voice group buttons as follows GRAND PI...

Page 20: ...S E PIANO 2 E PIANO 1 GRAND PIANO 1 CHURCH ORGAN JAZZ ORGAN GRAND PIANO 2 STRINGS CHOIR XG CONTRAST EXIT B D NO YES A C METRONOME ON OFF SETTING DOWN UP TEMPO EXTRA PARTS LEFT RIGHT SONG SELECT FILE SONG SETTING PLAY PAUSE STOP REC SONG NEW SONG SYNC START REPEAT DEMO SONG BALANCE KEYBOARD SONG MIN MAX MASTER VOLUME VOICE 1 2 3 4 TEMPO DOWN UP button TERMINOLOGY Song select screen B D NO YES A C P...

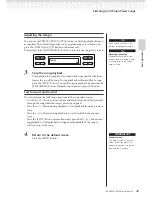
Page 21: ...ddle of a song press the STOP button You can also pause playback by pressing the PLAY PAUSE button Playback stops when you press the button Fast forward and rewind You can perform the following operations in the song select screen Use the B buttons to move back and forth rewind and fast forward through the song while the song is played or stopped Press the C button during playback to start playbac...

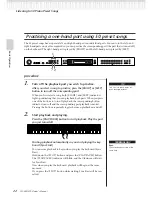
Page 22: ...tons repeatedly toggles between playback on and off 2 Start playback and playing Press the PLAY PAUSE button to start playback Play the part you just turned off Sync Synchronous occurring at the same time Starting playback automatically as you start playing the key board Sync Start You can cause playback to begin when you play the keyboard Sync Start Hold down the STOP button and press the PLAY PA...

Page 23: ...racticing with the Repeat Playback function and the preset songs The Song Repeat functions can be used to repeatedly play back a song or a specific range of measures in a song This is useful for repeated practicing of difficult to play phrases Playing back a song repeatedly procedure You can repeatedly play back all songs from the 50 preset songs or from the USB storage devices page 71 1 Enter the...

Page 24: ... A results in repeat playback between point A and the end of the song When you select another song the specified range is automati cally cancelled and the repeat function is turned off 2 Specify the repeat range Press the REPEAT button at the starting point A of the range to be repeated Press the REPEAT button again at the ending point B After an automatic lead in to help guide you into the phrase...

Page 25: ...then select the desired voice 2 1 Simultaneously press the screen buttons located beside the XG voice name display to access a screen where you can select XG voices 2 2 Use A buttons to select the voice group 2 3 Use C buttons to select the desired voice FUNCTION iAFC SETTING CHORUS REVERB BRILLIANCE MELLOW BRIGHT VOICE SETTING SPLIT GUITAR VIBRA PHONE E CLAVI CHORD HARPSI CHORD SYNTH PAD WOOD BAS...

Page 26: ...grand piano s soundboard and strings A half pedal effect lets you use the damper pedal to create partial sustain effects depending on how far down you press the pedal Sostenuto center pedal If you play a note or chord on the keyboard and press the sostenuto pedal while holding the note s the notes will sustain as long as the pedal is held All subsequent notes will not sustain You can assign a func...

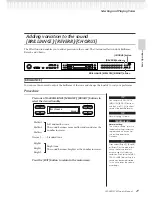
Page 27: ...tting the sound may become distorted In this case lower the volume accordingly Press one of the BRILLIANCE MELLOW BRIGHT buttons to select the desired tonality Normal Standard tone Press the EXIT button to return to the main screen FUNCTION iAFC SETTING CHORUS REVERB BRILLIANCE MELLOW BRIGHT VOICE SETTING SPLIT GUITAR VIBRA PHONE E CLAVI CHORD HARPSI CHORD SYNTH PAD WOOD BASS E BASS E PIANO 2 E PI...

Page 28: ...ype via the Chorus Type parameter in the VOICE SETTING menu and adjust the chorus depth for the selected voice via the Cho rus Send parameter You can also turn chorus on or off via the Chorus On Off parameter See page 77 Normal Setting The normal chorus on off set ting is different for each voice Pressing the CHORUS button repeatedly toggles the chorus on and off You can turn the chorus effect on ...

Page 29: ...to select a voice The voices listed in the upper row in Preset Voice List on page 106 are called voice 1 and those listed in the bottom row are called voice 2 3 Exit Dual mode and return to normal play mode Press any voice group button FUNCTION iAFC SETTING CHORUS REVERB BRILLIANCE MELLOW BRIGHT VOICE SETTING SPLIT GUITAR VIBRA PHONE E CLAVI CHORD HARPSI CHORD SYNTH PAD WOOD BASS E BASS E PIANO 2 ...

Page 30: ...ant to select Dual mode for the left hand area when the entire keyboard is divided into left and right areas page 31 press D buttons 3 Select another voice Use the B buttons to select another voice in the same voice group To use the identical voices press the B buttons once To use dif ferent voices within the same voice group press the B buttons repeatedly 4 Exit Dual mode and return to normal pla...

Page 31: ...tons and the A buttons to select the voice for the right hand area Refer to page 25 for details on how to select XG voice 3 Select a voice for the left hand Hold down the SPLIT button and press a voice group button to select the voice group for the left hand area Use the C buttons to select a voice FUNCTION iAFC SETTING CHORUS REVERB BRILLIANCE MELLOW BRIGHT VOICE SETTING SPLIT GUITAR VIBRA PHONE ...

Page 32: ...s F 2 To change the split point setting Hold down the SPLIT button then use the D buttons to specify the split point Optional Press and hold down the SPLIT button and play the key you wish to assign as the split point Release the SPLIT button to return to the main screen 5 Exit Split mode and return to normal play mode Press the SPLIT button TIP TIP You can use Dual see page 29 in each area right ...

Page 33: ...O DOWN UP or the D buttons To reset the tempo to the normal default setting press the DOWN and UP buttons or the D and buttons simultaneously Press the EXIT button to return to the normal screen 2 Stop the metronome Press the METRONOME ON OFF button FUNCTION iAFC SETTING CHORUS REVERB BRILLIANCE MELLOW BRIGHT VOICE SETTING SPLIT GUITAR VIBRA PHONE E CLAVI CHORD HARPSI CHORD SYNTH PAD WOOD BASS E B...

Page 34: ...essage List on page 93 for an explanation of each message appropriate actions to take and troubleshooting information Recording a New Song There are two ways to record your performance recording it quickly without specifying a recording part or recording several different parts to multiple parts You can select whichever way best suits your purpose Recording a performance without specifying the rec...

Page 35: ...reen does not appear press the SONG SELECT button once to return to the NewSong screen 3 Engage the record mode Press the REC button The REC and RIGHT indicators flash in red To stop recording press the REC button again or press the STOP button Set the tempo if necessary If this record standby screen does not appear press the SONG SELECT button once FUNCTION iAFC SETTING CHORUS REVERB BRILLIANCE M...

Page 36: ... to the start of the song press the REC button again Rename songs The recorded songs are named automatically but you can rename songs as you like page 48 To stop recording press the STOP button The Clavinova locates the top of the song As soon as recording is stopped the song is automatically saved to Storage memory page 43 When saving is completed the Storage memory screen appears 5 Play back the...

Page 37: ... note will not be erased Ending methods Replace The data after the point you stop recording will also be erased PunchOut The data after the point you stop recording will remain 2 Pause the song at the beginning of the part you wish to re record Use the B buttons while the playback screen is displayed to move through the measures or play back the recording and press the PLAY PAUSE button to locate ...

Page 38: ...splay To cancel this and not overwrite press the B NO button 5 Start and stop recording Recording begins automatically as soon as you play a note on the keyboard Optional Press the PLAY PAUSE button to start recording To stop recording press the STOP button The Clavinova locates the top of the song 6 Save the recorded songs When you stop recording the display prompts you whether you want to overwr...

Page 39: ...ecorded part to the EXTRA PARTS button press and hold down the REC button and press the EXTRA PARTS button The REC and specified part indicators flash in red To stop recording press the REC button again or press the STOP but ton Set the tempo if necessary If this record standby screen does not appear press the SONG SELECT button once If you don t want to hear the right left part while you record p...

Page 40: ...ercially available music data see page 57 or your old recorded performances see page 43 Procedure If you record on a part that already has data the existing data on the part will be lost 1 Select a song to be recorded over To select a preset song press the SONG SELECT button then press the A buttons to display PRESET To select a song press the C buttons To select a song from commercially available...

Page 41: ...iddle of the song specify the measure to change by using the B buttons while the playback screen is displayed or by pressing the PLAY PAUSE button to locate a point slightly prior to the beginning of the part you wish to re record 3 Change the settings voice reverb etc For example if you wish to change the recorded E Piano1 voice to E Piano2 use the voice group buttons and the A buttons to select ...

Page 42: ...re assigned to each voice CAUTION When you record multiple parts one by one or when you record new data over an existing song see page 40 the existing data will be erased Proceed with caution In the following example RIGHT LEFT and EXTRA PARTS n have been selected for recording Note Part n Part 3 Part 16 If n 1 n 2 and n 3 exceed 16 Parts 1 2 and 3 are used Switching between Dual and Split mode in...

Page 43: ...storage device When you select a song in the song select screen it is loaded from Preset song memory Storage memory or USB storage device into Current memory You will use Current memory to play back and record songs When you turn off the power to the Clavinova songs saved in Preset song memory and Stor age memory are not erased On the other hand songs in Current memory are lost However recorded so...

Page 44: ...no Soft songs in the Storage memory MS Ms Yamaha protection formatted songs in the Storage memory U1 External song U1P External songs such as Disk Orchestra Collection DOC songs or Disklavier Piano Soft songs in a USB storage device U1S U1s Yamaha protection formatted songs in a USB storage device U1 song with the SME exten sion can only be deleted cannot execute other file opera tions at left Lim...

Page 45: ...the USB storage device via the SONG SELECT button To use Delete Format SongAutoOpen or CharacterCode No need to perform any operations in this step 2 Access the File Song Setting menu Press the FILE SONG SETTING button To close the File Song Setting menu press the EXIT button once or twice 3 Select the desired parameter Press the FILE SONG SETTING or A buttons repeatedly to display the desired ite...

Page 46: ...display DriveSelected and press the C buttons to select a save destination Storage memory or USB storage device After selecting a save destination press the B YES button to fix it Then press the B YES button to display Execute 4 2 Name the song To move the cursor small underline use the C buttons To insert a space press the C buttons simultaneously To select a character at the cursor use the D but...

Page 47: ...you can use the D button to open the folder Press the D button to return to the previous upper level Do not turn off the power or eject the media while Execut ing is shown in the display See page 45 for information on basic operations The following is a detailed procedure of Step 4 4 1 Press the C buttons to select a song to delete To select Storage memory or USB storage device Press the D button ...

Page 48: ...lder by pressing the SONG SELECT button and the C buttons The folder name is shown after DIR To select another level in this display press the D buttons Other levels can be selected when is shown in the dis play After that select Rename again and rename the folder After you rename a song the Clavinova sorts songs alpha betically and renumbers them See page 45 for information on basic operations Th...

Page 49: ...hich does not belong to a folder You can copy songs However you cannot copy files to the same root direc tory or same folder TIP TERMINOLOGY Copy operation B D NO YES A C Copy Execute U1 001 NewaSong001 You can copy files to other memory location File A File A File B File B Storage memory Can be copied Can be copied USB storage device You can copy files to a folder but not on the same root directo...

Page 50: ...emory or USB storage device After selecting a copy destination press the B YES but ton to fix it 4 3 Press the B YES button located next to Exe cute Follow the instructions on screen Protected songs cannot be copied Please note that the copy fea tures are intended for your per sonal use only You cannot copy a folder If a folder is displayed for an External song the indi cator is displayed in the l...

Page 51: ...ct a move desti nation Storage memory or USB storage device After selecting a move destination press the B YES button to fix it 4 3 Press the B YES button located next to Exe cute Follow the instructions on screen B D NO YES A C Move Execute U1 001 NewSong001 Preset songs and some pro tected songs cannot be moved You cannot move a folder If a folder is displayed for an External song the indi cator...

Page 52: ... is a detailed procedure for step 4 4 1 If some USB storage devices are recognized by the instrument press the C buttons to select a device 4 2 Press the B YES button located next to Exe cute Follow the instructions on screen B D NO YES A C MakeDir Execute U1 NewDir_ Do not turn off the power or eject the media while Execut ing is shown in the display To make a folder for the selected drive or lev...

Page 53: ...Changing the type of characters on screen CharacterCode You can change the type of characters that appear on screen The default setting is International To input katakana change this setting to Japanese Options International Japanese Character list International Japanese B D NO YES A C SongAutoOpen On When a USB storage device is connected to the instrument a song in the device will not automatica...

Page 54: ...SETTING SPLIT GUITAR VIBRA PHONE E CLAVI CHORD HARPSI CHORD SYNTH PAD WOOD BASS E BASS E PIANO 2 E PIANO 1 GRAND PIANO 1 CHURCH ORGAN JAZZ ORGAN GRAND PIANO 2 STRINGS CHOIR XG CONTRAST EXIT B D NO YES A C METRONOME ON OFF SETTING DOWN UP TEMPO EXTRA PARTS LEFT RIGHT SONG SELECT FILE SONG SETTING PLAY PAUSE STOP REC SONG NEW SONG SYNC START REPEAT DEMO SONG BALANCE KEYBOARD SONG MIN MAX MASTER VOLU...

Page 55: ... playback as soon as you start playing the keyboard This is called the Sync Start function To enter Sync Start standby mode press and hold down the STOP button and press the PLAY PAUSE button The PLAY PAUSE indicator flashes Now play the keyboard Playback starts simultaneously To cancel the Sync Start function press the STOP button while the Clavinova is in Sync Start standby mode You can move bac...

Page 56: ... original tempo is set when you press the DOWN and UP buttons simul taneously Press the SONG SELECT button to return to the song select screen 4 Stop playback When playback is complete the Clavinova automatically stops and locates the top of the song To stop playback in the middle of a song press the STOP button You can also pause playback by pressing the PLAY PAUSE button Playback pauses when you...

Page 57: ... the following formats Sequence format A structured method for record ing performance data Sequence format SMF Standard MIDI File formats 0 and 1 ESEQ Performance data recorded on the CLP 280 270 is saved as SMF for mat 0 Voice arrangement format A structured method for num bering the voices for assign ment This instrument can play GS format songs However the voices may not be completely the same ...

Page 58: ...ST terminal This terminal allows direct connection to a personal computer Refer to Con necting a personal computer on page 63 for more information 3 MIDI IN OUT THRU terminals Use MIDI cables to connect external MIDI devices to these connectors MIDI IN Receives MIDI data MIDI OUT Transmits MIDI data MIDI THRU Transmits data received at the MIDI IN terminal as it is 4 AUX PEDAL jack A separately so...

Page 59: ... IN jacks the input sound will be output from the speaker of the CLP The output sound may be excessively loud and may cause noise 6 AUX OUT L R Pin jacks These jacks let you connect the Clavinova to your stereo system etc to play at higher volumes or connect a cassette recorder etc to record your playing Use audio cables to make connections as shown in the diagram CAUTION When the Clavinova s AUX ...

Page 60: ...SB hub Optional Floppy Disk Drive Yamaha UD FD01 Up to two USB storage devices such as a floppy disk drive hard disk drive CD ROM drive flash memory reader writer etc can be connected to the USB TO DEVICE terminal If necessary use a USB hub Other USB devices such as a computer keyboard or mouse cannot be used CAUTION Avoid frequently turning the power on off to the USB storage device or connect in...

Page 61: ...device media is unformatted If so execute the Format operation page 52 CAUTION The format operation overwrites any previously existing data Proceed with caution To display the data in the USB storage device Though the instrument supports the USB 1 1 standard you can connect and use a USB 2 0 storage device with the instru ment However note that the transfer speed is that of USB 1 1 To view the dat...

Page 62: ...also Standard MIDI files created on other devices can be copied to a USB storage device from the hard disk of the computer Once you ve copied the data connect the device to the USB TO DEVICE terminal of the instrument and play back the data on the instrument Instrument Computer USB storage device USB TO DEVICE terminal Saves internal data to a USB storage device USB storage device Disconnect the U...

Page 63: ... by USB rather than by MIDI For more information refer to the following pages When connecting the Clavinova to a personal computer first turn off the power of the Clavinova and quit any application software that is open on the computer before con necting any cables After making connections turn on the power to the Clavinova If you are not using the connection between the Clavinova and your compute...

Page 64: ...ng mode of the computer such as suspended sleep standby and quit any open application software also turns off the power to the instrument Execute the following before turning the power to the instrument off or unplugging the USB cable to from the instrument computer Quit any open application software on the computer Make sure that data is not being transmitted from the instrument Data is transmitt...

Page 65: ...CLP 280 270 Owner s Manual 65 Detailed Settings ...

Page 66: ...rage device MakeDir 52 Formatting a USB storage device Format 52 Automatically selecting a song in storage media SongAutoOpen 53 Changing the type of characters on screen CharacterCode 53 Playing back a song all songs repeatedly SongRepeat 71 Playing back the phrase specified by the phrase number PhraseMark 71 Correcting note timing Quantize 72 Specifying whether playback starts immediately along ...

Page 67: ...hone vibrato effect on off VibeRotorOnOff RotorOnOff 78 Setting the rotation speed of the rotary speaker RotarySpeed Rot Speed 79 Adjusting the depth of the DSP effect DSPDepth 79 Adjusting the brightness of the sound Brightness 79 Adjusting the resonance effect HarmonicContent Harmonic 79 Adjusting the low range frequency of the equalizer EQ LowFreq EQ L Freq 79 Adjusting the low range gain amoun...

Page 68: ...Type 87 Setting the point at which the damper pedal starts to affect the sound HalfPedalPoint 87 Adjusting the depth of the Soft pedal SoftPedalDepth 87 Setting the depth of string resonance StringResonanceDepth 88 Setting the depth of sustain sampling for the damper pedal SustainSamplingDepth 88 Specifying the volume of the key off sound KeyOffSamplingDepth 88 Setting the range of pitch bend Pitc...

Page 69: ...meters or parts lead you to more options Use the B NO YES C and D buttons to select or set the option To restore the normal parameter value press the and buttons simultaneously FUNCTION iAFC SETTING CHORUS REVERB BRILLIANCE MELLOW BRIGHT VOICE SETTING SPLIT GUITAR VIBRA PHONE E CLAVI CHORD HARPSI CHORD SYNTH PAD WOOD BASS E BASS E PIANO 2 E PIANO 1 GRAND PIANO 1 CHURCH ORGAN JAZZ ORGAN GRAND PIANO...

Page 70: ... Completed for three seconds then returns to the previous screen To cancel the operation press the B NO button instead of the B YES button When Overwrite appears after the Completed message press the B YES button If Set appears Press the B YES button to execute the setting The Clavinova displays Executing and saves the data When the operation is com plete it displays Completed for three seconds th...

Page 71: ...ers in the score to play back from the score from the mark point or to play back the phrase repeatedly If you start playing back a song with Repeat On selected the count down starts followed by the repeated playback of the specified phrase until you press the STOP button If you select Repeat Off normal playback starts without repeat See the procedure on page 69 Setting range of the phrase number n...

Page 72: ...0 is selected notes will be moved toward the specified quantization beats according to the specified per centage Applying less than 100 quantization lets you preserve some of the human feel in the recording Setting range 0 100 This parameter enables you to specify whether a song that starts from the middle of a bar or a song with a silence prior to the first note should be played from the first no...

Page 73: ... so in this instrument channel means the same as part Even channels that contain no data are displayed When you clear all channels using the ALL parameter you can overwrite the song In this case the file which contains song settings with no channel data is saved Auditioning the channels ChannelListen B D NO YES A C ChannelListen Start Ch1 Playback continues as long as you press and hold down this ...

Page 74: ... in French SpanishVoice Click and 1 2 3 4 in Spanish BellOn Click and bell To mute the beat count select BellOff FUNCTION iAFC SETTING CHORUS REVERB BRILLIANCE MELLOW BRIGHT VOICE SETTING SPLIT GUITAR VIBRA PHONE E CLAVI CHORD HARPSI CHORD SYNTH PAD WOOD BASS E BASS E PIANO 2 E PIANO 1 GRAND PIANO 1 CHURCH ORGAN JAZZ ORGAN GRAND PIANO 2 STRINGS CHOIR XG CONTRAST EXIT B D NO YES A C METRONOME ON OF...

Page 75: ...ding on the selected voice Main MAIN voices displayed with a single voice or in Split mode Main Layer MAIN Voice 1 and Voice 2 displayed when the MAIN side is in Dual mode Left LEFT voice displayed in Split mode Left Layer LEFT Voice 1 and Voice 2 displayed when the LEFT side is in Dual mode FUNCTION iAFC SETTING CHORUS REVERB BRILLIANCE MELLOW BRIGHT VOICE SETTING SPLIT GUITAR VIBRA PHONE E CLAVI...

Page 76: ...64 hard left C center R63 hard right The pitch of the two sounds selected in Dual mode can be skewed slightly away from each other See the procedure on page 69 Setting range 20 20 Positive settings will raise the pitch of the first sound and lower the pitch of the second sound Negative settings will do the opposite Setting the octave Octave Setting the volume level Volume TIP TIP B D NO YES A C Ma...

Page 77: ...cannot set this parameter for the voice parts Left and Left Layer See the procedure on page 69 Setting range Chorus Adds a rich spacious sound Celeste Adds swell and a spacious sound Flanger Adds swell effects of an ascending or descending jet plane See the procedure on page 69 In Dual mode Setting range 0 127 Setting the reverb type ReverbType Setting the reverb depth ReverbSend TIP B D NO YES A ...

Page 78: ...ser The phase changes periodically swelling the sound AutoWah The center frequency of the wah fil ter changes periodically SoundBoard Simulates the reverberation of a piano soundboard Off No effect Rotor The rotating portion of an electrical device etc This will be displayed only if VibeRotor is selected for the DSP Type parameter explained above This sets the speed of the vibrato effect that is a...

Page 79: ...ange 64 63 Resonance can produce a distinctive peaky tone making the sound brighter and harder Equalizer An audio equalizer divides the frequency spectrum into multi ple regions and enables the user to adjust the relative ampli tude of each region See the procedure on page 69 Setting range 32 Hz 2 0 kHz Setting the rotation speed of the rotary speaker RotarySpeed Rot Speed Adjusting the depth of t...

Page 80: ...eyboard the normal setting for these voices is 127 See the setting range below See the procedure on page 69 In Dual mode Setting range 0 softest 64 largest changes in the level 127 loud est and fixed Adjusting the low range gain amount of boost cut of the equal izer EQ LowGain Adjusting the high range frequency of the equalizer EQ HighFreq EQ H Freq Adjusting the high range gain amount of boost cu...

Page 81: ...fect is one type of the iAFC effect Dynamic Damper Effect simulates the sus tain sound that occurs when you press the damper pedal of a grand piano The internal microphones are not used but the sound produced within the Clavinova is processed to create a spacious sensa tion as you press the damper pedal and play the keyboard See the procedure on page 69 Setting range 0 127 Perform the automatic ad...

Page 82: ...d to simulate the spatial characteristics of performing together on stage See the procedure on page 69 Setting range 0 127 This automatically adjusts the sensitivity and response of iAFC so that the optimal iAFC effect will be obtained When automatic adjust begins a test sound noise will sound for about five seconds While automatic adjustment is being performed do not make audible noises in the vi...

Page 83: ...ponse how the sound responds to the way you play the keys See the procedure on page 69 Setting range Light With a soft touch the Clavinova produces a loud sound The volume level of tones tends to be consistent Medium Standard touch response Heavy You must hit the key very hard to generate a loud volume This allows for versatile expres sion from pianissimo to fortissimo tones Fixed No touch respons...

Page 84: ... tuning scale PureMajor PureMinor Based on natural overtones three major chords using these scales produce a beautiful pure sound Pythagorean This scale designed by Pythagoras a Greek phi losopher is based on the interval of a perfect 5th The 3rd produces swells but the 4th and 5th are beautiful and suitable for some leads MeanTone This scale is an improvement of the Pythagorean in that the swell ...

Page 85: ...time you press the pedal VibeRotor Switch the vibraphone vibrato on off switch on off each time you press the pedal Normal setting SustainCont See the procedure on page 69 Setting range Same as Setting the right pedal function above except for the following parameters SustainCont Expression PitchBend Up PitchBend Down Normal Setting Sostenuto See the procedure on page 69 Setting range Same as Sett...

Page 86: ...and determine whether the center pedal function set on page 85 will affect that part or not See the procedure on page 69 Setting for Main MLayer MainLayer Left LLayer LeftLayer Setting range On Off Normal Setting Different for each voice This turns the left pedal function on or off for the relevant voice part In other words you can select the desired voice part Main MainLayer Left Left Layer and d...

Page 87: ...em Use this parameter to reverse this mechanism See the procedure on page 69 Setting range Make Break Here you can specify the point to which you must depress the pedal right and AUX before the assigned effect begins to be applied This setting applies only to the SustainCont effect page 85 that is assigned to the right or AUX pedal Setting range 2 effective with the shallowest press 0 2 effective ...

Page 88: ... be made in semitone steps You can set the pedal function page 85 to spec ify whether the pitch will be raised or lowered See the procedure on page 69 Setting range 0 12 Pressing the pedal will raise lower the pitch by 12 semitones 1 octave Normal setting 2 This setting lets you switch the speaker on off See the procedure on page 69 Normal HeadphoneSW The speaker will sound only if headphones are ...

Page 89: ...Ch1 Left Midi Usb1 Ch2 Layer Midi Usb1 Ch3 Left Layer Midi Usb1 Ch4 You can specify whether each channel of data from MIDI IN and USB TO HOST will be received See the procedure on page 69 Setting for Midi Usb1 Ch1 Ch16 Usb2 Ch1 16 Setting range Song Main Left Layer LeftLayer Keyboard Off Normal setting Midi Usb1 Ch1 Ch16 Song Usb2 Ch1 Keyboard Usb2 Ch2 Main Usb2 Ch3 Left Usb2 Ch4 Layer Usb2 Ch5 Le...

Page 90: ...on the keyboard Song song playback data Normal setting Keyboard This parameter enables you to specify which MIDI data the Clavinova can receive See the procedure on page 69 Type of data Note Control Program Pitch Bend SysEx System Exclusive Setting range On Off Normal setting On for all types of data This parameter enables you to specify which MIDI data the Clavinova can transmit See the procedure...

Page 91: ... SplitPoint and Midi set tings Setting range On Off Normal setting The Transpose Main LeftVoice MetronomeSetting and Function except for Transpose and SplitPoint setting parameters are set to Off Other parameters are set to On You can reset the Clavinova to its normal factory default settings The CharacterCode parameter setting page 53 does not change The MemoryBackup parameter setting On Off left...

Page 92: ...hen back ing up your data When several devices are connected a specific device cannot be identified for saving data Do not execute FullBackup during file operations such as loading songs Doing so could result in damage to the data It may take 1 2 minutes to complete the backup Do not turn off the power during full backup Doing so could result in damage to the data Protected songs indicated by MS M...

Page 93: ...s reset to their default values In this case perform the automatic adjustment once again This message means that automatic adjustment of iAFC is not possi ble because no sound is output from the rear speaker In this case if the Speaker setting is Off turn Speaker On If Speaker is set to Normal and headphones are connected unplug the headphones This message will appear to confirm start of the iAFC ...

Page 94: ...ppear if an identically named song already exists Three seconds after this message is displayed you will return to the previous screen Please specify a different name This message prompts you to execute a file related operation Press the B YES button to proceed or press the EXIT button to cancel The Clavinova is processing the data internally Wait until the mes sage disappears then proceed to the ...

Page 95: ...tings are damaged they will be reset to the initial settings If Memory songs are damaged they will be deleted This message appears when you attempt to create a folder to a USB storage device that cannot be accessed Check that the USB storage device is connected to the instrument and that the SELECT switch specifies the appropriate device then try again There is not enough memory space left and you...

Page 96: ...s when a protected song and the drive are not compatible Use a drive whose compatibility has been confirmed by Yamaha page 60 You tried to copy or delete data in internally protected files such as commercially available music data You cannot write to copy or delete such files This message appears when you play back a protected song which has a file format error After you load an internally protect...

Page 97: ...you attempt to enter Record mode for additional recording if that song already occupies all of current memory In this case additional recording will not be pos sible If there is an already recorded part that you do not need to keep you can use ChannelClear page 73 to delete the unneeded part so that you will then be able to record the equiva lent amount of additional material 2 This message will b...

Page 98: ...confirmed by Yamaha page 60 This message appears when the connected USB storage device is damaged and cannot be accessed You used a period or space at the beginning of a song name or you tried to change a song name that includes a character or characters not supported by the CLP 280 270 and the CLP 280 270 could not process the name The Clavinova displays the previous screen in three seconds Renam...

Page 99: ... tempo changes when the recording part is selected and a red part indicator is flashing The same trick applies to editing the tempo after record ing Performance in Dual or Split mode is not recorded Part data is lost unexpectedly For Dual or Split mode recording the recording part for the second voice that is the voice for the left hand part is automatically assigned page 29 Therefore if the part ...

Page 100: ...FILE SONG SETTING menu to change the setting However if the song was recorded on another instrument changing the CharacterCode parameter setting may not resolve the problem What is the difference between Touch Sense and TouchResponse MIDI data TouchSense determines the manner and degree to which the volume level changes in response to your touch on the keyboard The MIDI note on velocity data is no...

Page 101: ...CLP 280 270 Owner s Manual 101 Appendix ...

Page 102: ...SONG BALANCE slider toward the keyboard to increase the keyboard volume Headphones are connected only if the Speaker setting is Normal HeadphoneSW page 88 Disconnect the headphone plug Speaker setting is off Set Speaker to Normal or ON page 88 Local Control is turned off Set Local control ON page 90 Expression is assigned to the right pedal or the AUX pedal Assign any function other than Expressio...

Page 103: ...NG SELECT button to engage song selection mode or press the FILE SONG SETTING button to engage file song setting mode If you try to engage these modes before connecting the USB storage device press the EXIT button to exit the mode and re engage the mode If the device is still not recog nized it may not be supported by Yamaha Only use devices sup ported by Yamaha page 60 The USB storage device has ...

Page 104: ...280 270 is compatible with both Format 0 and Format 1 Performance data recorded on the CLP 280 270 is saved in the SMF format 0 ESEQ This sequence format is compatible with many of Yamaha s MIDI devices including the Clavinova series instruments This is a common format used with various Yamaha software Voice Allocation Format With MIDI voices are assigned to specific numbers called program numbers...

Page 105: ...s well as greater expres sive control over voices and effects Even if the devices and data used satisfy all the condi tions above the data may still not be completely com patible depending on the specifications of the devices and particular data recording methods Disk format It is necessary to first configure the floppy disk to the system of the device being used This operation is called formattin...

Page 106: ...deal for popular music SynthPiano This voice simulates the electric piano sound pro duced by synthesizers in popular music It also goes well with the acoustic piano sound E PIANO2 E Piano2 The sound of an electric piano using hammer struck metallic tines Soft tone when played lightly and an aggressive tone when played hard Vintage E Piano A different type of electric piano sound Widely used in roc...

Page 107: ...rgan sound Ideal for calmer songs STRINGS Strings Stereo sampled large scale strings ensemble with realistic reverb Try combining this voice with piano in the Dual mode SynthStrings A bright and spacious strings sound Suitable for sustained parts in the background of an ensemble SlowStrings The sound of a string ensemble with a slow attack Suitable for use in Dual mode with GRAND PIANO or E PIANO ...

Page 108: ... or Bass Cymbal This is recommended for light Jazz music The damper pedal is effective on the voice assigned to the right hand range MAIN LEFT Celesta Choir This is suitable for a peaceful somewhat cute song MAIN LEFT Choir GrandPiano1 Play these voices elegantly along with piano arpeggio Playing the Choir voice in chords would be more effective MAIN LEFT Scat WoodBass This combination features a ...

Page 109: ...ws 1 2 Remove the twist tie from the folded pedal cord Do not remove the twist tie located next to the hole Don t discard the twist tie you ll need it later in step 6 Remove all parts from the box Confirm that all parts shown in the illustration are provided Have a Phillips head screwdriver ready A B C D E F Connector panel AC INLET Styrofoam pads Take out the styrofoam pads and place A on top of ...

Page 110: ...2 4 Temporarily secure with 4 x 14mm thin screws Insert four screws into the smaller holes on the brackets 2 5 If you assembled the stand on an unlevel sur face place the assemble stand on a level sur face 3 Mount A 3 1 Assemble the side panel protection card board pad as shown in the illustration Then remove the two backing papers from the adhe sive tape on the protection pad 3 2 Cover the top of...

Page 111: ... 4 2 Secure A using four 6 x 16mm short screws from the front 4 3 Firmly tighten the screws you temporarily secured in step 2 4 above assembly B Tighten these in order starting with the top side first then the bottom Make sure as you do this that the spaces on the left and right sides indicated by 1 and 2 below are even CAUTION Fingers can become pinched between the main unit and the rear or side ...

Page 112: ...en clip the cord into the holders At this time be careful that the pedal cord isn t loose between the plug and cord holder 6 3 Use a twist tie to bundle the pedal cord 7 Attach C 7 1 Place on D the stopper wood at the bottom edges of C then secure the top 7 2 Secure upper right and left of C using two 4 x 14mm thin screws 7 3 Secure upper center and lower of C using five 4 x 20mm tapping screws 8 ...

Page 113: ... the Clavinova or result in improper operation After completing the assembly please check the following Are there any parts left over Review the assembly procedure and correct any errors Is the Clavinova clear of doors and other movable fix tures Move the Clavinova to an appropriate location Does the Clavinova make a rattling noise when you shake it Tighten all screws Does the pedal box rattle or ...

Page 114: ...on of data If a floppy disk is inserted while the power is on the disk is automatically accessed since the instrument checks whether the disk has data CAUTION Do not remove the floppy disk or turn off the instrument itself while the disk is being accessed Doing so may result not only in loss of data on the disk but also damage to the floppy disk drive Be sure to remove the floppy disk from the dis...

Page 115: ...papers from the adhesive tape in the case and fit the floppy disk drive into the case 2 Fold the USB cable inside the case as shown 3 Attach the drive and case assembly to the left underside of the instru ment using the included four screws 4mm x 10mm 4 Connect the USB cable to the USB TO DEVICE terminal Have a Phillips head screwdriver ready Insert the drive to the case with the side having the r...

Page 116: ...k 16 track recording playback tempo adjustment Memory Device Optional USB storage device via USB TO DEVICE terminal Flash memory internal 1 7 MB Pedal Damper with half pedal effect Sostenuto Soft Demo Songs 16 voice demo songs 50 preset songs Jacks Terminals MIDI IN OUT THRU PHONES x 2 AUX IN L L R R AUX OUT L R USB TO HOST USB TO DEVICE AUX PEDAL Jacks Connectors 60W x 2 20W x 2 Speakers 16cm x 2...

Page 117: ...tunes 18 Detailed Settings 66 Function 83 iAFC 81 Metronome 74 recording and playback 71 voices 75 display 12 Display contrast 16 DOC Disk Orchestra Collection 105 DOWN TEMPO 50 Piano Preset Songs 21 metronome 33 Driver 63 Dual Detailed settings 75 Recording 42 Dual mode combining two voices 29 E Effect function 27 equalizer 79 ESEQ 104 EXIT button 13 External song 43 EXTRA PARTS button 34 39 F Fa...

Page 118: ... MIDI File 104 Soft left pedal 26 Song Data Type 57 Detailed settings 71 Playing back repeatedly 71 SONG BALANCE slider 42 SONG SELECT Recorded Songs and Music Data 54 SONG SELECT button 20 54 SongAutoOpen 53 Sostenuto center pedal 26 Sound brilliance 27 expression 27 reverberation 28 spread and spaciousness 28 Soundboard reverb 28 Split Detailed settings 75 Recording 42 SPLIT button 31 Split mode...

Page 119: ...CLP 280 270 Owner s Manual 119 MEMO ...

Page 120: ...120 CLP 280 270 Owner s Manual MEMO ...

Page 121: ...locations that do not significantly contribute to their operating temperature Placement of this product close to heat sources such as radiators heat registers and other devices that produce heat should be avoided 8 This product was NOT designed for use in wet damp loca tions and should not be used near water or exposed to rain Examples of wet damp locations are near a swimming pool spa tub sink or...

Page 122: ...case of radio or TV interference relocate reorient the antenna If the antenna lead in is 300 ohm ribbon lead change the lead in to co axial type cable If these corrective measures do not produce satisfac tory results please contact the local retailer authorized to distribute this type of product If you can not locate the appropriate retailer please contact Yamaha Corpo ration of America Electronic...

Page 123: ...hou Street 112 55 Athens Greece Tel 01 228 2160 SWEDEN Yamaha Scandinavia AB J A Wettergrens Gata 1 Box 30053 S 400 43 Göteborg Sweden Tel 031 89 34 00 DENMARK YS Copenhagen Liaison Office Generatorvej 6A DK 2730 Herlev Denmark Tel 44 92 49 00 FINLAND F Musiikki Oy Kluuvikatu 6 P O Box 260 SF 00101 Helsinki Finland Tel 09 618511 NORWAY Norsk filial av Yamaha Scandinavia AB Grini Næringspark 1 N 13...

Page 124: ...R G Pro Audio Digital Musical Instrument Division Yamaha Corporation 2005 Yamaha Corporation WE03680 603MWAP1 3 03B0 Clavinova Web site http music yamaha com homekeyboard Yamaha Manual Library http www yamaha co jp manual ...

Reviews: