background image

Operation

78

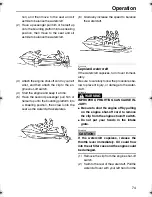
Once the engine is idling, shift into reverse
and gradually increase engine speed. Make
sure that there are no obstacles or people be-
hind you before shifting into reverse.

EJU33350

Rough water operation 

The force of landing after jumping can cause
a strong impact on both the watercraft and the
operator and passengers. It is possible for the
operator to hit his or her chest or jaw on the
watercraft or handlebars and be injured. The
passengers could also impact the watercraft
and be injured.
Do not operate the watercraft with your chin
right above the handlebars. In addition, the
operator and passengers should keep their
feet on the floor of the footwell.
Operating in rough water or jumping waves
can also crack the watercraft hull and deck,
and damage internal parts. Avoid operating in
rough water or bad weather conditions.

EJU33390

Post-operation care 

 To keep your watercraft in top shape, always
take it out of the water after using it and per-
form the following procedures. Leaving the
watercraft in the water for extended periods
will accelerate the rate of normal deterioration
of the jet unit components and hull finish. Ma-
rine organisms and corrosion are some of the
conditions that can adversely affect the life of
many watercraft components.
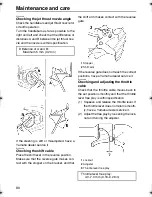
(1) Remove the watercraft from the water.
(2) Wash down the hull, handlebars, and jet

unit with fresh water.

(3) Remove the seat and check the engine

compartment for water. To drain excess
water, remove the stern drain plugs, and
then raise the bow of the watercraft
enough to allow the water in the bilge to
drain out.

NOTE:

This watercraft is equipped with a jet vacuum
bilge draining system and an electric bilge
draining system that remove water from the
engine compartment while you are underway.
However, some residual water will remain.
(See page 59 for bilge draining procedures.)

(4) Place the watercraft in a horizontal posi-

tion.

UF1X11E0.book  Page 78  Monday, August 7, 2006  3:51 PM

Summary of Contents for FX Cruiser High Output WaveRunner 2007

Page 1: ...2007 WaveRunner FX High Output FX Cruiser High Output OWNER S OPERATOR S MANUAL READ THIS MANUAL CAREFULLY BEFORE OPERATION F1X F8199 11 U S A Edition LIT 18626 06 87 ...

Page 2: ......

Page 3: ...n with it even if the watercraft is subsequently sold In this manual information of particular impor tance is distinguished in the following ways The Safety Alert Symbol means ATTEN TION BECOME ALERT YOUR SAFETY IS INVOLVED WARNING EWJ00070 Failure to follow WARNING instructions could result in severe injury or death to the machine operator passengers a bystand er or a person inspecting or repairi...

Page 4: ...e stop switch 32 Engine shut off switch 32 Start switch 33 Throttle lever 33 Cooling water pilot outlets 33 Steering system 34 Tilt lever 34 Shift lever 35 Quick Shift Trim System QSTS selector 35 Handgrip 37 Reboarding step 37 Bow eye 37 Stern eyes 38 Pull up cleats for FX Cruiser High Output 38 Yamaha Engine Management System YEMS 38 Yamaha Security System and low RPM mode 38 Multifunction infor...

Page 5: ...il filter 87 Checking the air filter element 88 Checking the jet thrust nozzle angle 89 Checking the shift cable 89 Checking and adjusting the throttle cable 89 Cleaning and adjusting the spark plugs 90 Lubrication points 91 Checking the battery 92 Fuel injection system 94 Specifications 95 Specifications 95 Trouble recovery 96 Troubleshooting 96 Troubleshooting chart 96 Emergency procedures 98 Cl...

Page 6: ...rcraft is stolen EJU30281 Primary Identification PRI ID number The PRI ID number is stamped on a plate at tached inside the engine compartment MODEL FX1100 F FX High Output FX1100A F FX Cruiser High Output EJU30300 Hull Identification Number HIN The HIN is stamped on a plate attached to the aft deck EJU30310 Engine serial number The engine serial number is stamped on a plate attached to the engine...

Page 7: ...bel of emission control certificate This label is attached to the top of the cylinder head and to the bulkhead EJU30430 Manufactured date label This label is attached to the top of the cylinder head EJU30440 Star labels This watercraft is labeled with a California Air Resources Board CARB star label See be low for a description of your particular label 1 Emission control information label location...

Page 8: ...g these standards have 20 lower emissions than One Star Low Emission engines Three Stars Ultra Low Emission The three star label identifies engines that meet the Air Resources Board s Personal Watercraft and Outboard marine engine 2008 exhaust emission standards or the Sterndrive and Inboard marine engine 2003 2008 ex haust emission standards Engines meeting these standards have 65 lower emissions...

Page 9: ...General and important labels 4 EJU30450 Important labels ...

Page 10: ...General and important labels 5 EJU35910 Warning labels ...

Page 11: ...General and important labels 6 ...

Page 12: ...General and important labels 7 EJU35922 Other labels ...

Page 13: ...General and important labels 8 The following label indicates the correct direction to upright a capsized watercraft ...

Page 14: ...em the video may help reinforce the information contained in these materi als EJU30730 Limitations on who may operate the watercraft Yamaha recommends a minimum operator age of 16 years old Adults must supervise use by minors Know the operator age and training require ments for your state A boating safety course is recommended and may be re quired in your state You can find local rules by contacti...

Page 15: ...her maneuvers that make it hard for others to avoid you or un derstand where you are going Avoid areas with submerged objects or shallow water Take early action to avoid collisions Re member watercraft and other boats do not have brakes Do not release the throttle lever when trying to steer away from objects you need throt tle to steer Always check throttle and steer ing controls before starting t...

Page 16: ...f you operate further than swim ming distance from shore you should be accompanied by another boat or watercraft but make sure you stay a safe distance away It s good common sense Never operate in water that is less than 60 cm 2 ft deep otherwise you increase your chance of hitting a submerged object which could result in injury This watercraft is not equipped with lighting required for night oper...

Page 17: ...t could help protect you in certain kinds of accidents and that it could injure you in others A helmet is designed to provide some head protection Although helmets cannot protect against all foreseeable impacts a helmet might reduce your injuries in a collision with a boat or other obstacle A helmet may have potential safety haz ards as well Falling into the water could risk the chance of the helm...

Page 18: ... health Do not attempt to modify this watercraft Modifications to your watercraft may reduce safety and reliability and render the water craft unsafe or illegal for use Attach the engine shut off cord to your left wrist and keep it free from the handlebars so that the engine stops if you the operator fall off After riding remove the engine shut off cord from the watercraft to avoid acci dental sta...

Page 19: ...ed on board your watercraft Sound signaling device You should carry a whistle or other sound signaling device that can be used to signal other boats See Rules of the Road for more information Visual distress signals It is recommended that a U S Coast Guard approved pyrotechnic device be stored in a waterproof container on your watercraft A mirror can also be used as an emergency signal Contact a Y...

Page 20: ...le lever The OTS system assists in turning by continuing to supply some thrust while the watercraft is deceler ating but you can turn more sharply if you apply throttle while turning the handlebars The OTS system does not function below planing speeds or when the engine is off Once the engine slows down the watercraft will no longer turn in response to handlebar input until you apply throttle agai...

Page 21: ... is on Items such as long hair loose clothing or PFD straps can become entan gled in moving parts resulting in severe in jury or drowning Never insert any object into the jet thrust nozzle while the engine is running Severe injury or death could result from coming in contact with the rotating parts of the jet pump Stop the engine and remove the clip from the engine shut off switch before removing ...

Page 22: ...onsider ations for minimizing risks while water skiing The skier should wear an approved PFD preferably a brightly colored one so boat operators can see the skier The skier should wear protective clothing Severe internal injuries can occur if water is forced into body cavities as a result of falling into the water Normal swimwear does not adequately protect against forceful water entry into the re...

Page 23: ...s no traffic or other obstacles ap ply enough throttle to raise the skier Make smooth wide turns The watercraft is capable of very sharp turns which could ex ceed the abilities of the skier Keep the skier at least 50 m 150 ft about twice the dis tance of a standard ski rope from any po tential hazard Be alert to the hazard of the ski rope handle snapping back at the watercraft when the skier falls...

Page 24: ...sel The vessel with the right of way has the duty to continue its course and speed except to avoid an immediate collision When you main tain your direction and speed the other vessel will be able to determine how best to avoid you Give way vessel The vessel which does not have the right of way has the duty to take positive and timely action to stay out of the way of the stand on vessel Normally yo...

Page 25: ...he right of way as it should Overtaking If you are passing another vessel you are the give way vessel This means that the other vessel is expected to maintain its course and speed You must stay out of its way until you are clear of it Likewise if another vessel is passing you you should maintain your speed and direction so that the other vessel can steer itself around you Other special situations ...

Page 26: ...navigation by the lateral system of buoyage Simply put buoys and markers have an arrangement of shapes colors num bers and lights to show which side of the buoy a boater should pass on when navigat ing in a particular direction The markings on these buoys are oriented from the perspective of being entered from seaward the boater is going towards the harbor Red buoys are passed on your starboard ri...

Page 27: ... They signify speed zones restricted areas danger areas and general information Remember markings may vary by geograph ic location Always consult local boating au thorities before riding your watercraft in unfamiliar waters ...

Page 28: ...site is a free 50 question learning course available to the public Upon successful completion of 80 percent or better the user can request a certificate of comple tion by mail or can download one immediate ly The Online Boating Safety Course provided by the Boat US Foundation is ap proved by the National Association of State Boating Law Administrators NASBLA and recognized by the United States Coa...

Page 29: ...er men other boats swimmers and populated beaches When travel in areas like these is unavoidable ride slowly and obey all laws Proper maintenance is necessary to ensure that the exhaust emission and sound levels of your watercraft will continue to be within regu lated limits You have the responsibility to make sure that the recommended mainte nance in this owner s operator s manual is carried out ...

Page 30: ...ctions 25 EJU31010 Location of main components Front view 1 Handlebars 2 Rear seat 3 Front seat 4 Footwell 5 Sponsons 6 Gunwale 7 Pull up cleat for FX Cruiser High Output 8 Cooling water pilot outlet 9 Bow eye 10 Hood ...

Page 31: ...ons 26 Rear view 1 Fuel tank filler cap 2 Intake grate 3 Speed sensor 4 Stern eyes 5 Stern drain plugs 6 Reverse gate 7 Ride plate 8 Jet thrust nozzle 9 Reboarding step 10 Electric bilge pilot outlet 11 Cleat 12 Handgrip ...

Page 32: ...iew mirrors 4 Throttle lever 5 Shift lever 6 Tilt lever 7 Glove compartment 8 Engine stop switch 9 Engine shut off cord lanyard 10 Quick Shift Trim System QSTS selector 11 QSTS selector lock lever 12 Watertight compartment 13 Remote control transmitter 14 Start switch 15 Engine shut off switch 16 Clip ...

Page 33: ...unctions 28 Engine compartment 1 Air filter case 2 Water separator 3 Fuel tank 4 Battery 5 Flushing hose connector 6 Electrical box 7 Oil tank 8 Muffler 9 Spark plugs Spark plug caps Ignition coils 10 Spark plug lead ...

Page 34: ...l the seat off FX High Output FX Cruiser High Output To install the rear seat Insert the projections on the front of the seat into the stays on the deck and then push the rear of the seat down to lock it in place To remove the front seat 1 Remove the rear seat 2 Pull the front seat latch up and then pull the seat off 1 Seat latch 1 Seat latch 1 Seat latch ...

Page 35: ...down to lock it in place 2 Install the rear seat NOTE Make sure that the seats are securely in stalled before operating the watercraft EJU31061 Hood To open the hood push the hood latch down and then lift up the hood To close the hood push the hood down to lock it in place NOTE Make sure that the hood is securely closed before operating the watercraft 1 Hood latch ...

Page 36: ...arefully so it will not be lost When op erating the watercraft use the transmit ter holder in the watertight compartment If you accidentally lose your remote control transmitter contact a Yamaha dealer While the remote control transmitter has been designed for use in wet environ ments it should not be operated under water or submerged for an extended length of time If it gets wet dry it with a sof...

Page 37: ...nsmit ter EJU31150 Engine stop switch Push the engine stop switch red button to stop the engine normally EJU31160 Engine shut off switch Insert the clip on the end of the engine shut off cord under the engine shut off switch black button The engine will stop automati cally when the clip is removed from the switch such as if the operator falls off the wa tercraft WARNING EWJ00010 Always attach the ...

Page 38: ...g water is circulated in the engine and then it is dis charged from the pilot outlets To check for proper operation of the cooling system check that water is being discharged from the port left pilot outlet If water is not being discharged from this outlet cooling wa ter may not be circulating in the engine When this occurs stop the engine and check for the cause See pages 45 and 98 for more infor...

Page 39: ... supply some thrust while the watercraft is decelerating but you can turn more sharply if you apply throttle while turning the handlebars The OTS system does not function below planing speeds or when the engine is off Once the engine slows down the watercraft will no longer turn in response to handlebar in put until you apply throttle again or you reach trolling speed EJU31290 Tilt lever The tilt ...

Page 40: ... idle before shifting into reverse Do not use the reverse function to slow down or stop the watercraft as it could cause you to lose control be ejected or impact the handlebars Use reverse for slow speed maneuver ing only Make sure that there are no obstacles or people behind you before shifting into reverse Do not touch the reverse gate while the shift lever is being operated otherwise you could ...

Page 41: ...ating conditions To enhance particular types of performance select bow down or bow up EJU31330 Bow down Turn the QSTS selector to a or b and the bow will go down while the watercraft is on plane Bow down puts more of the bow in the water This gives the watercraft more hook which enhances turning performance This position will also help the watercraft get up on plane more quickly At higher speeds h...

Page 42: ...raft The watercraft could fall which could result in severe injury EJU34860 Reboarding step The reboarding step provides a handhold and footstep for boarding the watercraft CAUTION ECJ00740 Use the reboarding step only to board the watercraft in the water Do not use the re boarding step for lifting the watercraft as a footstep when the watercraft is on land or for any other purpose The watercraft ...

Page 43: ...r ing OTS system EJU31380 Yamaha Security System and low RPM mode This watercraft is equipped with a remote con trol transmitter that is used to select the secu rity system and low RPM mode settings Since the watercraft is programmed to recog nize the internal code from this transmitter only the security system setting can only be changed with this transmitter If you lose the remote control transm...

Page 44: ...ht will come on and the engine can be started See the items in Se lecting the normal mode low RPM mode for operation mode information EJU36220 Selecting the normal mode low RPM mode The normal mode and low RPM mode can only be selected when the engine is stopped in the unlock mode Press the unlock button on the remote control transmitter for more than 4 seconds to switch between the normal mode an...

Page 45: ...mitter is not received CAUTION ECJ00080 If the remote control transmitter does not operate when its buttons are pressed the battery may be low Have a Yamaha dealer replace the battery EJU34900 Multifunction information center The multifunction information center is equipped with the following three main com ponents for help and convenience in operat ing the watercraft CAUTION ECJ00730 Do not run t...

Page 46: ...og speedometer tachometer is switched to the speedometer function the SPEED indicator light blinks three times and then comes on Analog speedometer The analog speedometer shows the water craft speed against water The large inner numbers on the meter show the watercraft speed in miles per hour mph and the small outer numbers show the speed in kilometers per hour km h when the speed ometer function ...

Page 47: ...he multifunction meter starts operating EJU34960 RPM indicator light The RPM indicator light comes on when the analog tachometer is selected EJU34980 WARNING indicator light The WARNING indicator light blinks or comes on together with a warning indicator when a malfunction has occurred EJU34990 UNLOCK indicator light The UNLOCK indicator light comes on when the unlock mode of the Yamaha Security S...

Page 48: ...hows the watercraft speed against water NOTE To switch the speedometer display be tween kilometers and miles push the Volt Hour button for at least 1 second within 10 seconds after the multifunction meter starts operating The SPEED indicator light blinks three times if miles are selected as the display units when the multifunction meter starts 1 L MODE indicator light 1 Fuel level meter 2 Fuel lev...

Page 49: ... NOTE The fuel level is most accurate when the wa tercraft is sitting level on a trailer or in the wa ter EJU35060 Hour meter voltmeter NOTE To switch the display between the hour meter and the voltmeter push the Volt Hour button for at least 1 second after the meter is dis played for more than 10 seconds Hour meter The hour meter is provided to make it easy to follow the maintenance schedule 1 Vo...

Page 50: ...engine is restarted after the fuel tank is re filled NOTE Press any button on the multifunction meter to stop the buzzer EJU35120 Oil pressure warning indicator If the oil pressure does not rise to specifica tion the WARNING indicator light and the oil pressure warning indicator begin to blink and the buzzer sounds intermittently At the same time the engine speed is limited to help pre vent damage...

Page 51: ...o remove weeds or de bris from the intake grate or impeller shut the engine off and remove the clip from the engine shut off switch Severe injury or death could result from coming in contact with the rotating parts of the jet pump CAUTION ECJ00040 If you cannot locate and correct the cause of the overheating consult a Yamaha deal er Continuing to operate at higher speeds could result in severe eng...

Page 52: ...lowing operation buttons are on the right side of the multifunction meter To switch the display mode push the Mode Reset button for less than 1 second The display mode changes in the following or der Compass Average speed Tripmeter Trip timer Fuel consumption per hour Fuel consumption per kilometer mile Water temperature Air temperature NOTE To switch the display units between kilome ters liters d...

Page 53: ...ass varies depend ing on the operating conditions Use this func tion as a reference only Average speed This display shows the average speed in miles per hour AV MPH or kilometers per hour AV KMH since it was reset Tripmeter This display shows the distance traveled in miles MILES or kilometers KM since it was reset Trip timer This display shows the hours of operation TRIPTM since it was reset 1 Vol...

Page 54: ...ure L TEMP lake temperature Air temperature This display shows the ambient air tempera ture E TEMP environmental temperature Average speed Tripmeter Trip timer modes Average speed distance traveled and trip time are recorded once measurements have started regardless of the current display To start the measurements push the Start Stop button for less than 1 second The beeper sounds once To stop the...

Page 55: ...beverage holder are pro vided NOTE Make sure that the storage compartments are closed securely before operating the watercraft The front storage compartment glove com partment and seat storage compartment are not designed to be watertight If you car ry objects that must be kept dry such as the manuals put them in a waterproof bag or the watertight compartment EJU35151 Front storage compartment The...

Page 56: ... To open the glove compartment turn the glove compartment knob and then lift up the lid To close the glove compartment lower the lid and then turn the glove compartment knob to lock the lid in place EJU31760 Seat storage compartment The seat storage compartment is located un der the rear seat Front storage compartment Capacity 75 0 L 19 8 US gal 16 5 Imp gal Load limit 5 0 kg 11 lb 1 Glove compart...

Page 57: ...s in the beverage hold er when operating the watercraft EJU35182 Watertight compartment The watertight compartment is located on the port left side of the watercraft To open the watertight compartment turn the cap counterclockwise 1 Seat storage compartment Seat storage compartment Capacity 15 0 L 4 0 US gal 3 3 Imp gal Load limit 9 0 kg 20 lb 1 Beverage holder 1 Watertight compartment cap Waterti...

Page 58: ...Features and functions 53 NOTE Make sure that the watertight compartment cap is closed securely before operating the watercraft ...

Page 59: ...rom the top of the fuel tank Fuel expands as it warms up and could overflow if the fuel tank has been overfilled If temporarily leaving the watercraft with a full fuel tank do not leave it in direct sunlight Leave it in a well ventilated area with the watercraft in a horizontal position Tighten the fuel tank filler cap securely after refueling If you should swallow some gasoline in hale a lot of g...

Page 60: ...e fuel tank Contaminated fuel can cause poor running and engine damage 1 Remove the seats See page 29 for seat removal and installation procedures 2 Remove the fuel tank filler cap and then slowly add fuel to the fuel tank Stop filling when the fuel level reaches approximate ly 50 mm 2 in from the top of the fuel tank as indicated in the illustration 3 Install the fuel tank filler cap and the seat...

Page 61: ...ocked in place 62 Shift lever and reverse gate Check for proper operation 62 QSTS Check for proper operation 63 Fuel and oil Check the fuel and oil levels and replenish if neces sary Check the hoses and tanks for leakage 58 58 Water separator Check for water and drain if necessary 59 Battery Check the electrolyte level and battery condition 60 Hood Check that the hood is securely closed 30 Front a...

Page 62: ...Operation 57 NOTE Pre operation checks should be made each time the watercraft is used These checks can be completed in a short time It is worth the time spent to ensure safety and reliability ...

Page 63: ...tallation procedures 3 Check the fuel level in the fuel tank and replenish if necessary See page 55 for filling procedures 4 Install the fuel tank filler cap and the seats EJU32411 Engine oil level Check the engine oil level before each use CAUTION ECJ00390 When checking the engine oil level on water be careful of other watercraft boats swimmers and obstacles The water current and wind can cause t...

Page 64: ...r separator Check the water separator for water The wa ter separator retains any water that may have entered through the fuel tank breather hose if the watercraft was capsized Normally the water separator is empty If water remains in the water separator drain it by removing the drain screw Place a drain pan under the water separator to catch the draining water or use a dry cloth to soak up any wat...

Page 65: ...ECJ00360 Before installing the stern drain plugs clean the drain plug threads to remove any foreign materials such as dirt or sand Otherwise the stern drain plugs could be damaged allowing water to en ter the engine compartment Make sure that the stern drain plugs are tightened securely before launching the watercraft Otherwise water may flood the engine compartment and cause the watercraft to sub...

Page 66: ...e extinguisher Check that there is a full fire extinguisher on board The fire extinguisher container is located in the seat storage compartment To open the fire extinguisher container turn the cap counterclockwise To close the fire extinguisher container insert the fire extinguisher into the container and then install the cap and tighten it securely NOTE To check the fire extinguisher see the in s...

Page 67: ...10 Steering system Check the handlebars for looseness Turn the handlebars as far as possible to the right and left to make sure that operation is smooth and unrestricted throughout the whole range Also make sure that the jet thrust nozzle moves as the handlebars are turned and that there is no free play between the handlebars and the jet thrust nozzle Check that the handlebars are locked in place ...

Page 68: ...tacles or people behind you before shifting into reverse Do not touch the reverse gate while the shift lever is being operated otherwise you could be pinched EJU32641 Quick Shift Trim System QSTS Operate the QSTS selector lock lever and the QSTS selector several times to check that they operate properly 1 Squeeze the QSTS selector lock lever and check that it returns smoothly to its original posit...

Page 69: ...to the engine could result Cooling water is fed to the engine by the jet pump See page 98 for jet intake cleaning procedures WARNING EWJ00470 Keep away from the intake grate while the engine is on Items such as long hair loose clothing or PFD straps can be come entangled in moving parts result ing in severe injury or drowning Stop the engine and remove the clip from the engine shut off switch befo...

Page 70: ... the clip from the engine shut off switch to ver ify that the engine stops immediately See pages 32 to 33 for information on proper op eration of the start switch the engine stop switch and the engine shut off switch EJU32700 Cooling water pilot outlet Check that water comes out from the port left cooling water pilot outlet while the engine is running and the watercraft is in the water See page 33...

Page 71: ...es run the engine at trolling speed only For the 30 minutes of operation after that keep the engine speed below 5000 r min For the 1 hour of operation after that keep the engine speed below 8000 r min 3 Proceed with normal operation CAUTION ECJ00430 Failure to follow the engine break in pro cedure could result in reduced engine life or even severe engine damage EJU32800 Launching the watercraft Wh...

Page 72: ...than 60 cm 2 ft deep otherwise pebbles or sand could be sucked into the jet intake caus ing impeller damage and engine overheat ing 3 Attach the engine shut off cord to your left wrist and then attach the clip to the en gine shut off switch WARNING EWJ00580 Check that the engine shut off cord is not frayed or broken and keep it free from the handlebars so that the engine stops if the operator fall...

Page 73: ...the start switch wait 15 seconds and then try again EJU32860 Stopping the engine To stop the engine release the throttle lever and then push the engine stop switch red button WARNING EWJ00600 You need throttle to steer Shutting the en gine off can cause you to hit an obstacle you are attempting to avoid A collision could result in severe injury or death EJU32880 Leaving the watercraft If leaving t...

Page 74: ... the pre operation checks listed on page 56 The short time spent checking the water craft will reward you with added safety and re liability Check state and local laws before operating your watercraft Operate defensively at safe speeds and keep a safe distance away from people objects and other watercraft Select a wide area to learn in where there is good visibility and light boat traffic Use the ...

Page 75: ...e a ride to children whose feet can not reach the floor of the footwell The pas sengers should hold on firmly either to the person in front of them or to the handgrip pro vided and keep their feet on the floor of the footwell Never allow a passenger to ride in front of the operator WARNING EWJ00550 When passengers are on board make sure that they are holding on firmly and have their feet on the fl...

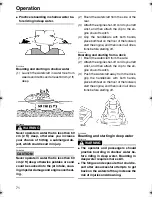
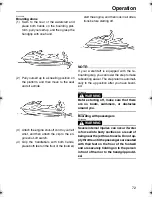
Page 76: ... gine shut off switch 4 Grip the handlebars with both hands place both feet on the floor of the footwell start the engine and then look in all direc tions before starting off EJU33110 Boarding and starting from a dock 1 Board the watercraft from the side 2 Attach the engine shut off cord to your left wrist and then attach the clip to the en gine shut off switch 3 Push the watercraft away from the ...

Page 77: ...en look in all direc tions before starting off NOTE If your watercraft is equipped with the re boarding step you can lower the step to make reboarding easier The step returns automati cally to the up position after you have board ed WARNING EWJ00610 Before starting off make sure that there are no boats swimmers or obstacles around you EJU33161 Boarding with passengers WARNING EWJ00660 Severe inter...

Page 78: ...the footwell and are securely holding on to the person in front of them or to the handgrip provided Nev er allow a passenger to ride in front of the operator 6 Start the engine look in all directions and then accelerate to planing speed WARNING EWJ00610 Before starting off make sure that there are no boats swimmers or obstacles around you NOTE The heavier the total weight of the operator and passe...

Page 79: ...s 6 Gradually increase the speed to balance the watercraft EJU33230 Capsized watercraft If the watercraft capsizes turn it over immedi ately Be sure to carefully follow the procedures be low to prevent injury or damage to the water craft WARNING EWJ00670 IMPROPER UPRIGHTING CAN CAUSE IN JURY Be sure to shut the engine off by pulling on the engine shut off cord to remove the clip from the engine sh...

Page 80: ...t 1 minute after the engine has been restarted Excessive water in the bilge can splash into the engine which can result in severe damage NOTE To efficiently discharge water from the engine compartment operate the watercraft as straight as possible and above planing speed for at least 2 minutes EJU33250 Turning the watercraft Steering control depends on the combination of handlebar position and the...

Page 81: ...ING EWJ00770 Do not release the throttle lever when trying to steer away from objects you need throttle to steer A collision could result in severe injury or death When operating at higher speeds make gradual turns or slow down before turn ing Sharp high speed turns may cause the watercraft to slide sideways or spin throwing the operator and passengers overboard which could cause an injury This mo...

Page 82: ...u need engine power to steer away from a boat or other obstacle that comes into your path Do not use the reverse function to slow down or stop the watercraft as it could cause you to lose control be ejected or impact the handlebars EJU35960 Beaching the watercraft 1 Make sure that there are no boats swim mers or obstacles near the beach Re lease the throttle lever about 100 m 330 ft before you rea...

Page 83: ...JU33390 Post operation care To keep your watercraft in top shape always take it out of the water after using it and per form the following procedures Leaving the watercraft in the water for extended periods will accelerate the rate of normal deterioration of the jet unit components and hull finish Ma rine organisms and corrosion are some of the conditions that can adversely affect the life of many...

Page 84: ...ecessary 10 Wipe the hull handlebars and jet unit dry with a clean cloth 11 Spray a rust inhibitor such as Yamaha Silicone Protectant and Lubricant on me tallic parts to minimize corrosion 12 Allow the engine compartment to air dry completely before installing the seat EJU33461 Transporting When transporting the watercraft on a trailer secure the tie downs to the trailer through the bow eye and st...

Page 85: ...ore than 15 seconds without supplying water or over 4000 r min on land otherwise the engine could overheat 1 Remove the watercraft from the water and place it in a horizontal position 2 Remove the rear seat and seat storage compartment See page 29 for seat re moval and installation procedures 3 Remove the flushing hose connector cap and then insert the garden hose adapter into the flushing hose co...

Page 86: ... for more than 15 seconds otherwise the engine could over heat 6 Lubricate all cables such as the throttle and steering cables NOTE Use a Yamaha Power Cable Luber and Yamaha Lube Zall to pressure lubricate the cables and purge out any moisture between the inner and outer cables 7 Lubricate the areas of the watercraft specified in Lubrication points on page 91 EJU33660 Fuel system WARNING EWJ00280 ...

Page 87: ...ast once every 2 months and fully charge it if necessary CAUTION ECJ00100 Always keep the battery charged Storing a discharged battery can cause permanent battery damage To check the condition of the battery check the specific gravity of the electrolyte or mea sure the voltage at both battery terminals Charge the battery if the voltage is less than 12 volts It is recommended to have a Yamaha deale...

Page 88: ... unexpected opera tion moving parts or electric shock If the owner is not familiar with watercraft servicing this work should be done by a Yamaha dealer Improperly serviced components could fail or stop operating correctly which could result in an acci dent Modifications to this watercraft not ap proved by Yamaha may cause loss of performance or excessive noise and ex haust emissions or render it ...

Page 89: ...vided in the tool kit are suf ficient for this purpose except that a torque wrench may also be necessary to tighten nuts and bolts 1 Tool bag 2 Screwdriver 3 16 mm box wrench 4 10 12 mm box wrench 5 Pliers 6 Open end wrench 7 Garden hose adapter ...

Page 90: ...hs 12 months 12 months 24 months Spark plugs Check clean adjust 90 Lubrication points Lubricate 91 Intermediate hous ing Lubricate 91 Fuel system Check 87 Fuel tank Check clean 87 Trolling speed Check adjust 94 Throttle shaft Check Cooling water pas sages Flush 80 Water inlet strain er Check clean Bilge strainer Clean Electric bilge pump strainer Check clean Impeller Check Jet thrust nozzle angle ...

Page 91: ...r every use Nuts and bolts Check Air filter element Check 88 Engine oil Replace 87 Oil filter Replace 87 Valve clearance Check adjust Item Operation Initial Thereafter every Page 10 hours 50 hours 100 hours 100 hours 200 hours 6 months 12 months 12 months 24 months ...

Page 92: ...cleaned have a Yamaha dealer service the watercraft EJU34280 Engine oil and oil filter WARNING EWJ00340 Engine oil is extremely hot immediately af ter the engine is turned off Coming in con tact with or getting any engine oil on your clothes could result in burns CAUTION ECJ00180 Do not run the engine with too much or not enough oil in the oil tank Oil could spray out and the engine could be dam a...

Page 93: ...d then remove the air filter case cover 3 Remove the air filter element and check it for dirt and oil Replace the air filter ele ment if there is any oil buildup or every 2 years or every 200 hours of operation 4 Install the air filter element in the air filter case and then install the air filter case cover 5 Install the seats CAUTION ECJ00200 Make sure that the air filter element is in stalled i...

Page 94: ...ith the stopper on the bracket and that the shift arm makes contact with the reverse gate If the reverse gate does not reach the correct positions have a Yamaha dealer service it EJU34360 Checking and adjusting the throttle cable Check that the throttle cable moves back to the set position smoothly and that the throttle lever free play is within specification 1 Squeeze and release the throttle lev...

Page 95: ... The spark plug cap may be difficult to remove be cause the rubber seal on the end of the cap fits tightly To remove the spark plug cap simply twist it back and forth while pulling it up to install it twist it back and forth while pushing it down 3 Remove the spark plug Measure the spark plug gap with a wire thickness gauge Replace the spark plug or adjust the gap to specification if neces sary To...

Page 96: ...them with water resistant grease Throttle cable throttle body end Throttle bodies throttle cable pulley throt tle cam and return spring Throttle cable handlebar end Loosen the adjuster and disconnect the outer cable from the bracket Spray a rust inhibitor into the outer cable Connect the outer cable and then adjust the throttle ca ble free play See page 89 for adjustment procedures Steering cable ...

Page 97: ...ate housing Fill the intermediate housing with water re sistant grease through the grease nipple using a grease gun EJU34450 Checking the battery Check the level of the battery electrolyte and make sure that the negative and positive battery leads are tightened securely Grease quantity Initial 10 hours or 1 month 33 0 35 0 cm 1 12 1 18 US oz 1 16 1 23 Imp oz Every 100 hours or 12 months 6 0 8 0 cm...

Page 98: ...m the battery compartment when adding elec trolyte or charging the battery To replenish the battery 1 Make sure that the electrolyte level is be tween the maximum and minimum level marks 2 Refill the battery with distilled water if necessary CAUTION ECJ00240 Normal tap water contains minerals that are harmful to a battery Use only distilled water for replenishing the battery To recharge the batter...

Page 99: ...njection system was set at the Yamaha factory If the fuel injection system needs to be adjusted have a Yamaha dealer service the watercraft CAUTION ECJ00220 Do not attempt to adjust the fuel injection system If the settings are disturbed by someone who does not have the neces sary technical knowledge poor engine performance and damage may result EJU34500 Checking the trolling speed 1 Place the wat...

Page 100: ...in Valve clearance exhaust cold 0 25 0 34 mm 0 0098 0 0134 in Lubrication system Dry sump Cooling system Water Starting system Electric Ignition system T C I Spark plug CR9EB Spark plug gap 0 7 0 8 mm 0 028 0 031 in Battery capacity 12 V 19 0 Ah Charging system Flywheel magneto Drive unit Propulsion system Jet pump Jet pump type Axial flow single stage Impeller rotation Counterclockwise Jet thrust...

Page 101: ...ch Clip not in place Install clip 32 Fuse Burned out Replace the fuse and check wiring 100 Battery Run down Recharge 92 Poor terminal con nections Tighten as required 92 Terminal corroded Clean 82 Starter motor Faulty Have serviced by Yamaha dealer Engine does not start Starter motor turns over Throttle lever Squeezed Release 33 Fuel Empty Refill as soon as pos sible 55 Stale or contaminat ed Have...

Page 102: ...ed Jet intake clogged Clean 98 Check engine warning Faulty sensors Have serviced by Yamaha dealer 46 Watercraft slow or loses power Yamaha Se curity System Low RPM mode se lected Select normal mode 39 Cavitation Jet intake clogged Clean 98 Impeller damaged or worn Have serviced by Yamaha dealer 98 Engine over heat warning Engine speed reduc tion control activated Clean jet intake and cool engine 4...

Page 103: ...ith weeds or debris return to shore and check the intake and impeller Al ways stop the engine before beaching the wa tercraft WARNING EWJ00780 Before attempting to remove weeds or de bris from the jet intake or impeller area shut the engine off and remove the clip from the engine shut off switch Severe in jury or death could result from coming in contact with the rotating parts of the jet pump CAU...

Page 104: ...te is poisonous and dan gerous causing severe burns etc Elec trolyte contains sulfuric acid Avoid contact with skin eyes or clothing Antidotes External Flush with water Internal Drink large quantities of water or milk Follow with milk of magnesia beaten egg or vegetable oil Call a physician im mediately Eyes Flush with water for 15 minutes and get prompt medical attention Batteries produce explosi...

Page 105: ...f the engine does not start in 5 seconds release the start switch wait 15 seconds and then try again EJU34680 Replacing the fuses The fuses are located in the electrical box To replace a fuse 1 Remove the cap on the electrical box 2 Replace the blown fuse with the spare fuse of the correct amperage by using the fuse puller on the reverse side of the cap WARNING EWJ00800 Do not use fuses of higher ...

Page 106: ...raft The operator of the towing boat must keep speed to a minimum and avoid traf fic or obstacles which could be a hazard to the rider on the watercraft EJU35270 Submerged watercraft If the watercraft is submerged or flooded with water follow the procedure below and consult a Yamaha dealer as soon as possible Failure to do so could result in serious engine dam age In an emergency 1 Beach the water...

Page 107: ...all the spark plugs and then connect the spark plug caps and fuel injector cou plers CAUTION ECJ00780 Do not start the engine even after complet ing the previous steps Any water remain ing in the engine could cause serious engine damage 9 Have the watercraft inspected by a Yamaha dealer as soon as possible CAUTION ECJ00790 Be sure to have a Yamaha dealer inspect the watercraft Otherwise serious en...

Page 108: ...ed as specified in the applicable Owner s Operator s Manual The owner of the watercraft shall give notice to an authorized Yamaha dealer of any and all apparent defects within ten 10 days of dis covery and make the watercraft available at that time for inspection and repairs at the dealer s place of business GENERAL EXCLUSIONS FROM WARRANTY This warranty will not cover the repair of damage if the ...

Page 109: ... to 1 Completely set up each new watercraft before sale 2 Explain the operation maintenance and warranty requirements to your satisfaction at the time of sale and upon your request at any later date In addition each Yamaha dealer is held responsible for his setup service and warranty repair work Q Is the warranty transferable to second owners A Yes The remainder of the existing warranty can be tra...

Page 110: ...s you up to 150 reimbursement per occurrence for any reasonable expenses you incur because your Yamaha needs covered service replacement vehicle rental emergency towing phone calls even food and lodging when you are away from home This superb cover age goes into effect when you purchase Y E S so it applies to any warranty repairs as well as covered repairs during your entire Y E S plan period Y E ...

Page 111: ... 87 Engine oil level 58 Engine overheat warning indicator 45 Engine serial number 1 Engine shut off cord 64 Engine shut off switch 32 Engine stop switch 32 Enjoy your watercraft responsibly 24 F Filling the fuel tank 55 Fire extinguisher 61 Flushing the cooling system 80 Front storage compartment 50 Fuel and oil 54 Fuel injection system 94 Fuel level 58 Fuel level meter 44 Fuel level warning indic...

Page 112: ...s 70 Right multifunction display and operation buttons for FX Cruiser High Output 47 Rough water operation 78 RPM indicator light 42 Rules of the Road 19 S Seat storage compartment 51 Seats 29 Selecting the normal mode low RPM mode 39 Shift cable checking 89 Shift lever 35 Shift lever and reverse gate 62 Spark plugs cleaning and adjusting 90 SPEED indicator light 42 Star labels 2 Start switch 33 S...

Page 113: ...Index YAMAHA EXTENDED SERVICE Y E S 105 Yamaha Security System 38 Yamaha Security System and low RPM mode 38 Yamaha Security System lock and unlock modes 38 ...

Page 114: ......

Page 115: ......

Page 116: ...Printed in USA August 2006 1 7 1 CR YAMAHA MOTOR CORPORATION USA ...

Reviews: